How to Enter the BIOS on Any PC: Access Keys by Manufacturer (original) (raw)

(Image credit: Shutterstock)
Windows or Linux may be your operating system of choice, but no matter which platform you choose, your computer's BIOS (Basic Input / Output System) is calling all the shots behind the scenes.
The BIOS, sometimes referred to as UEFI firmware on newer computers, tells your PC what storage drives you have and which one to boot from, what processor you have, how much RAM, and much more. You'll likely need to access the BIOS menus to overclock your CPU, enable virtualization, set your memory speed or enable TPM encryption.
There are a few different ways to access the BIOS menus on a PC whether it involves hitting a hotkey at POST time, using Windows' Advanced Startup menu or issuing a Linux command. We'll detail all these methods below and, if you need to get a new version of your firmware, see our tutorial on how to update your BIOS.
Method 1: Use a BIOS Key
When you first power-on a computer, it goes through a very quick POST (power on self test). If you can hit the correct key before the POST is completed (or hold it down as you hit the power button), you will get into the BIOS menu. However, some computers go through POST so fast that they don't recognize input from the keyboard in time for you to a hit key. For those, skip to method #2 below.

Annoyingly, different PC brands use different BIOS keys. Most modern motherboards use the DEL key, but ultrabooks, gaming laptops and gaming PCs are less consistent. For example, hitting F2 might work on an Asus, but you'll need F10 on an Acer computer.
If you don't know the hotkey for your computer, you can look and see if a message comes up during POST, telling you what key to press or you can try hitting one of the 12 function keys, the DEL key, the Enter key or the ESC key since it is always one of those. You may have to try a few times to determine which one it is. In our research, DEL and F2 were, by far, the most common.
BIOS Keys by Manufacturer
Here's a list of common BIOS keys by brand. Depending on the age of your model, the key may be different.
Get Tom's Hardware's best news and in-depth reviews, straight to your inbox.
- ASRock: F2 or DEL
- ASUS: F2 for all PCs, F2 or DEL for Motherboards
- Acer: F2 or DEL
- Dell: F2 or F12
- ECS: DEL
- Gigabyte / Aorus: F2 or DEL
- HP: F10
- Lenovo (Consumer Laptops): F2 or Fn + F2
- Lenovo (Desktops): F1
- Lenovo (ThinkPads): Enter then F1.
- MSI: DEL for motherboards and PCs
- Microsoft Surface Tablets: Press and hold volume up button.
- Origin PC: F2
- Samsung: F2
- Toshiba: F2
- Zotac: DEL
Unfortunately, some computers go through POST so quickly that there's no time to hit a key. Some desktops won't even recognize input from a USB keyboard until after POST is completed (though they will see input from an old PS2-style keyboard). If you can't use a BIOS key and you have Windows 11 or 10, you can use the "Advanced startup" feature to get there.
Note that the screen shots below are from Windows 11, but the same steps apply to Windows 10.
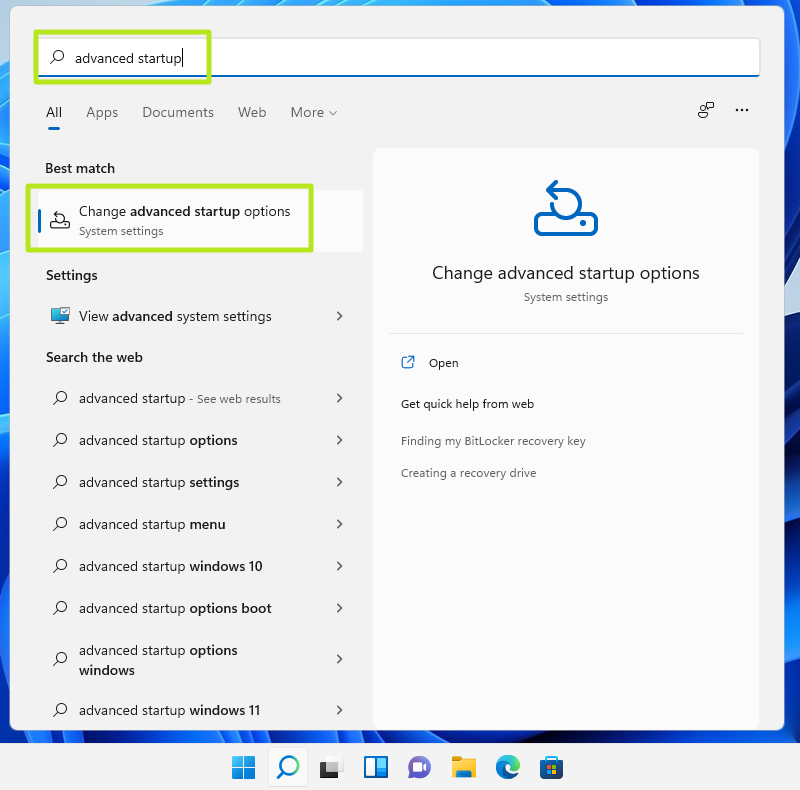
1. Navigate to the Advanced Startup section of Settings. The easiest way to get there is by searching for "advanced startup" in Windows search and clicking the top result.
(Image credit: Tom's Hardware)
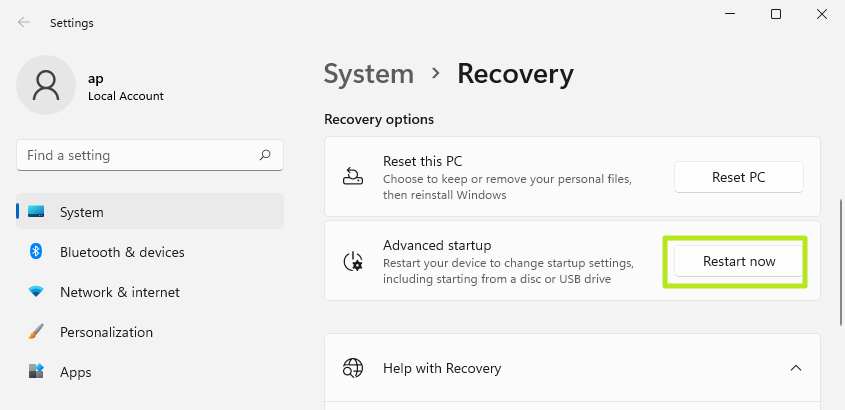
2. Click Restart now under the Advanced startup header.
(Image credit: Tom's Hardware)
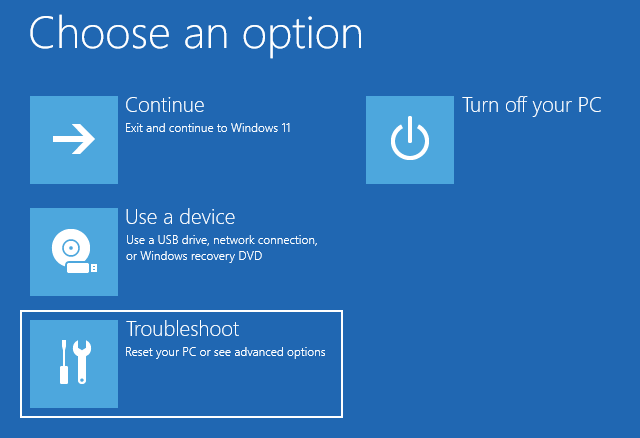
Your computer will reboot and a new menu eventually appears.
3. Click Troubleshoot.
(Image credit: Tom's Hardware)
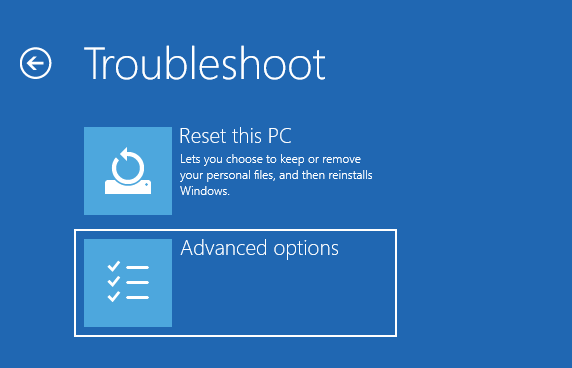
4. Click Advanced options.
(Image credit: Tom's Hardware)
5. Click UEFI Firmware Settings.
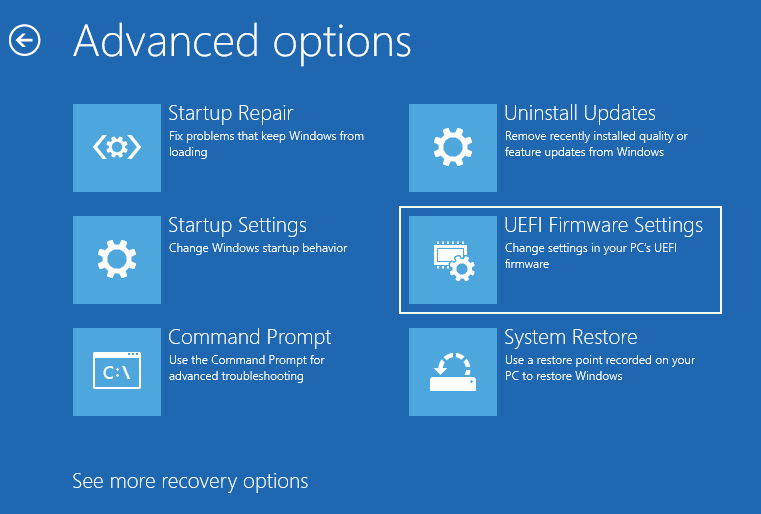
(Image credit: Tom's Hardware)
6. Click Restart to confirm.

(Image credit: Tom's Hardware)
Method 3: Use a Linux Command
If you're running a modern version of Linux such as Ubuntu, you may be able to get to the BIOS by typing "sudo systemctl reboot --firmware" at the command prompt.
What if you can't boot your OS or hit a BIOS key?
If your computer can't load an operating system, because it doesn't detect a bootable drive, it will usually pause, beep and give you the option to enter the BIOS, which it will often call "setup."
However, the biggest problems occur when the system POSTs too fast for you to hit a key and then Windows or Linux tries to boot and fails. I've had this problem when I had a missing or corrupted bootloader, I got the Windows splash screen and then a blue screen of death.
To force the BIOS to appear under these circumstances, you can try using an emergency boot disk, provided that you can either select a boot device at startup or your computer has set an external USB drive as a higher boot priority than its internal storage drive(s).
You can use a Windows install disk as an emergency boot disk. Once the USB boots, you need to click "Repair your computer" instead of install and then click Troubleshoot -> UEFI Firmware Settings -> Restart.
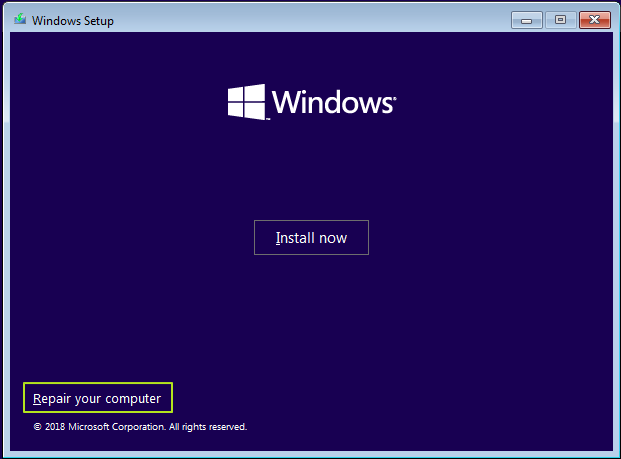
Finally, if you can't boot off of an emergency disk, you can try to cause a system halting error that would prevent your computer from attempting to boot off of its internal drives. Then, you'll be given the option to enter the BIOS menu.
Many desktop computers will give an error message if there's no keyboard plugged in (if you need help finding one, check our out Best Gaming Keyboards list) or if the keyboard buffer is overloaded from holding down too many keys at start. Pulling out your primary internal storage drive would also cause an error that would let you into the BIOS, but if that drive has a non-booting OS on it, your problems might resume once you plug it back in.
Bottom Line
Whatever method you use to access your BIOS, be careful when making changes to your settings there. You could end up disabling key components.
Avram Piltch is Tom's Hardware's editor-in-chief. When he's not playing with the latest gadgets at work or putting on VR helmets at trade shows, you'll find him rooting his phone, taking apart his PC or coding plugins. With his technical knowledge and passion for testing, Avram developed many real-world benchmarks, including our laptop battery test.