Red Dead Redemption 2: Poisonous Trail Treasure Hunt guide and location (original) (raw)
Fancy going on a treasure hunt? Here's everything you need to know about the Poisonous Trail in RDR2.
Image credit: Rockstar Games / Take-Two Interactive
There are quite a few treasure hunts hidden in the wilds of Red Dead Redemption 2, and the Poisonous Trail is just one of these.
So, dig out your shovel and get your map at the ready, it's time for another treasure hunt. A deadly path lies ahead, and you'll need a plan to navigate it. Here's how to complete the Poisonous Trail Treasure Hunt in Red Dead Redemption 2.
To see this content please enable targeting cookies.
On this page:
- Poisonous Trail Treasure Locations in Red Dead Redemption 2
- Poisonous Trail Treasure Location 1
- Poisonous Trail Treasure Location 2
- Poisonous Trail Treasure Location 3
Poisonous Trail Treasure Locations in Red Dead Redemption 2
To kick off the Poisonous Trail treasure mission in Red Dead Redemption 2, you firstly need to have started the Gunslinger missions. For a walkthrough of how to do just this, as well as how to track down all the famed fighters, check out our Red Dead Redemption 2 Gunslinger quests guide.
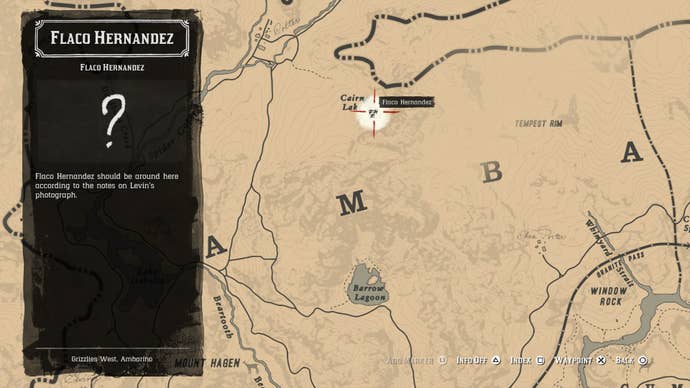
It's a particularly rich side quest, as it gives the player a bunch of new and unique weapons, but it also introduces you to Flaco Hernandez, who hides out in the hut at Cairn Lake, in The Grizzlies. Once Flaco is dead, search his cabin to find the Poisonous Trail map.
The location of Flaco Hernandez.
Poisonous Trail Treasure Location 1
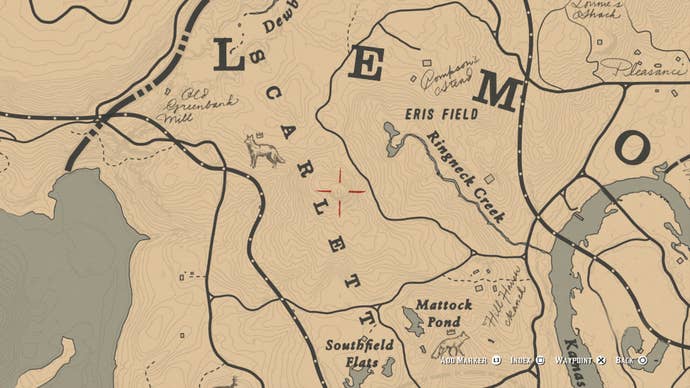
With the first map in hand, you need to head to the point on the map just below in Lemoyne, just west of Ringneck Creek. You need to look for a hollow tree, within which you can obtain the second map in the Poisonous Trail mission.
The location of the first Poisonous Trail treasure stash.
Poisonous Trail Treasure Location 2
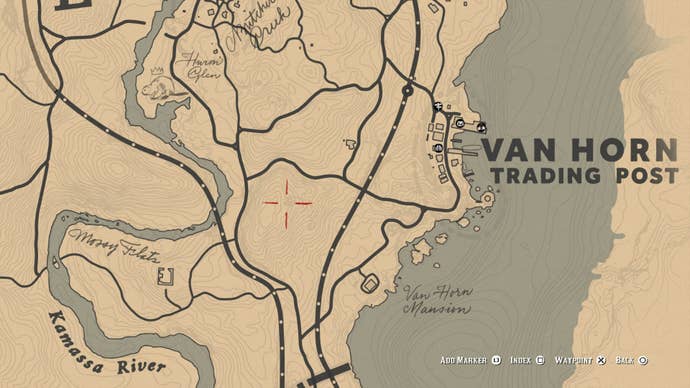
Looking at this second map, the drawing kind of looks like a snake, right? It doesn't seem to be marked on the map, but it's a mound directly west of the trading post Van Horn, on top of a steep hill.
Once you get there, poke around the stones that look like a nest of snake eggs to find the next treasure map.
The location of the second Poisonous Trail treasure stash.
Poisonous Trail Treasure Location 3
You now need to head northwest from the Van Horn Trading Post, to the Elysian Pool. On the northern bank of the river, you need to locate a small secret entrance behind the waterfall, which leads you into a cavern.
The location of the third Poisonous Trail treasure stash.
Note: This is the same secret cavern you'll enter to find the final reward for the Dreamcatcher challenge - but you will take a completely different route through the chambers.
This cavern can be particularly tricky to navigate your way through. Get out your lantern, and climb over the first ledge that you come to. After this, you’re looking for a path heading down on the right, directly after you’ve taken a steep drop.
Next, you’ll come to a small tunnel entrance that you need to crouch to make it under. Take the next path on your right, and when you can stand again, look to your left. Jump over the ledge, climb up another ledge, and you can search a small boulder to find the four gold bars in total, not a bad reward for a fair bit of trekking.
To get out of the chambers, head back to the last junction where you went right, but take the left hand path. Or, if you die, you'll spawn back outside the cavern.
Now that we’re all done with this treasure trail in Red Dead Redemption 2, maybe you want to head in the direction of another rewarding treasure hunt. Head over to our Red Dead Redemption 2 Jack Hall gang treasure guide or our guide on the Landmarks of Riches treasure for more.


