Using Neuron with Amazon EKS — AWS Neuron Documentation (original) (raw)
Using Neuron with Amazon EKS#
Table of Contents
- EKS Setup For Neuron
- Prerequisites
- Neuron Device Plugin
- Neuron Scheduler Extension
- Neuron Node Problem Detector Plugin
- Neuron Monitor Daemonset
- Neuron Helm Chart
EKS Setup For Neuron#
Customers that use Kubernetes can conveniently integrate Inf1/Trn1 instances into their workflows. This section will go through steps for setting up EKS cluster for Neuron.
Prerequisites#
Please refer to EKS instructions to create a cluster. Once the cluster is ACTIVE, please add nodes to the cluster. We recommend using node template for neuron nodes. Following example demonstrates how to add neuron nodes using node template. The example adds managed nodes using eksctl tool. For more details, please refer to EKS User Guide.
As first step, please create a script to capture the parameters for the node template:
#!/bin/bash
CLUSTER_NAME=$1 CLUSTER_SG=$(eksctl get cluster $CLUSTER_NAME -o json|jq -r ".[0].ResourcesVpcConfig.ClusterSecurityGroupId") VPC_ID=$(eksctl get cluster $CLUSTER_NAME -o json|jq -r ".[0].ResourcesVpcConfig.VpcId")
cat < cfn_params.json [ { "ParameterKey": "ClusterName", "ParameterValue": "$CLUSTER_NAME" },
{
    "ParameterKey": "ClusterControlPlaneSecurityGroup",
    "ParameterValue": "$CLUSTER_SG"
},

{
    "ParameterKey": "VpcId",
    "ParameterValue": "$VPC_ID"
}
] EOF
These parameters include the name of the cluster, the security group the nodes can use to connect to the control plane and the vpcid. Next, get the node group template from tutorial below -
This template file has a few important config settings -
- It places the node in a placement group. This optimizes the network speed between the nodes.
- The template installs the EFA driver. Please note that the libfabric version should match between the AMI and the workload containers.
- It uses the EKS optimized accelerated AMI which has the necessary neuron components installed. The template uses AMI for Kubernetes version 1.25. Please update to appropriate version.
- The template adds trn1.32xlarge nodes to the cluster. Please update to the desired instance type.
- Trn2 instance types use a default LNC (Logical NeuronCore Configuration) setting of 2, if you want to change it to 1, update the UserData section of the launch template to a new LNC setting as shown below, and deploy the new/updated version of launch template.
--==BOUNDARY== Content-Type: text/x-shellscript; charset="us-ascii"
#!/bin/bash set -ex config_dir=/opt/aws/neuron config_file=${config_dir}/logical_nc_config [ -d "$config_dir" ] || mkdir -p "$config_dir" [ -f "$config_file" ] || touch "$config_file" if ! grep -q "^NEURON_LOGICAL_NC_CONFIG=1$" "$config_file" 2>/dev/null; then printf "NEURON_LOGICAL_NC_CONFIG=1" >> "$config_file" fi --==BOUNDARY==--
Finally, run the following command to create cloud formation stack:
aws cloudformation create-stack
--stack-name eks-trn1-ng-stack
--template-body file://eks_trn1_ng_stack.yaml
--parameters file://cfn_params.json
--capabilities CAPABILITY_IAM
The above command will create a stack named eks-trn1-ng-stack, which will be visible in cloudformation. Please wait for that stack creation to complete before proceeding to next step.
Now we are ready to add the nodes. The example will demonstrate creating node groups using eksctl tool.
Please run following command to determine the AZs:
aws ec2 describe-availability-zones
--region $REGION_CODE
--query "AvailabilityZones[]"
--filters "Name=zone-id,Values=$1"
--query "AvailabilityZones[].ZoneName"
--output text
Next, create a script named create_ng_yaml.sh to generate node group yaml. The arguments to the script include the region, AZs, cluster name and name of the cloudformation stack created earlier (eks-trn1-ng-stack in case of this example):
#!/bin/bash
REGION_CODE=$1 EKSAZ1=$2 EKSAZ2=$3 CLUSTER_NAME=$4 STACKNAME=$5
LT_ID_TRN1=$(aws cloudformation describe-stacks --stack-name $STACKNAME
--query "Stacks[0].Outputs[?OutputKey=='LaunchTemplateIdTrn1'].OutputValue"
--output text)
cat < trn1_nodegroup.yaml apiVersion: eksctl.io/v1alpha5 kind: ClusterConfig
metadata: name: $CLUSTER_NAME region: $REGION_CODE version: "1.28"
iam: withOIDC: true
availabilityZones: ["$EKSAZ1","$EKSAZ2"]
managedNodeGroups:
- name: trn1-32xl-ng1 launchTemplate: id: $LT_ID_TRN1 minSize: 1 desiredCapacity: 1 maxSize: 1 availabilityZones: ["$EKSAZ1"] privateNetworking: true efaEnabled: true EOF
Run the above script. It should produce a yaml similar to -
apiVersion: eksctl.io/v1alpha5 kind: ClusterConfig
metadata: name: nemo2 region: us-west-2 version: "1.25"
iam: withOIDC: true
availabilityZones: ["us-west-2d","us-west-2c"]
managedNodeGroups:
- name: trn1-32xl-ng1 launchTemplate: id: lt-093c222b35ea89009 minSize: 1 desiredCapacity: 1 maxSize: 1 availabilityZones: ["us-west-2d"] privateNetworking: true efaEnabled: true
The example shows kubernetes version 1.25. Please update the version as needed. This yaml can now be used with eksctl.
eksctl create nodegroup -f trn1_nodegroup.yaml
This will add the nodes to the cluster. Please wait for the nodes to be ‘Ready’. This can be verified using the get node command.
If you are running a distributed training or inference job, you will need EFA resources. Please install the EFA device plugin using instructions at EFA device plugin repository.
Next, we will install the Neuron Device Plugin.
Neuron Device Plugin#
Neuron device plugin exposes Neuron cores & devices to kubernetes as a resource. aws.amazon.com/neuroncore and aws.amazon.com/neuron are the resources that the neuron device plugin registers with the kubernetes. aws.amazon.com/neuroncore is used for allocating neuron cores to the container. aws.amazon.com/neuron is used for allocating neuron devices to the container. When resource name ‘neuron’ is used, all the cores belonging to the device will be allocated to container.
Deploy Neuron Device Plugin#
- Make sure prequisite are satisified
- Apply the Neuron device plugin as a daemonset on the cluster with the following command
helm upgrade --install neuron-helm-chart oci://public.ecr.aws/neuron/neuron-helm-chart \
--set "npd.enabled=false" - Verify that neuron device plugin is running
kubectl get ds neuron-device-plugin -n kube-system
Expected result (with 2 nodes in cluster):
NAME DESIRED CURRENT READY UP-TO-DATE AVAILABLE NODE SELECTOR AGE
neuron-device-plugin 2 2 2 2 2 18h - Verify that the node has allocatable neuron cores and devices with the following command
kubectl get nodes "-o=custom-columns=NAME:.metadata.name,NeuronCore:.status.allocatable.aws.amazon.com/neuroncore"
Expected result:
NAME NeuronCore
ip-192-168-65-41.us-west-2.compute.internal 32
ip-192-168-87-81.us-west-2.compute.internal 32kubectl get nodes "-o=custom-columns=NAME:.metadata.name,NeuronDevice:.status.allocatable.aws.amazon.com/neuron"
Expected result:
NAME NeuronDevice
ip-192-168-65-41.us-west-2.compute.internal 16
ip-192-168-87-81.us-west-2.compute.internal 16
Neuron Scheduler Extension#
The Neuron scheduler extension is required for scheduling pods that require more than one Neuron core or device resource. For a graphical depiction of how the Neuron scheduler extension works, see Neuron Scheduler Extension Flow Diagram. The Neuron scheduler extension finds sets of directly connected devices with minimal communication latency when scheduling containers. On Inf1 and Inf2 instance types where Neuron devices are connected through a ring topology, the scheduler finds sets of contiguous devices. For example, for a container requesting 3 Neuron devices the scheduler might assign Neuron devices 0,1,2 to the container if they are available but never devices 0,2,4 because those devices are not directly connected. On Trn1.32xlarge and Trn1n.32xlarge instance types where devices are connected through a 2D torus topology, the Neuron scheduler enforces additional constraints that containers request 1, 4, 8, or all 16 devices. If your container requires a different number of devices, such as 2 or 5, we recommend that you use an Inf2 instance instead of Trn1 to benefit from more advanced topology.
Container Device Allocation On Different Instance Types#
The Neuron scheduler extension applies different rules when finding devices to allocate to a container on Inf1 and Inf2 instances than on Trn1. These rules ensure that when users request a specific number of resources, Neuron delivers consistent and high performance regardless of which cores and devices are assigned to the container.
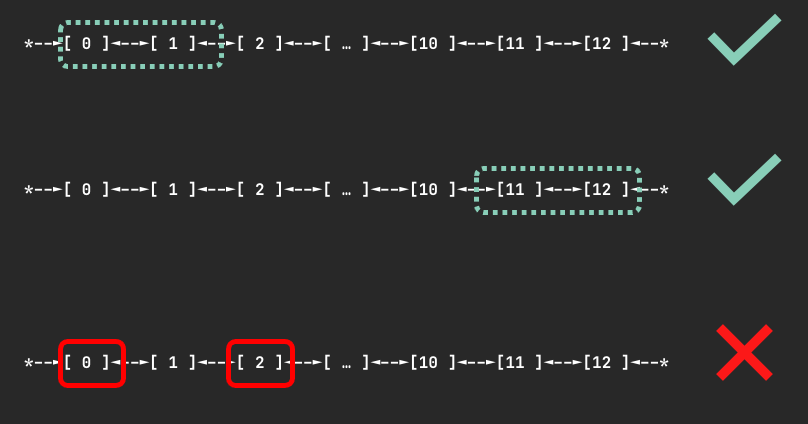
On Inf1 and Inf2 Neuron devices are connected through a ring topology. There are no restrictions on the number of devices requested as long as it is fewer than the number of devices on a node. When the user requests N devices, the scheduler finds a node where N contiguous devices are available. It will never allocate non-contiguous devices to the same container. The figure below shows examples of device sets on an Inf2.48xlarge node which could be assigned to a container given a request for 2 devices.
Devices on Trn1.32xlarge and Trn1n.32xlarge nodes are connected via a 2D torus topology. On Trn1 nodes containers can request 1, 4, 8, or all 16 devices. In the case you request an invalid number of devices, such as 7, your pod will not be scheduled and you will receive a warning:
Instance type trn1.32xlarge does not support requests for device: 7. Please request a different number of devices.
When requesting 4 devices, your container will be allocated one of the following sets of devices if they are available.
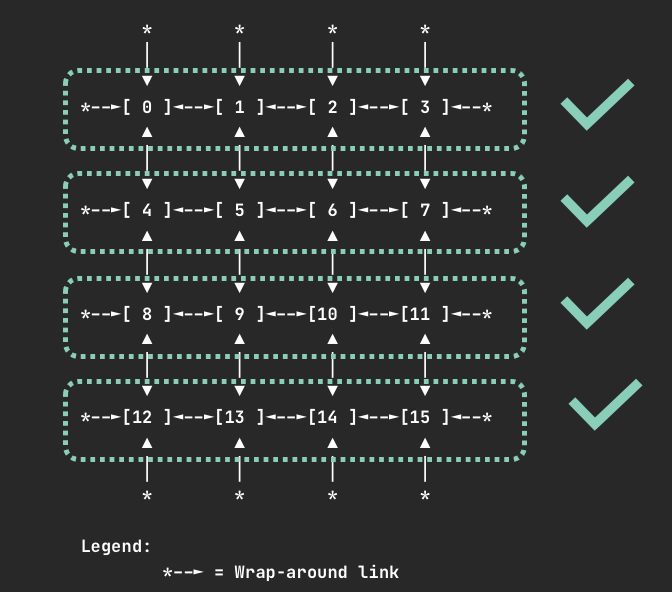
When requesting 8 devices, your container will be allocated one of the following sets of devices if they are available.

For all instance types, requesting one or all Neuron cores or devices is valid.
Deploy Neuron Scheduler Extension#
Multiple Scheduler Approach
In cluster environments where there is no access to default scheduler, the neuron scheduler extension can be used with another scheduler. A new scheduler is added (along with the default scheduler) and then the pod’s that needs to run the neuron workload use this new scheduler. Neuron scheduler extension is added to this new scheduler. EKS natively does not yet support the neuron scheduler extension and so in the EKS environment this is the only way to add the neuron scheduler extension.
- Make sure Neuron device plugin is running
- Install the neuron-scheduler-extension
helm upgrade --install neuron-helm-chart oci://public.ecr.aws/neuron/neuron-helm-chart \
--set "scheduler.enabled=true" \
--set "npd.enabled=false" - Check there are no errors in the my-scheduler pod logs and the k8s-neuron-scheduler pod is bound to a node
kubectl logs -n kube-system my-scheduler-79bd4cb788-hq2sq
I1012 15:30:21.629611 1 scheduler.go:604] "Successfully bound pod to node" pod="kube-system/k8s-neuron-scheduler-5d9d9d7988-xcpqm" node="ip-192-168-2-25.ec2.internal" evaluatedNodes=1 feasibleNodes=1
- When running new pod’s that need to use the neuron scheduler extension, make sure it uses the my-scheduler as the scheduler. Sample pod spec is below
apiVersion: v1
kind: Pod
metadata:
name:
spec:
restartPolicy: Never
schedulerName: my-scheduler
containers:- name:
command: [""]
image:
resources:
limits:
- name:
   cpu: "4"
   memory: 4Gi
   aws.amazon.com/neuroncore: 9
   requests:
   cpu: "1"
   memory: 1Gi
- Once the neuron workload pod is run, make sure logs in the k8s neuron scheduler has successfull filter/bind request
kubectl logs -n kube-system k8s-neuron-scheduler-5d9d9d7988-xcpqm
2022/10/12 15:41:16 POD nrt-test-5038 fits in Node:ip-192-168-2-25.ec2.internal
2022/10/12 15:41:16 Filtered nodes: [ip-192-168-2-25.ec2.internal]
2022/10/12 15:41:16 Failed nodes: map[]
2022/10/12 15:41:16 Finished Processing Filter Request...2022/10/12 15:41:16 Executing Bind Request!
2022/10/12 15:41:16 Determine if the pod %v is NeuronDevice podnrt-test-5038
2022/10/12 15:41:16 Updating POD Annotation with alloc devices!
2022/10/12 15:41:16 Return aws.amazon.com/neuroncore
2022/10/12 15:41:16 neuronDevUsageMap for resource:aws.amazon.com/neuroncore in node: ip-192-168-2-25.ec2.internal is [false false false false false false false false false false false false false false false false]
2022/10/12 15:41:16 Allocated ids for POD nrt-test-5038 are: 0,1,2,3,4,5,6,7,8
2022/10/12 15:41:16 Try to bind pod nrt-test-5038 in default namespace to node ip-192-168-2-25.ec2.internal with &Binding{ObjectMeta:{nrt-test-5038 8da590b1-30bc-4335-b7e7-fe574f4f5538 0 0001-01-01 00:00:00 +0000 UTC map[] map[] [] [] []},Target:ObjectReference{Kind:Node,Namespace:,Name:ip-192-168-2-25.ec2.internal,UID:,APIVersion:,ResourceVersion:,FieldPath:,},}
2022/10/12 15:41:16 Updating the DevUsageMap since the bind is successful!
2022/10/12 15:41:16 Return aws.amazon.com/neuroncore
2022/10/12 15:41:16 neuronDevUsageMap for resource:aws.amazon.com/neuroncore in node: ip-192-168-2-25.ec2.internal is [false false false false false false false false false false false false false false false false]
2022/10/12 15:41:16 neuronDevUsageMap for resource:aws.amazon.com/neurondevice in node: ip-192-168-2-25.ec2.internal is [false false false false]
2022/10/12 15:41:16 Allocated devices list 0,1,2,3,4,5,6,7,8 for resource aws.amazon.com/neuroncore
2022/10/12 15:41:16 Allocated devices list [0] for other resource aws.amazon.com/neurondevice
2022/10/12 15:41:16 Allocated devices list [0] for other resource aws.amazon.com/neurondevice
2022/10/12 15:41:16 Allocated devices list [0] for other resource aws.amazon.com/neurondevice
2022/10/12 15:41:16 Allocated devices list [0] for other resource aws.amazon.com/neurondevice
2022/10/12 15:41:16 Allocated devices list [1] for other resource aws.amazon.com/neurondevice
2022/10/12 15:41:16 Allocated devices list [1] for other resource aws.amazon.com/neurondevice
2022/10/12 15:41:16 Allocated devices list [1] for other resource aws.amazon.com/neurondevice
2022/10/12 15:41:16 Allocated devices list [1] for other resource aws.amazon.com/neurondevice
2022/10/12 15:41:16 Allocated devices list [2] for other resource aws.amazon.com/neurondevice
2022/10/12 15:41:16 Return aws.amazon.com/neuroncore
2022/10/12 15:41:16 Succesfully updated the DevUsageMap [true true true true true true true true true false false false false false false false] and otherDevUsageMap [true true true false] after alloc for node ip-192-168-2-25.ec2.internal
2022/10/12 15:41:16 Finished executing Bind Request...
Default Scheduler Approach
- Make sure Neuron device plugin is running
- Enable the kube-scheduler with option to use configMap for scheduler policy. In your cluster.yml Please update the spec section with the following
spec:
kubeScheduler:
usePolicyConfigMap: true - Launch the cluster
kops create -f cluster.yml
kops create secret --name neuron-test-1.k8s.local sshpublickey admin -i ~/.ssh/id_rsa.pub
kops update cluster --name neuron-test-1.k8s.local --yes - Install the neuron-scheduler-extension [Registers neuron-scheduler-extension with kube-scheduler]
helm upgrade --install neuron-helm-chart oci://public.ecr.aws/neuron/neuron-helm-chart \
--set "scheduler.enabled=true" \
--set "scheduler.customScheduler.enabled=false" \
--set "scheduler.defaultScheduler.enabled=true" \
--set "npd.enabled=false"
Neuron Node Problem Detector Plugin#
The Neuron Problem Detector Plugin facilitates error detection and recovery by continuously monitoring the health of Neuron devices across all Kubernetes nodes. It publishes CloudWatch metrics for node errors and can optionally trigger automatic recovery of affected nodes. Please follow the instructions below to enable the necessary permissions for the plugin.
Permissions for Neuron Node Problem Detector Plugin#
Neuron node problem detection and recovery is authorized via IAM roles for service accounts. For more information, see IAM roles for service accounts in the Amazon EKS User Guide. This documentation shows how to configure an IAM role for service accounts using the command line tool eksctl. Follow the instructions below to configure IAM authorization for service accounts:
- Install the eksctl CLI using instructions listed at https://eksctl.io/installation/.
- Create a policy as shown below:
Policy template
{
"Version": "2012-10-17",
"Statement": [
{
       "Action": [
           "autoscaling:SetInstanceHealth",
           "autoscaling:DescribeAutoScalingInstances"
       ],
       "Effect": "Allow",
       "Resource": <arn of the Auto Scaling group corresponding to the Neuron nodes for the cluster>
   },
   {
       "Action": [
           "ec2:DescribeInstances"
       ],
       "Effect": "Allow",
       "Resource": "*",
       "Condition": {
           "ForAllValues:StringEquals": {
               "ec2:ResourceTag/aws:autoscaling:groupName": <name of the Auto Scaling group corresponding to the Neuron nodes for the cluster>
           }
       }
   },
   {
       "Action": [
           "cloudwatch:PutMetricData"
       ],
       "Effect": "Allow",
       "Resource": "*",
       "Condition": {
           "StringEquals": {
               "cloudwatch:Namespace": "NeuronHealthCheck"
           }
       }
   }
]
}To create the policy, the AWS CLI can be used as shown below, where npd-policy-trimmed.json is the JSON policy constructed from the template above.
aws iam create-policy \
--policy-name NeuronProblemDetectorPolicy \
--policy-document file://npd-policy-trimmed.json
- Create a namespace for the Neuron Node Problem Detector and its service account:
kubectl create ns neuron-healthcheck-system
- Associate the authorization with the service account using the following script:
#!/bin/bash
CLUSTER_NAME=
REGION_CODE=$(aws configure get region)
POLICY_ARN=eksctl create iamserviceaccount \
--name node-problem-detector \
--namespace neuron-healthcheck-system \
--cluster $CLUSTER_NAME \
--attach-policy-arn $POLICY_ARN \
--approve \
--role-name neuron-problem-detector-role-$CLUSTER_NAME \
--region $REGION_CODE \
--override-existing-serviceaccounts
- Verify that the service account is annotated correctly. An example is shown below:
kubectl describe sa node-problem-detector -n neuron-healthcheck-system
Name: node-problem-detector
Namespace: neuron-healthcheck-system
Labels: app.kubernetes.io/managed-by=eksctl
Annotations: eks.amazonaws.com/role-arn: arn:aws:iam::111111111111:role/neuron-problem-detector-role-cluster1
Image pull secrets:
Mountable secrets:
Tokens:
Events: - To cleanup, deletion of the service account can be done using the following command:
#!/bin/bash
CLUSTER_NAME=
REGION_CODE=$(aws configure get region)eksctl delete iamserviceaccount \
--name node-problem-detector \
--namespace neuron-healthcheck-system \
--cluster $CLUSTER_NAME \
--approve \
--region $REGION_CODE \
Deploy Neuron Node Problem Detector And Recovery#
Neuron node problem detector and recovery artifact checks the health of Neuron devices on each Kubernetes node. After detecting an unrecoverable Neuron error, it triggers a node replacement. In order to get started with Neuron node problem detector and recovery, make sure that the following requirements are satisfied:
- The Neuron node problem detector and recovery requires Neuron driver 2.15+, and it requires the runtime to be at SDK 2.18 or later.
- Make sure prerequisites are satisfied. This includes prerequisites for getting started with Kubernetes containers and prerequisites for the Neuron node problem detector and recovery.
- Install the Neuron node problem detector and recovery as a DaemonSet on the cluster with the following command:
Note
The installation pulls the container image from the upstream repository for node problem detector registry.k8s.io/node-problem-detector.
helm upgrade --install neuron-helm-chart oci://public.ecr.aws/neuron/neuron-helm-chart
- By default, the Neuron node problem detector and recovery has monitor only mode enabled. To enable the recovery functionality:
helm upgrade --install neuron-helm-chart oci://public.ecr.aws/neuron/neuron-helm-chart \
--set "npd.nodeRecovery.enabled=true" - Verify that the Neuron device plugin is running:
kubectl get pod -n neuron-healthcheck-system
Expected result (with 4 nodes in cluster):
NAME READY STATUS RESTARTS AGE
node-problem-detector-7qcrj 1/1 Running 0 59s
node-problem-detector-j45t5 1/1 Running 0 59s
node-problem-detector-mr2cl 1/1 Running 0 59s
node-problem-detector-vpjtk 1/1 Running 0 59s - When any unrecoverable error occurs, Neuron node problem detector and recovery publishes a metric under the CloudWatch namespace NeuronHealthCheck. It also reflects in NodeCondition and can be seen with kubectl describe node.
Neuron Monitor Daemonset#
Neuron monitor is primary observability tool for neuron devices. For details of neuron monitor, please refer to the neuron monitor guide. This tutorial describes deploying neuron monitor as a daemonset on the kubernetes cluster.
Deploy Neuron Monitor Daemonset#
- Download the neuron monitor yaml file. k8s-neuron-monitor-daemonset.yml
- Apply the Neuron monitor yaml to create a daemonset on the cluster with the following command
kubectl apply -f k8s-neuron-monitor.yml
- Verify that neuron monitor daemonset is running
kubectl get ds neuron-monitor --namespace neuron-monitor
Expected result (with 2 nodes in cluster):
NAME DESIRED CURRENT READY UP-TO-DATE AVAILABLE NODE SELECTOR AGE
neuron-monitor 2 2 2 2 2 27h - Get the neuron-monitor pod names
Expected result
NAME READY STATUS RESTARTS AGE
neuron-monitor-slsxf 1/1 Running 0 17m
neuron-monitor-wc4f5 1/1 Running 0 17m - Verify the prometheus endpoint is available
kubectl exec neuron-monitor-wc4f5 -- wget -q --output-document - http://127.0.0.1:8000
Expected result
HELP python_gc_objects_collected_total Objects collected during gc
TYPE python_gc_objects_collected_total counter
python_gc_objects_collected_total{generation="0"} 362.0
python_gc_objects_collected_total{generation="1"} 0.0
python_gc_objects_collected_total{generation="2"} 0.0HELP python_gc_objects_uncollectable_total Uncollectable objects found during GC
TYPE python_gc_objects_uncollectable_total counter
Neuron Helm Chart#
To simplify the Kubernetes container deployment process, the Neuron Helm Chart has been provided with the following containers:
- Neuron Device Plugin
- Neuron Scheduler Extension
- Neuron Node Problem Detector and Recovery
For information on how to setup the containers on a Kubernetes cluster using the Neuron Helm Chart, please refer to aws-neuron/neuron-helm-charts.
This document is relevant for: Inf1, Inf2, Trn1, Trn2