Qt Quick Controls 1 - Touch Gallery (original) (raw)
Demonstrates UI controls for a touch interface.
Warning: The Qt Quick Controls 1 module is deprecated since Qt 5.12. Use the latest Qt Quick Controls module instead.
Touch Gallery demonstrates how to implement a UI suitable for touch input using the following Qt Quick Controls 1:
The appearance of the controls is customized by using Qt Quick Controls 1 Styles.
Running the Example
To run the example from Qt Creator, open the Welcome mode and select the example from Examples. For more information, visit Building and Running an Example.
Creating the Main Page
In the main.qml file, we use a Rectangle type within the ApplicationWindow type to create the main page of the application:
To use the Qt Quick Controls, we must import them:
The toolBar property of the application window holds a BorderImage type that we use to create a separator between the application name and a list of additional pages:
toolBar: BorderImage {
    border.bottom: 8
    source: "images/toolbar.png"
    width: parent.width
    height: 100
We use an Image type in a Rectangle type to create a back button. We use the onClicked signal handler to call the StackView pop() function that pops off the page when users tap the button:
    [Rectangle](qml-qtquick-rectangle.html) {
        id: backButton
        width: opacity ? 60 : 0
        anchors.left: parent.left
        anchors.leftMargin: 20
        opacity: stackView.depth > 1 ? 1 : 0
        anchors.verticalCenter: parent.verticalCenter
        antialiasing: true
        height: 60
        radius: 4
        color: backmouse.pressed ? "#222" : "transparent"
        Behavior on opacity { [NumberAnimation](qml-qtquick-numberanimation.html){} }
        [Image](qml-qtquick-image.html) {
            anchors.verticalCenter: parent.verticalCenter
            source: "images/navigation_previous_item.png"
        }
        [MouseArea](qml-qtquick-mousearea.html) {
            id: backmouse
            anchors.fill: parent
            anchors.margins: -10
            onClicked: stackView.pop()
        }
    }
We use the opacity property to hide the back button on the main page.
We use a Text type to display the application name:
    [Text](qml-qtquick-text.html) {
        font.pixelSize: 42
        Behavior on x { [NumberAnimation](qml-qtquick-numberanimation.html){ easing.type: Easing.OutCubic} }
        x: backButton.x + backButton.width + 20
        anchors.verticalCenter: parent.verticalCenter
        color: "white"
        text: "Widget Gallery"
    }
The x position of the Text type is bound to the position and width of the back button, and animated using a Behavior.
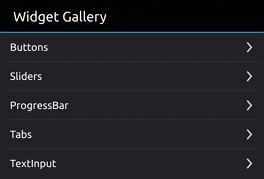
We use a ListModel type that contains ListElement definitions to define titles and source files for the other pages in the application:
ListModel {
    id: pageModel
    ListElement {
        title: "Buttons"
        page: "content/ButtonPage.qml"
    }
    ListElement {
        title: "Sliders"
        page: "content/SliderPage.qml"
    }
    ListElement {
        title: "ProgressBar"
        page: "content/ProgressBarPage.qml"
    }
    ListElement {
        title: "Tabs"
        page: "content/TabBarPage.qml"
    }
    ListElement {
        title: "TextInput"
        page: "content/TextInputPage.qml"
    }
    ListElement {
        title: "List"
        page: "content/ListPage.qml"
    }
}
Navigating in the Application
We implement a stack-based navigation model to link the application pages together. Items are pushed onto the stack as users navigate deeper into the application, and popped off again when they return to the main page.
In main.qml, we add a StackView type as a child of the application window:
[StackView](qml-qtquick-controls-stackview.html) {
    id: stackView
    anchors.fill: parent
    // Implements back key navigation
    focus: true
    Keys.onReleased: if (event.key === Qt.Key_Back && stackView.depth > 1) {
                         stackView.pop();
                         event.accepted = true;
                     }
The stack is used by invoking its navigation methods. To load the first item in the stack view, we assign it to initialItem:
    initialItem: Item {
        width: parent.width
        height: parent.height
        [ListView](qml-qtquick-listview.html) {
            model: pageModel
            anchors.fill: parent
            delegate: AndroidDelegate {
                text: title
                onClicked: stackView.push(Qt.resolvedUrl(page))
            }
        }
    }
}
}
We use a ListView type to display a list of the items provided by pageModel. The AndroidDelegate custom type defines each item instantiated by the view.
Creating Push Buttons and Switches
In ButtonPage.qml we use the Button type to create two buttons that change color when users tap them and one that pops off the page and returns the user to the main page:
    [Button](qml-qtquick-controls-button.html) {
        text: "Press me"
        style: touchStyle
    }

    [Button](qml-qtquick-controls-button.html) {
        style: touchStyle
        text: "Press me too"
    }

    [Button](qml-qtquick-controls-button.html) {
        anchors.margins: 20
        style: touchStyle
        text: "Don't press me"
        onClicked: if (stackView) stackView.pop()
    }
We use a Switch type to create two switches that users can turn on and off. They are placed within a Row type to lay them out horizontally:
    [Row](qml-qtquick-row.html) {
        spacing: 20
        [Switch](qml-qtquick-controls-switch.html) {
            style: switchStyle
        }
        [Switch](qml-qtquick-controls-switch.html) {
            style: switchStyle
        }
    }
A ButtonStyle type creates a custom appearance for the buttons:
[Component](qml-qtqml-component.html) {
    id: touchStyle
    [ButtonStyle](qml-qtquick-controls-styles-buttonstyle.html) {
        panel: Item {
            implicitHeight: 50
            implicitWidth: 320
            [BorderImage](qml-qtquick-borderimage.html) {
                anchors.fill: parent
                antialiasing: true
                border.bottom: 8
                border.top: 8
                border.left: 8
                border.right: 8
                anchors.margins: control.pressed ? -4 : 0
                source: control.pressed ? "../images/button_pressed.png" : "../images/button_default.png"
                [Text](qml-qtquick-text.html) {
                    text: control.text
                    anchors.centerIn: parent
                    color: "white"
                    font.pixelSize: 23
                    renderType: Text.NativeRendering
                }
To use Qt Quick Controls Styles, we must import them:
A SwitchStyle type creates a custom appearance for the switches:
[Component](qml-qtqml-component.html) {
    id: switchStyle
    [SwitchStyle](qml-qtquick-controls-styles-switchstyle.html) {

        groove: Rectangle {
            implicitHeight: 50
            implicitWidth: 152
            [Rectangle](qml-qtquick-rectangle.html) {
                anchors.top: parent.top
                anchors.left: parent.left
                anchors.bottom: parent.bottom
                width: parent.width/2 - 2
                height: 20
                anchors.margins: 2
                color: control.checked ? "#468bb7" : "#222"
                Behavior on color {[ColorAnimation](qml-qtquick-coloranimation.html) {}}
                [Text](qml-qtquick-text.html) {
                    font.pixelSize: 23
                    color: "white"
                    anchors.centerIn: parent
                    text: "ON"
                }
            }
            [Item](qml-qtquick-item.html) {
                width: parent.width/2
                height: parent.height
                anchors.right: parent.right
                [Text](qml-qtquick-text.html) {
                    font.pixelSize: 23
                    color: "white"
                    anchors.centerIn: parent
                    text: "OFF"
                }
            }
            color: "#222"
            border.color: "#444"
            border.width: 2
        }
        handle: Rectangle {
            width: parent.parent.width/2
            height: control.height
            color: "#444"
            border.color: "#555"
            border.width: 2
        }
    }
}
}
The groove property holds the background groove of the switch and the handle property defines the switch handle.
Creating Sliders
In SliderPage.qml, we use a Slider type to create three horizontal sliders that are placed within a Column type to lay them out in a column:
[Column](qml-qtquick-column.html) {
    spacing: 12
    anchors.centerIn: parent

    [Slider](qml-qtquick-controls-slider.html) {
        anchors.margins: 20
        style: touchStyle
        value: 0
    }
    [Slider](qml-qtquick-controls-slider.html) {
        anchors.margins: 20
        style: touchStyle
        value: 0.5
    }
    [Slider](qml-qtquick-controls-slider.html) {
        anchors.margins: 20
        style: touchStyle
        value: 1.0
    }

}
The value property holds the initial handle position on the slider.
A SliderStyle type creates a custom appearance for the sliders:
[Component](qml-qtqml-component.html) {
    id: touchStyle
    [SliderStyle](qml-qtquick-controls-styles-sliderstyle.html) {
        handle: Rectangle {
            width: 30
            height: 30
            radius: height
            antialiasing: true
            color: Qt.lighter("#468bb7", 1.2)
        }

        groove: Item {
            implicitHeight: 50
            implicitWidth: 400
            [Rectangle](qml-qtquick-rectangle.html) {
                height: 8
                width: parent.width
                anchors.verticalCenter: parent.verticalCenter
                color: "#444"
                opacity: 0.8
                [Rectangle](qml-qtquick-rectangle.html) {
                    antialiasing: true
                    radius: 1
                    color: "#468bb7"
                    height: parent.height
                    width: parent.width * control.value / control.maximumValue
                }
            }
        }
    }
}
}
The handle property defines the slider handle and the groove property holds the background groove of the slider.
Indicating Progress
In ProgressBar.qml, we use a ProgressBar type to create three progress bars:
[Column](qml-qtquick-column.html) {
    spacing: 40
    anchors.centerIn: parent

    [ProgressBar](qml-qtquick-controls-progressbar.html) {
        anchors.margins: 20
        style: touchStyle
        width: 400
        value: progress
    }

    [ProgressBar](qml-qtquick-controls-progressbar.html) {
        anchors.margins: 20
        style: touchStyle
        width: 400
        value: 1 - progress
    }

    [ProgressBar](qml-qtquick-controls-progressbar.html) {
        anchors.margins: 20
        style: touchStyle
        value: 1
        width: 400
    }
We use a NumberAnimation type with a SequentialAnimation type to run two number animations in a sequence. We apply the animations on the progress custom property to animate the current value on the progress bars:
property real progress: 0
SequentialAnimation on progress {
    loops: Animation.Infinite
    running: true
    [NumberAnimation](qml-qtquick-numberanimation.html) {
        from: 0
        to: 1
        duration: 3000
    }
    [NumberAnimation](qml-qtquick-numberanimation.html) {
        from: 1
        to: 0
        duration: 3000
    }
A ProgressBarStyle type creates a custom appearance for the progress bars:
[Component](qml-qtqml-component.html) {
    id: touchStyle
    [ProgressBarStyle](qml-qtquick-controls-styles-progressbarstyle.html) {
        panel: Rectangle {
            implicitHeight: 15
            implicitWidth: 400
            color: "#444"
            opacity: 0.8
            [Rectangle](qml-qtquick-rectangle.html) {
                antialiasing: true
                radius: 1
                color: "#468bb7"
                height: parent.height
                width: parent.width * control.value / control.maximumValue
            }
        }
    }
}
}
Creating Tabs
In TabBarPage.qml, we use a TabView type with a Tab type to provide a tab-based navigation model for our application. We use tabs to display the ButtonPage, SliderPage, and ProgressBarPage on separate tab pages:
[TabView](qml-qtquick-controls-tabview.html) {
    anchors.fill: parent
    style: touchStyle
    [Tab](qml-qtquick-controls-tab.html) {
        title: "Buttons"
        ButtonPage{ visible: true }
    }
    [Tab](qml-qtquick-controls-tab.html) {
        title: "Sliders"
        SliderPage{ visible: true }
    }
    [Tab](qml-qtquick-controls-tab.html) {
        title: "Progress"
        ProgressBarPage{ visible: true }
    }
A TabViewStyle type creates a custom appearance for the tabs:
[Component](qml-qtqml-component.html) {
    id: touchStyle
    [TabViewStyle](qml-qtquick-controls-styles-tabviewstyle.html) {
        tabsAlignment: Qt.AlignVCenter
        tabOverlap: 0
        frame: Item { }
        tab: Item {
            implicitWidth: control.width/control.count
            implicitHeight: 50
            [BorderImage](qml-qtquick-borderimage.html) {
                anchors.fill: parent
                border.bottom: 8
                border.top: 8
                source: styleData.selected ? "../images/tab_selected.png":"../images/tabs_standard.png"
                [Text](qml-qtquick-text.html) {
                    anchors.centerIn: parent
                    color: "white"
                    text: styleData.title.toUpperCase()
                    font.pixelSize: 16
                }
                [Rectangle](qml-qtquick-rectangle.html) {
                    visible: index > 0
                    anchors.top: parent.top
                    anchors.bottom: parent.bottom
                    anchors.margins: 10
                    width:1
                    color: "#3a3a3a"
                }
            }
        }
    }
}
}
Creating Text Input Fields
In the TextInputPage.qml, we use a TextField type to create an input field and a read-only text field:
[Column](qml-qtquick-column.html) {
    spacing: 40
    anchors.centerIn: parent

    [TextField](qml-qtquick-controls-textfield.html) {
        anchors.margins: 20
        text: "Text input"
        style: touchStyle
    }

    [TextField](qml-qtquick-controls-textfield.html) {
        anchors.margins: 20
        text: "Readonly Text input"
        style: touchStyle
        readOnly: true
    }
}
A TextFieldStyle creates a custom appearance for the text fields:
[Component](qml-qtqml-component.html) {
    id: touchStyle

    [TextFieldStyle](qml-qtquick-controls-styles-textfieldstyle.html) {
        textColor: "white"
        font.pixelSize: 28
        background: Item {
            implicitHeight: 50
            implicitWidth: 320
            [BorderImage](qml-qtquick-borderimage.html) {
                source: "../images/textinput.png"
                border.left: 8
                border.right: 8
                anchors.bottom: parent.bottom
                anchors.left: parent.left
                anchors.right: parent.right
            }
        }
    }
}
}
We use a BorderImage type with an image to create borders for the fields.
Creating Scrolling Lists
In ListPage.qml, we use a ScrollView type to provide a scrolling page with a vertical scoll bar:
ScrollView { width: parent.width height: parent.height
flickableItem.interactive: trueWe use a ListView type to display a list of 100 items by specifying an integer as the value of the model property. We reuse the AndroidDelegate custom type here to define each item instantiated by the view. The text property adds the string Item # to each list item:
[ListView](qml-qtquick-listview.html) {
    anchors.fill: parent
    model: 100
    delegate: AndroidDelegate {
        text: "Item #" + modelData
    }
}
A ScrollViewStyle type creates a custom appearance for the scroll view:
style: ScrollViewStyle {
    transientScrollBars: true
    handle: Item {
        implicitWidth: 14
        implicitHeight: 26
        [Rectangle](qml-qtquick-rectangle.html) {
            color: "#424246"
            anchors.fill: parent
            anchors.topMargin: 6
            anchors.leftMargin: 4
            anchors.rightMargin: 4
            anchors.bottomMargin: 6
        }
    }
    scrollBarBackground: Item {
        implicitWidth: 14
        implicitHeight: 26
    }
}
}
The transientScrollBars property is set to true to make the scroll bars appear when the content is scrolled and disappear when they are no longer needed.
The handle property controls the appearance of the scroll bar handle and the scrollBarBackground property that of the background.