Getting Started - Qt for Python (original) (raw)
Toggle table of contents sidebar
Here you can find the steps to install and create a simple application using the two technologies that Qt provides: Qt Widgets and Qt Quick.
Note
If you are new to Qt, you can check the Frequently Asked Questions section at the end of this page to understand concepts, file types, compatibles IDEs, etc. In case you own a Qt License, please refer to Commercial Use.
Requirements
Before you can install Qt for Python, first you must install the following software:
- Official Python 3.8+
- We highly recommend using a virtual environment, such asvenv orvirtualenvand avoid installing PySide6 via
pipin your system.
Installation
- Creating and activating an environmentYou can do this by running the following on a terminal:
- Create environment (Your Python executable might be called
python3): - Activate the environment (Linux and macOS):
- Activate the environment (Windows):
Check this animation on how to do it:
Note
Having Qt installed in your system will not interfere with your PySide6 installation if you do it viapip install, because the Python packages (wheels) already includes Qt binaries. Most notably, style plugins from the system won’t have any effect on PySide applications.
- Create environment (Your Python executable might be called
- Installing PySide6
Now you are ready to install the Qt for Python packages usingpip. From the terminal, run the following command:- For the latest version:
- For a specific version, like 6.4.1:
pip install pyside6==6.4.1 - It is also possible to install a specific snapshot from our servers. To do so, you can use the following command:
pip install --index-url=https://download.qt.io/snapshots/ci/pyside/6.4/latest pyside6 --trusted-host download.qt.io
- Test your installation
Now that you have Qt for Python installed, test your setup by running the following Python constructs to print version information:
import PySide6.QtCore
Prints PySide6 version
print(PySide6.version)
Prints the Qt version used to compile PySide6
print(PySide6.QtCore.version)
Note
For more information about what’s included in the pyside6package, check Package Details.
Create your first Qt Application
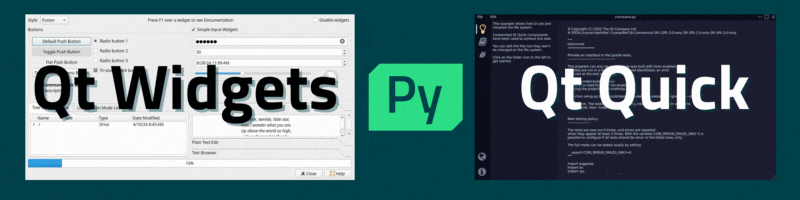
Qt provides two technologies to build User Interfaces:
- Qt Widgets, an imperative programming and design approach that has been around since the beginning of Qt, making it a stable and reliable technology for UI applications.
- Qt Quick, a declarative programming and design approach, which enables you to create fluid UIs by describing them in terms of simple elements.
Both technologies offer you the possibility to use drag and drop tools to create your interfaces. pyside6-designer for Qt Widgets (included when you install pyside6), and Qt Design Studio for Qt Quick (Get it here).
Note
After reading this page, it is recommended that you check thepyside6-project tool to learn how to create projects automatically without writing all the code by hand.
Create your first Qt Application with Qt Widgets
Your Qt for Python setup is ready. You can explore it further by developing a simple application that prints "Hello World" in several languages. The following instructions will guide you through the development process:
- Imports
Create a new file namedhello_world.py, and add the following imports to it.:
import sys
import random
from PySide6 import QtCore, QtWidgets, QtGui
The PySide6 Python module provides access to the Qt APIs as its submodule. In this case, you are importing the QtCore, QtWidgets, and QtGui submodules. - Main Class
Define a class namedMyWidget, which extends QWidget and includes a QPushButton and QLabel.:
class MyWidget(QtWidgets.QWidget):
def init(self):
super().init()
self.hello = ["Hallo Welt", "Hei maailma", "Hola Mundo", "Привет мир"]
self.button = QtWidgets.QPushButton("Click me!")
self.text = QtWidgets.QLabel("Hello World",
alignment=QtCore.Qt.AlignCenter)
self.layout = QtWidgets.QVBoxLayout(self)
self.layout.addWidget(self.text)
self.layout.addWidget(self.button)
self.button.clicked.connect(self.magic)
@QtCore.Slot()
def magic(self):
self.text.setText(random.choice(self.hello))
The MyWidget class has the magic member function that randomly chooses an item from the hello list. When you click the button, themagic function is called.
- Application execution
Now, add a main function where you instantiateMyWidgetandshowit.:
if name == "main":
app = QtWidgets.QApplication([])
widget = MyWidget()
widget.resize(800, 600)
widget.show()
sys.exit(app.exec())
Run your example by writing the following command:
Try clicking the button at the bottom to see which greeting you get.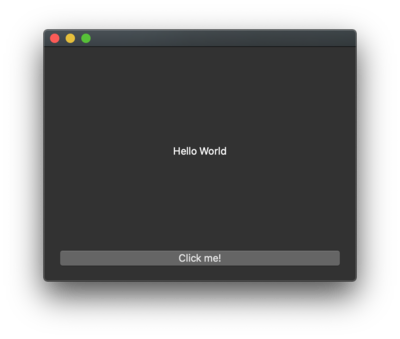
Create your first Qt Application with Qt Quick
To do the same using Qt Quick:
- Imports
Create a new file namedhello_world_quick.py, and add the following imports to it.:
import sys
from PySide6.QtGui import QGuiApplication
from PySide6.QtQml import QQmlApplicationEngine - Declarative UI
The UI can be described in the QML language:
import QtQuick
import QtQuick.Controls
import QtQuick.Layouts
Window {
width: 300
height: 200
visible: true
title: "Hello World"
readonly property list texts: ["Hallo Welt", "Hei maailma",
"Hola Mundo", "Привет мир"]
function setText() {
var i = Math.round(Math.random() * 3)
text.text = texts[i]
}
ColumnLayout {
anchors.fill: parent
Text {
id: text
text: "Hello World"
Layout.alignment: Qt.AlignHCenter
}
Button {
text: "Click me"
Layout.alignment: Qt.AlignHCenter
onClicked: setText()
}
}
}
Put the this into a file namedMain.qmlinto a directory namedExamplealong with a file namedqmldirto describe a basic QML module:
module Example
Main 254.0 Main.qml - Application execution
Now, add a main function where you instantiate a QQmlApplicationEngine and load the QML:
import sys
from PySide6.QtGui import QGuiApplication
from PySide6.QtQml import QQmlApplicationEngine
if name == "main":
app = QGuiApplication(sys.argv)
engine = QQmlApplicationEngine()
engine.addImportPath(sys.path[0])
engine.loadFromModule("Example", "Main")
if not engine.rootObjects():
sys.exit(-1)
exit_code = app.exec()
del engine
sys.exit(exit_code)
Run your example by writing the following command:
Try clicking the button at the bottom to see which greeting you get.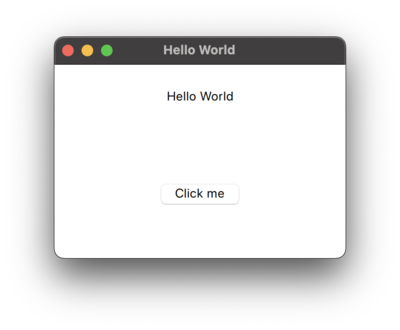
Next steps
Now that you have use both technologies, you can head to ourExamples and Tutorials sections.
Frequently Asked Questions
Here you can find a couple of common questions and situations that will clarify questions before you start programming.
Why Qt for Python?
As a Qt/C++ developer, why should I consider Qt for Python?