Split a template into reusable pieces using nested stacks (original) (raw)
As your infrastructure grows, you might find yourself repeatedly creating identical resource configurations across multiple templates. To avoid this redundancy, you can separate these common configurations into dedicated templates. Then, you can use the AWS::CloudFormation::Stack resource in other templates to reference these dedicated templates, creating nested stacks.
For example, suppose you have a load balancer configuration that you use for most of your stacks. Instead of copying and pasting the same configurations into your templates, you can create a dedicated template for the load balancer. Then, you can reference this template from within other templates that require the same load balancer configuration.
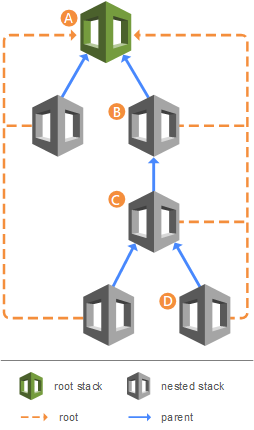
Nested stacks can themselves contain other nested stacks, resulting in a hierarchy of stacks, as shown in the diagram below. The root stack is the top-level stack to which all nested stacks ultimately belong. Each nested stack has an immediate parent stack. For the first level of nested stacks, the root stack is also the parent stack.
- Stack A is the root stack for all the other, nested, stacks in the hierarchy.
- For stack B, stack A is both the parent stack, and the root stack.
- For stack D, stack C is the parent stack; while for stack C, stack B is the parent stack.
Topics
- Before and after example of splitting a template
- Example of a nested stack architecture
- Performing stack operations on nested stacks
- Related information
Before and after example of splitting a template
This example demonstrates how you can take a single, large CloudFormation template and reorganize it into a more structured and reusable design using nested templates. Initially, the "Before nesting stacks" template shows all the resources defined in one file. This can become messy and hard to manage as the number of resources grows. The "After nesting stacks" template splits up the resources into smaller, separate templates. Each nested stack handles a specific set of related resources, making the overall structure more organized and easier to maintain.
| Before nesting stacks | After nesting stacks |
|---|---|
| AWSTemplateFormatVersion: 2010-09-09 Parameters: InstanceType: Type: String Default: t2.micro Description: The EC2 instance type Environment: Type: String Default: Production Description: The deployment environment Resources: MyEC2Instance: Type: AWS::EC2::Instance Properties: ImageId: ami-1234567890abcdef0 InstanceType: !Ref InstanceType MyS3Bucket: Type: AWS::S3::Bucket | AWSTemplateFormatVersion: 2010-09-09 Resources: MyFirstNestedStack: Type: AWS::CloudFormation::Stack Properties: TemplateURL: https://s3.amazonaws.com/amzn-s3-demo-bucket/first-nested-stack.yaml Parameters: # Pass parameters to the nested stack if needed InstanceType: t3.micro MySecondNestedStack: Type: AWS::CloudFormation::Stack Properties: TemplateURL: https://s3.amazonaws.com/amzn-s3-demo-bucket/second-nested-stack.yaml Parameters: # Pass parameters to the nested stack if needed Environment: Testing DependsOn: MyFirstNestedStack |
Example of a nested stack architecture
This section demonstrates a nested stack architecture consisting of a top-level stack that references a nested stack. The nested stack deploys a Node.js Lambda function, receives a parameter value from the top-level stack, and returns an output that's exposed through the top-level stack.
Topics
- Step 1: Create a template for the nested stack on your local system
- Step 2: Create a template for the top-level stack on your local system
- Step 3: Package and deploy the templates
Step 1: Create a template for the nested stack on your local system
The following example shows the format of the nested stack template.
YAML
AWSTemplateFormatVersion: 2010-09-09
Description: Nested stack template for Lambda function deployment
Parameters:
  MemorySize:
    Type: Number
    Default: 128
    MinValue: 128
    MaxValue: 10240
    Description: Lambda function memory allocation (128-10240 MB)
Resources:
  LambdaFunction:
    Type: AWS::Lambda::Function
    Properties:
      FunctionName: !Sub "${AWS::StackName}-Function"
      Runtime: nodejs18.x
      Handler: index.handler
      Role: !GetAtt LambdaExecutionRole.Arn
      Code:
        ZipFile: |
          exports.handler = async (event) => {
            return {
              statusCode: 200,
              body: JSON.stringify('Hello from Lambda!')
            };
          };
      MemorySize: !Ref MemorySize
  LambdaExecutionRole:
    Type: AWS::IAM::Role
    Properties:
      AssumeRolePolicyDocument:
        Version: '2012-10-17'
        Statement:
          - Effect: Allow
            Principal:
              Service: lambda.amazonaws.com
            Action: sts:AssumeRole
      ManagedPolicyArns:
        - 'arn:aws:iam::aws:policy/service-role/AWSLambdaBasicExecutionRole'
Outputs:
  LambdaArn:
    Description: ARN of the created Lambda function
    Value: !GetAtt LambdaFunction.Arn
Step 2: Create a template for the top-level stack on your local system
The following example shows the format of the top-level stack template and theAWS::CloudFormation::Stack resource that references the stack you created in the previous step.
YAML
AWSTemplateFormatVersion: 2010-09-09
Description: Top-level stack template that deploys a nested stack
Resources:
  NestedStack:
    Type: AWS::CloudFormation::Stack
    Properties:
      TemplateURL: /path_to_template/nested-template.yaml
      Parameters:
        MemorySize: 256
Outputs:
  NestedStackLambdaArn:
    Description: ARN of the Lambda function from nested stack
    Value: !GetAtt NestedStack.Outputs.LambdaArn
Step 3: Package and deploy the templates
Note
When working with templates locally, the AWS CLI package command can help you prepare templates for deployment. It automatically handles the upload of local artifacts to Amazon S3 (including TemplateURL) and generates a new template file with updated references to these S3 locations. For more information, see Upload local artifacts to an S3 bucket with the AWS CLI.
Next, you can use the package command to upload the nested template to an Amazon S3 bucket.
aws cloudformation package \
  --s3-bucket amzn-s3-demo-bucket \
  --template /path_to_template/top-level-template.yaml \
  --output-template-file packaged-template.yaml \
  --output json
The command generates a new template at the path specified by--output-template-file. It replaces the TemplateURL reference with the Amazon S3 location, as shown below.
Resulting template
AWSTemplateFormatVersion: 2010-09-09
Description: Top-level stack template that deploys a nested stack
Resources:
  NestedStack:
    Type: AWS::CloudFormation::Stack
    Properties:
      TemplateURL: https://s3.us-west-2.amazonaws.com/amzn-s3-demo-bucket/8b3bb7aa7abfc6e37e2d06b869484bed.template
      Parameters:
        MemorySize: 256
Outputs:
  NestedStackLambdaArn:
    Description: ARN of the Lambda function from nested stack
    Value:
      Fn::GetAtt:
      - NestedStack
      - Outputs.LambdaArn
After you run the package command, you can deploy the processed template using the deploy command. For nested stacks that contain IAM resources, you must acknowledge IAM capabilities by including the--capabilities option.
aws cloudformation deploy \
  --template-file packaged-template.yaml \
  --stack-name stack-name \
  --capabilities CAPABILITY_NAMED_IAM
Performing stack operations on nested stacks
When working with nested stacks, you must handle them carefully during operations. Certain stack operations, such as stack updates, should be initiated from the root stack rather than performed directly on the nested stacks. When you update a root stack, only nested stacks with template changes will be updated.
Additionally, the presence of the nested stacks can affect operations on the root stack. For example, if one nested stack becomes stuck inUPDATE_ROLLBACK_IN_PROGRESS state, the root stack will wait until that nested stack completes its rollback before continuing. Before proceeding with update operations, make sure that you have IAM permissions to cancel a stack update in case it rolls back. For more information, see Control CloudFormation access with AWS Identity and Access Management.
Use the following procedures to find the root stack and nested stacks.
To view the root stack of a nested stack
- Sign in to the AWS Management Console and open the AWS CloudFormation console athttps://console.aws.amazon.com/cloudformation.
- On the Stacks page, choose the name of the nested stack you want to view the root stack of.
Nested stacks display NESTED above their stack name. - On the Stack info tab, in theOverview section, choose the stack name listed asRoot stack.
To view the nested stacks that belong to a root stack
- From the root stack whose nested stacks you want to view, choose theResources tab.
- In the Type column, look for resources of typeAWS::CloudFormation::Stack.