Preparing to create a CEV for RDS Custom for SQL Server (original) (raw)
You can create a CEV using an Amazon Machine Image (AMI) that contains pre-installed, License Included (LI) Microsoft SQL Server, or with an AMI on which you install your own SQL Server installation media (BYOM).
Preparing a CEV
Use the following procedures to create a CEV using Bring Your Own Media (BYOM) or pre-installed Microsoft SQL Server (LI).
The following steps use an AMI with Windows Server 2019 Base as an example.
To create a CEV using BYOM
- On the Amazon EC2 console, choose Launch Instance.
- For Name, enter the name of the instance.
- Under Quick Start, choose Windows.
- Choose Microsoft Windows Server 2019 Base.
- Choose an appropriate instance type, key pair, network and storage settings, and launch the instance.
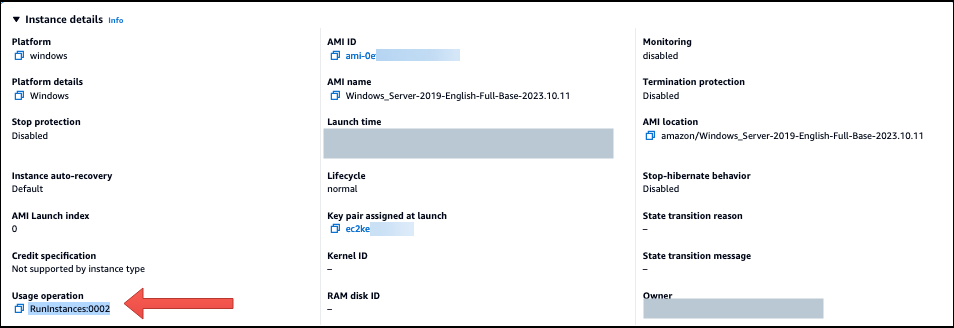
- After launching or creating the EC2 instance, ensure the correct Windows AMI was selected from Step 4:
- Select the EC2 instance in the Amazon EC2 console.
- In the Details section, check the Usage operation and ensure that it is set to RunInstances:0002.
- Log in to the EC2 instance and copy your SQL Server installation media to it.
- Install SQL Server. Make sure that you do the following:
- Review Requirements for BYOM for RDS Custom for SQL Server and Version support for RDS Custom for SQL Server CEVs.
- Set the instance root directory to the default
C:\Program Files\Microsoft SQL Server\. Don't change this directory. - Set the SQL Server Database Engine Account Name to either
NT Service\MSSQLSERVERorNT AUTHORITY\NETWORK SERVICE. - Set the SQL Server Startup mode to Manual.
- Choose SQL Server Authentication mode asMixed.
- Leave the current settings for the default Data directories and TempDB locations.
- Grant the SQL Server sysadmin (SA) server role privilege to
NT AUTHORITY\SYSTEM:
USE [master]
GO
EXEC master..sp_addsrvrolemember @loginame = N'NT AUTHORITY\SYSTEM' , @rolename = N'sysadmin'
GO - Install additional software or customize the OS and database configuration to meet your requirements.
- Run Sysprep on the EC2 instance. For more information, seeCreate an Amazon EC2 AMI using Windows Sysprep.
- Save the AMI that contains your installed SQL Server version, other software, and customizations. This will be your golden image.
- Create a new CEV by providing the AMI ID of the image that you created. For detailed steps, see Creating a CEV for RDS Custom for SQL Server.
- Create a new RDS Custom for SQL Server DB instance using the CEV. For detailed steps, see Create an RDS Custom for SQL Server DB instance from a CEV.
The following steps to create a CEV using pre-installed Microsoft SQL Server (LI) use an AMI with SQL Server CU20 Release number 2023.05.10 as an example. When you create a CEV, choose an AMI with the most recent release number. This ensures that you are using a supported version of Windows Server and SQL Server with the latest Cumulative Update (CU).
To create a CEV using pre-installed Microsoft SQL Server (LI)
- Choose the latest available AWS EC2 Windows Amazon Machine Image (AMI) with License Included (LI) Microsoft Windows Server and SQL Server.
- Search for CU20 within the Windows AMI version history.
- Note the Release number. For SQL Server 2019 CU20, the release number is
2023.05.10.
- Open the Amazon EC2 console athttps://console.aws.amazon.com/ec2/.
- In the left navigation panel of the Amazon EC2 console choose Images, then AMIs.
- Choose Public images.
- Enter
2023.05.10into the search box. A list of AMIs appears. - Enter
Windows_Server-2019-English-Full-SQL_2019into the search box to filter the results. The following results should appear.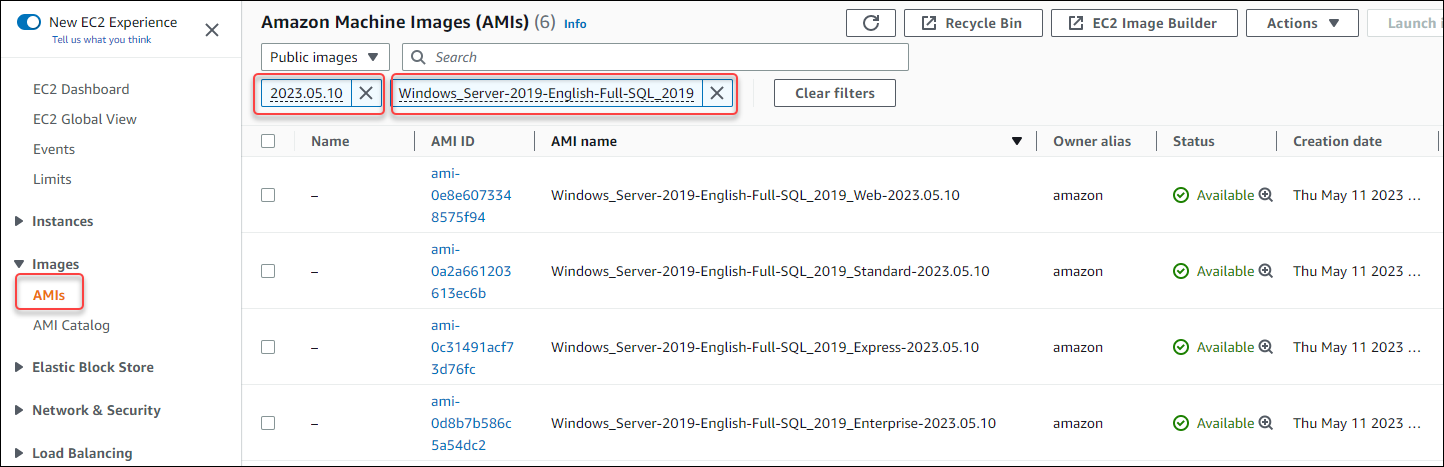
- Choose the AMI with the SQL Server edition that you want to use.
- Create or launch an EC2 instance from your chosen AMI.
- Log in to the EC2 instance and install additional software or customize the OS and database configuration to meet your requirements.
- Run Sysprep on the EC2 instance. For more information prepping an AMI using Sysprep, seeCreate a standardized Amazon Machine Image (AMI) using Sysprep.
- Save the AMI that contains your installed SQL Server version, other software, and customizations. This will be your golden image.
- Create a new CEV by providing the AMI ID of the image that you created. For detailed steps on creating a CEV, see Creating a CEV for RDS Custom for SQL Server.
- Create a new RDS Custom for SQL Server DB instance using the CEV. For detailed steps, see Create an RDS Custom for SQL Server DB instance from a CEV.
Region availability for RDS Custom for SQL Server CEVs
Custom engine version (CEV) support for RDS Custom for SQL Server is available in the following AWS Regions:
- US East (Ohio)
- US East (N. Virginia)
- US West (Oregon)
- US West (N. California)
- Asia Pacific (Mumbai)
- Asia Pacific (Osaka)
- Asia Pacific (Seoul)
- Asia Pacific (Singapore)
- Asia Pacific (Sydney)
- Asia Pacific (Tokyo)
- Canada (Central)
- Europe (Frankfurt)
- Europe (Ireland)
- Europe (London)
- Europe (Paris)
- Europe (Stockholm)
- South America (São Paulo)
Version support for RDS Custom for SQL Server CEVs
CEV creation for RDS Custom for SQL Server is supported for the following AWS EC2 Windows AMIs:
- For CEVs using pre-installed media, AWS EC2 Windows AMIs with License Included (LI) Microsoft Windows Server 2019 (OS) and SQL Server 2022 or 2019
- For CEVs using bring your own media (BYOM), AWS EC2 Windows AMIs with Microsoft Windows Server 2019 (OS)
CEV creation for RDS Custom for SQL Server is supported for the following operating system (OS) and database editions:
- For CEVs using pre-installed media:
- SQL Server 2022 Enterprise, Standard, or Web, with CU9, CU13, CU14-GDR, CU15-GDR, CU16, CU17, CU18, and CU19.
- SQL Server 2019 Enterprise, Standard, or Web, with CU8, CU17, CU18, CU20, CU24, CU26, CU28-GDR, CU29-GDR, CU30, and CU32.
- For CEVs using bring your own media (BYOM):
- SQL Server 2022 Enterprise, Standard, or Developer, with CU9, CU13, CU14-GDR, CU15-GDR, CU16, CU17, CU18, and CU19.
- SQL Server 2019 Enterprise, Standard, or Developer, with CU8, CU17, CU18, CU20, CU24, CU26, CU28-GDR, CU29-GDR, CU30, and CU32.
- For CEVs using pre-installed media or bring your own media (BYOM), Windows Server 2019 is the only supported OS.
For more information, see AWS Windows AMI version history.
Requirements for RDS Custom for SQL Server CEVs
The following requirements apply to creating a CEV for RDS Custom for SQL Server:
- The AMI used to create a CEV must be based on an OS and database configuration supported by RDS Custom for SQL Server. For more information on supported configurations, seeRequirements and limitations for Amazon RDS Custom for SQL Server.
- The CEV must have a unique name. You can't create a CEV with the same name as an existing CEV.
- You must name the CEV using a naming pattern of SQL Server major version + minor version + customized string. The major version + minor version must match the SQL Server version provided with the AMI. For example, you can name an AMI with SQL Server 2019 CU17 as 15.00.4249.2.my_cevtest.
- You must prepare an AMI using Sysprep. For more information about prepping an AMI using Sysprep, see Create a standardized Amazon Machine Image (AMI) using Sysprep.
- You are responsible for maintaining the life cycle of the AMI. An RDS Custom for SQL Server DB instance created from a CEV doesn't store a copy of the AMI. It maintains a pointer to the AMI that you used to create the CEV. The AMI must exist for an RDS Custom for SQL Server DB instance to remain operable.
Limitations for RDS Custom for SQL Server CEVs
The following limitations apply to custom engine versions with RDS Custom for SQL Server:
- You can't delete a CEV if there are resources, such as DB instances or DB snapshots, associated with it.
- To create an RDS Custom for SQL Server DB instance, a CEV must have a status of
pending-validation,available,failed, orvalidating. You can't create an RDS Custom for SQL Server DB instance using a CEV if the CEV status isincompatible-image-configuration. - To modify a RDS Custom for SQL Server DB instance to use a new CEV, the CEV must have a status of
available. - You can't create an AMI or CEV from an existing RDS Custom for SQL Server DB instance.
- You can't modify an existing CEV to use a different AMI. However, you can modify an RDS Custom for SQL Server DB instance to use a different CEV. For more information, see Modifying an RDS Custom for SQL Server DB instance.
- Encrypting an AMI or CEV with a customer-managed KMS key different than the KMS key provided during DB instance creation is not supported.
- Cross-Region copy of CEVs isn't supported.
- Cross-account copy of CEVs isn't supported.
- You can't restore or recover a CEV after you delete it. However, you can create a new CEV from the same AMI.
- A RDS Custom for SQL Server DB instance stores your SQL Server database files in the _D:\_drive. The AMI associated with a CEV should store the Microsoft SQL Server system database files in the C:\ drive.
- An RDS Custom for SQL Server DB instance retains your configuration changes made to SQL Server. Any configuration changes to the OS on a running RDS Custom for SQL Server DB instance created from a CEV aren't retained. If you need to make a permanent configuration change to the OS and have it retained as your new baseline configuration, create a new CEV and modify the DB instance to use the new CEV.
Important
Modifying an RDS Custom for SQL Server DB instance to use a new CEV is an offline operation. You can perform the modification immediately or schedule it to occur during a weekly maintenance window.
- When you modify a CEV, Amazon RDS doesn't push those modifications to any associated RDS Custom for SQL Server DB instances. You must modify each RDS Custom for SQL Server DB instance to use the new or updated CEV. For more information, see Modifying an RDS Custom for SQL Server DB instance.
Important
If an AMI used by a CEV is deleted, any modifications that may require host replacement, for example, scale compute, will fail. The RDS Custom for SQL Server DB instance will then be placed outside of the RDS support perimeter. We recommend that you avoid deleting any AMI that's associated to a CEV.