IAM tutorial: Define permissions to access AWS resources based on tags (original) (raw)
Attribute-based access control (ABAC) is an authorization strategy that defines permissions based on attributes. In AWS, these attributes are called tags. You can attach tags to IAM resources, including IAM entities (users or roles) and to AWS resources. You can define policies that use tag condition keys to grant permissions to your principals based on their tags. When you use tags to control access to your AWS resources, you allow your teams and resources to grow with fewer changes to AWS policies. ABAC policies are more flexible than traditional AWS policies, which require you to list each individual resource. For more information about ABAC and its advantage over traditional policies, see Define permissions based on attributes with ABAC authorization.
Note
You must pass a single value for each session tag. AWS Security Token Service does not support multi-valued session tags.
Topics
- Tutorial overview
- Prerequisites
- Step 1: Create test users
- Step 2: Create the ABAC policy
- Step 3: Create roles
- Step 4: Test creating secrets
- Step 5: Test viewing secrets
- Step 6: Test scalability
- Step 7: Test updating and deleting secrets
- Summary
- Related resources
- IAM tutorial: Use SAML session tags for ABAC
Tutorial overview
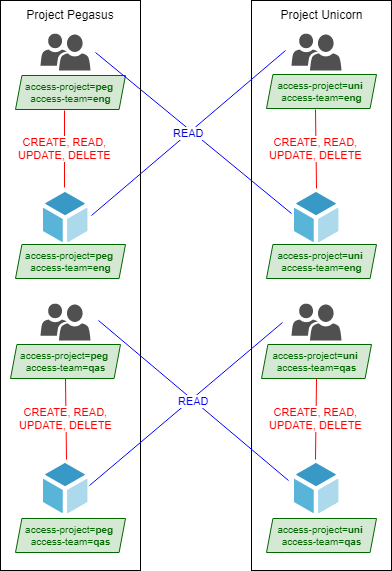
This tutorial shows how to create and test a policy that allows IAM roles with principal tags to access resources with matching tags. When a principal makes a request to AWS, their permissions are granted based on whether the principal and resource tags match. This strategy allows individuals to view or edit only the AWS resources required for their jobs.
Scenario
Assume that you're a lead developer at a large company named Example Corporation, and you're an experienced IAM administrator. You're familiar with creating and managing IAM users, roles, and policies. You want to ensure that your development engineers and quality assurance team members can access the resources they need. You also need a strategy that scales as your company grows.
You choose to use AWS resource tags and IAM role principal tags to implement an ABAC strategy for services that support it, beginning with AWS Secrets Manager. To learn which services support authorization based on tags, see AWS services that work with IAM. To learn which tagging condition keys you can use in a policy with each service's actions and resources, seeActions, Resources, and Condition Keys for AWS Services. You can configure your SAML-based or web identity provider to pass session tags to AWS. When your employees federate into AWS, their attributes are applied to their resulting principal in AWS. You can then use ABAC to allow or deny permissions based on those attributes. To learn how using session tags with a SAML federated identity differs from this tutorial, see IAM tutorial: Use SAML session tags for ABAC.
Your Engineering and Quality Assurance team members are on either thePegasus or Unicorn project. You choose the following 3-character project and team tag values:
access-project=pegfor thePegasus projectaccess-project=unifor theUnicorn projectaccess-team=engfor the Engineering teamaccess-team=qasfor the Quality Assurance team
Additionally, you choose to require the cost-center cost allocation tag to enable custom AWS billing reports. For more information, see Using Cost Allocation Tags in the_AWS Billing and Cost Management User Guide_.
Summary of key decisions
- Employees sign in with IAM user credentials and then assume the IAM role for their team and project. If your company has its own identity system, you can set up federation to allow employees to assume a role without IAM users. For more information, see IAM tutorial: Use SAML session tags for ABAC.
- The same policy is attached to all of the roles. Actions are allowed or denied based on tags.
- Employees can create new resources, but only if they attach the same tags to the resource that are applied to their role. This ensures that employees can view the resource after they create it. Administrators are no longer required to update policies with the ARN of new resources.
- Employees can read resources owned by their team, regardless of the project.
- Employees can update and delete resources owned by their own team and project.
- IAM administrators can add a new role for new projects. They can create and tag a new IAM user to allow access to the appropriate role. Administrators are not required to edit a policy to support a new project or team member.
In this tutorial, you will tag each resource, tag your project roles, and add policies to the roles to allow the behavior previously described. The resulting policy allows the roles Create, Read, Update, and Delete access to resources that are tagged with the same project and team tags. The policy also allows cross-project Read access for resources that are tagged with the same team.
Prerequisites
To perform the steps in this tutorial, you must already have the following:
- An AWS account that you can sign in to as a user with administrative permissions.
- Your 12-digit account ID, which you use to create the roles in step 3.
To find your AWS account ID number using the AWS Management Console, choose Support on the navigation bar on the upper right, and then choose Support Center. The account number (ID) appears in the navigation pane on the left.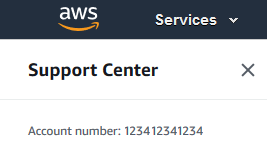
- Experience creating and editing IAM users, roles, and policies in the AWS Management Console. However, if you need help remembering an IAM management process, this tutorial provides links where you can view step-by-step instructions.
Step 1: Create test users
For testing, create four IAM users with permissions to assume roles with the same tags. This makes it easier to add more users to your teams. When you tag the users, they automatically get access to assume the correct role. You don't have to add the users to the trust policy of the role if they work on only one project and team.
- Create the following customer managed policy named
access-assume-role. For more information about creating a JSON policy, see Creating IAM policies.
ABAC policy: Assume any ABAC role, but only when the user and role tags match
The following policy allows a user to assume any role in your account with theaccess- name prefix. The role must also be tagged with the same project, team, and cost center tags as the user.
To use this policy, replace the italicized placeholder text with your account information.
{
    "Version": "2012-10-17",
    "Statement": [
        {
            "Sid": "TutorialAssumeRole",
            "Effect": "Allow",
            "Action": "sts:AssumeRole",
            "Resource": "arn:aws:iam::account-ID-without-hyphens:role/access-*",
            "Condition": {
                "StringEquals": {
                    "iam:ResourceTag/access-project": "${aws:PrincipalTag/access-project}",
                    "iam:ResourceTag/access-team": "${aws:PrincipalTag/access-team}",
                    "iam:ResourceTag/cost-center": "${aws:PrincipalTag/cost-center}"
                }
            }
        }
    ]
}
To scale this tutorial to a large number of users, you can attach the policy to a group and add each user to the group. For more information, see Create IAM groups and Edit users in IAM groups.
2. Create the following IAM users, attach the access-assume-role permissions policy. Make sure you select Provide user access to the AWS Management Console, and then add the following tags.
| User name | User tag key | User tag value |
|---|---|---|
| access-Arnav-peg-eng | access-project access-team cost-center | peg eng 987654 |
| access-Mary-peg-qas | access-project access-team cost-center | peg qas 987654 |
| access-Saanvi-uni-eng | access-project access-team cost-center | uni eng 123456 |
| access-Carlos-uni-qas | access-project access-team cost-center | uni qas 123456 |
Step 2: Create the ABAC policy
Create the following policy named access-same-project-team. You will add this policy to the roles in a later step. For more information about creating a JSON policy, see Creating IAM policies.
For additional policies that you can adapt for this tutorial, see the following pages:
- Controlling access for IAM principals
- Amazon EC2: Allows starting or stopping EC2 instances a user has tagged, programmatically and in the console
- EC2: Start or stop instances based on matching principal and resource tags
- EC2: Start or stop instances based on tags
- IAM: Assume roles that have a specific tag
ABAC Policy: Access Secrets Manager Resources Only When the Principal and Resource Tags Match
The following policy allows principals to create, read, edit, and delete resources, but only when those resources are tagged with the same key-value pairs as the principal. When a principal creates a resource, they must add access-project,access-team, and cost-center tags with values that match the principal's tags. The policy also allows adding optional Name orOwnedBy tags.
{
 "Version": "2012-10-17",
 "Statement": [
     {
         "Sid": "AllActionsSecretsManagerSameProjectSameTeam",
         "Effect": "Allow",
         "Action": "secretsmanager:*",
         "Resource": "*",
         "Condition": {
             "StringEquals": {
                 "aws:ResourceTag/access-project": "${aws:PrincipalTag/access-project}",
                 "aws:ResourceTag/access-team": "${aws:PrincipalTag/access-team}",
                 "aws:ResourceTag/cost-center": "${aws:PrincipalTag/cost-center}"
             },
             "ForAllValues:StringEquals": {
                 "aws:TagKeys": [
                     "access-project",
                     "access-team",
                     "cost-center",
                     "Name",
                     "OwnedBy"
                 ]
             },
             "StringEqualsIfExists": {
                 "aws:RequestTag/access-project": "${aws:PrincipalTag/access-project}",
                 "aws:RequestTag/access-team": "${aws:PrincipalTag/access-team}",
                 "aws:RequestTag/cost-center": "${aws:PrincipalTag/cost-center}"
             }
         }
     },
     {
         "Sid": "AllResourcesSecretsManagerNoTags",
         "Effect": "Allow",
         "Action": [
             "secretsmanager:GetRandomPassword",
             "secretsmanager:ListSecrets"
         ],
         "Resource": "*"
     },
     {
         "Sid": "ReadSecretsManagerSameTeam",
         "Effect": "Allow",
         "Action": [
             "secretsmanager:Describe*",
             "secretsmanager:Get*",
             "secretsmanager:List*"
         ],
         "Resource": "*",
         "Condition": {
             "StringEquals": {
                 "aws:ResourceTag/access-team": "${aws:PrincipalTag/access-team}"
             }
         }
     },
     {
         "Sid": "DenyUntagSecretsManagerReservedTags",
         "Effect": "Deny",
         "Action": "secretsmanager:UntagResource",
         "Resource": "*",
         "Condition": {
             "ForAnyValue:StringLike": {
                 "aws:TagKeys": "access-*"
             }
         }
     },
     {
         "Sid": "DenyPermissionsManagement",
         "Effect": "Deny",
         "Action": "secretsmanager:*Policy",
         "Resource": "*"
     }
 ]
}
What does this policy do?
- The
AllActionsSecretsManagerSameProjectSameTeamstatement allows all of this service's actions on all related resources, but only if the resource tags match the principal tags. By adding"Action": "secretsmanager:*"to the policy, the policy grows as Secrets Manager grows. If Secrets Manager adds a new API operation, you are not required to add that action to the statement. The statement implements ABAC using three condition blocks. The request is allowed only if all three blocks return true.- The first condition block of this statement returns true if the specified tag keys are present on the resource, and their values match the principal's tags. This block returns false for mismatched tags, or for actions that don't support resource tagging. To learn which actions are not allowed by this block, see Actions, Resources, and Condition Keys for AWS Secrets Manager. That page shows that actions performed on the Secret resource type support the
secretsmanager:ResourceTag/tag-keycondition key. Some Secrets Manager actions don't support that resource type, includingGetRandomPasswordandListSecrets. You must create additional statements to allow those actions. - The second condition block returns true if every tag key passed in the request is included in the specified list. This is done using
ForAllValueswith theStringEqualscondition operator. If no keys or a subset of the set of keys is passed, then the condition returns true. This allowsGet*operations that do not allow passing tags in the request. If the requester includes a tag key that is not in the list, the condition returns false. Every tag key that is passed in the request must match a member of this list. For more information, see Set operators for multivalued context keys. - The third condition block returns true if the request supports passing tags, if all three of the tags are present, and if they match the principal tag values. This block also returns true if the request does not support passing tags. This is thanks to ...IfExists in the condition operator. The block returns false if there is no tag passed during an action that supports it, or if the tag keys and values don't match.
- The first condition block of this statement returns true if the specified tag keys are present on the resource, and their values match the principal's tags. This block returns false for mismatched tags, or for actions that don't support resource tagging. To learn which actions are not allowed by this block, see Actions, Resources, and Condition Keys for AWS Secrets Manager. That page shows that actions performed on the Secret resource type support the
- The
AllResourcesSecretsManagerNoTagsstatement allows theGetRandomPasswordandListSecretsactions that are not allowed by the first statement. - The
ReadSecretsManagerSameTeamstatement allows read-only operations if the principal is tagged with the same access-team tag as the resource. This is allowed regardless of the project or cost-center tag. - The
DenyUntagSecretsManagerReservedTagsstatement denies requests to remove tags with keys that begin with "access-" from Secrets Manager. These tags are used to control access to resources, therefore removing tags might remove permissions. - The
DenyPermissionsManagementstatement denies access to create, edit, or delete Secrets Manager resource-based policies. These policies could be used to change the permissions of the secret.
Important
This policy uses a strategy to allow all actions for a service, but explicitly deny permissions-altering actions. Denying an action overrides any other policy that allows the principal to perform that action. This can have unintended results. As a best practice, use explicit denies only when there is no circumstance that should allow that action. Otherwise, allow a list of individual actions, and the unwanted actions are denied by default.
Step 3: Create roles
Create the following IAM roles and attach theaccess-same-project-team policy that you created in the previous step. For more information about creating IAM roles, see Create a role to give permissions to an IAM user. If you choose to use federation instead of IAM users and roles, see IAM tutorial: Use SAML session tags for ABAC.
| Job function | Role name | Role tags | Role description |
|---|---|---|---|
| Project Pegasus Engineering | access-peg-engineering | access-project = peg access-team = eng cost-center = 987654 | Allows engineers to read all engineering resources and create and manage Pegasus engineering resources. |
| Project Pegasus Quality Assurance | access-peg-quality-assurance | access-project = peg access-team = qas cost-center = 987654 | Allows the QA team to read all QA resources and create and manage all Pegasus QA resources. |
| Project Unicorn Engineering | access-uni-engineering | access-project= uni access-team = eng cost-center = 123456 | Allows engineers to read all engineering resources and create and manage Unicorn engineering resources. |
| Project Unicorn Quality Assurance | access-uni-quality-assurance | access-project = uni access-team = qas cost-center = 123456 | Allows the QA team to read all QA resources and create and manage all Unicorn QA resources. |
Step 4: Test creating secrets
The permissions policy attached to the roles allows the employees to create secrets. This is allowed only if the secret is tagged with their project, team, and cost center. Confirm that your permissions are working as expected by signing in as your users, assuming the correct role, and testing activity in Secrets Manager.
To test creating a secret with and without the required tags
- In your main browser window, remain signed in as the administrator user so that you can review users, roles, and policies in IAM. Use a browser incognito window or separate browser for your testing. There, sign in as the
access-Arnav-peg-engIAM user and open the Secrets Manager console athttps://console.aws.amazon.com/secretsmanager/. - Attempt to switch to the
access-uni-engineeringrole.
This operation fails because theaccess-projectandcost-centertag values do not match for theaccess-Arnav-peg-enguser andaccess-uni-engineeringrole.
For more information about switching roles in the AWS Management Console, see Switch from a user to an IAM role (console) - Switch to the
access-peg-engineeringrole. - Store a new secret using the following information. To learn how to store a secret, see Creating a Basic Secret in the AWS Secrets Manager User Guide.
Important
Secrets Manager displays alerts that you don't have permissions for additional AWS services that work with Secrets Manager. For example, to create credentials for an Amazon RDS database, you must have permission to describe RDS instances, RDS clusters, and Amazon Redshift clusters. You can ignore these alerts since you aren't using these specific AWS services in this tutorial.
- In the Select secret type section, chooseOther type of secrets. In the two text boxes, enter
test-access-keyandtest-access-secret. - Enter
test-access-peg-engfor the Secret name field. - Add different tag combinations from the following table and view the expected behavior.
- Choose Store to attempt to create the secret. When the storage fails, return to the previous Secrets Manager console pages and use the next tag set from the following table. The last tag set is allowed and will successfully create the secret.
The following table shows ABAC tag combinations for thetest-access-peg-engrole.access-project Tag value access-team Tag value cost-center Tag value Additional tags Expected behavior (none) (none) (none) (none) Denied because the access-project tag value does not match the role's value of peg. uni eng 987654 (none) Denied because the access-project tag value does not match the role's value of peg.
| peg | qas | 987654 | (none) | Denied because the access-team tag value does not match the role's value of eng. |
| peg | eng | 123456 | (none) | Denied because the cost-center tag value does not match the role's value of 987654. |
| peg | eng | 987654 | Owner = Jane | Denied because the additional tag owner is not allowed by the policy, even though all three required tags are present and their values match the role's values. |
| peg | eng | 987654 | Name = Jane | Allowed because all three required tags are present and their values match the role's values. You are also allowed to include the optional Name tag. |
5. Sign out and repeat the first three steps of this procedure for each of the following roles and tag values. In the fourth step in this procedure, test any set of missing tags, optional tags, disallowed tags, and invalid tag values that you choose. Then use the required tags to create a secret with the following tags and name.
| User name | Role name | Secret name | Secret tags |
|---|---|---|---|
| access-Mary-peg-qas | access-peg-quality-assurance | test-access-peg-qas | access-project = peg access-team = qas cost-center = 987654 |
| access-Saanvi-uni-eng | access-uni-engineering | test-access-uni-eng | access-project = uni access-team = eng cost-center = 123456 |
| access-Carlos-uni-qas | access-uni-quality-assurance | test-access-uni-qas | access-project = uni access-team = qas cost-center = 123456 |
Step 5: Test viewing secrets
The policy that you attached to each role allows the employees to view any secrets tagged with their team name, regardless of their project. Confirm that your permissions are working as expected by testing your roles in Secrets Manager.
To test viewing a secret with and without the required tags
- Sign in as one of the following IAM users:
access-Arnav-peg-engaccess-Mary-peg-qasaccess-Saanvi-uni-engaccess-Carlos-uni-qas
- Switch to the matching role:
access-peg-engineeringaccess-peg-quality-assuranceaccess-uni-engineeringaccess-uni-quality-assurance
For more information about switching roles in the AWS Management Console, see Switch from a user to an IAM role (console).
- In the navigation pane on the left, choose the menu icon to expand the menu and then choose Secrets.
- You should see all four secrets in the table, regardless of your current role. This is expected because the policy named
access-same-project-teamallows thesecretsmanager:ListSecretsaction for all resources. - Choose the name of one of the secrets.
- On the details page for the secret, your role's tags determine whether you can view the page content. Compare the name of your role to the name of your secret. If they share the same team name, then the
access-teamtags match. If they don't match, then access is denied.
The following table shows ABAC secret viewing behavior for each role.Role name Secret name Expected behavior access-peg-engineering test-access-peg-eng Allowed test-access-peg-qas Denied test-access-uni-eng Allowed test-access-uni-qas Denied access-peg-quality-assurance test-access-peg-eng Denied test-access-peg-qas Allowed test-access-uni-eng Denied test-access-uni-qas Allowed access-uni-engineering test-access-peg-eng Allowed test-access-peg-qas Denied test-access-uni-eng Allowed test-access-uni-qas Denied access-uni-quality-assurance test-access-peg-eng Denied test-access-peg-qas Allowed test-access-uni-eng Denied test-access-uni-qas Allowed - From the breadcrumbs at the top of the page, choose Secrets to return to the list of secrets. Repeat the steps in this procedure using different roles to test whether you can view each of the secrets.
Step 6: Test scalability
An important reason for using attribute-based access control (ABAC) over role-based access control (RBAC) is scalability. As your company adds new projects, teams, or people to AWS, you don't need to update your ABAC-driven policies. For example, assume that Example Company is funding a new project, code named Centaur. An engineer named Saanvi Sarkar will be the lead engineer for Centaur while continuing to work on the Unicorn project. Saanvi will also review work for the Peg project. There are also several newly hired engineers, including Nikhil Jayashankar, who will work on only theCentaur project.
To add the new project to AWS
- Sign in as the IAM administrator user and open the IAM console at https://console.aws.amazon.com/iam/.
- In the navigation pane on the left, choose Roles and add an IAM role named
access-cen-engineering. Attach theaccess-same-project-teampermissions policy to the role and add the following role tags:access-project=cenaccess-team=engcost-center=101010
- In the navigation pane on the left, choose Users.
- Add a new user named
access-Nikhil-cen-eng, attach the policy namedaccess-assume-role, and add the following user tags.access-project=cenaccess-team=engcost-center=101010
- Use the procedures in Step 4: Test creating secrets and Step 5: Test viewing secrets. In another browser window, test that Nikhil can create only Centaur engineering secrets, and that he can view all engineering secrets.
- In the main browser window where you signed in as the administrator, choose the user
access-Saanvi-uni-eng. - On the Permissions tab, remove theaccess-assume-role permissions policy.
- Add the following inline policy named
access-assume-specific-roles. For more information about adding an inline policy to a user, see To embed an inline policy for a user or role (console).
ABAC policy: Assume only specific roles
This policy allows Saanvi to assume the engineering roles for thePegasus and Centaur projects. It is necessary to create this custom policy because IAM does not support multivalued tags. You can't tag Saanvi's user with access-project =peg and access-project = cen. Additionally, the AWS authorization model can't match both values. For more information, see Rules for tagging in IAM and AWS STS. Instead, you must manually specify the two roles that she can assume.
To use this policy, replace the italicized placeholder text with your account information.
{
    "Version": "2012-10-17",
    "Statement": [
        {
            "Sid": "TutorialAssumeSpecificRoles",
            "Effect": "Allow",
            "Action": "sts:AssumeRole",
            "Resource": [
                "arn:aws:iam::account-ID-without-hyphens:role/access-peg-engineering",
                "arn:aws:iam::account-ID-without-hyphens:role/access-cen-engineering"
            ]
        }
    ]
} - Use the procedures in Step 4: Test creating secrets and Step 5: Test viewing secrets. In another browser window, confirm that Saanvi can assume both roles. Check that she can create secrets for only her project, team, and cost center, depending on the role's tags. Also confirm that she can view details about any secrets owned by the engineering team, including the ones that she just created.
Step 7: Test updating and deleting secrets
The access-same-project-team policy that is attached to the roles allows the employees to update and delete any secrets tagged with their project, team, and cost center. Confirm that your permissions are working as expected by testing your roles in Secrets Manager.
To test updating and deleting a secret with and without the required tags
- Sign in as one of the following IAM users:
access-Arnav-peg-engaccess-Mary-peg-qasaccess-Saanvi-uni-engaccess-Carlos-uni-qasaccess-Nikhil-cen-eng
- Switch to the matching role:
access-peg-engineeringaccess-peg-quality-assuranceaccess-uni-engineeringaccess-peg-quality-assuranceaccess-cen-engineering
For more information about switching roles in the AWS Management Console, see Switch from a user to an IAM role (console).
- For each role, try to update the secret description and then try to delete the following secrets. For more information, see Modifying a Secret and Deleting and Restoring a Secret in the AWS Secrets Manager User Guide.
The following table shows ABAC secret updating and deleting behavior for each role.Role name Secret name Expected behavior access-peg-engineering test-access-peg-eng Allowed test-access-uni-eng Denied test-access-uni-qas Denied access-peg-quality-assurance test-access-peg-qas Allowed test-access-uni-eng Denied access-uni-engineering test-access-uni-eng Allowed test-access-uni-qas Denied access-peg-quality-assurance test-access-uni-qas Allowed
Summary
You've now successfully completed all of the steps necessary to use tags for attribute-based access control (ABAC). You've learned how to define a tagging strategy. You applied that strategy to your principals and resources. You created and applied a policy that enforces the strategy for Secrets Manager. You also learned that ABAC scales easily when you add new projects and team members. As a result, you are able to sign in to the IAM console with your test roles and experience how to use tags for ABAC in AWS.
Note
You added policies that allow actions only under specific conditions. If you apply a different policy to your users or roles that has broader permissions, then the actions might not be limited to require tagging. For example, if you give a user full administrative permissions using the AdministratorAccess AWS managed policy, then these policies don't restrict that access. For more information about how permissions are determined when multiple policies are involved, see How AWS enforcement code logic evaluates requests to allow or deny access.
For related information, see the following resources:
- Define permissions based on attributes with ABAC authorization
- AWS global condition context keys
- Create a role to give permissions to an IAM user
- Tags for AWS Identity and Access Management resources
- Controlling access to AWS resources using tags
- Switch from a user to an IAM role (console)
- IAM tutorial: Use SAML session tags for ABAC
To learn how to monitor the tags in your account, see Monitor tag changes on AWS resources with serverless workflows and Amazon CloudWatch Events.