Switch between Python environments - Visual Studio (Windows) (original) (raw)
All code in a Python project runs within the context of a specific environment. These environments can be a global Python environment, an Anaconda environment, a virtual environment, or a conda environment. Visual Studio uses the Python environment for debugging, import and member completions, and syntax checking. The environment is used for any tasks that require language services that are specific to the Python version and a set of installed packages.
In Visual Studio, you can create multiple environments for a project and switch between them according to your specific development needs. All new Python projects are initially configured to use the default global environment. You can see the environments for your project under the Python Environments node in Solution Explorer:

Prerequisites
- Visual Studio. To install the product, follow the steps in Install Visual Studio.
- You can only switch between existing environments. If you don't have an environment other than the default global environment, see the following sections about working with virtual environments. For more information, see Create and manage Python environments in Visual Studio.
Switch the current project environment
In Visual Studio, you can change the active (current) environment for a Python project in Solution Explorer or from the toolbar by using the Add Environment feature.
- Start the Add Environment process:
- In Solution Explorer, right-click the Python Environments node for your project and select Add Environment.
- Or, on the Python toolbar, select Add Environment from the Environment dropdown menu.

- In the Add Environment dialog, select the Existing environment tab. Expand the Environment dropdown list and choose your desired environment, then select Add.


Use virtual environments
A virtual environment is a unique combination of a specific Python interpreter and a specific set of libraries that's different from other global and conda environments. A virtual environment is specific to a project and is maintained in a project subfolder. The folder contains the environment's installed libraries along with a pyvenv.cfg file that specifies the path to the environment's base interpreter on the file system. (A virtual environment doesn't contain a copy of the interpreter, only a link to it.)
One benefit to using a virtual environment is that as you develop your project over time, the virtual environment always reflects the exact dependencies of your project. This behavior is different from a shared global environment, which contains any number of libraries whether you use them in your project or not. From a virtual environment, you can easily create a requirements.txt file, which is used to reinstall package dependencies on other development or production computers. For more information, see Manage required packages with requirements.txt.
When you open a project in Visual Studio that contains a requirements.txt file, Visual Studio automatically gives you the option to recreate the virtual environment. On computers where Visual Studio isn't installed, you can use the pip install -r requirements.txt command to restore the necessary packages.
Because a virtual environment contains a hard-coded path to the base Python interpreter, and you can recreate the environment by using the requirements.txt file, you typically omit the environment subfolder from source control. After you add a virtual environment to your project, it appears in the Python Environments window. You can then activate it like any other environment and manage its packages.
Create a virtual environment
You can create a new virtual environment directly in Visual Studio as follows:
- Start the Add Environment process:
- In Solution Explorer, right-click the Python Environments node for your project and select Add Environment.
- Or, on the Python toolbar, select Add Environment from the Environment dropdown menu.
- In the Add Environment dialog, select the Virtual environment tab:

- Configure the required fields:
Required field Description Project Identify the project in which to create the environment. Name Provide the name for the new virtual environment. Base interpreter Specify the base language interpreter for the virtual environment. Location The system assigns the default location for the virtual environment. To change the location, select the Change virtual environment location link, browse to the location and choose Select folder. - Configure any desired optional fields:
Optional field Description Install packages from file Specify the path to a requirements.txt file to add packages to the virtual environment. Enter the location and name of the file or browse (...) to the location and select the file. Set as current environment Activate the new environment in the selected project after the environment is created. Set as default environment for new projects Automatically set and activate the environment in any new projects created in Visual Studio. This setting is also available via the Make this the default environment for new projects option in the Python Environments window. When you use this option, place the virtual environment in a location outside of a specific project. View in Python Environments window Specify whether to show the Python Environments window after you create the new environment. Make this environment available globally Specify whether the virtual environment should also act as a global environment. When you use this option, place the virtual environment in a location outside of a specific project. - Select Create to finalize the virtual environment.

Visual Studio displays a progress bar while it configures the environment and downloads any necessary packages.
After the process completes, Visual Studio activates the new virtual environment and adds it to the Python Environments node in Solution Explorer. The environment is also available in the Python Environments window for the containing project.
Activate an environment
Follow these steps to activate an existing environment for a project:
- In Solution Explorer, expand the Python Environments node for your project, and locate the environment you want to use.
- Right-click the environment, and select Activate Environment.

If Visual Studio detects a requirements.txt file in that environment, it asks whether to install those packages.
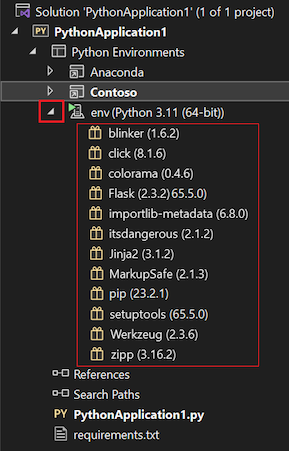
After Visual Studio activates the environment, the name of the active environment is shown in a bold font in Solution Explorer: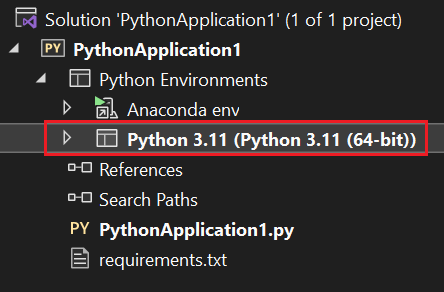

Remove a virtual environment
Follow these steps to remove an existing environment for a project:
- In Solution Explorer, right-click the virtual environment and select Remove.
- Visual Studio asks whether you want to remove or delete the virtual environment.
- Select Remove to make the environment unavailable to the project but leave it on the file system.
- Select Delete to both remove the environment from the project and delete it from the file system. The base interpreter is unaffected.
View and manage installed packages
In Solution Explorer, you can view and manage the packages installed in an environment. These packages can be imported and used in your code when the environment is active.
- To quickly view the packages installed in an environment, expand the environment node under the Python Environments node for your project in Solution Explorer:
- To install new packages or manage existing packages, right-click the environment node and select Manage Python Packages. You can also use the package button on the Python toolbar:

The Python Environments window opens and shows the installed packages for the selected environment on the Packages (PyPI) tab:

In Visual Studio, packages and dependencies for most environments are downloaded from the Python Package Index (PyPI), where you can also search for available packages. Visual Studio's status bar and output window show information about the install. - To uninstall (remove) a package, locate the package in the list and select the x icon at the right.
- To look for updated versions of a package or other packages, enter a search term (usually a package name):
Visual Studio displays matching packages. In this example, the search is for packages that match the term blinker.
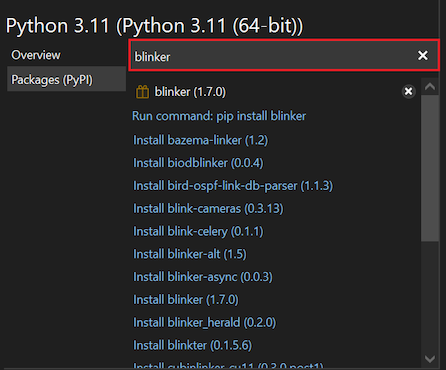
Visual Studio displays a list of matching results as active command links.- The first command refreshes the package to the most current version and current dependencies. The command is similar to
Run command: pip install <package-name>. If you select Enter after your search term, Visual Studio automatically runs this first command. - The other links are for commands that install a specific package, version, or dependency, such as
Install blinker-async (0.0.3). To run one of these commands, select the link.
- The first command refreshes the package to the most current version and current dependencies. The command is similar to


Considerations about package installation
When you work with packages in Visual Studio, keep in mind the following considerations:
- Keep in mind that the displayed entries for packages might not be accurate in terms of the most current version or availability. The installation and uninstallation information shown for a package might not be reliable or available.
- Visual Studio uses the pip package manager if available, and downloads and installs it when required. Visual Studio can also use the easy_install package manager. Packages installed by using the
piporeasy_installcommands from the command line are also displayed. - A common situation where pip fails to install a package is when the package includes source code for native components in *.pyd files. Without the required version of Visual Studio installed, pip can't compile these components. The error message displayed in this situation is error: Unable to find vcvarsall.bat. The
easy_installcommand is often able to download precompiled binaries, and you can download a suitable compiler for older versions of Python from https://python.en.uptodown.com/windows/versions. For more information, see How to deal with the pain of "unable to find vcvarsallbat" on the Python tools team blog. - The conda package manager generally uses
https://repo.continuum.io/pkgs/as the default channel, but other channels are available. For more information, see Manage Channels (docs.conda.io). - Visual Studio doesn't currently support using the
condacommand to install packages into a conda environment. Use thecondacommand from the command line instead.