Deploying HuggingFace models — NVIDIA Triton Inference Server (original) (raw)
Note: If you are new to the Triton Inference Server, it is recommended to review Part 1 of the Conceptual Guide. This tutorial assumes basic understanding about the Triton Inference Server.
Developers often work with open source models. HuggingFace is a popular source of many open source models. The discussion in this guide will focus on how a user can deploy almost any model from HuggingFace with the Triton Inference Server. For this example, the ViT model available on HuggingFace is being used.
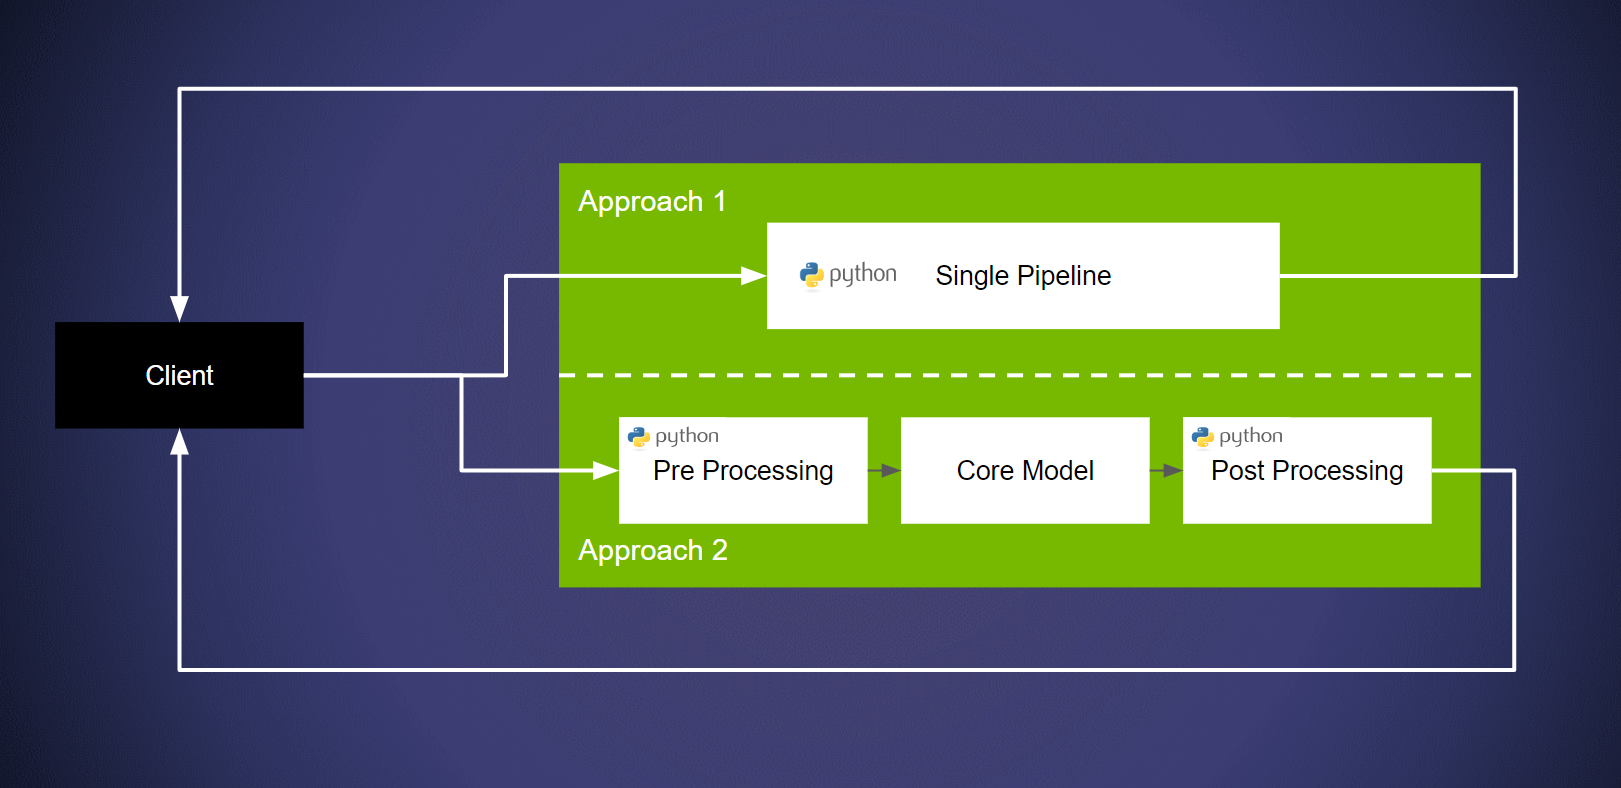
There are two primary methods of deploying a model pipeline on the Triton Inference Server:
- Approach 1: Deploy the pipeline without explicitly breaking apart model from a pipeline. The core advantage of this approach is that users can quickly deploy their pipeline. This can be achieved with the use of Triton’s “Python Backend”. Refer this example for more information. In summary, we deploy the model/pipeline using the Python Backend.
- Approach 2: Break apart the pipeline, use a different backends for pre/post processing and deploying the core model on a framework backend. The advantage in this case is that running the core network on a dedicated framework backend provides higher performance. Additionally, many framework specific optimizations can be leveraged. See Part 4 of the conceptual guide for more information. This is achieved with Triton’s Ensembles. An explanation for the same can be found in Part 5 of the Conceptual Guide. Refer to the documentation for more information. In summary, we build an ensemble with a preprocessing step and the exported model.
Examples#
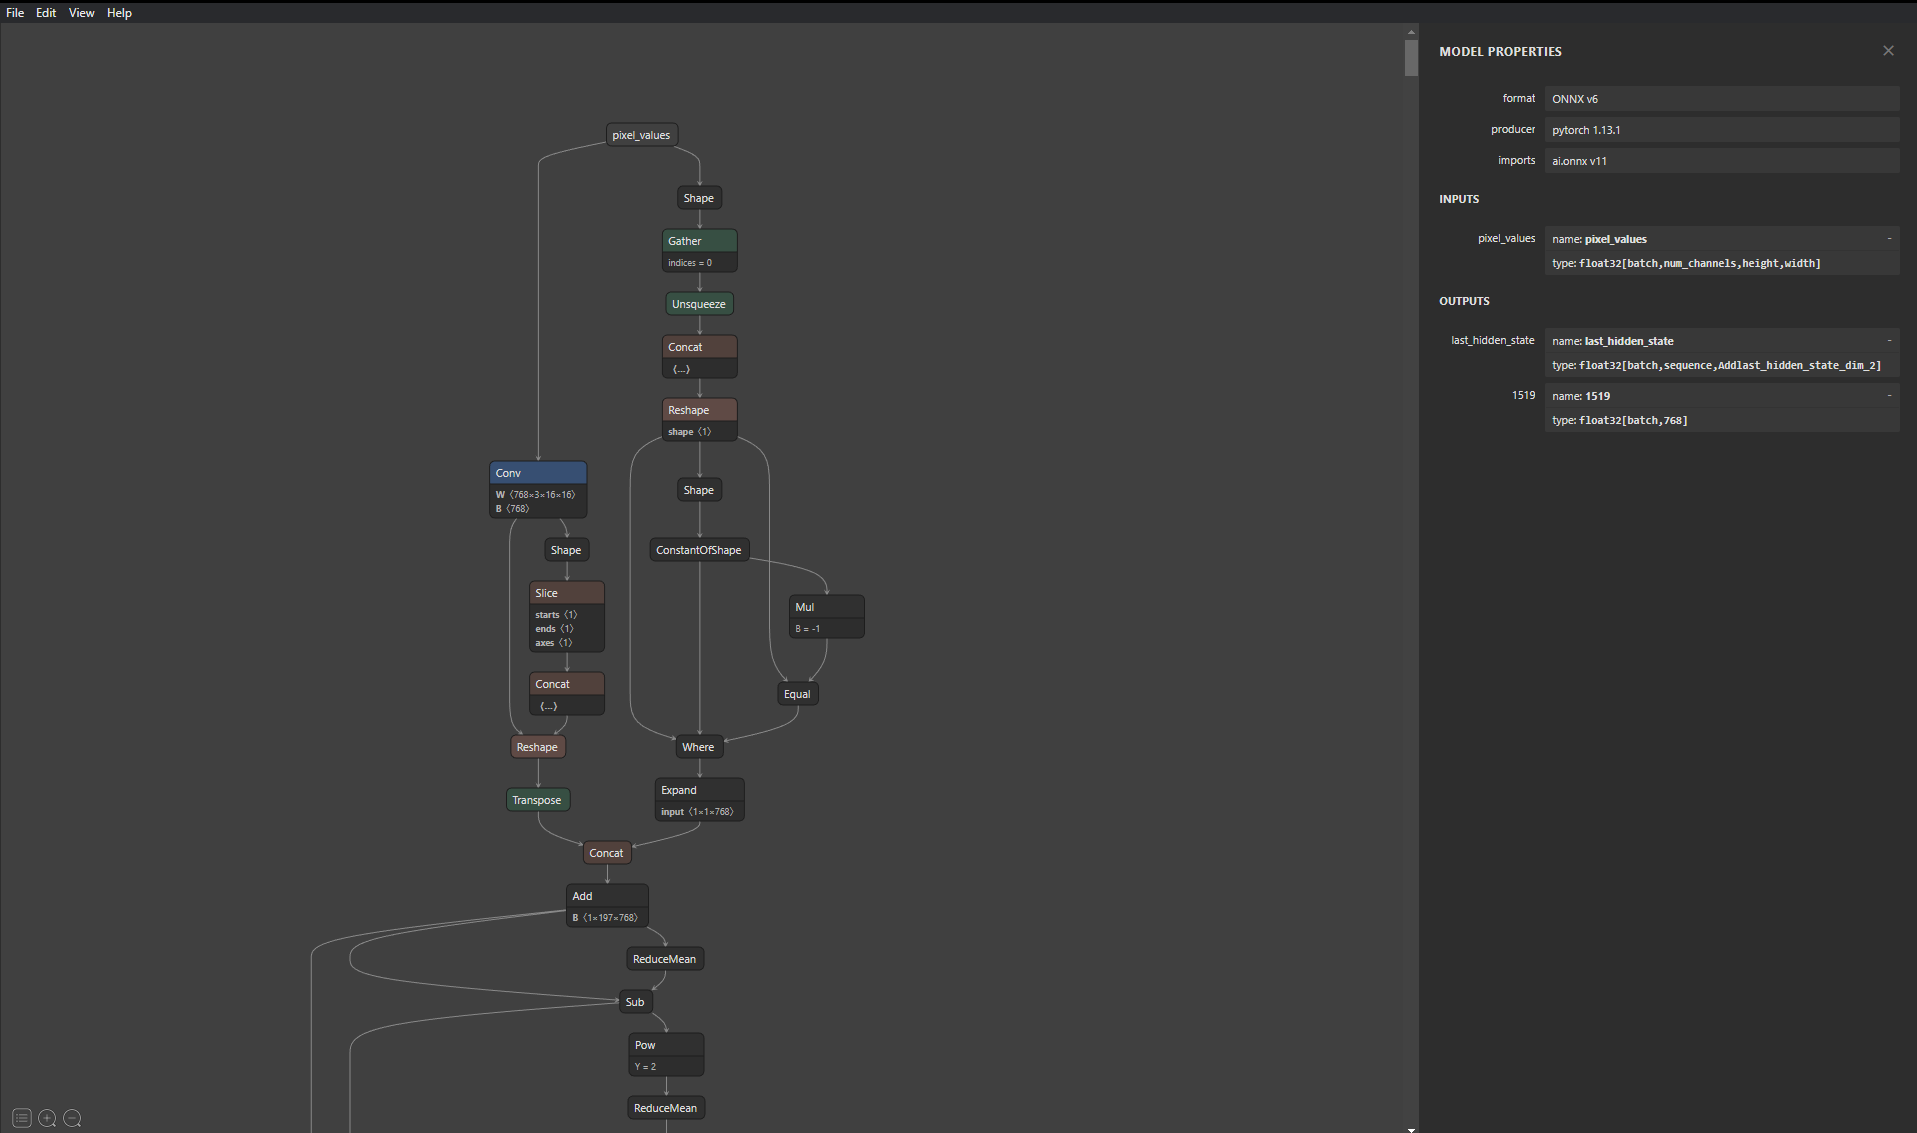
For the purposes of this explanation, the ViT model(Link to HuggingFace) is being used. This specific ViT model doesn’t have an application head (like image classification) but HuggingFace provides ViT models with different heads which users can utilize. A good practice while deploying models is to understand the and explore the structure of the model if you are unfamiliar with it. An easy way to see the structure with a graphical interface is by using tools like Netron. While Triton autogenerates configuration files for the models, the users may still require names of the input and output layers to build clients/model ensembles for which we can use this tool.
Deploying on the Python Backend (Approach 1)#
Making use of Triton’s python backend requires users to define up to three functions of the TritonPythonModel class:
initialize(): This function runs when Triton loads the model. It is recommended to use this function to initialize/load any models and/or data objects. Defining this function is optional.
def initialize(self, args): self.feature_extractor = ViTFeatureExtractor.from_pretrained('google/vit-base-patch16-224-in21k') self.model = ViTModel.from_pretrained("google/vit-base-patch16-224-in21k")
execute(): This function is executed upon every request. This can be used to house all the required pipeline logic.
def execute(self, requests): responses = [] for request in requests: inp = pb_utils.get_input_tensor_by_name(request, "image") input_image = np.squeeze(inp.as_numpy()).transpose((2,0,1)) inputs = self.feature_extractor(images=input_image, return_tensors="pt")
    outputs = self.model(**inputs)

    # Sending results
    inference_response = pb_utils.InferenceResponse(output_tensors=[
        pb_utils.Tensor(
            "label",
            outputs.last_hidden_state.numpy()
        )
    ])
    responses.append(inference_response)
return responsesfinalize(): This function is executed when Triton unloads the model. It can be used to free any memory, or any other operations required to safely unload the model. Defining this function is optional.
To run this example open two terminals and use the following commands:
- Terminal 1: This terminal will be used to launch the Triton Inference Server.
Pick the pre-made model repository
mv python_model_repository model_repository
Pull and run the Triton container & replace yy.mm
with year and month of release. Eg. 23.05
docker run --gpus=all -it --shm-size=256m --rm -p8000:8000 -p8001:8001 -p8002:8002 -v PWD:/workspace/−v{PWD}:/workspace/ -v PWD:/workspace/−v{PWD}/model_repository:/models nvcr.io/nvidia/tritonserver:yy.mm-py3 bash
Install dependencies
pip install torch torchvision pip install transformers pip install Image
Launch the server
tritonserver --model-repository=/models
- Terminal 2: This terminal will be used to run the client.
Pull & run the container
docker run -it --net=host -v ${PWD}:/workspace/ nvcr.io/nvidia/tritonserver:yy.mm-py3-sdk bash
Run the client
python3 client.py --model_name "python_vit"
Deploying using a Triton Ensemble (Approach 2)#
Before the specifics around deploying the models can be discussed, the first step is to download and export the model. It is recommended to run the following inside the PyTorch container available on NGC. If this is your first try at setting up a model ensemble in Triton, it is highly recommended to review this guide before proceeding. The key advantages of breaking down the pipeline is improved performance and access to a multitude of acceleration options. Explore Part-4 of the conceptual guide for details about model acceleration.
Pull the PyTorch Container from NGC
docker run -it --gpus=all -v ${PWD}:/workspace nvcr.io/nvidia/pytorch:23.05-py3
Install dependencies
pip install transformers pip install transformers[onnx]
Export the model
python -m transformers.onnx --model=google/vit-base-patch16-224 --atol=1e-3 onnx/vit
With the model downloaded, set up the model repository in the structure described below. The basic structure of the model repository along with the required configuration files are available in ensemble_model_repository.
model_repository/
|-- ensemble_model
| |-- 1
| -- config.pbtxt |-- preprocessing | |-- 1 | | -- model.py
| -- config.pbtxt -- vit
-- 1 -- model.onnx
In this approach, there are three points to consider.
- Preprocessing: The feature extraction step for ViT is done on a python backend. The implementation details for this step are same as the process followed in the section above.
- The ViT model: Simply place the model in the repository as described above. The Triton Inference Server will auto generate the required configurations files. If you wish to see the generated config, append
--log-verbose=1while launching the server. - Ensemble Configuration: In this configuration we map the input and output layers of the two pieces in the ensemble,
preprocessingwhich is handled on the python backend, and the ViT model which is deployed on the ONNX backend.
To run this example, similar to the previous flow, make use of two terminals:
- Terminal 1: This terminal will be used to launch the Triton Inference Server.
Pick the pre-made model repository and add the model
mv ensemble_model_repository model_repository mkdir -p model_repository/vit/1 mv vit/model.onnx model_repository/vit/1/ mkdir model_repository/ensemble_model/1
Pull and run the Triton container & replace yy.mm
with year and month of release. Eg. 23.05
docker run --gpus=all -it --shm-size=256m --rm -p8000:8000 -p8001:8001 -p8002:8002 -v PWD:/workspace/−v{PWD}:/workspace/ -v PWD:/workspace/−v{PWD}/model_repository:/models nvcr.io/nvidia/tritonserver:yy.mm-py3 bash
Install dependencies
pip install torch torchvision torchaudio pip install transformers pip install Image
Launch the server
tritonserver --model-repository=/models
- Terminal 2: This terminal will be used to run the client.
Pull & run the container
docker run -it --net=host -v ${PWD}:/workspace/ nvcr.io/nvidia/tritonserver:yy.mm-py3-sdk bash
Run the client
python3 client.py --model_name "ensemble_model"
Summary#
In summary, there are two methods in which most HuggingFace models can be deployed, either deploy the entire pipeline on a python backend, or construct and ensemble.