Data Structures (original) (raw)
DataArray#
xarray.DataArray is xarray’s implementation of a labeled, multi-dimensional array. It has several key properties:
values: a numpy.ndarray ornumpy-like array holding the array’s valuesdims: dimension names for each axis (e.g.,('x', 'y', 'z'))coords: a dict-like container of arrays (coordinates) that label each point (e.g., 1-dimensional arrays of numbers, datetime objects or strings)attrs: dict to hold arbitrary metadata (attributes)
Xarray uses dims and coords to enable its core metadata aware operations. Dimensions provide names that xarray uses instead of the axis argument found in many numpy functions. Coordinates enable fast label based indexing and alignment, building on the functionality of the index found on a pandasDataFrame or Series.
DataArray objects also can have a name and can hold arbitrary metadata in the form of their attrs property. Names and attributes are strictly for users and user-written code: xarray makes no attempt to interpret them, and propagates them only in unambiguous cases. For reading and writing attributes xarray relies on the capabilities of the supported backends. (see FAQ, What is your approach to metadata?).
Creating a DataArray#
The DataArray constructor takes:
data: a multi-dimensional array of values (e.g., a numpy ndarray, a numpy-like array, Series,DataFrame orpandas.Panel)coords: a list or dictionary of coordinates. If a list, it should be a list of tuples where the first element is the dimension name and the second element is the corresponding coordinate array_like object.dims: a list of dimension names. If omitted andcoordsis a list of tuples, dimension names are taken fromcoords.attrs: a dictionary of attributes to add to the instancename: a string that names the instance
data = np.random.rand(4, 3) locs = ["IA", "IL", "IN"] times = pd.date_range("2000-01-01", periods=4) foo = xr.DataArray(data, coords=[times, locs], dims=["time", "space"]) foo
<xarray.DataArray (time: 4, space: 3)> Size: 96B array([[0.12696983, 0.96671784, 0.26047601], [0.89723652, 0.37674972, 0.33622174], [0.45137647, 0.84025508, 0.12310214], [0.5430262 , 0.37301223, 0.44799682]], shape=(4, 3)) Coordinates:
time (time) datetime64[ns] 32B 2000-01-01 2000-01-02 ... 2000-01-04
space (space) <U2 24B 'IA' 'IL' 'IN'
0.127 0.9667 0.2605 0.8972 0.3767 ... 0.8403 0.1231 0.543 0.373 0.448
array([[0.12696983, 0.96671784, 0.26047601],
[0.89723652, 0.37674972, 0.33622174],
[0.45137647, 0.84025508, 0.12310214],
[0.5430262 , 0.37301223, 0.44799682]], shape=(4, 3))Coordinates: (2)
- time
(time)
datetime64[ns]
2000-01-01 ... 2000-01-04
array(['2000-01-01T00:00:00.000000000', '2000-01-02T00:00:00.000000000',
'2000-01-03T00:00:00.000000000', '2000-01-04T00:00:00.000000000'],
dtype='datetime64[ns]') - space
(space)
<U2
'IA' 'IL' 'IN'
array(['IA', 'IL', 'IN'], dtype='<U2')
- time
Indexes: (2)
- PandasIndex
PandasIndex(DatetimeIndex(['2000-01-01', '2000-01-02', '2000-01-03', '2000-01-04'], dtype='datetime64[ns]', name='time', freq='D')) - PandasIndex
PandasIndex(Index(['IA', 'IL', 'IN'], dtype='object', name='space'))
- PandasIndex
Attributes: (0)
Only data is required; all of other arguments will be filled in with default values:
<xarray.DataArray (dim_0: 4, dim_1: 3)> Size: 96B array([[0.12696983, 0.96671784, 0.26047601], [0.89723652, 0.37674972, 0.33622174], [0.45137647, 0.84025508, 0.12310214], [0.5430262 , 0.37301223, 0.44799682]], shape=(4, 3)) Dimensions without coordinates: dim_0, dim_1
- 0.127 0.9667 0.2605 0.8972 0.3767 ... 0.8403 0.1231 0.543 0.373 0.448
array([[0.12696983, 0.96671784, 0.26047601],
[0.89723652, 0.37674972, 0.33622174],
[0.45137647, 0.84025508, 0.12310214],
[0.5430262 , 0.37301223, 0.44799682]], shape=(4, 3)) - Coordinates: (0)
- Indexes: (0)
- Attributes: (0)
As you can see, dimension names are always present in the xarray data model: if you do not provide them, defaults of the form dim_N will be created. However, coordinates are always optional, and dimensions do not have automatic coordinate labels.
Note
This is different from pandas, where axes always have tick labels, which default to the integers [0, ..., n-1].
Prior to xarray v0.9, xarray copied this behavior: default coordinates for each dimension would be created if coordinates were not supplied explicitly. This is no longer the case.
Coordinates can be specified in the following ways:
- A list of values with length equal to the number of dimensions, providing coordinate labels for each dimension. Each value must be of one of the following forms:
- A DataArray or Variable
- A tuple of the form
(dims, data[, attrs]), which is converted into arguments for Variable - A pandas object or scalar value, which is converted into a
DataArray - A 1D array or list, which is interpreted as values for a one dimensional coordinate variable along the same dimension as its name
- A dictionary of
{coord_name: coord}where values are of the same form as the list. Supplying coordinates as a dictionary allows other coordinates than those corresponding to dimensions (more on these later). If you supplycoordsas a dictionary, you must explicitly providedims.
As a list of tuples:
xr.DataArray(data, coords=[("time", times), ("space", locs)])
<xarray.DataArray (time: 4, space: 3)> Size: 96B array([[0.12696983, 0.96671784, 0.26047601], [0.89723652, 0.37674972, 0.33622174], [0.45137647, 0.84025508, 0.12310214], [0.5430262 , 0.37301223, 0.44799682]], shape=(4, 3)) Coordinates:
time (time) datetime64[ns] 32B 2000-01-01 2000-01-02 ... 2000-01-04
space (space) <U2 24B 'IA' 'IL' 'IN'
0.127 0.9667 0.2605 0.8972 0.3767 ... 0.8403 0.1231 0.543 0.373 0.448
array([[0.12696983, 0.96671784, 0.26047601],
[0.89723652, 0.37674972, 0.33622174],
[0.45137647, 0.84025508, 0.12310214],
[0.5430262 , 0.37301223, 0.44799682]], shape=(4, 3))Coordinates: (2)
- time
(time)
datetime64[ns]
2000-01-01 ... 2000-01-04
array(['2000-01-01T00:00:00.000000000', '2000-01-02T00:00:00.000000000',
'2000-01-03T00:00:00.000000000', '2000-01-04T00:00:00.000000000'],
dtype='datetime64[ns]') - space
(space)
<U2
'IA' 'IL' 'IN'
array(['IA', 'IL', 'IN'], dtype='<U2')
- time
Indexes: (2)
- PandasIndex
PandasIndex(DatetimeIndex(['2000-01-01', '2000-01-02', '2000-01-03', '2000-01-04'], dtype='datetime64[ns]', name='time', freq='D')) - PandasIndex
PandasIndex(Index(['IA', 'IL', 'IN'], dtype='object', name='space'))
- PandasIndex
Attributes: (0)
As a dictionary:
xr.DataArray( data, coords={ "time": times, "space": locs, "const": 42, "ranking": ("space", [1, 2, 3]), }, dims=["time", "space"], )
<xarray.DataArray (time: 4, space: 3)> Size: 96B array([[0.12696983, 0.96671784, 0.26047601], [0.89723652, 0.37674972, 0.33622174], [0.45137647, 0.84025508, 0.12310214], [0.5430262 , 0.37301223, 0.44799682]], shape=(4, 3)) Coordinates:
time (time) datetime64[ns] 32B 2000-01-01 2000-01-02 ... 2000-01-04
space (space) <U2 24B 'IA' 'IL' 'IN' const int64 8B 42 ranking (space) int64 24B 1 2 3
0.127 0.9667 0.2605 0.8972 0.3767 ... 0.8403 0.1231 0.543 0.373 0.448
array([[0.12696983, 0.96671784, 0.26047601],
[0.89723652, 0.37674972, 0.33622174],
[0.45137647, 0.84025508, 0.12310214],
[0.5430262 , 0.37301223, 0.44799682]], shape=(4, 3))Coordinates: (4)
- time
(time)
datetime64[ns]
2000-01-01 ... 2000-01-04
array(['2000-01-01T00:00:00.000000000', '2000-01-02T00:00:00.000000000',
'2000-01-03T00:00:00.000000000', '2000-01-04T00:00:00.000000000'],
dtype='datetime64[ns]') - space
(space)
<U2
'IA' 'IL' 'IN'
array(['IA', 'IL', 'IN'], dtype='<U2') - const
()
int64
42 - ranking
(space)
int64
1 2 3
- time
Indexes: (2)
- PandasIndex
PandasIndex(DatetimeIndex(['2000-01-01', '2000-01-02', '2000-01-03', '2000-01-04'], dtype='datetime64[ns]', name='time', freq='D')) - PandasIndex
PandasIndex(Index(['IA', 'IL', 'IN'], dtype='object', name='space'))
- PandasIndex
Attributes: (0)
As a dictionary with coords across multiple dimensions:
xr.DataArray( data, coords={ "time": times, "space": locs, "const": 42, "ranking": (("time", "space"), np.arange(12).reshape(4, 3)), }, dims=["time", "space"], )
<xarray.DataArray (time: 4, space: 3)> Size: 96B array([[0.12696983, 0.96671784, 0.26047601], [0.89723652, 0.37674972, 0.33622174], [0.45137647, 0.84025508, 0.12310214], [0.5430262 , 0.37301223, 0.44799682]], shape=(4, 3)) Coordinates:
time (time) datetime64[ns] 32B 2000-01-01 2000-01-02 ... 2000-01-04
space (space) <U2 24B 'IA' 'IL' 'IN' const int64 8B 42 ranking (time, space) int64 96B 0 1 2 3 4 5 6 7 8 9 10 11
0.127 0.9667 0.2605 0.8972 0.3767 ... 0.8403 0.1231 0.543 0.373 0.448
array([[0.12696983, 0.96671784, 0.26047601],
[0.89723652, 0.37674972, 0.33622174],
[0.45137647, 0.84025508, 0.12310214],
[0.5430262 , 0.37301223, 0.44799682]], shape=(4, 3))Coordinates: (4)
- time
(time)
datetime64[ns]
2000-01-01 ... 2000-01-04
array(['2000-01-01T00:00:00.000000000', '2000-01-02T00:00:00.000000000',
'2000-01-03T00:00:00.000000000', '2000-01-04T00:00:00.000000000'],
dtype='datetime64[ns]') - space
(space)
<U2
'IA' 'IL' 'IN'
array(['IA', 'IL', 'IN'], dtype='<U2') - const
()
int64
42 - ranking
(time, space)
int64
0 1 2 3 4 5 6 7 8 9 10 11
array([[ 0, 1, 2],
[ 3, 4, 5],
[ 6, 7, 8],
[ 9, 10, 11]], shape=(4, 3))
- time
Indexes: (2)
- PandasIndex
PandasIndex(DatetimeIndex(['2000-01-01', '2000-01-02', '2000-01-03', '2000-01-04'], dtype='datetime64[ns]', name='time', freq='D')) - PandasIndex
PandasIndex(Index(['IA', 'IL', 'IN'], dtype='object', name='space'))
- PandasIndex
Attributes: (0)
If you create a DataArray by supplying a pandasSeries, DataFrame orpandas.Panel, any non-specified arguments in theDataArray constructor will be filled in from the pandas object:
df = pd.DataFrame({"x": [0, 1], "y": [2, 3]}, index=["a", "b"]) df.index.name = "abc" df.columns.name = "xyz" df
<xarray.DataArray (abc: 2, xyz: 2)> Size: 32B array([[0, 2], [1, 3]]) Coordinates:
abc (abc) object 16B 'a' 'b'
xyz (xyz) object 16B 'x' 'y'
Coordinates: (2)
- abc
(abc)
object
'a' 'b'
array(['a', 'b'], dtype=object) - xyz
(xyz)
object
'x' 'y'
array(['x', 'y'], dtype=object)
- abc
Indexes: (2)
- PandasIndex
PandasIndex(Index(['a', 'b'], dtype='object', name='abc')) - PandasIndex
PandasIndex(Index(['x', 'y'], dtype='object', name='xyz'))
- PandasIndex
Attributes: (0)
DataArray properties#
Let’s take a look at the important properties on our array:
array([[0.12696983, 0.96671784, 0.26047601], [0.89723652, 0.37674972, 0.33622174], [0.45137647, 0.84025508, 0.12310214], [0.5430262 , 0.37301223, 0.44799682]], shape=(4, 3))
Coordinates:
- time (time) datetime64[ns] 32B 2000-01-01 2000-01-02 ... 2000-01-04
- space (space) <U2 24B 'IA' 'IL' 'IN'
You can modify values inplace:
foo.values = 1.0 * foo.values
Note
The array values in a DataArray have a single (homogeneous) data type. To work with heterogeneous or structured data types in xarray, use coordinates, or put separate DataArray objects in a single Dataset (see below).
Now fill in some of that missing metadata:
foo.name = "foo" foo.attrs["units"] = "meters" foo
<xarray.DataArray 'foo' (time: 4, space: 3)> Size: 96B array([[0.12696983, 0.96671784, 0.26047601], [0.89723652, 0.37674972, 0.33622174], [0.45137647, 0.84025508, 0.12310214], [0.5430262 , 0.37301223, 0.44799682]], shape=(4, 3)) Coordinates:
time (time) datetime64[ns] 32B 2000-01-01 2000-01-02 ... 2000-01-04
space (space) <U2 24B 'IA' 'IL' 'IN' Attributes: units: meters
0.127 0.9667 0.2605 0.8972 0.3767 ... 0.8403 0.1231 0.543 0.373 0.448
array([[0.12696983, 0.96671784, 0.26047601],
[0.89723652, 0.37674972, 0.33622174],
[0.45137647, 0.84025508, 0.12310214],
[0.5430262 , 0.37301223, 0.44799682]], shape=(4, 3))Coordinates: (2)
- time
(time)
datetime64[ns]
2000-01-01 ... 2000-01-04
array(['2000-01-01T00:00:00.000000000', '2000-01-02T00:00:00.000000000',
'2000-01-03T00:00:00.000000000', '2000-01-04T00:00:00.000000000'],
dtype='datetime64[ns]') - space
(space)
<U2
'IA' 'IL' 'IN'
array(['IA', 'IL', 'IN'], dtype='<U2')
- time
Indexes: (2)
- PandasIndex
PandasIndex(DatetimeIndex(['2000-01-01', '2000-01-02', '2000-01-03', '2000-01-04'], dtype='datetime64[ns]', name='time', freq='D')) - PandasIndex
PandasIndex(Index(['IA', 'IL', 'IN'], dtype='object', name='space'))
- PandasIndex
Attributes: (1)
The rename() method is another option, returning a new data array:
<xarray.DataArray 'bar' (time: 4, space: 3)> Size: 96B array([[0.12696983, 0.96671784, 0.26047601], [0.89723652, 0.37674972, 0.33622174], [0.45137647, 0.84025508, 0.12310214], [0.5430262 , 0.37301223, 0.44799682]], shape=(4, 3)) Coordinates:
time (time) datetime64[ns] 32B 2000-01-01 2000-01-02 ... 2000-01-04
space (space) <U2 24B 'IA' 'IL' 'IN' Attributes: units: meters
0.127 0.9667 0.2605 0.8972 0.3767 ... 0.8403 0.1231 0.543 0.373 0.448
array([[0.12696983, 0.96671784, 0.26047601],
[0.89723652, 0.37674972, 0.33622174],
[0.45137647, 0.84025508, 0.12310214],
[0.5430262 , 0.37301223, 0.44799682]], shape=(4, 3))Coordinates: (2)
- time
(time)
datetime64[ns]
2000-01-01 ... 2000-01-04
array(['2000-01-01T00:00:00.000000000', '2000-01-02T00:00:00.000000000',
'2000-01-03T00:00:00.000000000', '2000-01-04T00:00:00.000000000'],
dtype='datetime64[ns]') - space
(space)
<U2
'IA' 'IL' 'IN'
array(['IA', 'IL', 'IN'], dtype='<U2')
- time
Indexes: (2)
- PandasIndex
PandasIndex(DatetimeIndex(['2000-01-01', '2000-01-02', '2000-01-03', '2000-01-04'], dtype='datetime64[ns]', name='time', freq='D')) - PandasIndex
PandasIndex(Index(['IA', 'IL', 'IN'], dtype='object', name='space'))
- PandasIndex
Attributes: (1)
DataArray Coordinates#
The coords property is dict like. Individual coordinates can be accessed from the coordinates by name, or even by indexing the data array itself:
<xarray.DataArray 'time' (time: 4)> Size: 32B array(['2000-01-01T00:00:00.000000000', '2000-01-02T00:00:00.000000000', '2000-01-03T00:00:00.000000000', '2000-01-04T00:00:00.000000000'], dtype='datetime64[ns]') Coordinates:
time (time) datetime64[ns] 32B 2000-01-01 2000-01-02 ... 2000-01-04
2000-01-01 2000-01-02 2000-01-03 2000-01-04
array(['2000-01-01T00:00:00.000000000', '2000-01-02T00:00:00.000000000',
'2000-01-03T00:00:00.000000000', '2000-01-04T00:00:00.000000000'],
dtype='datetime64[ns]')Coordinates: (1)
- time
(time)
datetime64[ns]
2000-01-01 ... 2000-01-04
array(['2000-01-01T00:00:00.000000000', '2000-01-02T00:00:00.000000000',
'2000-01-03T00:00:00.000000000', '2000-01-04T00:00:00.000000000'],
dtype='datetime64[ns]')
- time
Indexes: (1)
- PandasIndex
PandasIndex(DatetimeIndex(['2000-01-01', '2000-01-02', '2000-01-03', '2000-01-04'], dtype='datetime64[ns]', name='time', freq='D'))
- PandasIndex
Attributes: (0)
These are also DataArray objects, which contain tick-labels for each dimension.
Coordinates can also be set or removed by using the dictionary like syntax:
foo["ranking"] = ("space", [1, 2, 3]) foo.coords
Coordinates:
- time (time) datetime64[ns] 32B 2000-01-01 2000-01-02 ... 2000-01-04
- space (space) <U2 24B 'IA' 'IL' 'IN' ranking (space) int64 24B 1 2 3
del foo["ranking"] foo.coords
Coordinates:
- time (time) datetime64[ns] 32B 2000-01-01 2000-01-02 ... 2000-01-04
- space (space) <U2 24B 'IA' 'IL' 'IN'
For more details, see Coordinates below.
Dataset#
xarray.Dataset is xarray’s multi-dimensional equivalent of aDataFrame. It is a dict-like container of labeled arrays (DataArray objects) with aligned dimensions. It is designed as an in-memory representation of the data model from the netCDF file format.
In addition to the dict-like interface of the dataset itself, which can be used to access any variable in a dataset, datasets have four key properties:
dims: a dictionary mapping from dimension names to the fixed length of each dimension (e.g.,{'x': 6, 'y': 6, 'time': 8})data_vars: a dict-like container of DataArrays corresponding to variablescoords: another dict-like container of DataArrays intended to label points used indata_vars(e.g., arrays of numbers, datetime objects or strings)attrs: dict to hold arbitrary metadata
The distinction between whether a variable falls in data or coordinates (borrowed from CF conventions) is mostly semantic, and you can probably get away with ignoring it if you like: dictionary like access on a dataset will supply variables found in either category. However, xarray does make use of the distinction for indexing and computations. Coordinates indicate constant/fixed/independent quantities, unlike the varying/measured/dependent quantities that belong in data.
Here is an example of how we might structure a dataset for a weather forecast:
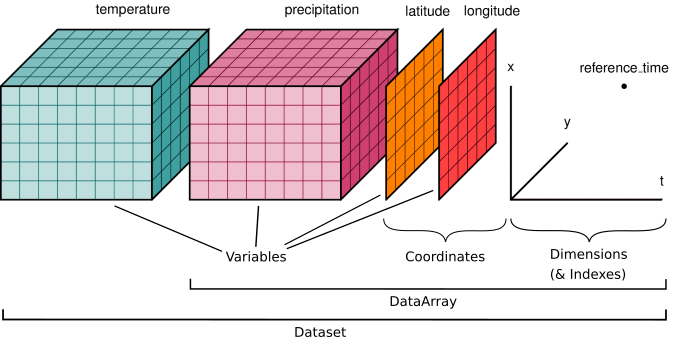
In this example, it would be natural to call temperature andprecipitation “data variables” and all the other arrays “coordinate variables” because they label the points along the dimensions. (see [1] for more background on this example).
Creating a Dataset#
To make an Dataset from scratch, supply dictionaries for any variables (data_vars), coordinates (coords) and attributes (attrs).
data_varsshould be a dictionary with each key as the name of the variable and each value as one of:coordsshould be a dictionary of the same form asdata_vars.attrsshould be a dictionary.
Let’s create some fake data for the example we show above. In this example dataset, we will represent measurements of the temperature and pressure that were made under various conditions:
- the measurements were made on four different days;
- they were made at two separate locations, which we will represent using their latitude and longitude; and
- they were made using instruments by three different manufacturers, which we will refer to as
'manufac1','manufac2', and'manufac3'.
np.random.seed(0) temperature = 15 + 8 * np.random.randn(2, 3, 4) precipitation = 10 * np.random.rand(2, 3, 4) lon = [-99.83, -99.32] lat = [42.25, 42.21] instruments = ["manufac1", "manufac2", "manufac3"] time = pd.date_range("2014-09-06", periods=4) reference_time = pd.Timestamp("2014-09-05")
for real use cases, its good practice to supply array attributes such as
units, but we won't bother here for the sake of brevity
ds = xr.Dataset( { "temperature": (["loc", "instrument", "time"], temperature), "precipitation": (["loc", "instrument", "time"], precipitation), }, coords={ "lon": (["loc"], lon), "lat": (["loc"], lat), "instrument": instruments, "time": time, "reference_time": reference_time, }, ) ds
<xarray.Dataset> Size: 552B Dimensions: (loc: 2, instrument: 3, time: 4) Coordinates: lon (loc) float64 16B -99.83 -99.32 lat (loc) float64 16B 42.25 42.21
instrument (instrument) <U8 96B 'manufac1' 'manufac2' 'manufac3'
time (time) datetime64[ns] 32B 2014-09-06 ... 2014-09-09 reference_time datetime64[ns] 8B 2014-09-05 Dimensions without coordinates: loc Data variables: temperature (loc, instrument, time) float64 192B 29.11 18.2 ... 9.063 precipitation (loc, instrument, time) float64 192B 4.562 5.684 ... 1.613
Dimensions:
- loc: 2
- instrument: 3
- time: 4
Coordinates: (5)
- lon
(loc)
float64
-99.83 -99.32 - lat
(loc)
float64
42.25 42.21 - instrument
(instrument)
<U8
'manufac1' 'manufac2' 'manufac3'
array(['manufac1', 'manufac2', 'manufac3'], dtype='<U8') - time
(time)
datetime64[ns]
2014-09-06 ... 2014-09-09
array(['2014-09-06T00:00:00.000000000', '2014-09-07T00:00:00.000000000',
'2014-09-08T00:00:00.000000000', '2014-09-09T00:00:00.000000000'],
dtype='datetime64[ns]') - reference_time
()
datetime64[ns]
2014-09-05
array('2014-09-05T00:00:00.000000000', dtype='datetime64[ns]')
- lon
Data variables: (2)
- temperature
(loc, instrument, time)
float64
29.11 18.2 22.83 ... 21.92 9.063
array([[[29.11241877, 18.20125767, 22.82990387, 32.92714559],
[29.94046392, 7.18177696, 22.60070734, 13.78914233],
[14.17424919, 18.28478802, 16.15234857, 26.63418806]],
   [[21.0883018 , 15.97340013, 18.55090586, 17.66939462],
    [26.95263259, 13.35873389, 17.50454161,  8.16723409],
    [-5.42391853, 20.22894876, 21.91548959,  9.06267984]]],
shape=(2, 3, 4)) - precipitation
(loc, instrument, time)
float64
4.562 5.684 0.1879 ... 2.089 1.613
array([[[4.56150332, 5.68433949, 0.187898 , 6.17635497],
[6.12095723, 6.16933997, 9.43748079, 6.81820299],
[3.59507901, 4.37031954, 6.97631196, 0.60225472]],
[[6.66766715, 6.7063787 , 2.10382561, 1.28926298],
[3.15428351, 3.63710771, 5.7019677 , 4.38601513],
[9.88373838, 1.02044811, 2.08876756, 1.61309518]]],
shape=(2, 3, 4))
- temperature
Indexes: (2)
- PandasIndex
PandasIndex(Index(['manufac1', 'manufac2', 'manufac3'], dtype='object', name='instrument')) - PandasIndex
PandasIndex(DatetimeIndex(['2014-09-06', '2014-09-07', '2014-09-08', '2014-09-09'], dtype='datetime64[ns]', name='time', freq='D'))
- PandasIndex
Attributes: (0)
Here we pass xarray.DataArray objects or a pandas object as values in the dictionary:
xr.Dataset(dict(bar=foo))
<xarray.Dataset> Size: 152B Dimensions: (time: 4, space: 3) Coordinates:
time (time) datetime64[ns] 32B 2000-01-01 2000-01-02 ... 2000-01-04
space (space) <U2 24B 'IA' 'IL' 'IN' Data variables: bar (time, space) float64 96B 0.127 0.9667 0.2605 ... 0.543 0.373 0.448
Dimensions:
- time: 4
- space: 3
Coordinates: (2)
- time
(time)
datetime64[ns]
2000-01-01 ... 2000-01-04
array(['2000-01-01T00:00:00.000000000', '2000-01-02T00:00:00.000000000',
'2000-01-03T00:00:00.000000000', '2000-01-04T00:00:00.000000000'],
dtype='datetime64[ns]') - space
(space)
<U2
'IA' 'IL' 'IN'
array(['IA', 'IL', 'IN'], dtype='<U2')
- time
Data variables: (1)
- bar
(time, space)
float64
0.127 0.9667 0.2605 ... 0.373 0.448
array([[0.12696983, 0.96671784, 0.26047601],
[0.89723652, 0.37674972, 0.33622174],
[0.45137647, 0.84025508, 0.12310214],
[0.5430262 , 0.37301223, 0.44799682]], shape=(4, 3))
- bar
Indexes: (2)
- PandasIndex
PandasIndex(DatetimeIndex(['2000-01-01', '2000-01-02', '2000-01-03', '2000-01-04'], dtype='datetime64[ns]', name='time', freq='D')) - PandasIndex
PandasIndex(Index(['IA', 'IL', 'IN'], dtype='object', name='space'))
- PandasIndex
Attributes: (0)
xr.Dataset(dict(bar=foo.to_pandas()))
<xarray.Dataset> Size: 152B Dimensions: (time: 4, space: 3) Coordinates:
time (time) datetime64[ns] 32B 2000-01-01 2000-01-02 ... 2000-01-04
space (space) object 24B 'IA' 'IL' 'IN' Data variables: bar (time, space) float64 96B 0.127 0.9667 0.2605 ... 0.543 0.373 0.448
Dimensions:
- time: 4
- space: 3
Coordinates: (2)
- time
(time)
datetime64[ns]
2000-01-01 ... 2000-01-04
array(['2000-01-01T00:00:00.000000000', '2000-01-02T00:00:00.000000000',
'2000-01-03T00:00:00.000000000', '2000-01-04T00:00:00.000000000'],
dtype='datetime64[ns]') - space
(space)
object
'IA' 'IL' 'IN'
array(['IA', 'IL', 'IN'], dtype=object)
- time
Data variables: (1)
- bar
(time, space)
float64
0.127 0.9667 0.2605 ... 0.373 0.448
array([[0.12696983, 0.96671784, 0.26047601],
[0.89723652, 0.37674972, 0.33622174],
[0.45137647, 0.84025508, 0.12310214],
[0.5430262 , 0.37301223, 0.44799682]], shape=(4, 3))
- bar
Indexes: (2)
- PandasIndex
PandasIndex(DatetimeIndex(['2000-01-01', '2000-01-02', '2000-01-03', '2000-01-04'], dtype='datetime64[ns]', name='time', freq='D')) - PandasIndex
PandasIndex(Index(['IA', 'IL', 'IN'], dtype='object', name='space'))
- PandasIndex
Attributes: (0)
Where a pandas object is supplied as a value, the names of its indexes are used as dimension names, and its data is aligned to any existing dimensions.
You can also create an dataset from:
- A pandas.DataFrame or
pandas.Panelalong its columns and items respectively, by passing it into the Dataset directly - A pandas.DataFrame with Dataset.from_dataframe, which will additionally handle MultiIndexes See Working with pandas
- A netCDF file on disk with open_dataset(). See Reading and writing files.
Dataset contents#
Dataset implements the Python mapping interface, with values given by xarray.DataArray objects:
print("temperature" in ds) ds["temperature"]
<xarray.DataArray 'temperature' (loc: 2, instrument: 3, time: 4)> Size: 192B array([[[29.11241877, 18.20125767, 22.82990387, 32.92714559], [29.94046392, 7.18177696, 22.60070734, 13.78914233], [14.17424919, 18.28478802, 16.15234857, 26.63418806]],
   [[21.0883018 , 15.97340013, 18.55090586, 17.66939462],
    [26.95263259, 13.35873389, 17.50454161,  8.16723409],
    [-5.42391853, 20.22894876, 21.91548959,  9.06267984]]],
  shape=(2, 3, 4))
Coordinates: lon (loc) float64 16B -99.83 -99.32 lat (loc) float64 16B 42.25 42.21
instrument (instrument) <U8 96B 'manufac1' 'manufac2' 'manufac3'
time (time) datetime64[ns] 32B 2014-09-06 ... 2014-09-09 reference_time datetime64[ns] 8B 2014-09-05 Dimensions without coordinates: loc
29.11 18.2 22.83 32.93 29.94 7.182 ... 8.167 -5.424 20.23 21.92 9.063
array([[[29.11241877, 18.20125767, 22.82990387, 32.92714559],
[29.94046392, 7.18177696, 22.60070734, 13.78914233],
[14.17424919, 18.28478802, 16.15234857, 26.63418806]],
   [[21.0883018 , 15.97340013, 18.55090586, 17.66939462],
    [26.95263259, 13.35873389, 17.50454161,  8.16723409],
    [-5.42391853, 20.22894876, 21.91548959,  9.06267984]]],
  shape=(2, 3, 4))
Coordinates: (5)
- lon
(loc)
float64
-99.83 -99.32 - lat
(loc)
float64
42.25 42.21 - instrument
(instrument)
<U8
'manufac1' 'manufac2' 'manufac3'
array(['manufac1', 'manufac2', 'manufac3'], dtype='<U8') - time
(time)
datetime64[ns]
2014-09-06 ... 2014-09-09
array(['2014-09-06T00:00:00.000000000', '2014-09-07T00:00:00.000000000',
'2014-09-08T00:00:00.000000000', '2014-09-09T00:00:00.000000000'],
dtype='datetime64[ns]') - reference_time
()
datetime64[ns]
2014-09-05
array('2014-09-05T00:00:00.000000000', dtype='datetime64[ns]')
- lon
Indexes: (2)
- PandasIndex
PandasIndex(Index(['manufac1', 'manufac2', 'manufac3'], dtype='object', name='instrument')) - PandasIndex
PandasIndex(DatetimeIndex(['2014-09-06', '2014-09-07', '2014-09-08', '2014-09-09'], dtype='datetime64[ns]', name='time', freq='D'))
- PandasIndex
Attributes: (0)
Valid keys include each listed coordinate and data variable.
Data and coordinate variables are also contained separately in thedata_vars and coordsdictionary-like attributes:
Data variables: temperature (loc, instrument, time) float64 192B 29.11 18.2 ... 9.063 precipitation (loc, instrument, time) float64 192B 4.562 5.684 ... 1.613
Coordinates: lon (loc) float64 16B -99.83 -99.32 lat (loc) float64 16B 42.25 42.21
- instrument (instrument) <U8 96B 'manufac1' 'manufac2' 'manufac3'
- time (time) datetime64[ns] 32B 2014-09-06 ... 2014-09-09 reference_time datetime64[ns] 8B 2014-09-05
Finally, like data arrays, datasets also store arbitrary metadata in the form of attributes:
print(ds.attrs) ds.attrs["title"] = "example attribute" ds
<xarray.Dataset> Size: 552B Dimensions: (loc: 2, instrument: 3, time: 4) Coordinates: lon (loc) float64 16B -99.83 -99.32 lat (loc) float64 16B 42.25 42.21
instrument (instrument) <U8 96B 'manufac1' 'manufac2' 'manufac3'
time (time) datetime64[ns] 32B 2014-09-06 ... 2014-09-09 reference_time datetime64[ns] 8B 2014-09-05 Dimensions without coordinates: loc Data variables: temperature (loc, instrument, time) float64 192B 29.11 18.2 ... 9.063 precipitation (loc, instrument, time) float64 192B 4.562 5.684 ... 1.613 Attributes: title: example attribute
Dimensions:
- loc: 2
- instrument: 3
- time: 4
Coordinates: (5)
- lon
(loc)
float64
-99.83 -99.32 - lat
(loc)
float64
42.25 42.21 - instrument
(instrument)
<U8
'manufac1' 'manufac2' 'manufac3'
array(['manufac1', 'manufac2', 'manufac3'], dtype='<U8') - time
(time)
datetime64[ns]
2014-09-06 ... 2014-09-09
array(['2014-09-06T00:00:00.000000000', '2014-09-07T00:00:00.000000000',
'2014-09-08T00:00:00.000000000', '2014-09-09T00:00:00.000000000'],
dtype='datetime64[ns]') - reference_time
()
datetime64[ns]
2014-09-05
array('2014-09-05T00:00:00.000000000', dtype='datetime64[ns]')
- lon
Data variables: (2)
- temperature
(loc, instrument, time)
float64
29.11 18.2 22.83 ... 21.92 9.063
array([[[29.11241877, 18.20125767, 22.82990387, 32.92714559],
[29.94046392, 7.18177696, 22.60070734, 13.78914233],
[14.17424919, 18.28478802, 16.15234857, 26.63418806]],
[[21.0883018 , 15.97340013, 18.55090586, 17.66939462],
[26.95263259, 13.35873389, 17.50454161, 8.16723409],
[-5.42391853, 20.22894876, 21.91548959, 9.06267984]]],
shape=(2, 3, 4)) - precipitation
(loc, instrument, time)
float64
4.562 5.684 0.1879 ... 2.089 1.613
array([[[4.56150332, 5.68433949, 0.187898 , 6.17635497],
[6.12095723, 6.16933997, 9.43748079, 6.81820299],
[3.59507901, 4.37031954, 6.97631196, 0.60225472]],
[[6.66766715, 6.7063787 , 2.10382561, 1.28926298],
[3.15428351, 3.63710771, 5.7019677 , 4.38601513],
[9.88373838, 1.02044811, 2.08876756, 1.61309518]]],
shape=(2, 3, 4))
- temperature
Indexes: (2)
- PandasIndex
PandasIndex(Index(['manufac1', 'manufac2', 'manufac3'], dtype='object', name='instrument')) - PandasIndex
PandasIndex(DatetimeIndex(['2014-09-06', '2014-09-07', '2014-09-08', '2014-09-09'], dtype='datetime64[ns]', name='time', freq='D'))
- PandasIndex
Attributes: (1)
Xarray does not enforce any restrictions on attributes, but serialization to some file formats may fail if you use objects that are not strings, numbers or numpy.ndarray objects.
As a useful shortcut, you can use attribute style access for reading (but not setting) variables and attributes:
<xarray.DataArray 'temperature' (loc: 2, instrument: 3, time: 4)> Size: 192B array([[[29.11241877, 18.20125767, 22.82990387, 32.92714559], [29.94046392, 7.18177696, 22.60070734, 13.78914233], [14.17424919, 18.28478802, 16.15234857, 26.63418806]],
[[21.0883018 , 15.97340013, 18.55090586, 17.66939462],
[26.95263259, 13.35873389, 17.50454161, 8.16723409],
[-5.42391853, 20.22894876, 21.91548959, 9.06267984]]],
shape=(2, 3, 4))Coordinates: lon (loc) float64 16B -99.83 -99.32 lat (loc) float64 16B 42.25 42.21
instrument (instrument) <U8 96B 'manufac1' 'manufac2' 'manufac3'
time (time) datetime64[ns] 32B 2014-09-06 ... 2014-09-09 reference_time datetime64[ns] 8B 2014-09-05 Dimensions without coordinates: loc
29.11 18.2 22.83 32.93 29.94 7.182 ... 8.167 -5.424 20.23 21.92 9.063
array([[[29.11241877, 18.20125767, 22.82990387, 32.92714559],
[29.94046392, 7.18177696, 22.60070734, 13.78914233],
[14.17424919, 18.28478802, 16.15234857, 26.63418806]],
[[21.0883018 , 15.97340013, 18.55090586, 17.66939462],
[26.95263259, 13.35873389, 17.50454161, 8.16723409],
[-5.42391853, 20.22894876, 21.91548959, 9.06267984]]],
shape=(2, 3, 4))Coordinates: (5)
- lon
(loc)
float64
-99.83 -99.32 - lat
(loc)
float64
42.25 42.21 - instrument
(instrument)
<U8
'manufac1' 'manufac2' 'manufac3'
array(['manufac1', 'manufac2', 'manufac3'], dtype='<U8') - time
(time)
datetime64[ns]
2014-09-06 ... 2014-09-09
array(['2014-09-06T00:00:00.000000000', '2014-09-07T00:00:00.000000000',
'2014-09-08T00:00:00.000000000', '2014-09-09T00:00:00.000000000'],
dtype='datetime64[ns]') - reference_time
()
datetime64[ns]
2014-09-05
array('2014-09-05T00:00:00.000000000', dtype='datetime64[ns]')
- lon
Indexes: (2)
- PandasIndex
PandasIndex(Index(['manufac1', 'manufac2', 'manufac3'], dtype='object', name='instrument')) - PandasIndex
PandasIndex(DatetimeIndex(['2014-09-06', '2014-09-07', '2014-09-08', '2014-09-09'], dtype='datetime64[ns]', name='time', freq='D'))
- PandasIndex
Attributes: (0)
This is particularly useful in an exploratory context, because you can tab-complete these variable names with tools like IPython.
Dictionary like methods#
We can update a dataset in-place using Python’s standard dictionary syntax. For example, to create this example dataset from scratch, we could have written:
ds = xr.Dataset() ds["temperature"] = (("loc", "instrument", "time"), temperature) ds["temperature_double"] = (("loc", "instrument", "time"), temperature * 2) ds["precipitation"] = (("loc", "instrument", "time"), precipitation) ds.coords["lat"] = (("loc",), lat) ds.coords["lon"] = (("loc",), lon) ds.coords["time"] = pd.date_range("2014-09-06", periods=4) ds.coords["reference_time"] = pd.Timestamp("2014-09-05")
To change the variables in a Dataset, you can use all the standard dictionary methods, including values, items, __delitem__, get andupdate(). Note that assigning a DataArray or pandas object to a Dataset variable using __setitem__ or update willautomatically align the array(s) to the original dataset’s indexes.
You can copy a Dataset by calling the copy()method. By default, the copy is shallow, so only the container will be copied: the arrays in the Dataset will still be stored in the same underlyingnumpy.ndarray objects. You can copy all data by callingds.copy(deep=True).
Transforming datasets#
In addition to dictionary-like methods (described above), xarray has additional methods (like pandas) for transforming datasets into new objects.
For removing variables, you can select and drop an explicit list of variables by indexing with a list of names or using thedrop_vars() methods to return a new Dataset. These operations keep around coordinates:
<xarray.Dataset> Size: 264B Dimensions: (loc: 2, instrument: 3, time: 4) Coordinates: lat (loc) float64 16B 42.25 42.21 lon (loc) float64 16B -99.83 -99.32
time (time) datetime64[ns] 32B 2014-09-06 ... 2014-09-09 reference_time datetime64[ns] 8B 2014-09-05 Dimensions without coordinates: loc, instrument Data variables: temperature (loc, instrument, time) float64 192B 29.11 18.2 ... 9.063
Dimensions:
- loc: 2
- instrument: 3
- time: 4
Coordinates: (4)
- lat
(loc)
float64
42.25 42.21 - lon
(loc)
float64
-99.83 -99.32 - time
(time)
datetime64[ns]
2014-09-06 ... 2014-09-09
array(['2014-09-06T00:00:00.000000000', '2014-09-07T00:00:00.000000000',
'2014-09-08T00:00:00.000000000', '2014-09-09T00:00:00.000000000'],
dtype='datetime64[ns]') - reference_time
()
datetime64[ns]
2014-09-05
array('2014-09-05T00:00:00.000000000', dtype='datetime64[ns]')
- lat
Data variables: (1)
- temperature
(loc, instrument, time)
float64
29.11 18.2 22.83 ... 21.92 9.063
array([[[29.11241877, 18.20125767, 22.82990387, 32.92714559],
[29.94046392, 7.18177696, 22.60070734, 13.78914233],
[14.17424919, 18.28478802, 16.15234857, 26.63418806]],
[[21.0883018 , 15.97340013, 18.55090586, 17.66939462],
[26.95263259, 13.35873389, 17.50454161, 8.16723409],
[-5.42391853, 20.22894876, 21.91548959, 9.06267984]]],
shape=(2, 3, 4))
- temperature
Indexes: (1)
- PandasIndex
PandasIndex(DatetimeIndex(['2014-09-06', '2014-09-07', '2014-09-08', '2014-09-09'], dtype='datetime64[ns]', name='time', freq='D'))
- PandasIndex
Attributes: (0)
ds[["temperature", "temperature_double"]]
<xarray.Dataset> Size: 456B Dimensions: (loc: 2, instrument: 3, time: 4) Coordinates: lat (loc) float64 16B 42.25 42.21 lon (loc) float64 16B -99.83 -99.32
time (time) datetime64[ns] 32B 2014-09-06 ... 2014-09-09 reference_time datetime64[ns] 8B 2014-09-05 Dimensions without coordinates: loc, instrument Data variables: temperature (loc, instrument, time) float64 192B 29.11 ... 9.063 temperature_double (loc, instrument, time) float64 192B 58.22 ... 18.13
Dimensions:
- loc: 2
- instrument: 3
- time: 4
Coordinates: (4)
- lat
(loc)
float64
42.25 42.21 - lon
(loc)
float64
-99.83 -99.32 - time
(time)
datetime64[ns]
2014-09-06 ... 2014-09-09
array(['2014-09-06T00:00:00.000000000', '2014-09-07T00:00:00.000000000',
'2014-09-08T00:00:00.000000000', '2014-09-09T00:00:00.000000000'],
dtype='datetime64[ns]') - reference_time
()
datetime64[ns]
2014-09-05
array('2014-09-05T00:00:00.000000000', dtype='datetime64[ns]')
- lat
Data variables: (2)
- temperature
(loc, instrument, time)
float64
29.11 18.2 22.83 ... 21.92 9.063
array([[[29.11241877, 18.20125767, 22.82990387, 32.92714559],
[29.94046392, 7.18177696, 22.60070734, 13.78914233],
[14.17424919, 18.28478802, 16.15234857, 26.63418806]],
[[21.0883018 , 15.97340013, 18.55090586, 17.66939462],
[26.95263259, 13.35873389, 17.50454161, 8.16723409],
[-5.42391853, 20.22894876, 21.91548959, 9.06267984]]],
shape=(2, 3, 4)) - temperature_double
(loc, instrument, time)
float64
58.22 36.4 45.66 ... 43.83 18.13
array([[[ 58.22483754, 36.40251533, 45.65980775, 65.85429119],
[ 59.88092784, 14.36355392, 45.20141468, 27.57828467],
[ 28.34849837, 36.56957603, 32.30469714, 53.26837611]],
[[ 42.1766036 , 31.94680026, 37.10181172, 35.33878924],
[ 53.90526517, 26.71746778, 35.00908323, 16.33446817],
[-10.84783705, 40.45789753, 43.83097918, 18.12535967]]],
shape=(2, 3, 4))
- temperature
Indexes: (1)
- PandasIndex
PandasIndex(DatetimeIndex(['2014-09-06', '2014-09-07', '2014-09-08', '2014-09-09'], dtype='datetime64[ns]', name='time', freq='D'))
- PandasIndex
Attributes: (0)
ds.drop_vars("temperature")
<xarray.Dataset> Size: 456B Dimensions: (loc: 2, instrument: 3, time: 4) Coordinates: lat (loc) float64 16B 42.25 42.21 lon (loc) float64 16B -99.83 -99.32
time (time) datetime64[ns] 32B 2014-09-06 ... 2014-09-09 reference_time datetime64[ns] 8B 2014-09-05 Dimensions without coordinates: loc, instrument Data variables: temperature_double (loc, instrument, time) float64 192B 58.22 ... 18.13 precipitation (loc, instrument, time) float64 192B 4.562 ... 1.613
Dimensions:
- loc: 2
- instrument: 3
- time: 4
Coordinates: (4)
- lat
(loc)
float64
42.25 42.21 - lon
(loc)
float64
-99.83 -99.32 - time
(time)
datetime64[ns]
2014-09-06 ... 2014-09-09
array(['2014-09-06T00:00:00.000000000', '2014-09-07T00:00:00.000000000',
'2014-09-08T00:00:00.000000000', '2014-09-09T00:00:00.000000000'],
dtype='datetime64[ns]') - reference_time
()
datetime64[ns]
2014-09-05
array('2014-09-05T00:00:00.000000000', dtype='datetime64[ns]')
- lat
Data variables: (2)
- temperature_double
(loc, instrument, time)
float64
58.22 36.4 45.66 ... 43.83 18.13
array([[[ 58.22483754, 36.40251533, 45.65980775, 65.85429119],
[ 59.88092784, 14.36355392, 45.20141468, 27.57828467],
[ 28.34849837, 36.56957603, 32.30469714, 53.26837611]],
[[ 42.1766036 , 31.94680026, 37.10181172, 35.33878924],
[ 53.90526517, 26.71746778, 35.00908323, 16.33446817],
[-10.84783705, 40.45789753, 43.83097918, 18.12535967]]],
shape=(2, 3, 4)) - precipitation
(loc, instrument, time)
float64
4.562 5.684 0.1879 ... 2.089 1.613
array([[[4.56150332, 5.68433949, 0.187898 , 6.17635497],
[6.12095723, 6.16933997, 9.43748079, 6.81820299],
[3.59507901, 4.37031954, 6.97631196, 0.60225472]],
[[6.66766715, 6.7063787 , 2.10382561, 1.28926298],
[3.15428351, 3.63710771, 5.7019677 , 4.38601513],
[9.88373838, 1.02044811, 2.08876756, 1.61309518]]],
shape=(2, 3, 4))
- temperature_double
Indexes: (1)
- PandasIndex
PandasIndex(DatetimeIndex(['2014-09-06', '2014-09-07', '2014-09-08', '2014-09-09'], dtype='datetime64[ns]', name='time', freq='D'))
- PandasIndex
Attributes: (0)
To remove a dimension, you can use drop_dims() method. Any variables using that dimension are dropped:
<xarray.Dataset> Size: 40B Dimensions: (loc: 2) Coordinates: lat (loc) float64 16B 42.25 42.21 lon (loc) float64 16B -99.83 -99.32 reference_time datetime64[ns] 8B 2014-09-05 Dimensions without coordinates: loc Data variables: empty
- Dimensions:
- loc: 2
- Coordinates: (3)
- lat
(loc)
float64
42.25 42.21 - lon
(loc)
float64
-99.83 -99.32 - reference_time
()
datetime64[ns]
2014-09-05
array('2014-09-05T00:00:00.000000000', dtype='datetime64[ns]')
- lat
- Data variables: (0)
- Indexes: (0)
- Attributes: (0)
As an alternate to dictionary-like modifications, you can useassign() and assign_coords(). These methods return a new dataset with additional (or replaced) values:
ds.assign(temperature2=2 * ds.temperature)
<xarray.Dataset> Size: 840B Dimensions: (loc: 2, instrument: 3, time: 4) Coordinates: lat (loc) float64 16B 42.25 42.21 lon (loc) float64 16B -99.83 -99.32
time (time) datetime64[ns] 32B 2014-09-06 ... 2014-09-09 reference_time datetime64[ns] 8B 2014-09-05 Dimensions without coordinates: loc, instrument Data variables: temperature (loc, instrument, time) float64 192B 29.11 ... 9.063 temperature_double (loc, instrument, time) float64 192B 58.22 ... 18.13 precipitation (loc, instrument, time) float64 192B 4.562 ... 1.613 temperature2 (loc, instrument, time) float64 192B 58.22 ... 18.13
Dimensions:
- loc: 2
- instrument: 3
- time: 4
Coordinates: (4)
- lat
(loc)
float64
42.25 42.21 - lon
(loc)
float64
-99.83 -99.32 - time
(time)
datetime64[ns]
2014-09-06 ... 2014-09-09
array(['2014-09-06T00:00:00.000000000', '2014-09-07T00:00:00.000000000',
'2014-09-08T00:00:00.000000000', '2014-09-09T00:00:00.000000000'],
dtype='datetime64[ns]') - reference_time
()
datetime64[ns]
2014-09-05
array('2014-09-05T00:00:00.000000000', dtype='datetime64[ns]')
- lat
Data variables: (4)
- temperature
(loc, instrument, time)
float64
29.11 18.2 22.83 ... 21.92 9.063
array([[[29.11241877, 18.20125767, 22.82990387, 32.92714559],
[29.94046392, 7.18177696, 22.60070734, 13.78914233],
[14.17424919, 18.28478802, 16.15234857, 26.63418806]],
[[21.0883018 , 15.97340013, 18.55090586, 17.66939462],
[26.95263259, 13.35873389, 17.50454161, 8.16723409],
[-5.42391853, 20.22894876, 21.91548959, 9.06267984]]],
shape=(2, 3, 4)) - temperature_double
(loc, instrument, time)
float64
58.22 36.4 45.66 ... 43.83 18.13
array([[[ 58.22483754, 36.40251533, 45.65980775, 65.85429119],
[ 59.88092784, 14.36355392, 45.20141468, 27.57828467],
[ 28.34849837, 36.56957603, 32.30469714, 53.26837611]],
[[ 42.1766036 , 31.94680026, 37.10181172, 35.33878924],
[ 53.90526517, 26.71746778, 35.00908323, 16.33446817],
[-10.84783705, 40.45789753, 43.83097918, 18.12535967]]],
shape=(2, 3, 4)) - precipitation
(loc, instrument, time)
float64
4.562 5.684 0.1879 ... 2.089 1.613
array([[[4.56150332, 5.68433949, 0.187898 , 6.17635497],
[6.12095723, 6.16933997, 9.43748079, 6.81820299],
[3.59507901, 4.37031954, 6.97631196, 0.60225472]],
[[6.66766715, 6.7063787 , 2.10382561, 1.28926298],
[3.15428351, 3.63710771, 5.7019677 , 4.38601513],
[9.88373838, 1.02044811, 2.08876756, 1.61309518]]],
shape=(2, 3, 4)) - temperature2
(loc, instrument, time)
float64
58.22 36.4 45.66 ... 43.83 18.13
array([[[ 58.22483754, 36.40251533, 45.65980775, 65.85429119],
[ 59.88092784, 14.36355392, 45.20141468, 27.57828467],
[ 28.34849837, 36.56957603, 32.30469714, 53.26837611]],
[[ 42.1766036 , 31.94680026, 37.10181172, 35.33878924],
[ 53.90526517, 26.71746778, 35.00908323, 16.33446817],
[-10.84783705, 40.45789753, 43.83097918, 18.12535967]]],
shape=(2, 3, 4))
- temperature
Indexes: (1)
- PandasIndex
PandasIndex(DatetimeIndex(['2014-09-06', '2014-09-07', '2014-09-08', '2014-09-09'], dtype='datetime64[ns]', name='time', freq='D'))
- PandasIndex
Attributes: (0)
There is also the pipe() method that allows you to use a method call with an external function (e.g., ds.pipe(func)) instead of simply calling it (e.g., func(ds)). This allows you to write pipelines for transforming your data (using “method chaining”) instead of writing hard to follow nested function calls:
these lines are equivalent, but with pipe we can make the logic flow
entirely from left to right
plt.plot((2 * ds.temperature.sel(loc=0)).mean("instrument")) (ds.temperature.sel(loc=0).pipe(lambda x: 2 * x).mean("instrument").pipe(plt.plot))
Both pipe and assign replicate the pandas methods of the same names (DataFrame.pipe andDataFrame.assign).
With xarray, there is no performance penalty for creating new datasets, even if variables are lazily loaded from a file on disk. Creating new objects instead of mutating existing objects often results in easier to understand code, so we encourage using this approach.
Renaming variables#
Another useful option is the rename() method to rename dataset variables:
ds.rename({"temperature": "temp", "precipitation": "precip"})
<xarray.Dataset> Size: 648B Dimensions: (loc: 2, instrument: 3, time: 4) Coordinates: lat (loc) float64 16B 42.25 42.21 lon (loc) float64 16B -99.83 -99.32
time (time) datetime64[ns] 32B 2014-09-06 ... 2014-09-09 reference_time datetime64[ns] 8B 2014-09-05 Dimensions without coordinates: loc, instrument Data variables: temp (loc, instrument, time) float64 192B 29.11 ... 9.063 temperature_double (loc, instrument, time) float64 192B 58.22 ... 18.13 precip (loc, instrument, time) float64 192B 4.562 ... 1.613
Dimensions:
- loc: 2
- instrument: 3
- time: 4
Coordinates: (4)
- lat
(loc)
float64
42.25 42.21 - lon
(loc)
float64
-99.83 -99.32 - time
(time)
datetime64[ns]
2014-09-06 ... 2014-09-09
array(['2014-09-06T00:00:00.000000000', '2014-09-07T00:00:00.000000000',
'2014-09-08T00:00:00.000000000', '2014-09-09T00:00:00.000000000'],
dtype='datetime64[ns]') - reference_time
()
datetime64[ns]
2014-09-05
array('2014-09-05T00:00:00.000000000', dtype='datetime64[ns]')
- lat
Data variables: (3)
- temp
(loc, instrument, time)
float64
29.11 18.2 22.83 ... 21.92 9.063
array([[[29.11241877, 18.20125767, 22.82990387, 32.92714559],
[29.94046392, 7.18177696, 22.60070734, 13.78914233],
[14.17424919, 18.28478802, 16.15234857, 26.63418806]],
[[21.0883018 , 15.97340013, 18.55090586, 17.66939462],
[26.95263259, 13.35873389, 17.50454161, 8.16723409],
[-5.42391853, 20.22894876, 21.91548959, 9.06267984]]],
shape=(2, 3, 4)) - temperature_double
(loc, instrument, time)
float64
58.22 36.4 45.66 ... 43.83 18.13
array([[[ 58.22483754, 36.40251533, 45.65980775, 65.85429119],
[ 59.88092784, 14.36355392, 45.20141468, 27.57828467],
[ 28.34849837, 36.56957603, 32.30469714, 53.26837611]],
[[ 42.1766036 , 31.94680026, 37.10181172, 35.33878924],
[ 53.90526517, 26.71746778, 35.00908323, 16.33446817],
[-10.84783705, 40.45789753, 43.83097918, 18.12535967]]],
shape=(2, 3, 4)) - precip
(loc, instrument, time)
float64
4.562 5.684 0.1879 ... 2.089 1.613
array([[[4.56150332, 5.68433949, 0.187898 , 6.17635497],
[6.12095723, 6.16933997, 9.43748079, 6.81820299],
[3.59507901, 4.37031954, 6.97631196, 0.60225472]],
[[6.66766715, 6.7063787 , 2.10382561, 1.28926298],
[3.15428351, 3.63710771, 5.7019677 , 4.38601513],
[9.88373838, 1.02044811, 2.08876756, 1.61309518]]],
shape=(2, 3, 4))
- temp
Indexes: (1)
- PandasIndex
PandasIndex(DatetimeIndex(['2014-09-06', '2014-09-07', '2014-09-08', '2014-09-09'], dtype='datetime64[ns]', name='time', freq='D'))
- PandasIndex
Attributes: (0)
The related swap_dims() method allows you do to swap dimension and non-dimension variables:
ds.coords["day"] = ("time", [6, 7, 8, 9]) ds.swap_dims({"time": "day"})
<xarray.Dataset> Size: 680B Dimensions: (loc: 2, instrument: 3, day: 4) Coordinates: lat (loc) float64 16B 42.25 42.21 lon (loc) float64 16B -99.83 -99.32 time (day) datetime64[ns] 32B 2014-09-06 ... 2014-09-09 reference_time datetime64[ns] 8B 2014-09-05
day (day) int64 32B 6 7 8 9 Dimensions without coordinates: loc, instrument Data variables: temperature (loc, instrument, day) float64 192B 29.11 18.2 ... 9.063 temperature_double (loc, instrument, day) float64 192B 58.22 36.4 ... 18.13 precipitation (loc, instrument, day) float64 192B 4.562 ... 1.613
Dimensions:
- loc: 2
- instrument: 3
- day: 4
Coordinates: (5)
- lat
(loc)
float64
42.25 42.21 - lon
(loc)
float64
-99.83 -99.32 - time
(day)
datetime64[ns]
2014-09-06 ... 2014-09-09
array(['2014-09-06T00:00:00.000000000', '2014-09-07T00:00:00.000000000',
'2014-09-08T00:00:00.000000000', '2014-09-09T00:00:00.000000000'],
dtype='datetime64[ns]') - reference_time
()
datetime64[ns]
2014-09-05
array('2014-09-05T00:00:00.000000000', dtype='datetime64[ns]') - day
(day)
int64
6 7 8 9
- lat
Data variables: (3)
- temperature
(loc, instrument, day)
float64
29.11 18.2 22.83 ... 21.92 9.063
array([[[29.11241877, 18.20125767, 22.82990387, 32.92714559],
[29.94046392, 7.18177696, 22.60070734, 13.78914233],
[14.17424919, 18.28478802, 16.15234857, 26.63418806]],
[[21.0883018 , 15.97340013, 18.55090586, 17.66939462],
[26.95263259, 13.35873389, 17.50454161, 8.16723409],
[-5.42391853, 20.22894876, 21.91548959, 9.06267984]]],
shape=(2, 3, 4)) - temperature_double
(loc, instrument, day)
float64
58.22 36.4 45.66 ... 43.83 18.13
array([[[ 58.22483754, 36.40251533, 45.65980775, 65.85429119],
[ 59.88092784, 14.36355392, 45.20141468, 27.57828467],
[ 28.34849837, 36.56957603, 32.30469714, 53.26837611]],
[[ 42.1766036 , 31.94680026, 37.10181172, 35.33878924],
[ 53.90526517, 26.71746778, 35.00908323, 16.33446817],
[-10.84783705, 40.45789753, 43.83097918, 18.12535967]]],
shape=(2, 3, 4)) - precipitation
(loc, instrument, day)
float64
4.562 5.684 0.1879 ... 2.089 1.613
array([[[4.56150332, 5.68433949, 0.187898 , 6.17635497],
[6.12095723, 6.16933997, 9.43748079, 6.81820299],
[3.59507901, 4.37031954, 6.97631196, 0.60225472]],
[[6.66766715, 6.7063787 , 2.10382561, 1.28926298],
[3.15428351, 3.63710771, 5.7019677 , 4.38601513],
[9.88373838, 1.02044811, 2.08876756, 1.61309518]]],
shape=(2, 3, 4))
- temperature
Indexes: (1)
- PandasIndex
PandasIndex(Index([6, 7, 8, 9], dtype='int64', name='day'))
- PandasIndex
Attributes: (0)
DataTree#
DataTree is xarray’s highest-level data structure, able to organise heterogeneous data which could not be stored inside a singleDataset object. This includes representing the recursive structure of multiple groups within a netCDF file or Zarr Store.
Each DataTree object (or “node”) contains the same data that a singlexarray.Dataset would (i.e. DataArray objects stored under hashable keys), and so has the same key properties:
dims: a dictionary mapping of dimension names to lengths, for the variables in this node, and this node’s ancestors,data_vars: a dict-like container of DataArrays corresponding to variables in this node,coords: another dict-like container of DataArrays, corresponding to coordinate variables in this node, and this node’s ancestors,attrs: dict to hold arbitrary metadata relevant to data in this node.
A single DataTree object acts much like a single Dataset object, and has a similar set of dict-like methods defined upon it. However, DataTrees can also contain other DataTree objects, so they can be thought of as nested dict-like containers of both xarray.DataArrays and DataTrees.
A single datatree object is known as a “node”, and its position relative to other nodes is defined by two more key properties:
children: An dictionary mapping from names to other DataTreeobjects, known as its “child nodes”.parent: The single DataTree object whose children this datatree is a member of, known as its “parent node”.
Each child automatically knows about its parent node, and a node without a parent is known as a “root” node (represented by the parent attribute pointing to None). Nodes can have multiple children, but as each child node has at most one parent, there can only ever be one root node in a given tree.
The overall structure is technically a connected acyclic undirected rooted graph, otherwise known as a “Tree”.
DataTree objects can also optionally have a name as well as attrs, just like a DataArray. Again these are not normally used unless explicitly accessed by the user.
Creating a DataTree#
One way to create a DataTree from scratch is to create each node individually, specifying the nodes’ relationship to one another as you create each one.
The DataTree constructor takes:
dataset: The data that will be stored in this node, represented by a singlexarray.Dataset.children: The various child nodes (if there are any), given as a mapping from string keys to DataTree objects.name: A string to use as the name of this node.
Let’s make a single datatree node with some example data in it:
ds1 = xr.Dataset({"foo": "orange"}) dt = xr.DataTree(name="root", dataset=ds1) dt
<xarray.DatasetView> Size: 24B Dimensions: () Data variables: foo <U6 24B 'orange'
- Groups: (0)
- Dimensions:
- Coordinates: (0)
- Inherited coordinates: (0)
- Data variables: (1)
- foo
()
<U6
'orange'
array('orange', dtype='<U6')
- foo
- Attributes: (0)
At this point we have created a single node datatree with no parent and no children.
print(dt.parent is None) dt.children
We can add a second node to this tree, assigning it to the parent node dt:
dataset2 = xr.Dataset({"bar": 0}, coords={"y": ("y", [0, 1, 2])}) dt2 = xr.DataTree(name="a", dataset=dataset2)
Add the child Datatree to the root node
dt.children = {"child-node": dt2} dt
<xarray.DatasetView> Size: 24B Dimensions: () Data variables: foo <U6 24B 'orange'
- Groups: (1)
<xarray.DatasetView> Size: 32B
Dimensions: (y: 3)
Coordinates:- y (y) int64 24B 0 1 2
Data variables:
bar int64 8B 0 - Groups: (0)
- Dimensions:
* y: 3 - Coordinates: (1)
* y
(y)
int64
0 1 2 - Data variables: (1)
* bar
()
int64
0 - Attributes: (0)
- y (y) int64 24B 0 1 2
- Dimensions:
- Coordinates: (0)
- Inherited coordinates: (0)
- Data variables: (1)
- foo
()
<U6
'orange'
array('orange', dtype='<U6')
- foo
- Attributes: (0)
More idiomatically you can create a tree from a dictionary of Datasets andDataTrees. In this case we add a new node under dt["child-node"] by providing the explicit path under "child-node" as the dictionary key:
create a third Dataset
ds3 = xr.Dataset({"zed": np.nan})
create a tree from a dictionary of DataTrees and Datasets
dt = xr.DataTree.from_dict({"/": dt, "/child-node/new-zed-node": ds3})
We have created a tree with three nodes in it:
<xarray.DatasetView> Size: 24B Dimensions: () Data variables: foo <U6 24B 'orange'
- Groups: (1)
<xarray.DatasetView> Size: 32B
Dimensions: (y: 3)
Coordinates:- y (y) int64 24B 0 1 2
Data variables:
bar int64 8B 0 - Groups: (1)
<xarray.DatasetView> Size: 32B
Dimensions: (y: 3)
Coordinates:- y (y) int64 24B 0 1 2
Data variables:
zed float64 8B nan- Groups: (0)
- Dimensions:
* y: 3 - Coordinates: (0)
- Data variables: (1)
* zed
()
float64
nan - Attributes: (0)
- y (y) int64 24B 0 1 2
- Dimensions:
* y: 3 - Coordinates: (1)
* y
(y)
int64
0 1 2 - Data variables: (1)
* bar
()
int64
0 - Attributes: (0)
- y (y) int64 24B 0 1 2
- Dimensions:
- Coordinates: (0)
- Inherited coordinates: (0)
- Data variables: (1)
- foo
()
<U6
'orange'
array('orange', dtype='<U6')
- foo
- Attributes: (0)
Consistency checks are enforced. For instance, if we try to create a cycle, where the root node is also a child of a descendant, the constructor will raise an (InvalidTreeError):
dt["child-node"].children = {"new-child": dt}
InvalidTreeError: Cannot set parent, as intended parent is already a descendant of this node.
Alternatively you can also create a DataTree object from:
- A dictionary mapping directory-like paths to either DataTree nodes or data, using xarray.DataTree.from_dict(),
- A well formed netCDF or Zarr file on disk with open_datatree(). See reading and writing files.
For data files with groups that do not not align seexarray.open_groups() or target each group individuallyxarray.open_dataset(group='groupname'). For more information about coordinate alignment see DataTree Inheritance
DataTree Contents#
Like Dataset, DataTree implements the python mapping interface, but with values given by either DataArray objects or otherDataTree objects.
<xarray.DatasetView> Size: 32B Dimensions: (y: 3) Coordinates:
y (y) int64 24B 0 1 2 Data variables: bar int64 8B 0
Groups: (1)
<xarray.DatasetView> Size: 32B
Dimensions: (y: 3)
Coordinates:- y (y) int64 24B 0 1 2
Data variables:
zed float64 8B nan - Groups: (0)
- Dimensions:
* y: 3 - Coordinates: (0)
- Data variables: (1)
* zed
()
float64
nan - Attributes: (0)
- y (y) int64 24B 0 1 2
Dimensions:
- y: 3
Coordinates: (1)
- y
(y)
int64
0 1 2
- y
Inherited coordinates: (0)
Data variables: (1)
- bar
()
int64
0
- bar
Attributes: (0)
<xarray.DataArray 'foo' ()> Size: 24B array('orange', dtype='<U6')
- 'orange'
array('orange', dtype='<U6') - Coordinates: (0)
- Indexes: (0)
- Attributes: (0)
Iterating over keys will iterate over both the names of variables and child nodes.
We can also access all the data in a single node, and its inherited coordinates, through a dataset-like view
<xarray.DatasetView> Size: 32B Dimensions: (y: 3) Coordinates:
y (y) int64 24B 0 1 2 Data variables: bar int64 8B 0
Dimensions:
- y: 3
Coordinates: (1)
- y
(y)
int64
0 1 2
- y
Data variables: (1)
- bar
()
int64
0
- bar
Indexes: (1)
- PandasIndex
PandasIndex(Index([0, 1, 2], dtype='int64', name='y'))
- PandasIndex
Attributes: (0)
This demonstrates the fact that the data in any one node is equivalent to the contents of a single Dataset object. The DataTree.dataset property returns an immutable view, but we can instead extract the node’s data contents as a new and mutable Dataset object viaDataTree.to_dataset():
dt["child-node"].to_dataset()
<xarray.Dataset> Size: 32B Dimensions: (y: 3) Coordinates:
y (y) int64 24B 0 1 2 Data variables: bar int64 8B 0
Dimensions:
- y: 3
Coordinates: (1)
- y
(y)
int64
0 1 2
- y
Data variables: (1)
- bar
()
int64
0
- bar
Indexes: (1)
- PandasIndex
PandasIndex(Index([0, 1, 2], dtype='int64', name='y'))
- PandasIndex
Attributes: (0)
Like with Dataset, you can access the data and coordinate variables of a node separately via the data_vars and coords attributes:
dt["child-node"].data_vars
Data variables: bar int64 8B 0
Coordinates:
- y (y) int64 24B 0 1 2
Dictionary-like methods#
We can update a datatree in-place using Python’s standard dictionary syntax, similar to how we can for Dataset objects. For example, to create this example DataTree from scratch, we could have written:
dt = xr.DataTree(name="root") dt["foo"] = "orange" dt["child-node"] = xr.DataTree( dataset=xr.Dataset({"bar": 0}, coords={"y": ("y", [0, 1, 2])}) ) dt["child-node/new-zed-node/zed"] = np.nan dt
<xarray.DatasetView> Size: 24B Dimensions: () Data variables: foo <U6 24B 'orange'
- Groups: (1)
<xarray.DatasetView> Size: 32B
Dimensions: (y: 3)
Coordinates:- y (y) int64 24B 0 1 2
Data variables:
bar int64 8B 0 - Groups: (1)
<xarray.DatasetView> Size: 32B
Dimensions: (y: 3)
Coordinates:- y (y) int64 24B 0 1 2
Data variables:
zed float64 8B nan- Groups: (0)
- Dimensions:
* y: 3 - Coordinates: (0)
- Data variables: (1)
* zed
()
float64
nan - Attributes: (0)
- y (y) int64 24B 0 1 2
- Dimensions:
* y: 3 - Coordinates: (1)
* y
(y)
int64
0 1 2 - Data variables: (1)
* bar
()
int64
0 - Attributes: (0)
- y (y) int64 24B 0 1 2
- Dimensions:
- Coordinates: (0)
- Inherited coordinates: (0)
- Data variables: (1)
- foo
()
<U6
'orange'
array('orange', dtype='<U6')
- foo
- Attributes: (0)
To change the variables in a node of a DataTree, you can use all the standard dictionary methods, including values, items, __delitem__,get and xarray.DataTree.update(). Note that assigning a DataTree object to a DataTree variable using__setitem__ or update() will automatically align the array(s) to the original node’s indexes.
If you copy a DataTree using the copy() function or thexarray.DataTree.copy() method it will copy the subtree, meaning that node and children below it, but no parents above it. Like for Dataset, this copy is shallow by default, but you can copy all the underlying data arrays by calling dt.copy(deep=True).
DataTree Inheritance#
DataTree implements a simple inheritance mechanism. Coordinates, dimensions and their associated indices are propagated from downward starting from the root node to all descendent nodes. Coordinate inheritance was inspired by the NetCDF-CF inherited dimensions, but DataTree’s inheritance is slightly stricter yet easier to reason about.
The constraint that this puts on a DataTree is that dimensions and indices that are inherited must be aligned with any direct descendant node’s existing dimension or index. This allows descendants to use dimensions defined in ancestor nodes, without duplicating that information. But as a consequence, if a dimension-name is defined in on a node and that same dimension-name exists in one of its ancestors, they must align (have the same index and size).
Some examples:
Set up coordinates
time = xr.DataArray(data=["2022-01", "2023-01"], dims="time") stations = xr.DataArray(data=list("abcdef"), dims="station") lon = [-100, -80, -60] lat = [10, 20, 30]
Set up fake data
wind_speed = xr.DataArray(np.ones((2, 6)) * 2, dims=("time", "station")) pressure = xr.DataArray(np.ones((2, 6)) * 3, dims=("time", "station")) air_temperature = xr.DataArray(np.ones((2, 6)) * 4, dims=("time", "station")) dewpoint = xr.DataArray(np.ones((2, 6)) * 5, dims=("time", "station")) infrared = xr.DataArray(np.ones((2, 3, 3)) * 6, dims=("time", "lon", "lat")) true_color = xr.DataArray(np.ones((2, 3, 3)) * 7, dims=("time", "lon", "lat"))
dt2 = xr.DataTree.from_dict( { "/": xr.Dataset( coords={"time": time}, ), "/weather": xr.Dataset( coords={"station": stations}, data_vars={ "wind_speed": wind_speed, "pressure": pressure, }, ), "/weather/temperature": xr.Dataset( data_vars={ "air_temperature": air_temperature, "dewpoint": dewpoint, }, ), "/satellite": xr.Dataset( coords={"lat": lat, "lon": lon}, data_vars={ "infrared": infrared, "true_color": true_color, }, ), }, ) dt2
<xarray.DatasetView> Size: 56B Dimensions: (time: 2) Coordinates:
time (time) <U7 56B '2022-01' '2023-01' Data variables: empty
Groups: (2)
<xarray.DatasetView> Size: 272B
Dimensions: (time: 2, station: 6)
Coordinates:- time (time) <U7 56B '2022-01' '2023-01'
- station (station) <U1 24B 'a' 'b' 'c' 'd' 'e' 'f'
Data variables:
wind_speed (time, station) float64 96B 2.0 2.0 2.0 2.0 ... 2.0 2.0 2.0 2.0
pressure (time, station) float64 96B 3.0 3.0 3.0 3.0 ... 3.0 3.0 3.0 3.0 - Groups: (1)
<xarray.DatasetView> Size: 272B
Dimensions: (time: 2, station: 6)
Coordinates:- time (time) <U7 56B '2022-01' '2023-01'
- station (station) <U1 24B 'a' 'b' 'c' 'd' 'e' 'f'
Data variables:
air_temperature (time, station) float64 96B 4.0 4.0 4.0 4.0 ... 4.0 4.0 4.0
dewpoint (time, station) float64 96B 5.0 5.0 5.0 5.0 ... 5.0 5.0 5.0- Groups: (0)
- Dimensions:
* time: 2
* station: 6 - Coordinates: (0)
- Data variables: (2)
* air_temperature
(time, station)
float64
4.0 4.0 4.0 4.0 ... 4.0 4.0 4.0 4.0
array([[4., 4., 4., 4., 4., 4.],
[4., 4., 4., 4., 4., 4.]], shape=(2, 6))
* dewpoint
(time, station)
float64
5.0 5.0 5.0 5.0 ... 5.0 5.0 5.0 5.0
array([[5., 5., 5., 5., 5., 5.],
[5., 5., 5., 5., 5., 5.]], shape=(2, 6)) - Attributes: (0)
- Dimensions:
* time: 2
* station: 6 - Coordinates: (1)
* station
(station)
<U1
'a' 'b' 'c' 'd' 'e' 'f'
array(['a', 'b', 'c', 'd', 'e', 'f'], dtype='<U1') - Data variables: (2)
* wind_speed
(time, station)
float64
2.0 2.0 2.0 2.0 ... 2.0 2.0 2.0 2.0
array([[2., 2., 2., 2., 2., 2.],
[2., 2., 2., 2., 2., 2.]], shape=(2, 6))
* pressure
(time, station)
float64
3.0 3.0 3.0 3.0 ... 3.0 3.0 3.0 3.0
array([[3., 3., 3., 3., 3., 3.],
[3., 3., 3., 3., 3., 3.]], shape=(2, 6)) - Attributes: (0)
<xarray.DatasetView> Size: 392B
Dimensions: (time: 2, lat: 3, lon: 3)
Coordinates: - time (time) <U7 56B '2022-01' '2023-01'
- lat (lat) int64 24B 10 20 30
- lon (lon) int64 24B -100 -80 -60
Data variables:
infrared (time, lon, lat) float64 144B 6.0 6.0 6.0 6.0 ... 6.0 6.0 6.0
true_color (time, lon, lat) float64 144B 7.0 7.0 7.0 7.0 ... 7.0 7.0 7.0 - Groups: (0)
- Dimensions:
* time: 2
* lat: 3
* lon: 3 - Coordinates: (2)
* lat
(lat)
int64
10 20 30
* lon
(lon)
int64
-100 -80 -60 - Data variables: (2)
* infrared
(time, lon, lat)
float64
6.0 6.0 6.0 6.0 ... 6.0 6.0 6.0 6.0
array([[[6., 6., 6.],
[6., 6., 6.],
[6., 6., 6.]],
[[6., 6., 6.],
[6., 6., 6.],
[6., 6., 6.]]], shape=(2, 3, 3))
* true_color
(time, lon, lat)
float64
7.0 7.0 7.0 7.0 ... 7.0 7.0 7.0 7.0
array([[[7., 7., 7.],
[7., 7., 7.],
[7., 7., 7.]],
[[7., 7., 7.],
[7., 7., 7.],
[7., 7., 7.]]], shape=(2, 3, 3)) - Attributes: (0)
Dimensions:
- time: 2
Coordinates: (1)
- time
(time)
<U7
'2022-01' '2023-01'
array(['2022-01', '2023-01'], dtype='<U7')
- time
Inherited coordinates: (0)
Data variables: (0)
Attributes: (0)
Here there are four different coordinate variables, which apply to variables in the DataTree in different ways:
time is a shared coordinate used by both weather and satellite variablesstation is used only for weather variableslat and lon are only use for satellite images
Coordinate variables are inherited to descendent nodes, which is only possible because variables at different levels of a hierarchical DataTree are always aligned. Placing the time variable at the root node automatically indicates that it applies to all descendent nodes. Similarly, station is in the baseweather node, because it applies to all weather variables, both directly inweather and in the temperature sub-tree. Notice the inherited coordinates are explicitly shown in the tree representation under Inherited coordinates:.
<xarray.DatasetView> Size: 272B Dimensions: (time: 2, station: 6) Coordinates:
time (time) <U7 56B '2022-01' '2023-01'
station (station) <U1 24B 'a' 'b' 'c' 'd' 'e' 'f' Data variables: wind_speed (time, station) float64 96B 2.0 2.0 2.0 2.0 ... 2.0 2.0 2.0 2.0 pressure (time, station) float64 96B 3.0 3.0 3.0 3.0 ... 3.0 3.0 3.0 3.0
Groups: (1)
<xarray.DatasetView> Size: 272B
Dimensions: (time: 2, station: 6)
Coordinates:- time (time) <U7 56B '2022-01' '2023-01'
- station (station) <U1 24B 'a' 'b' 'c' 'd' 'e' 'f'
Data variables:
air_temperature (time, station) float64 96B 4.0 4.0 4.0 4.0 ... 4.0 4.0 4.0
dewpoint (time, station) float64 96B 5.0 5.0 5.0 5.0 ... 5.0 5.0 5.0 - Groups: (0)
- Dimensions:
* time: 2
* station: 6 - Coordinates: (0)
- Data variables: (2)
* air_temperature
(time, station)
float64
4.0 4.0 4.0 4.0 ... 4.0 4.0 4.0 4.0
array([[4., 4., 4., 4., 4., 4.],
[4., 4., 4., 4., 4., 4.]], shape=(2, 6))
* dewpoint
(time, station)
float64
5.0 5.0 5.0 5.0 ... 5.0 5.0 5.0 5.0
array([[5., 5., 5., 5., 5., 5.],
[5., 5., 5., 5., 5., 5.]], shape=(2, 6)) - Attributes: (0)
Dimensions:
- time: 2
- station: 6
Coordinates: (1)
- station
(station)
<U1
'a' 'b' 'c' 'd' 'e' 'f'
array(['a', 'b', 'c', 'd', 'e', 'f'], dtype='<U1')
- station
Inherited coordinates: (1)
- time
(time)
<U7
'2022-01' '2023-01'
array(['2022-01', '2023-01'], dtype='<U7')
- time
Data variables: (2)
- wind_speed
(time, station)
float64
2.0 2.0 2.0 2.0 ... 2.0 2.0 2.0 2.0
array([[2., 2., 2., 2., 2., 2.],
[2., 2., 2., 2., 2., 2.]], shape=(2, 6)) - pressure
(time, station)
float64
3.0 3.0 3.0 3.0 ... 3.0 3.0 3.0 3.0
array([[3., 3., 3., 3., 3., 3.],
[3., 3., 3., 3., 3., 3.]], shape=(2, 6))
- wind_speed
Attributes: (0)
Accessing any of the lower level trees through the .dataset property automatically includes coordinates from higher levels (e.g., time andstation):
dt2["/weather/temperature"].dataset
<xarray.DatasetView> Size: 272B Dimensions: (time: 2, station: 6) Coordinates:
time (time) <U7 56B '2022-01' '2023-01'
station (station) <U1 24B 'a' 'b' 'c' 'd' 'e' 'f' Data variables: air_temperature (time, station) float64 96B 4.0 4.0 4.0 4.0 ... 4.0 4.0 4.0 dewpoint (time, station) float64 96B 5.0 5.0 5.0 5.0 ... 5.0 5.0 5.0
Dimensions:
- time: 2
- station: 6
Coordinates: (2)
- time
(time)
<U7
'2022-01' '2023-01'
array(['2022-01', '2023-01'], dtype='<U7') - station
(station)
<U1
'a' 'b' 'c' 'd' 'e' 'f'
array(['a', 'b', 'c', 'd', 'e', 'f'], dtype='<U1')
- time
Data variables: (2)
- air_temperature
(time, station)
float64
4.0 4.0 4.0 4.0 ... 4.0 4.0 4.0 4.0
array([[4., 4., 4., 4., 4., 4.],
[4., 4., 4., 4., 4., 4.]], shape=(2, 6)) - dewpoint
(time, station)
float64
5.0 5.0 5.0 5.0 ... 5.0 5.0 5.0 5.0
array([[5., 5., 5., 5., 5., 5.],
[5., 5., 5., 5., 5., 5.]], shape=(2, 6))
- air_temperature
Indexes: (2)
- PandasIndex
PandasIndex(Index(['2022-01', '2023-01'], dtype='object', name='time')) - PandasIndex
PandasIndex(Index(['a', 'b', 'c', 'd', 'e', 'f'], dtype='object', name='station'))
- PandasIndex
Attributes: (0)
Similarly, when you retrieve a Dataset through to_dataset() , the inherited coordinates are included by default unless you exclude them with the inherit flag:
dt2["/weather/temperature"].to_dataset()
<xarray.Dataset> Size: 272B Dimensions: (time: 2, station: 6) Coordinates:
time (time) <U7 56B '2022-01' '2023-01'
station (station) <U1 24B 'a' 'b' 'c' 'd' 'e' 'f' Data variables: air_temperature (time, station) float64 96B 4.0 4.0 4.0 4.0 ... 4.0 4.0 4.0 dewpoint (time, station) float64 96B 5.0 5.0 5.0 5.0 ... 5.0 5.0 5.0
Dimensions:
- time: 2
- station: 6
Coordinates: (2)
- time
(time)
<U7
'2022-01' '2023-01'
array(['2022-01', '2023-01'], dtype='<U7') - station
(station)
<U1
'a' 'b' 'c' 'd' 'e' 'f'
array(['a', 'b', 'c', 'd', 'e', 'f'], dtype='<U1')
- time
Data variables: (2)
- air_temperature
(time, station)
float64
4.0 4.0 4.0 4.0 ... 4.0 4.0 4.0 4.0
array([[4., 4., 4., 4., 4., 4.],
[4., 4., 4., 4., 4., 4.]], shape=(2, 6)) - dewpoint
(time, station)
float64
5.0 5.0 5.0 5.0 ... 5.0 5.0 5.0 5.0
array([[5., 5., 5., 5., 5., 5.],
[5., 5., 5., 5., 5., 5.]], shape=(2, 6))
- air_temperature
Indexes: (2)
- PandasIndex
PandasIndex(Index(['2022-01', '2023-01'], dtype='object', name='time')) - PandasIndex
PandasIndex(Index(['a', 'b', 'c', 'd', 'e', 'f'], dtype='object', name='station'))
- PandasIndex
Attributes: (0)
dt2["/weather/temperature"].to_dataset(inherit=False)
<xarray.Dataset> Size: 192B Dimensions: (time: 2, station: 6) Dimensions without coordinates: time, station Data variables: air_temperature (time, station) float64 96B 4.0 4.0 4.0 4.0 ... 4.0 4.0 4.0 dewpoint (time, station) float64 96B 5.0 5.0 5.0 5.0 ... 5.0 5.0 5.0
- Dimensions:
- time: 2
- station: 6
- Coordinates: (0)
- Data variables: (2)
- air_temperature
(time, station)
float64
4.0 4.0 4.0 4.0 ... 4.0 4.0 4.0 4.0
array([[4., 4., 4., 4., 4., 4.],
[4., 4., 4., 4., 4., 4.]], shape=(2, 6)) - dewpoint
(time, station)
float64
5.0 5.0 5.0 5.0 ... 5.0 5.0 5.0 5.0
array([[5., 5., 5., 5., 5., 5.],
[5., 5., 5., 5., 5., 5.]], shape=(2, 6))
- air_temperature
- Indexes: (0)
- Attributes: (0)
For more examples and further discussion see alignment and coordinate inheritance.
Coordinates#
Coordinates are ancillary variables stored for DataArray and Datasetobjects in the coords attribute:
Coordinates: lat (loc) float64 16B 42.25 42.21 lon (loc) float64 16B -99.83 -99.32
- time (time) datetime64[ns] 32B 2014-09-06 ... 2014-09-09 reference_time datetime64[ns] 8B 2014-09-05 day (time) int64 32B 6 7 8 9
Unlike attributes, xarray does interpret and persist coordinates in operations that transform xarray objects. There are two types of coordinates in xarray:
- dimension coordinates are one dimensional coordinates with a name equal to their sole dimension (marked by
*when printing a dataset or data array). They are used for label based indexing and alignment, like theindexfound on a pandas DataFrame orSeries. Indeed, these “dimension” coordinates use apandas.Index internally to store their values. - non-dimension coordinates are variables that contain coordinate data, but are not a dimension coordinate. They can be multidimensional (seeWorking with Multidimensional Coordinates), and there is no relationship between the name of a non-dimension coordinate and the name(s) of its dimension(s). Non-dimension coordinates can be useful for indexing or plotting; otherwise, xarray does not make any direct use of the values associated with them. They are not used for alignment or automatic indexing, nor are they required to match when doing arithmetic (see Coordinates).
Note
Xarray’s terminology differs from the CF terminology, where the “dimension coordinates” are called “coordinate variables”, and the “non-dimension coordinates” are called “auxiliary coordinate variables” (see GH1295 for more details).
Modifying coordinates#
To entirely add or remove coordinate arrays, you can use dictionary like syntax, as shown above.
To convert back and forth between data and coordinates, you can use theset_coords() andreset_coords() methods:
<xarray.Dataset> Size: 680B Dimensions: (loc: 2, instrument: 3, time: 4) Coordinates:
time (time) datetime64[ns] 32B 2014-09-06 ... 2014-09-09 Dimensions without coordinates: loc, instrument Data variables: temperature (loc, instrument, time) float64 192B 29.11 ... 9.063 temperature_double (loc, instrument, time) float64 192B 58.22 ... 18.13 precipitation (loc, instrument, time) float64 192B 4.562 ... 1.613 lat (loc) float64 16B 42.25 42.21 lon (loc) float64 16B -99.83 -99.32 reference_time datetime64[ns] 8B 2014-09-05 day (time) int64 32B 6 7 8 9
Dimensions:
- loc: 2
- instrument: 3
- time: 4
Coordinates: (1)
- time
(time)
datetime64[ns]
2014-09-06 ... 2014-09-09
array(['2014-09-06T00:00:00.000000000', '2014-09-07T00:00:00.000000000',
'2014-09-08T00:00:00.000000000', '2014-09-09T00:00:00.000000000'],
dtype='datetime64[ns]')
- time
Data variables: (7)
- temperature
(loc, instrument, time)
float64
29.11 18.2 22.83 ... 21.92 9.063
array([[[29.11241877, 18.20125767, 22.82990387, 32.92714559],
[29.94046392, 7.18177696, 22.60070734, 13.78914233],
[14.17424919, 18.28478802, 16.15234857, 26.63418806]],
[[21.0883018 , 15.97340013, 18.55090586, 17.66939462],
[26.95263259, 13.35873389, 17.50454161, 8.16723409],
[-5.42391853, 20.22894876, 21.91548959, 9.06267984]]],
shape=(2, 3, 4)) - temperature_double
(loc, instrument, time)
float64
58.22 36.4 45.66 ... 43.83 18.13
array([[[ 58.22483754, 36.40251533, 45.65980775, 65.85429119],
[ 59.88092784, 14.36355392, 45.20141468, 27.57828467],
[ 28.34849837, 36.56957603, 32.30469714, 53.26837611]],
[[ 42.1766036 , 31.94680026, 37.10181172, 35.33878924],
[ 53.90526517, 26.71746778, 35.00908323, 16.33446817],
[-10.84783705, 40.45789753, 43.83097918, 18.12535967]]],
shape=(2, 3, 4)) - precipitation
(loc, instrument, time)
float64
4.562 5.684 0.1879 ... 2.089 1.613
array([[[4.56150332, 5.68433949, 0.187898 , 6.17635497],
[6.12095723, 6.16933997, 9.43748079, 6.81820299],
[3.59507901, 4.37031954, 6.97631196, 0.60225472]],
[[6.66766715, 6.7063787 , 2.10382561, 1.28926298],
[3.15428351, 3.63710771, 5.7019677 , 4.38601513],
[9.88373838, 1.02044811, 2.08876756, 1.61309518]]],
shape=(2, 3, 4)) - lat
(loc)
float64
42.25 42.21 - lon
(loc)
float64
-99.83 -99.32 - reference_time
()
datetime64[ns]
2014-09-05
array('2014-09-05T00:00:00.000000000', dtype='datetime64[ns]') - day
(time)
int64
6 7 8 9
- temperature
Indexes: (1)
- PandasIndex
PandasIndex(DatetimeIndex(['2014-09-06', '2014-09-07', '2014-09-08', '2014-09-09'], dtype='datetime64[ns]', name='time', freq='D'))
- PandasIndex
Attributes: (0)
ds.set_coords(["temperature", "precipitation"])
<xarray.Dataset> Size: 680B Dimensions: (loc: 2, instrument: 3, time: 4) Coordinates: temperature (loc, instrument, time) float64 192B 29.11 ... 9.063 precipitation (loc, instrument, time) float64 192B 4.562 ... 1.613 lat (loc) float64 16B 42.25 42.21 lon (loc) float64 16B -99.83 -99.32
time (time) datetime64[ns] 32B 2014-09-06 ... 2014-09-09 reference_time datetime64[ns] 8B 2014-09-05 day (time) int64 32B 6 7 8 9 Dimensions without coordinates: loc, instrument Data variables: temperature_double (loc, instrument, time) float64 192B 58.22 ... 18.13
Dimensions:
- loc: 2
- instrument: 3
- time: 4
Coordinates: (7)
- temperature
(loc, instrument, time)
float64
29.11 18.2 22.83 ... 21.92 9.063
array([[[29.11241877, 18.20125767, 22.82990387, 32.92714559],
[29.94046392, 7.18177696, 22.60070734, 13.78914233],
[14.17424919, 18.28478802, 16.15234857, 26.63418806]],
[[21.0883018 , 15.97340013, 18.55090586, 17.66939462],
[26.95263259, 13.35873389, 17.50454161, 8.16723409],
[-5.42391853, 20.22894876, 21.91548959, 9.06267984]]],
shape=(2, 3, 4)) - precipitation
(loc, instrument, time)
float64
4.562 5.684 0.1879 ... 2.089 1.613
array([[[4.56150332, 5.68433949, 0.187898 , 6.17635497],
[6.12095723, 6.16933997, 9.43748079, 6.81820299],
[3.59507901, 4.37031954, 6.97631196, 0.60225472]],
[[6.66766715, 6.7063787 , 2.10382561, 1.28926298],
[3.15428351, 3.63710771, 5.7019677 , 4.38601513],
[9.88373838, 1.02044811, 2.08876756, 1.61309518]]],
shape=(2, 3, 4)) - lat
(loc)
float64
42.25 42.21 - lon
(loc)
float64
-99.83 -99.32 - time
(time)
datetime64[ns]
2014-09-06 ... 2014-09-09
array(['2014-09-06T00:00:00.000000000', '2014-09-07T00:00:00.000000000',
'2014-09-08T00:00:00.000000000', '2014-09-09T00:00:00.000000000'],
dtype='datetime64[ns]') - reference_time
()
datetime64[ns]
2014-09-05
array('2014-09-05T00:00:00.000000000', dtype='datetime64[ns]') - day
(time)
int64
6 7 8 9
- temperature
Data variables: (1)
- temperature_double
(loc, instrument, time)
float64
58.22 36.4 45.66 ... 43.83 18.13
array([[[ 58.22483754, 36.40251533, 45.65980775, 65.85429119],
[ 59.88092784, 14.36355392, 45.20141468, 27.57828467],
[ 28.34849837, 36.56957603, 32.30469714, 53.26837611]],
[[ 42.1766036 , 31.94680026, 37.10181172, 35.33878924],
[ 53.90526517, 26.71746778, 35.00908323, 16.33446817],
[-10.84783705, 40.45789753, 43.83097918, 18.12535967]]],
shape=(2, 3, 4))
- temperature_double
Indexes: (1)
- PandasIndex
PandasIndex(DatetimeIndex(['2014-09-06', '2014-09-07', '2014-09-08', '2014-09-09'], dtype='datetime64[ns]', name='time', freq='D'))
- PandasIndex
Attributes: (0)
ds["temperature"].reset_coords(drop=True)
<xarray.DataArray 'temperature' (loc: 2, instrument: 3, time: 4)> Size: 192B array([[[29.11241877, 18.20125767, 22.82990387, 32.92714559], [29.94046392, 7.18177696, 22.60070734, 13.78914233], [14.17424919, 18.28478802, 16.15234857, 26.63418806]],
[[21.0883018 , 15.97340013, 18.55090586, 17.66939462],
[26.95263259, 13.35873389, 17.50454161, 8.16723409],
[-5.42391853, 20.22894876, 21.91548959, 9.06267984]]],
shape=(2, 3, 4))Coordinates:
time (time) datetime64[ns] 32B 2014-09-06 2014-09-07 ... 2014-09-09 Dimensions without coordinates: loc, instrument
29.11 18.2 22.83 32.93 29.94 7.182 ... 8.167 -5.424 20.23 21.92 9.063
array([[[29.11241877, 18.20125767, 22.82990387, 32.92714559],
[29.94046392, 7.18177696, 22.60070734, 13.78914233],
[14.17424919, 18.28478802, 16.15234857, 26.63418806]],
[[21.0883018 , 15.97340013, 18.55090586, 17.66939462],
[26.95263259, 13.35873389, 17.50454161, 8.16723409],
[-5.42391853, 20.22894876, 21.91548959, 9.06267984]]],
shape=(2, 3, 4))Coordinates: (1)
- time
(time)
datetime64[ns]
2014-09-06 ... 2014-09-09
array(['2014-09-06T00:00:00.000000000', '2014-09-07T00:00:00.000000000',
'2014-09-08T00:00:00.000000000', '2014-09-09T00:00:00.000000000'],
dtype='datetime64[ns]')
- time
Indexes: (1)
- PandasIndex
PandasIndex(DatetimeIndex(['2014-09-06', '2014-09-07', '2014-09-08', '2014-09-09'], dtype='datetime64[ns]', name='time', freq='D'))
- PandasIndex
Attributes: (0)
Notice that these operations skip coordinates with names given by dimensions, as used for indexing. This mostly because we are not entirely sure how to design the interface around the fact that xarray cannot store a coordinate and variable with the name but different values in the same dictionary. But we do recognize that supporting something like this would be useful.
Coordinates methods#
Coordinates objects also have a few useful methods, mostly for converting them into dataset objects:
<xarray.Dataset> Size: 104B Dimensions: (loc: 2, time: 4) Coordinates: lat (loc) float64 16B 42.25 42.21 lon (loc) float64 16B -99.83 -99.32
time (time) datetime64[ns] 32B 2014-09-06 ... 2014-09-09 reference_time datetime64[ns] 8B 2014-09-05 day (time) int64 32B 6 7 8 9 Dimensions without coordinates: loc Data variables: empty
Dimensions:
- loc: 2
- time: 4
Coordinates: (5)
- lat
(loc)
float64
42.25 42.21 - lon
(loc)
float64
-99.83 -99.32 - time
(time)
datetime64[ns]
2014-09-06 ... 2014-09-09
array(['2014-09-06T00:00:00.000000000', '2014-09-07T00:00:00.000000000',
'2014-09-08T00:00:00.000000000', '2014-09-09T00:00:00.000000000'],
dtype='datetime64[ns]') - reference_time
()
datetime64[ns]
2014-09-05
array('2014-09-05T00:00:00.000000000', dtype='datetime64[ns]') - day
(time)
int64
6 7 8 9
- lat
Data variables: (0)
Indexes: (1)
- PandasIndex
PandasIndex(DatetimeIndex(['2014-09-06', '2014-09-07', '2014-09-08', '2014-09-09'], dtype='datetime64[ns]', name='time', freq='D'))
- PandasIndex
Attributes: (0)
The merge method is particularly interesting, because it implements the same logic used for merging coordinates in arithmetic operations (see Computation):
alt = xr.Dataset(coords={"z": [10], "lat": 0, "lon": 0}) ds.coords.merge(alt.coords)
<xarray.Dataset> Size: 80B Dimensions: (time: 4, z: 1) Coordinates:
time (time) datetime64[ns] 32B 2014-09-06 ... 2014-09-09 reference_time datetime64[ns] 8B 2014-09-05 day (time) int64 32B 6 7 8 9
z (z) int64 8B 10 Data variables: empty
Dimensions:
- time: 4
- z: 1
Coordinates: (4)
- time
(time)
datetime64[ns]
2014-09-06 ... 2014-09-09
array(['2014-09-06T00:00:00.000000000', '2014-09-07T00:00:00.000000000',
'2014-09-08T00:00:00.000000000', '2014-09-09T00:00:00.000000000'],
dtype='datetime64[ns]') - reference_time
()
datetime64[ns]
2014-09-05
array('2014-09-05T00:00:00.000000000', dtype='datetime64[ns]') - day
(time)
int64
6 7 8 9 - z
(z)
int64
10
- time
Data variables: (0)
Indexes: (2)
- PandasIndex
PandasIndex(DatetimeIndex(['2014-09-06', '2014-09-07', '2014-09-08', '2014-09-09'], dtype='datetime64[ns]', name='time', freq='D')) - PandasIndex
PandasIndex(Index([10], dtype='int64', name='z'))
- PandasIndex
Attributes: (0)
The coords.merge method may be useful if you want to implement your own binary operations that act on xarray objects. In the future, we hope to write more helper functions so that you can easily make your functions act like xarray’s built-in arithmetic.
Indexes#
To convert a coordinate (or any DataArray) into an actualpandas.Index, use the to_index() method:
DatetimeIndex(['2014-09-06', '2014-09-07', '2014-09-08', '2014-09-09'], dtype='datetime64[ns]', name='time', freq='D')
A useful shortcut is the indexes property (on both DataArray andDataset), which lazily constructs a dictionary whose keys are given by each dimension and whose the values are Index objects:
Indexes: time DatetimeIndex(['2014-09-06', '2014-09-07', '2014-09-08', '2014-09-09'], dtype='datetime64[ns]', name='time', freq='D')
MultiIndex coordinates#
Xarray supports labeling coordinate values with a pandas.MultiIndex:
midx = pd.MultiIndex.from_arrays( [["R", "R", "V", "V"], [0.1, 0.2, 0.7, 0.9]], names=("band", "wn") ) mda = xr.DataArray(np.random.rand(4), coords={"spec": midx}, dims="spec") mda
<xarray.DataArray (spec: 4)> Size: 32B array([0.65310833, 0.2532916 , 0.46631077, 0.24442559]) Coordinates:
spec (spec) object 32B MultiIndex
band (spec) object 32B 'R' 'R' 'V' 'V'
wn (spec) float64 32B 0.1 0.2 0.7 0.9
0.6531 0.2533 0.4663 0.2444
array([0.65310833, 0.2532916 , 0.46631077, 0.24442559])Coordinates: (3)
- spec
(spec)
object
MultiIndex
array([('R', 0.1), ('R', 0.2), ('V', 0.7), ('V', 0.9)], dtype=object) - band
(spec)
object
'R' 'R' 'V' 'V'
array(['R', 'R', 'V', 'V'], dtype=object) - wn
(spec)
float64
0.1 0.2 0.7 0.9
array([0.1, 0.2, 0.7, 0.9])
- spec
Indexes: (1)
- PandasMultiIndex
PandasIndex(MultiIndex([('R', 0.1),
('R', 0.2),
('V', 0.7),
('V', 0.9)],
name='spec'))
- PandasMultiIndex
Attributes: (0)
For convenience multi-index levels are directly accessible as “virtual” or “derived” coordinates (marked by - when printing a dataset or data array):
<xarray.DataArray 'band' (spec: 4)> Size: 32B array(['R', 'R', 'V', 'V'], dtype=object) Coordinates:
spec (spec) object 32B MultiIndex
band (spec) object 32B 'R' 'R' 'V' 'V'
wn (spec) float64 32B 0.1 0.2 0.7 0.9
'R' 'R' 'V' 'V'
array(['R', 'R', 'V', 'V'], dtype=object)Coordinates: (3)
- spec
(spec)
object
MultiIndex
array([('R', 0.1), ('R', 0.2), ('V', 0.7), ('V', 0.9)], dtype=object) - band
(spec)
object
'R' 'R' 'V' 'V'
array(['R', 'R', 'V', 'V'], dtype=object) - wn
(spec)
float64
0.1 0.2 0.7 0.9
array([0.1, 0.2, 0.7, 0.9])
- spec
Indexes: (1)
- PandasMultiIndex
PandasIndex(MultiIndex([('R', 0.1),
('R', 0.2),
('V', 0.7),
('V', 0.9)],
name='spec'))
- PandasMultiIndex
Attributes: (0)
<xarray.DataArray 'wn' (spec: 4)> Size: 32B array([0.1, 0.2, 0.7, 0.9]) Coordinates:
spec (spec) object 32B MultiIndex
band (spec) object 32B 'R' 'R' 'V' 'V'
wn (spec) float64 32B 0.1 0.2 0.7 0.9
0.1 0.2 0.7 0.9
array([0.1, 0.2, 0.7, 0.9])Coordinates: (3)
- spec
(spec)
object
MultiIndex
array([('R', 0.1), ('R', 0.2), ('V', 0.7), ('V', 0.9)], dtype=object) - band
(spec)
object
'R' 'R' 'V' 'V'
array(['R', 'R', 'V', 'V'], dtype=object) - wn
(spec)
float64
0.1 0.2 0.7 0.9
array([0.1, 0.2, 0.7, 0.9])
- spec
Indexes: (1)
- PandasMultiIndex
PandasIndex(MultiIndex([('R', 0.1),
('R', 0.2),
('V', 0.7),
('V', 0.9)],
name='spec'))
- PandasMultiIndex
Attributes: (0)
Indexing with multi-index levels is also possible using the sel method (see Multi-level indexing).
Unlike other coordinates, “virtual” level coordinates are not stored in the coords attribute of DataArray and Dataset objects (although they are shown when printing the coords attribute). Consequently, most of the coordinates related methods don’t apply for them. It also can’t be used to replace one particular level.
Because in a DataArray or Dataset object each multi-index level is accessible as a “virtual” coordinate, its name must not conflict with the names of the other levels, coordinates and data variables of the same object. Even though xarray sets default names for multi-indexes with unnamed levels, it is recommended that you explicitly set the names of the levels.