Create, Edit, and View Coverage Filter Rules - MATLAB & Simulink (original) (raw)
Create and Edit Coverage Filter Rules
- Create a Coverage Filter Rule
- Select the Filtering Mode
- Add Rationale to a Coverage Filter Rule
- Justify Dead Logic from Simulink Design Verifier Dead Logic Analysis
- Justify Dead Logic from Polyspace Code Prover Results
Create a Coverage Filter Rule
To create a coverage filter rule:
- Enable model coverage.
- To record coverage results, simulate the model.
- Create a new filter rule in one of these ways:
- In the model window, right-click a model object and select > .
- In the Details section of the Coverage Report, clickJustify or Exclude for a model object.
- Create a new coverage filter file directly from the coverage Results Explorer:
1. Click Applied filters.
2. Click New filter.
3. Enter a Name andDescription for the filter.
4. Click Save as.
5. Specify a file name and folder for the filter file and click Save.
Alternatively, you can right-click theApplied filters label and select New filter.
Depending on which option you select, the Type field in the View Applied Filters in the Coverage Results Explorer is set for the coverage filter rule you selected. You cannot override the value in the Type field.
Select the Filtering Mode
When you create a filtering rule, the default filtering mode is Excluded. Excluded objects do not appear in the coverage reports. You can also set the filtering mode to Justified. Justified blocks appear as achieving 100% coverage.
For more information, see Coverage Filtering.
Add Rationale to a Coverage Filter Rule
Optionally, you can add text that describes why you exclude that object or objects from coverage recording. This information can be useful to others who review the coverage for your model. When you add a coverage filter rule, theApplied filters section of the coverage Results Explorer opens. To add the rationale:
- Double-click the Rationale field for the rule.
- Delete the existing text.
- Add the rationale for excluding this object.
Note
The Rationale field and Mode field are the only coverage filter rule fields that you can edit in theApplied filters section of the coverage Results Explorer.
After you add a new coverage filter rule or edit an existing coverage filter rule, click Apply to enable the Generate report and Highlight model with coverage results links.
Justify Dead Logic from Simulink Design Verifier Dead Logic Analysis
You can create justification rules in the coverage Results Explorer using the dead logic detected during a Simulink® Design Verifier™ Dead Logic Analysis.
- Open the Results Explorer from the Coverage app.
- Click Applied filters to access the coverage filters.
- Click Make justification filter rules for dead logic (usingSimulink Design Verifier).
Simulink Design Verifier runs the Dead Logic Analysis and populates the list of filters. - Click Generate report.
The justified rules from the previous step are shown in the Objects Filtered from Coverage Analysis section at the beginning of the report. To navigate to the rules’ corresponding items in theDetails section of the report, use the hyperlinks in the rule descriptions. Clicking the hyperlinks in theRationale column navigates to the coverage Results Explorer.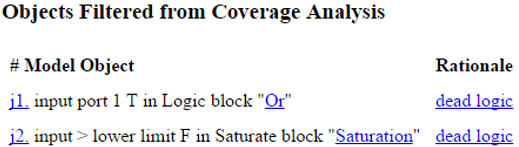
You can add justification rules for elements that do not receive coverage to the filter by clicking in the section of the report.
Justify Dead Logic from Polyspace Code Prover Results
You can create justification rules for code coverage in the coverage Results Explorer using Polyspace® Code Prover™ results.
- Open the Results Explorer from the Coverage app.
- Click Applied filters to access the coverage filters.
- Click Make justification filter rules for dead logic (usingPolyspace Code Prover results).
Opens a file selection window so you can provide a Polyspace Code Prover results file. - Click Generate report.
Save Coverage Filter to File
After you define the coverage filter rules, save the rules to a file so that you can reuse them with this model or other models. By default, coverage filter files are named<_`modelname`_>_covfilter.cvf.
- In the Apps tab, click Coverage Analyzer. In the Coverage tab, open the coverage Results Explorer.
- Click Applied filters, then select your filter.
- Enter a Name and Description for the filter, if none already exist.
- Click Apply. A save dialog box opens.
- Specify a file name and folder for the filter file and clickSave.
If you make multiple changes to the coverage filter rules, apply the changes to the coverage filter file each time.
Create New Coverage Filter File
You can create a new coverage filter file directly from the coverage Results Explorer.
- Click Applied filters.
- Click New filter. Alternatively, you can right-click Applied filters and selectNew filter.
- Enter a Name and Description for the filter.
- Click Apply. A save dialog box opens.
- Specify a file name and folder for the filter file and clickSave.
Load Coverage Filter File
After you save a coverage filter file, you can load the coverage filter file for use in other models. In the coverage Results Explorer:
- Click Applied filters.
- Click Load filter. Alternatively, you can right-click Applied filters and selectLoad filter.
- Navigate to the filter file and clickOpen.
You can load multiple coverage filter files for any model. Loaded filter files show in the Applied filters section of the coverage Results Explorer.
Two or more models can have the same coverage filter file attached. If a model has an attached filter file that contains coverage filter rules for specific objects in a different model, those rules are ignored during coverage recording.
Remove Applied Coverage Filter
To remove an applied coverage filter, from the coverage Results Explorer:
- Expand the Applied filters.
- Right-click the coverage filter you want to remove and selectRemove.
Manage Applied filters by Using the Test Manager in Simulink Test
You can also add and remove coverage filter files from the Test Manager inSimulink Test™. For more information, see Coverage Filtering Using the Test Manager (Simulink Test).
Update the Report with the Current Filter Settings
If you change the filtering settings or add filters after you simulate the model, you can update the coverage report and model highlighting without resimulating the model. After you have simulated the model, in the Current Cumulative Data section of theApplied filters section of the coverage Results Explorer:
- Apply or Revert any changes you have made.
- Click Generate Report.
View Coverage Filter Rules in Your Model
Whenever you define a coverage filter rule or remove an existing coverage filter rule, theApplied filters section of the coverage Results Explorer opens. This pane lists the coverage filter rules for your applied filters. For more information, see View Applied Filters in the Coverage Results Explorer.
The list of currently applied filters for a model is available in the Applied filters section of the coverage Results Explorer. Alternatively, you can right-click anywhere in the model window and select > .
If you are inside a subsystem, you can view any coverage filter rule attached to the subsystem. To open the Applied filters section of the coverage Results Explorer, right-click any object inside the subsystem and select > .