The taskcreator Concurrency Example (original) (raw)
The taskcreator example demonstrates how to use Concurrency Utilities for Java EE to run tasks immediately, periodically, or after a fixed delay. This example provides a JavaServer Faces interface that enables users to submit tasks to be executed and displays information messages for each task. The example uses the Managed Executor Service to run tasks immediately and the Managed Scheduled Executor Service to run tasks periodically or after a fixed delay. (SeeMain Components of the Concurrency Utilities for information about these services.)
The taskcreator example consists of the following components.
- A JavaServer Faces page (
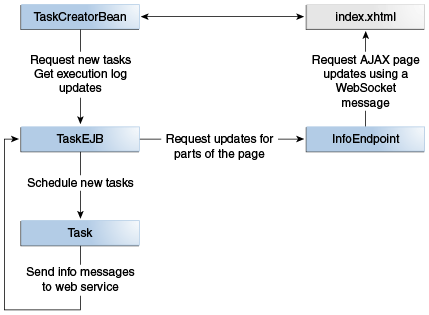
index.xhtml) that contains three elements: a form to submit tasks, a task execution log, and a form to cancel periodic tasks. This page submits Ajax requests to create and cancel tasks. This page also receives WebSocket messages, using JavaScript code to update the task execution log. - A CDI managed bean (
TaskCreatorBean) that processes the requests from the JavaServer Faces page. This bean invokes the methods inTaskEJBto submit new tasks and to cancel periodic tasks. - An enterprise bean (
TaskEJB) that obtains executor service instances using resource injection and submits tasks for execution. This bean is also a JAX-RS web service endpoint. The tasks send information messages to this endpoint. - A WebSocket endpoint (
InfoEndpoint) that the enterprise bean uses to send information messages to the clients. - A task class (
Task) that implements theRunnableinterface. Therunmethod in this class sends information messages to the web service endpoint inTaskEJBand sleeps for 1.5 seconds.
Figure 59-1 shows the architecture of the taskcreatorexample.
Figure 59-1 Architecture of the taskcreator Example
The TaskEJB class obtains the default executor service objects from the application server as follows:
@Resource(name="java:comp/DefaultManagedExecutorService")
ManagedExecutorService mExecService;

@Resource(name="java:comp/DefaultManagedScheduledExecutorService")
ManagedScheduledExecutorService sExecService;
The submitTask method in TaskEJB uses these objects to submit tasks for execution as follows:
public void submitTask(Task task, String type) {
    /* Use the managed executor objects from the app server */
    switch (type) {
        case "IMMEDIATE":
            mExecService.submit(task);
            break;
        case "DELAYED":
            sExecService.schedule(task, 3, TimeUnit.SECONDS);
            break;
        case "PERIODIC":
            ScheduledFuture<?> fut;
            fut = sExecService.scheduleAtFixedRate(task, 0, 8,
                    TimeUnit.SECONDS);
            periodicTasks.put(task.getName(), fut);
            break;
    }
}
For periodic tasks, TaskEJB keeps a reference to the ScheduledFutureobject, so that the user can cancel the task at any time.
Running the taskcreator Example
This section describes how to build, package, deploy, and run thetaskcreator example using NetBeans IDE or Maven.
The following topics are addressed here:
- To Build, Package, and Deploy the taskcreator Example Using NetBeans IDE
- To Build, Package, and Deploy the taskcreator Example Using Maven
- To Run the taskcreator Example
To Build, Package, and Deploy the taskcreator Example Using NetBeans IDE
- Make sure that GlassFish Server has been started (seeStarting and Stopping GlassFish Server).
- From the File menu, choose Open Project.
- In the Open Project dialog box, navigate to:
tut-install/examples/concurrency - Select the
taskcreatorfolder. - Click Open Project.
- In the Projects tab, right-click the
taskcreatorproject and select Build.
This command builds and deploys the application.
To Build, Package, and Deploy the taskcreator Example Using Maven
- Make sure that GlassFish Server has been started (seeStarting and Stopping GlassFish Server).
- In a terminal window, go to:
tut-install/examples/concurrency/taskcreator - Enter the following command to build and deploy the application:
To Run the taskcreator Example
- Open the following URL in a web browser:
http://localhost:8080/taskcreator/ The page contains a form to submit tasks, a task execution log, and a form to cancel periodic tasks. 2. Select the Immediate task type, enter a task name, and click the Submit button. Messages like the following appear in the task execution log:
12:40:47 - IMMEDIATE Task TaskA finished
12:40:45 - IMMEDIATE Task TaskA started - Select the Delayed (3 sec) task type, enter a task name, and click the Submit button. Messages like the following appear in the task execution log:
12:43:26 - DELAYED Task TaskB finished
12:43:25 - DELAYED Task TaskB started
12:43:22 - DELAYED Task TaskB submitted - Select the Periodic (8 sec) task type, enter a task name, and click the Submit button. Messages like the following appear in the task execution log:
12:45:25 - PERIODIC Task TaskC finished run #2
12:45:23 - PERIODIC Task TaskC started run #2
12:45:17 - PERIODIC Task TaskC finished run #1
12:45:15 - PERIODIC Task TaskC started run #1
You can add more than one periodic task. To cancel a periodic task, select it from the form and click Cancel Task.