Nikon D50 infra-red (original) (raw)
**Nikon D50IR (Infra-Red) © 2006 KenRockwell.com
**INTRODUCTION
The Nikon D50IR (infra-red) is a Nikon D50 custom modified for easy and high-quality results in infra-red. See my D50 review for the specifications and my opinions on the base camera from which the D50IR is crafted.
This D50IR is hand-made by a friend from my photo club, Dr. Jim Chen. Jim makes it by changing the internal filters. It looks the same from the outside.
It makes IR photography as easy as conventional photography. It allows short exposures and requires no filters in front of the lens.
Jim's site is here and he explains how he makes this camera here. He'll do the conversion for you, too.
HINTS: You can forget this and cheat in Photoshop and make any photo look like infrared. See also my page on Infrared.
BACKGROUND: TRADITIONAL CAMERAS
Digital image sensors are naturally sensitive to infra-red. In order to get natural colors all digital cameras use filters which remove the infra-red. This makes digital cameras respond to light as our eyes do, and therefore render natural colors. It also makes IR photography a pain with traditional digital cameras. Depending on the efficiency of these filters traditional cameras have almost no IR sensitivity left.
Traditional IR photography requires the use of special lens filters which look black. They pass nothing but invisible IR. The most popular of these is the Hoya R72, which passes wavelengths longer than 720 nm. Visible light is between 400 and 700 nm.
Traditional IR photography is a pain because you can't see or focus through the filters! You have to take them on and off between shots. It's expensive: in 77mm size the filter costs a few hundred dollars! Because a traditional camera has an internal filter to eliminate IR sensitivity exposures run long enough to require a tripod even in broad daylight.
We did the same thing with film cameras. Special IR-sensitive film was used and various filters were used to eliminate the visible light to which the film may have been sensitive. Exposure times were long, even in full sun.
HOW THE D50IR IS MADE
The D50IR is made by removing the standard IR-blocking filter from the sensor and replacing it with a small section of R72 filter.
Brilliant!
Now the camera is completely sensitive to infra-red and blind to visible light. Since the filter is placed over the sensor and not the lens you can view and focus exactly as always. It works with all your lenses and flashes.
SPECIFICATIONS
See my D50 review for the specifications and my opinions on the excellent base camera from which the D50IR is crafted.
Jim usually uses an R72 internal filter, and can use other filters if you prefer.
He also modifies other cameras. He loaned me his D50IR while he's out using his 20D-IR.
PERFORMANCE
See my D50 review for the specifications and my opinions on the base camera from which the D50IR is crafted. Unless I say otherwise, everything like focus speed and frame rate are unchanged from the base D50.
The D50IR is way too much fun. It's even more fun for people who have done IR the old fashioned way. We can appreciate how tough it used to be to get any results at all, and now we can just point and shoot for true IR results.
Focus
I've seen no change. Whatever Jim did gives me perfect focus. In the days of film we used to have to change our focus points manually using the little red dot on our fixed focal length lenses focus scales. Zooms no longer have these, since they are different for each setting.
I've use my 12 - 24, 18 - 200 VR and 18 - 55 lenses and all my results are in focus. I have not looked for problems or tried my f/1.4 lenses.
White Balance and Color
 |
 |
|---|---|
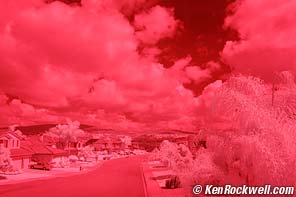
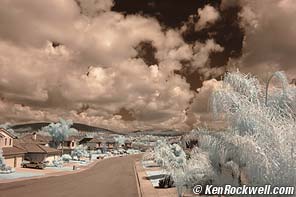
| Auto WB | Preset WB |
 |
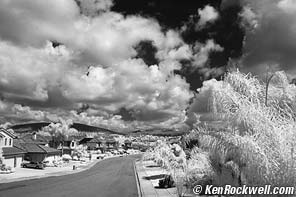 |
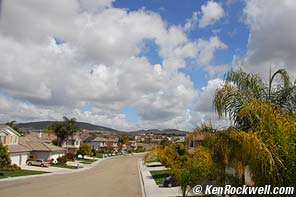
| Color image, conventional camera | Preset WB converted to B/W |
If you use Auto or Daylight WB you'll get a very red image. You expect this. This isn't very fun or pretty.
I prefer to use the Preset white balance. This is a manual setting made from a white or gray card. It gives neutral images, with some odd coloring. I get tobacco brown skies and very light green foliage.
Blown out highlights turn cyan.
You may like this colored effect. If not, turn these back into traditional black and white in Photoshop.
I usually add some increased contrast by way of the Curves command.
I have not tried to get smart and take advantage of the color information to extend the dynamic range when converting to B/W from color. I set my exposure low enough so nothing blows out to cyan.
Exposure and Metering
The meter still reads visible light, not IR. Therefore you need to look at the LCD and use exposure compensation depending on the ambient light.
Under daylight the meter is right on. The camera really works at ISO 200 - 1,600. IR film is usually only around ISO 10 - 25, if you're lucky.
Conventional tungsten bulbs put out more IR than visible light. A 100W bulb puts out only 1W of visible light and 99W of heat and IR. The meter sees the visible light, but there is a lot more IR than it expects. I use about -2 stops of compensation in a nice house with conventional bulbs.
This means the camera is about ISO 800 - 6,400 under tungsten light. It's easy to shoot indoors under IR!
Fluorescent bulbs, computer screens, TVs, LEDs, sodium, HMI and mercury street lights put out very little IR. This is what makes these bulbs so much more efficient for making light compared to conventional tungsten bulbs: they aren't wasting 99% of the electricity putting out IR and heat as tungsten does. These light sources put out mostly visible light and very little IR. Under these lights, found on streets at night or in cheap motels and lower end homes and kitchens, I have to add about +3 stops exposure compensation.
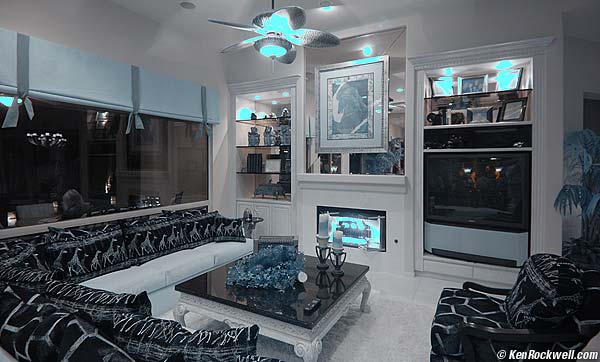
Living Room.
In this living room you can see all of this. The fireplace and incandescent lamps themselves are extremely bright in IR. They are deliberately overexposed for this example and appear cyan. There is a huge projection TV on the right. It looks almost completely black, since TVs emit very little IR.
I made this shot in Program auto exposure, at -1 exposure compensation to take off two stops for tungsten lighting and add one back in for the light walls. I arrived at this value by looking at my LCD screen, not math. It's easy: just look at the LCD and set the exposure compensation until it looks right.
I find this very interesting from a lighting and scientific standpoint. I've always studied lights and spectral curves and for the first time I can see them.
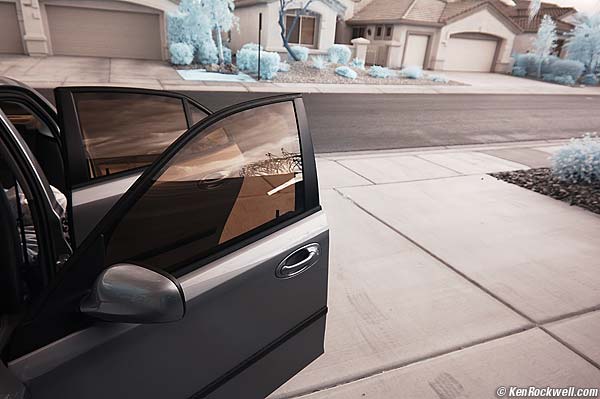
Ordinary car windows look clear to our eyes, but dark to infrared.
Car windows, even untinted, are quite dark to IR. This is deliberate. So are many better home and most office windows. This is done deliberately to make it easier on the air conditioner. Because car windows pass visible light but not much IR I need to set +3 stops exposure compensation shooting in a car or out its windows. This is because the meter sees all the visible light, but there is very little IR. You may also find this indoors during the day or if you shoot through a window in your house. In fact, it can help since the tungsten light indoors will balance better with the window light under IR than in the visible spectrum.
LEDs, except of course IR LED's used in remote controls, make very little IR. If you photograph a car's brake or tail lights you'll see conventional bulbs extremely bright, even as cyan, while any lit LEDs may almost look black.
Forget the science if you don't care. Just look at your LCD and adjust exposure compensation (the +/- button) until it looks right.
Sharpness, Resolution and Noise
Seems the same as a regular D50! No loss for IR, as expected.
This is great, since IR film usually has all sorts of problems with haze, fog softness and grain. If you want the grain and haze that most people associate with IR film you can add them back in Photoshop.
The D50 IR easily outdoes IR film. Film has to be specially sensitized to IR. Silver halide is only naturally sensitive to blue and ultra violet. We learned in the 1940s how to sensitize it to green and red light, which we take for granted today. Sensitivity to IR is still very tough with film due to the weird chemical concoctions added to it to allow sensitivity to IR.
Digital sensors have always been naturally sensitive to IR. IN fact, CCDs are more sensitive to IR than to visible light!
EXAMPLES
See some of Jim's photos here. Here are some I made below.
This first example is a comparison, Move your mouse over to change to the IR image. I used two different cameras. The color image was made with a regular camera, the IR with this D50IR.
Sprawl. Move mouse over to see IR version. Color: D200, ISO 100, f/8 @ 1/250. IR: D50IR, ISO 200, f/10 @ 1/400.
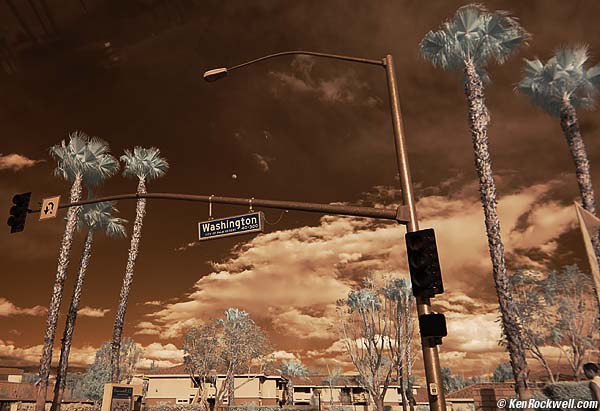
Intersection, Palm Desert, California. Drive-by shot. I couldn't do this with a time exposure with film or an over-the-lens filter! ISO 200, f/5.6 @ 1/100, through IR-blocking car window.
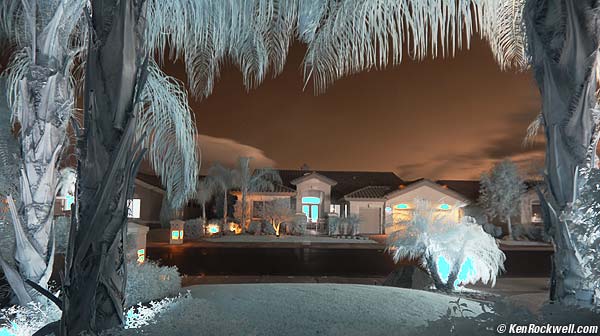
Night. Brilliant highlights turn cyan in color. I'd convert this to B/W, but left it in color as an example. ISO 200, f/4 @ 30 seconds.
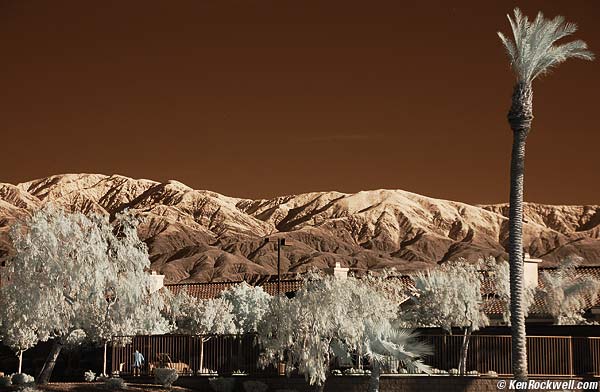
Snow on the Mountains, Palm Desert, California. ISO 200, f/8 @ 1/400.
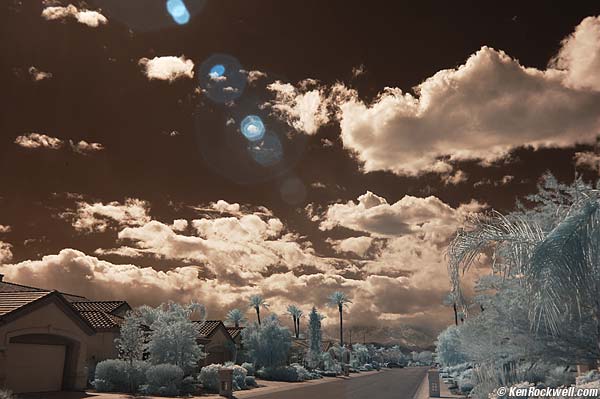
Palm Desert, California. Watch out for IR flare! I obviously didn't see this as I made this shot, since I can't see infra-red. Lens coatings are optimized for visible light and are much less effective for IR. Check your LCD as you shoot. ISO 200, f/11 @ 1/500.
RECOMMENDATIONS
It's fun!
If you do any IR work you need one of these. You won't believe how instantly it makes you realize how silly it is to waste your time waiting for long exposures with expensive R72 filters on unmodified cameras.
Of course after modification it no longer can make normal images, unless you convert it back. The traditional photos above were made with a different camera.
I left all the example in color. Most people will turn them into B/W. I left the examples in color so you could get a better idea of what's going on.
See also Lifepixel.com for more on infrared and camera conversions.
WANT ONE?
Ask Jim at [email protected]


