Generate Code from Nested Variant Subsystem with Code Compile and Startup Activation - MATLAB & Simulink (original) (raw)
This example illustrates how code compile and startup variant activation time can be used together in two nested variant subsystems.
Model
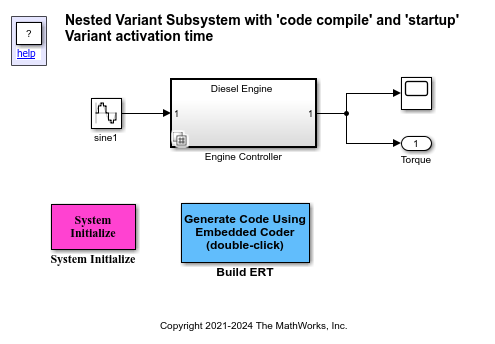
Open the model slexNestedVSSWithCCAndST.slx. The model contains a Variant Subsystem block Engine Controller with two choices Diesel Engine and Petrol Engine with the conditions ENGINE_TYPE == 1 and ENGINE_TYPE == 2 respectively. The Variant activation time parameter of the Engine Controller block is set to code compile.The two variants Diesel Engine and Petrol Engine have startup as the Variant activation time parameter. Each engine type has two choices Effficient Mode and Normal Mode. The Petrol Engine has the conditions PMODE == 1 and PMODE == 2, and the Diesel Engine has the conditions DMODE == 1 and DMODE == 2. One of the engine types can be selected while building the generated code and one of the controller modes can be selected before the start of execution of the code.
Both the variant subsystems have Propagate conditions outside of variant subsystem and Built-in empty choice turned off. When these flags are turned on, this model will error out during compilation as the conditions with code compile and startup variant activation time will get mixed for the Inport and Outport blocks. For more information, see Considerations and Limitations for startup Variant Activation Time
model = "slexNestedVSSWithCCAndST"; open_system(model)
Generate Code
Click on Generate Code Using Embedded Coder to generate code with ERT target. In the generated code, you can see the variant conditions related to Engine Controller appear with the preprocessor #if conditions and the conditions related to the mode appear as regular if.
slbuild(model); cfile=fullfile(pwd, "slexNestedVSSWithCCAndST_ert_rtw", "slexNestedVSSWithCCAndST.c"); coder.example.extractLines(cfile, '#if ENGINE_TYPE == 1', 'slexNestedVSSWithCCAndST_Y.Torque =', 1, 0);
Searching for referenced models in model 'slexNestedVSSWithCCAndST'.
Total of 1 models to build.
Starting build procedure for: slexNestedVSSWithCCAndST
Successful completion of build procedure for: slexNestedVSSWithCCAndST
Build Summary
Top model targets:
Model Build Reason Status Build Duration
slexNestedVSSWithCCAndST Information cache folder or artifacts were missing. Code generated and compiled. 0h 0m 13.069s
1 of 1 models built (0 models already up to date) Build duration: 0h 0m 13.618s
#if ENGINE_TYPE == 1
if (rtpVLatch_DMODE == 1) { slexNestedVSSWithCCAndST_B.VariantMergeForOutportOut1 = look1_binlxpw (slexNestedVSSWithCCAndST_B.sine1, slexNestedVSSWithCCAndST_ConstP.pooled1, slexNestedVSSWithCCAndST_ConstP.uDLookupTable_tableData, 4U); } else if (rtpVLatch_DMODE == 2) { denAccum = slexNestedVSSWithCCAndST_B.sine1; slexNestedVSSWithCCAndST_B.VariantMergeForOutportOut1 = slexNestedVSSWithCCAndST_DW.DiscreteTransferFcn_states_e[0]; denAccum -= 0.06 * slexNestedVSSWithCCAndST_DW.DiscreteTransferFcn_states_e [0]; slexNestedVSSWithCCAndST_B.VariantMergeForOutportOut1 += 0.5 * slexNestedVSSWithCCAndST_DW.DiscreteTransferFcn_states_e[1]; denAccum -= 0.3 * slexNestedVSSWithCCAndST_DW.DiscreteTransferFcn_states_e[1]; slexNestedVSSWithCCAndST_DW.DiscreteTransferFcn_states_e[1] = slexNestedVSSWithCCAndST_DW.DiscreteTransferFcn_states_e[0]; slexNestedVSSWithCCAndST_DW.DiscreteTransferFcn_states_e[0] = denAccum; }
#elif ENGINE_TYPE == 2
if (rtpVLatch_PMODE == 1) { slexNestedVSSWithCCAndST_B.VariantMergeForOutportOut1 = look1_binlxpw (slexNestedVSSWithCCAndST_B.sine1, slexNestedVSSWithCCAndST_ConstP.pooled1, slexNestedVSSWithCCAndST_ConstP.uDLookupTable_tableData_k, 4U); } else if (rtpVLatch_PMODE == 2) { denAccum = slexNestedVSSWithCCAndST_B.sine1; slexNestedVSSWithCCAndST_B.VariantMergeForOutportOut1 = slexNestedVSSWithCCAndST_DW.DiscreteTransferFcn_states[0]; denAccum -= 0.09 * slexNestedVSSWithCCAndST_DW.DiscreteTransferFcn_states[0]; slexNestedVSSWithCCAndST_B.VariantMergeForOutportOut1 += 0.7 * slexNestedVSSWithCCAndST_DW.DiscreteTransferFcn_states[1]; denAccum -= 0.5 * slexNestedVSSWithCCAndST_DW.DiscreteTransferFcn_states[1]; slexNestedVSSWithCCAndST_DW.DiscreteTransferFcn_states[1] = slexNestedVSSWithCCAndST_DW.DiscreteTransferFcn_states[0]; slexNestedVSSWithCCAndST_DW.DiscreteTransferFcn_states[0] = denAccum; }
#endif
The mix of code compile and startup variant activation times enables you to fine tune the variant selection. In the generated executable, you can have either the Petrol Engine controller or the Diesel Engine controller. At startup, you can decide if you want the Efficient Mode or the Normal Mode of either Petrol Engine or Diesel Engine controllers. To do this, write a custom code which can help to select different variants at startup activation time in the System Initialize block. To select different variants, navigate to Model Settings > Code Generation > Custom Code. Specify the Header file and Source file as #include "ChangeDieselController.h" and ChangeDieselController.c respectively.
The ChangeDieselController.c is responsible for selecting the startup variant in the initialize function.
type ChangeDieselController.c
/* Copyright 2021-2024 The MathWorks, Inc. */ #include "rtwtypes.h" extern int32_T DMODE; void ChangeDieselEngineController(void) { // select the diesel controller at startup. // This is just an example, so the value is hard coded. // In practical scenario, this can read value from sensor and // decide which controller you want at startup. DMODE = 1; }
With the help of this code, you can select the startup variant in the model_initialize function and generate code.
cfile=fullfile(pwd, "slexNestedVSSWithCCAndST_ert_rtw", "slexNestedVSSWithCCAndST.c"); coder.example.extractLines(cfile, 'void slexNestedVSSWithCCAndST_initialize(void)', 'void slexNestedVSSWithCCAndST_terminate(void)', 1, 0);
void slexNestedVSSWithCCAndST_initialize(void) { ChangeDieselEngineController(); rtpVLatch_PMODE = PMODE; rtpVLatch_DMODE = DMODE; slexNestedVSSWithCCAndST_DW.systemEnable = 1; slexNeste_startupVariantChecker(); }