masking, cloning, stroke, frame with round corners -> header (original) (raw)
 ]
] I made this header out of three images.
Warning They are big!
The tutorial aspects today:
[ ] Masking layers
[ ] Using the clone stamp tool
[ ] Rounding corners
Creating a frame using stroke
I chose to use a header in this tutorial rather than an icon, because it’s easier to use the clone stamp tool if you have a lot of space.
Note #1: Shortcuts are given in the brackets.
Note #2: For this tutorial, I recommend you choose relatively large images. That way, less quality is lost when resizing.
Before you start, you should have a vague idea of what you’d like your result to look like. Consider which image you’d like to use as a background, for instance, or which color you’d like your header to be dominated by.
Starting off:
Prepare your images you are about to use, till they have the basic quality, style and look you’d like them to have. (Nothing fancy, mind. Just the colors and smoothness, etc. No brushes or textures yet.)
Then open a new canvas (ctrl + n) with a transparent background and drag all of your images in there.
Select one in the layer window, then resize it: edit -> free transform (ctrl + t)
Note:To make sure your image isn’t distorted in any way, hover your mouse over any of the corners and hold SHIFT while resizing.
Once the image has the desired size, hit enter.
Repeat this with your other images, then arrange them on your canvas till they look right to you.
Masking layers
Why mask when I can erase?
Very simple. If you erase parts of your image and save them as .psd, but later discover that you have erased too much of your original, those parts will be gone. Not a very nice situation to be in. Especially if you no longer have the original image you used, or if you can no longer find it by googling.
Masking allows you to erase parts of an image, without deleting those parts from the layer. Savy?
Set your layer order now if you have not already done so. Then reset your back-and-foreground colors (d) and click on the mask button in the layer window. []
A white mask layer should appear next to the miniature of your image.
Make sure this mask layer is selected.
Note:You can tell that the mask layer is selected when the mask icon [] appears next to the visibility icon [ ].
].
Now you can start erasing the background around your person.
You use a brush (b) – not an eraser - for this.
Personally, I think it’s best to mask with a large soft brush rather than a hard one. It often looks very nice, imo. And other than that, there’s the fact that you can simply use ’extraction on your layer if you’re intending to use a hard brush in the mask mode. Extraction is much quicker.
You ‘erase’ using black (as foreground color) and ‘recreate’ the image using white.
You can easily switch between the fore-and-background color by pressing the X key on your keyboard.
You might have to do this several times before you have achieved the desired effect.
The clone stamp tool
[ ]
]
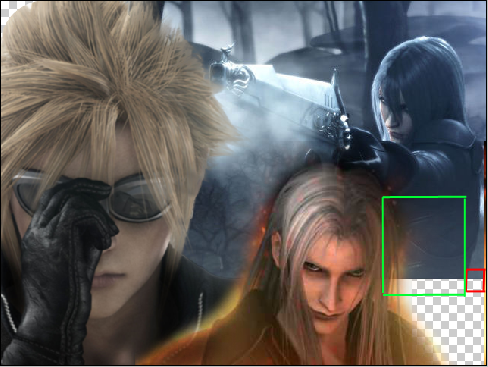
As you can see in the image above, there is a big, empty space at the bottom right corner.
There are several things I could have done to fill that vacant area, but almost all of them would have resulted in people seeing exactly where the original image ends and the ‘fake’ begins.
With a clone tool, things are slightly different. You’d have to know it was used, and even then, you’d have to look a few times till you found out where it was done.
For cloning, I recommend a sharp-edged brush rather than a soft one, simply because of the detail and accuracy involved.
Select the clone stamp tool (s), and while holding down the ALT key on your keyboard, select the part of the image you’d like to clone.
Then release the ALT key.
Now you can ‘clone print’ and fill out the transparent parts in your header
You will most likely have to ‘clone copy’ several times, and pick up color at different parts of your image [always making sure that those parts are nearby because of coloring and so on].
This is quite confusing, I know. I’m sorry I can’t phrase this any better.
Just keep an eye out for the [+] sign in your clone tool while you’re working. It appears every time you ‘clone stamp.’
Note:
You might have to ‘clone stamp’ and ‘clone copy’ different certain parts individually. (see squares in image above)
Other than that, you might like to try using different brush sizes when cloning.
Once you’re done, it might help to go over the parts you have just cloned with the blur tool (r), to get rid of jagged edges.
the rounded edges
Create a new layer (ctrl + shift + n) and make it your topmost layer.
Select the rounded rectangle tool (r) from the tool menu which us usually situated at the left-hand side of your screen. It is the tool beside the pen-tool. You might have to left-click there in order to select it.
The first option selected in the screenshot below will immediately fill out the rectangle, rather than create a path. And that is what we need for our next step. You cannot use the stroke option if your layer has no pixels in it.
You can choose the other settings as you like. It makes no difference, since it will be cut out of the canvas as soon as you have your frame.
Checking the box all the way at the right will make sure the edges are nice and smooth.
The bigger the radius you choose, the flatter your curve/rounded corner will be.
After you have applied your settings, align your crosshair at one of the corners of your canvas and drag. Once you let go, your canvas should be filled with the foreground color you had selected.
Note: If you’d like the bottom edge of your header to keep its 90° corners as in the example here, then follow these steps:
Select your rectangle (v) and stretch it till the rounded corners left and right are no longer visible. Press enter to verify.
Then select the pixels of your rectangle with the wand tool (w) and copy the selection (ctrl + j).
Now you can delete the original rounded rectangle layer if you like.
Creating a frame using the stroke option
Go to edit -> stroke, chose a color and the width of your border/frame in pixel, then hit ok. (Make sure it contrasts well with your rectangle. If you don’t, you might select some pixels from your frame and cut those out as well.)
To get rid of the remaining rectangle you’ll have to select it with the wand tool (w) and cut it out of the layer (ctrl +x)
Finishing things off
The final steps, like everything else, will vary, depending on your image size, coloring, style, and – most importantly – your personal tastes.
I’ll just tell you what I did to finish mine off.
My border/frame was a grayish-blue, selected with the pipette tool (i) from the image at the top-right. I added the layer style [ ] ‘satin’ to give it a slight 3d-effect, then set the blending mode to soft light at full opacity.
Because I thought the colors in the banner didn’t harmonize well, I thought I’d give the whole image a single hue.
I created a new layer (ctrl + shift + n) and filled it with another pale blue chosen from the background. I set the blending mode to color at 100%.
After that, I erased the corners at top left and top right, and tugged the layer under my frame layer, considering myself done.
Another header I made in a similar fashion is this here:
[ ]
]
My credits:
For this header, I used a tiny-text brush by masterjinn from deviantart dot com because I got lazy.
Your opinions on my tutorials are always welcome. Please feel free to give me your opinions and observations – both negative and positive. ;)
I’m trying to improve, hehe.
I hope this tutorial was helpful to some of you.
Should anything be unclear, feel free to ask.
Thank you very much for your attention!