Cloud Spanner support for Django — google-cloud-spanner-django documentation (original) (raw)
![]()


Cloud Spanner is the world’s first fully managed relational database service to offer both strong consistency and horizontal scalability for mission-critical online transaction processing (OLTP) applications. With Cloud Spanner you enjoy all the traditional benefits of a relational database; but unlike any other relational database service, Cloud Spanner scales horizontally to hundreds or thousands of servers to handle the biggest transactional workloads.
Quick Start
In order to use this library, you first need to go through the following steps:
- Select or create a Cloud Platform project.
- Enable billing for your project.
- Enable the Google Cloud Spanner API.
- Setup Authentication.
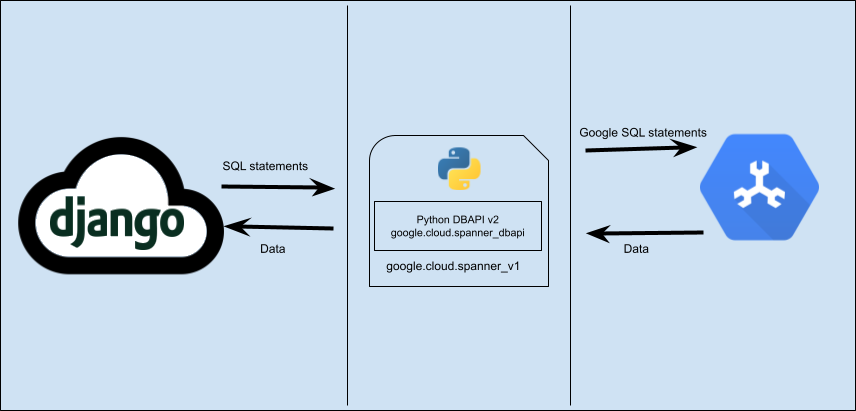
This package provides a 3rd-party database backendfor using Cloud Spanner with the Django ORM. It uses the Cloud Spanner Python client libraryunder the hood.
Installation
Install this library in a virtualenv using pip. virtualenv is a tool to create isolated Python and Django environments. The basic problem it addresses is one of dependencies and versions, and indirectly permissions.
With virtualenv, it’s possible to install this library without needing system install permissions, and without clashing with the installed system dependencies.
Supported versions
The library supports Django 2.2, and Django 3.2. Both versions are long-term support (LTS) releases for theDjango project<https://www.djangoproject.com/download/#supported-versions>_. The minimum required Python version is 3.6.
Installing the package
To install from PyPI:
pip3 install django-google-spanner
To install from source:
git clone git@github.com:googleapis/python-spanner-django.git cd python-spanner-django pip3 install -e .
Creating a Cloud Spanner instance and database
If you don’t already have a Cloud Spanner database, or want to start from scratch for a new Django application, you can create a new instanceand databaseusing the Google Cloud SDK:
gcloud spanner instances create $INSTANCE --config=regional-us-central1 --description="New Django Instance" --nodes=1 gcloud spanner databases create DB−−instanceDB --instance DB−−instanceINSTANCE
Configuring settings.py
This package provides a Django application named django_spanner. To use the Cloud Spanner database backend, the application needs to installed and configured:
- Add
django_spanneras the first entry inINSTALLED_APPS:
INSTALLED_APPS = [
'django_spanner',
...
] - Edit the
DATABASESsetting to point to an existing Cloud Spanner database:
DATABASES = {
'default': {
'ENGINE': 'django_spanner',
'PROJECT': '$PROJECT',
'INSTANCE': '$INSTANCE',
'NAME': '$DATABASE',
}
}
Transaction support in autocommit mode
Django version 4.2 and higher by default supports transactions in autocommit mode. A transaction is automatically started if you define an [atomic block](https://docs.djangoproject.com/en/4.2/topics/db/transactions/#controlling-transactions-explicitly).
Django version 3.2 and earlier did not support transactions in autocommit mode with Spanner. You can enable transactions in autocommit mode with Spanner with theALLOW_TRANSACTIONS_IN_AUTO_COMMIT configuration option.
- To enable transactions in autocommit mode in V3.2, set the flag
ALLOW_TRANSACTIONS_IN_AUTO_COMMITto True in your settings.py file. - To disable transactions in autocommit mode in V4.2, set the flag
ALLOW_TRANSACTIONS_IN_AUTO_COMMITto False in your settings.py file.
Set credentials and project environment variables
You’ll need to download a service account JSON key file and point to it using an environment variable:
export GOOGLE_APPLICATION_CREDENTIALS=/path/to/keyfile.json export GOOGLE_CLOUD_PROJECT=gcloud_project
Apply the migrations
Please run:
$ python3 manage.py migrate
That’ll take a while to run. After this you should be able to see the tables and indexes created in your Cloud Spanner console.
Create a Django admin user
First you’ll need to create a user who can login to the admin site. Run the following command:
$ python3 manage.py createsuperuser
which will then produce a prompt which will allow you to create your super user
Username: admin Email address: admin@example.com Password: ********** Password (again): ********** Superuser created successfully.
Login as admin
Now, run the server
python3 manage.py runserver
Then visit http://127.0.0.1:8000/admin/
Create and register your first model
Please follow the guides in https://docs.djangoproject.com/en/2.2/intro/tutorial02/#creating-modelsto create and register the model to the Django’s automatically-generated admin site.
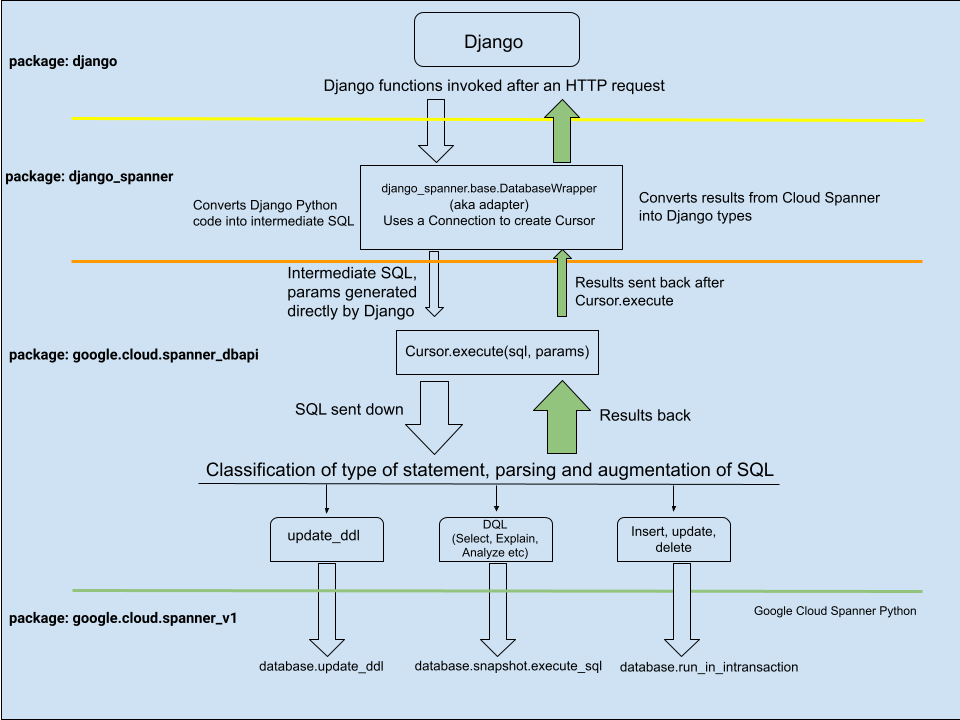
How it works
Overall design
Internals
Executing a query
Here is an example of how to add a row for Model Author, save it and later query it using Django
author_kent = Author( first_name="Arthur", last_name="Kent", rating=Decimal("4.1"),) author_kent.save() qs1 = Author.objects.all().values("first_name", "last_name")
How to contribute
Contributions to this library are always welcome and highly encouraged.
See CONTRIBUTING for more information on how to get started.
Please note that this project is released with a Contributor Code of Conduct. By participating in this project you agree to abide by its terms. See the Code of Conduct for more information.
Limitations
Spanner has certain limitations of its own. The full set of limitations is documentedhere. It is recommended that you go through that list.
Django spanner has a set of limitations as well, which you can findhere.
Features from spanner that are not supported in Django-spanner are listedhere.
Usage Documentation
API Documentation
Changelog
For a list of all google-cloud-spanner-django releases: