JARVIS(っぽい何か)を作ろう!第四回:キャラクターが喋っているような見た目を作る (original) (raw)

はじめに
本記事はおしゃべりAIをオフラインかつローカルで実装するシリーズ第四回です。
前回までは、音声認識、text to text、音声合成を実装しました。 今回は上記の実装に加えて、合成音声で出力した音声に合わせてキャラクターが口パクし話しているような見た目をUnityで実装します。
シリーズ
こちらの手順を踏まえて、作っていきたいと思います。
※ 本シリーズはローカルUbuntuマシンにGPUがある場合を想定しております。
第一回:マイクからリアルタイムで音声認識する
第二回:音声認識した結果から返答生成する
第三回:返答を合成音声で喋らせる
第四回:キャラクターが喋っているような見た目を作る ← 今回はこちらになります。
第五回:今までで作ったものを組み合わせる
今回の目次
- 既存例の紹介
- 口パク実装
1. 既存例の紹介
概要
以下の手順で実装していきます。
1. キャラクターモデルを作ります
2. 作ったキャラクターをUnityに取り込みます
3. 合成音声で生成した音声を再生中の時のみ、キャラクターを口パクさせます(厳密なリップシンクは実装しませんのでご了承くださいませ)
キャラクター制作の例
Blender
3DCGモデリング初心者からスペシャリストまで幅広い層から愛されているソフトです。
練度が必要ですが、キャラクターだけでなくその気になればなんでも作れます。
VRoid Studio
Blenderは難しいし、Live2Dを作るのも大変そうだし...という方にはおすすめです。
人型に限定されますが多数のサンプルアバターや服のテンプレートがあり、ゲームのキャラクリ感覚で3Dキャラクターが作れます。
また、作成したキャラクターをVRoid Hubにアップロードすると自分のキャラクターを他者と共有できたり、VRoid Hubをサポートしているゲームと連携できる利点があります。
※ VRoid Hubにアップロードして利用する際には、モデリングに使用した素材に著作権等の記載が含まれる可能性があるためご注意ください。
Tool for Manipulating Anime Images (V3)
GitHub: https://github.com/pkhungurn/talking-head-anime-3-demo
YouTube: https://www.youtube.com/watch?v=9BzdxrYVSrs&t=3s
一枚絵とGANを使ってパラメータ(頭のローピッチヨー、口の開度)をモデルに入力し、頭の姿勢や口や目の開度に沿った絵を生成する手法です。画像が一枚あればLive2Dや3Dモデルのモデリングをしなくても良くなる一方、ある程度のVRAMを備えたGPUが必須となります。
今回はVRoidを使用してキャラクターを作りました。
2. 口パク実装
実装コンセプト:
Unityでは口の開度を受信し、TTSによって音声が再生されている間、口パクスクリプトから口の開度(0.0 ~ 1.0)をランダムで送信します。
2.1. VRMをUnityにインポートする
2.2. 口パクスクリプト(受信側)を作る
2.3. 口パクスクリプト(送信側)を作る
2.4. 今回作ったもの
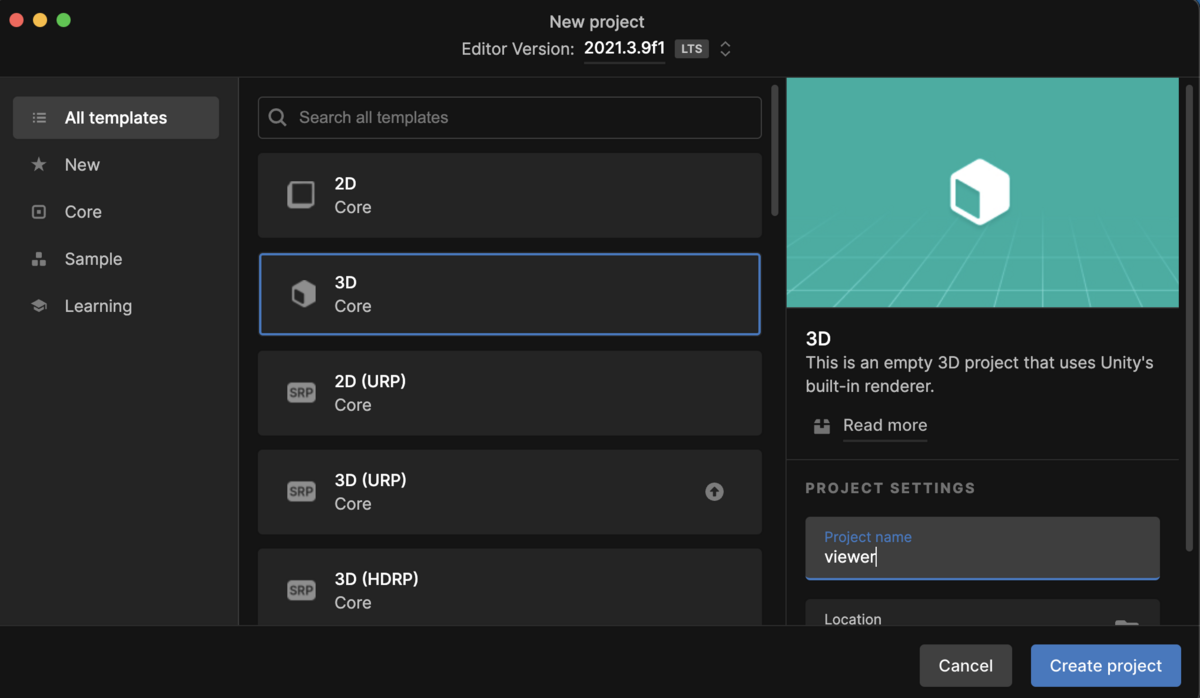
2.1. VRMをUnityにインポートする
- 新しいプロジェクトを作成します
- VRMを読み込むためのアセットをインストールします 「Assets」→「Import Package」→「Custom Package...」を選択してUniVRMをインポートしてください。
UniVRMはGitHubからダウンロードします。
https://github.com/vrm-c/UniVRM - Unityプロジェクトの「Assets」配下にVRMファイルをドラッグ&ドロップします 追加したキャラクターのprefabを「Hierarchy」に追加します。
今回は「any」の名前でキャラクターのprefabが追加されています。
2.2. 口パクスクリプト(受信側)を作る
以下のプログラムを「LipController.cs」の名前で「Assets/Scripts/LipController.cs」のパスになるように保存します。(フォルダがない場合は作成します。任意の名前で問題ございません。)Assets/Scripts/LipController.cs
using System.IO; using System.Collections; using System.Collections.Generic; using UnityEngine; using VRM; using System.Net; using System.Net.Sockets; using System.Text; using System.Threading;
public class LipController : MonoBehaviour { //リップ周り float mouse = 0.0f; bool lipEnabled = true; bool liping = false; BlendShapePreset currentFace;
//UDP
[SerializeField]
int LOCA_LPORT = 11121;
static UdpClient udp;
Thread thread;

VRMBlendShapeProxy proxy;
    void Start()
    {
        proxy = GetComponent<VRMBlendShapeProxy>();
        //デフォルトの表情をセット
        currentFace = BlendShapePreset.Neutral;
        proxy.AccumulateValue(BlendShapeKey.CreateFromPreset(currentFace), 1);
        Debug.Log("=> Starting LipController");

        //UDP
        udp = new UdpClient(LOCA_LPORT);
        thread = new Thread(new ThreadStart(ThreadMethod));
        thread.Start();
    }

void Update()
{
    Animator animator = GetComponent<Animator>();
    StartCoroutine("AutoLip");
    proxy.Apply();
}

public void ChangeFace(BlendShapePreset preset = BlendShapePreset.Neutral, bool lip = false)
{
    lipEnabled = lip;
    if (!lip)
    {
        StopCoroutine("AutoLip");
        liping = false;
        proxy.AccumulateValue(BlendShapeKey.CreateFromPreset(BlendShapePreset.A), 0);
    }

    //今の表情を無効化する
    proxy.AccumulateValue(BlendShapeKey.CreateFromPreset(currentFace), 0);
    //新しい表情をセットする
    proxy.AccumulateValue(BlendShapeKey.CreateFromPreset(preset), 1);
    currentFace = preset;
}

IEnumerator AutoLip()
{
    if (!lipEnabled | liping)
    {
        yield break;
    }

    if (mouse > 0)
    {
        proxy.AccumulateValue(BlendShapeKey.CreateFromPreset(BlendShapePreset.A), mouse);
    }else{
        proxy.AccumulateValue(BlendShapeKey.CreateFromPreset(BlendShapePreset.A), 0);
    }
}

void OnApplicationQuit()
{
    thread.Abort();
}

private void ThreadMethod()
{
    while(true)
    {
        IPEndPoint remoteEP = null;
        byte[] data = udp.Receive(ref remoteEP);
        string text = Encoding.ASCII.GetString(data);
        //Debug.Log(text);
        mouse = float.Parse(text);
    }
}
}
「LipController.cs」をキャラクターのprefabにアタッチします。
2.3. 口パクスクリプト(送信側)を作る
JARVIS(っぽい何か)を作ろう!第三回:返答を合成音声で喋らせる - AnyTech Engineer Blogのプログラムを改造します。tools/voice_synthesis.py
import os import time import random import soundfile as sf import simpleaudio as sa from espnet2.bin.tts_inference import Text2Speech import socket import multiprocessing from multiprocessing import Manager, Value, Process
machines = ['localhost', 'mac'] ips = ['', '192.168.50.9'] modules = ['mouth_module'] ports = [11121] host = 'localhost' #host = 'mac' sock_lip = socket.socket(socket.AF_INET,socket.SOCK_DGRAM)
def lip_control(is_talking, mouth, host): while True: # Vary lip and emotion if is_talking.value == 1: # Random lip sync mouth.value = random.randrange(0, 10, 1) * 0.1 else: # Close mouth mouth.value = 0.0 # Send to Unity try: send_lip(mouth.value, sock_lip, ips[machines.index(host)], ports[modules.index('mouth_module')]) except: print('send_lip BrokenPipeError')
def send_lip(mouse_status, sock, host, port): message = '{0}'.format(mouse_status).encode('utf-8') sock.sendto(message,(host,port)) time.sleep(0.1) return
def load_tts(model_path): fs, lang = 44100, "Japanese" text2speech = Text2Speech( model_file=model_path, device="cuda", speed_control_alpha=1.2, noise_scale=0.333, noise_scale_dur=0.333, ) return text2speech
def main(): # Load espnet model_path = "../models/tts/exp/tts_finetune_full_band_jsut_vits_raw_phn_jaconv_pyopenjtalk_prosody/100epoch.pth" text2speech = load_tts(model_path)
# 読み上げる文章
text = "こんにちは、今日はいい天気ですね"

# 推論
wav = text2speech(text)["wav"]

# 音声保存
audio_path = "talk.wav"
sf.write(audio_path, wav.data.cpu().numpy(), text2speech.fs, "PCM_16")

with Manager() as manager:
    is_talking = manager.Value('i', 0)
    mouth = manager.Value('d', 0.0)

    # Unityへ口の開度を送信する
    lip_p = Process(target=lip_control, args=[is_talking, mouth, host])
    lip_p.start()

    # 保存した音声を読み込み
    wave_obj = sa.WaveObject.from_wave_file(audio_path)
    # 再生
    is_talking.value = 1
    play_obj = wave_obj.play()
    play_obj.wait_done()
    is_talking.value = 0
    lip_p.terminate()
if name == 'main': main()
2.4. 今回作ったもの
Unityで実行ボタンを押し、口パクスクリプトを実行すると以下のようにTTSによる声が再生されている間、いい感じに口パクしてくれます。
python tools/voice_synthesis.py
※ GIFのため音声は出ません

その他
口パクだけじゃなくてモーションもつけて動かしたい!という方には「Very Animation」というアセットが非常に便利です。Unity単体ではモーション編集ができないのでモーションはBlenderなどで別途作成する必要があったのですが、このアセットを使えばUnityでアニメーションを編集ができます。 左右に揺れるだけのモーションであればサクッと作ることができます。
本記事はこちらで終了となります! ありがとうございました!