Spring Security Custom Form Login with Database Authentication (original) (raw)
Last Updated : 28 May, 2026
Spring Security Custom Form Login with Database Authentication allows users to log in using credentials stored in a database instead of in-memory authentication. It provides a customizable login page, secure authentication handling, and role-based authorization for Spring MVC applications.
- Supports authentication using database-stored user credentials.
- Allows creation of a custom login page instead of the default Spring Security login form.
- Provides role-based access control for securing application endpoints.
Step-by-Step Implementation
Step 1: Create the Spring MVC Project
Create a Dynamic Web Project in Spring Tool Suite (STS) or Eclipse and configure the Apache Tomcat Server.
Add dependencies in the pom.xml file:
- Spring Web MVC
- Spring Security Config
- Spring Security Web
- Spring JDBC
- MySQL Connector Java
- Servlet API Java `
<!-- https://mvnrepository.com/artifact/org.springframework/spring-webmvc -->
<dependency>
    <groupId>org.springframework</groupId>
    <artifactId>spring-webmvc</artifactId>
    <version>5.3.24</version>
</dependency>

<!-- https://mvnrepository.com/artifact/javax.servlet/javax.servlet-api -->
<dependency>
    <groupId>javax.servlet</groupId>
    <artifactId>javax.servlet-api</artifactId>
    <version>4.0.1</version>
    <scope>provided</scope>
</dependency>

<!-- https://mvnrepository.com/artifact/org.springframework.security/spring-security-config -->
<dependency>
    <groupId>org.springframework.security</groupId>
    <artifactId>spring-security-config</artifactId>
    <version>5.7.3</version>
</dependency>

<!-- https://mvnrepository.com/artifact/org.springframework.security/spring-security-web -->
<dependency>
    <groupId>org.springframework.security</groupId>
    <artifactId>spring-security-web</artifactId>
    <version>5.7.3</version>
</dependency>

  <!-- https://mvnrepository.com/artifact/org.springframework/spring-jdbc -->
<dependency>
    <groupId>org.springframework</groupId>
    <artifactId>spring-jdbc</artifactId>
    <version>5.3.24</version>
</dependency>

<!-- https://mvnrepository.com/artifact/mysql/mysql-connector-java -->
<dependency>
    <groupId>mysql</groupId>
    <artifactId>mysql-connector-java</artifactId>
    <version>8.0.28</version>
</dependency>
`
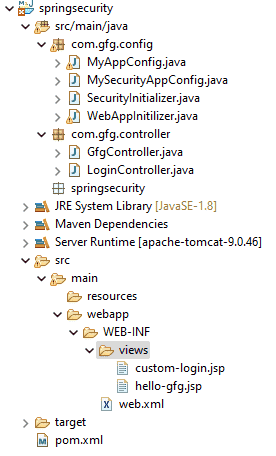
**Project Structure:
Step 2: Create Database and Tables
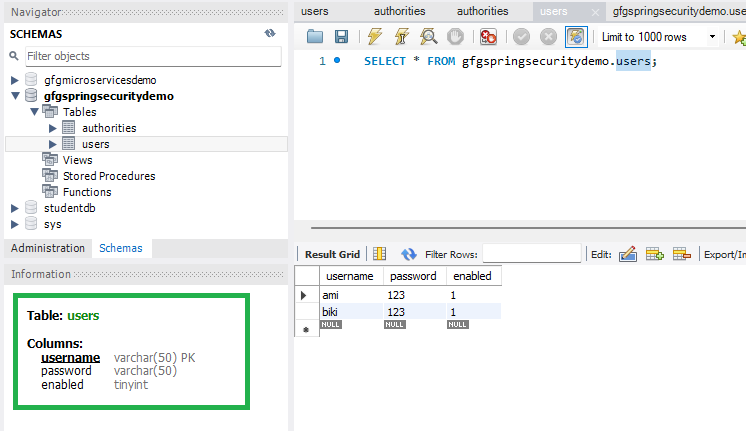
Go to your MySQL Workbench and create a schema named gfgspringsecuritydemo and inside that create two tables users and authorities and put some sample data as shown in the below image.
**Note: It is strictly recommended that you should create the tables as per the schema. The column name must be the same.
**Create users Table:
CREATE TABLE users (
username VARCHAR(50) PRIMARY KEY,
password VARCHAR(50) NOT NULL,
enabled BOOLEAN NOT NULL
);
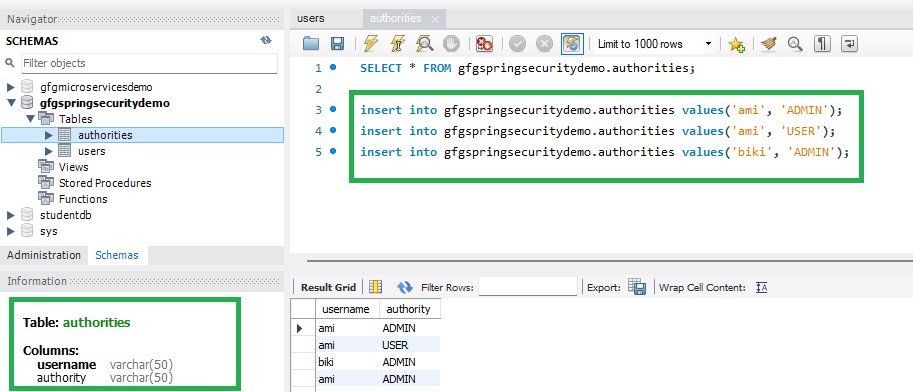
**Create authorities Table:
CREATE TABLE authorities (
username VARCHAR(50) NOT NULL,
authority VARCHAR(50) NOT NULL,
CONSTRAINT fk_authorities_users
FOREIGN KEY(username) REFERENCES users(username)
);
Step 3: Configure Dispatcher Servlet
- Go to the src > main > java and create a class WebAppInitilizer.
- Dispatcher Servlet handles incoming HTTP requests and forwards them to controllers.
**File: WebAppInitilizer.java
Java `
package com.gfg.config;
import org.springframework.web.servlet.support.AbstractAnnotationConfigDispatcherServletInitializer;
public class WebAppInitilizer extends AbstractAnnotationConfigDispatcherServletInitializer {
@Override
protected Class<?>[] getRootConfigClasses() {
    // TODO Auto-generated method stub
    return null;
}

@Override
protected Class<?>[] getServletConfigClasses() {
    Class[] configFiles = {MyAppConfig.class};
    return configFiles;
}

@Override
protected String[] getServletMappings() {
    String[] mappings = {"/"};
    return mappings;
}
}
`
Step 4: Configure Spring MVC
- Create another class in the same location (src > main > java) and name it MyAppConfig.
- This configuration enables Spring MVC and resolves JSP view pages.
**File: MyAppConfig.java
Java `
package com.gfg.config;
import org.springframework.context.annotation.Bean; import org.springframework.context.annotation.ComponentScan; import org.springframework.context.annotation.Configuration; import org.springframework.web.servlet.config.annotation.EnableWebMvc; import org.springframework.web.servlet.view.InternalResourceViewResolver;
@Configuration @EnableWebMvc @ComponentScan("com") public class MyAppConfig {
}
`
Step 5: Create Your Spring MVC Controller
- Go to the src > main > java and create a class GfgController.
- Controllers handle user requests and return the required JSP pages.
**File: GfgController.java
Java `
package com.gfg.controller;
import org.springframework.stereotype.Controller; import org.springframework.web.bind.annotation.GetMapping;
@Controller public class GfgController {
@GetMapping("/gfg")
public String helloGfg() {
    return "hello-gfg";
}
}
`
Go to the src > main > java and create a class LoginController.
**File: LoginController.java
Java `
package com.gfg.controller;
import org.springframework.stereotype.Controller; import org.springframework.web.bind.annotation.GetMapping;
@Controller public class LoginController {
@GetMapping("/customLogin")
public String customLogin() {
    return "custom-login";
}
}
`
Step 6: Create JSP View Pages
- Go to the src > main > webapp > WEB-INF > right-click > New > Folder and name the folder as views.
- Then views > right-click > New > JSP File and name your first view. Here we have named it as hello-gfg.jsp file.
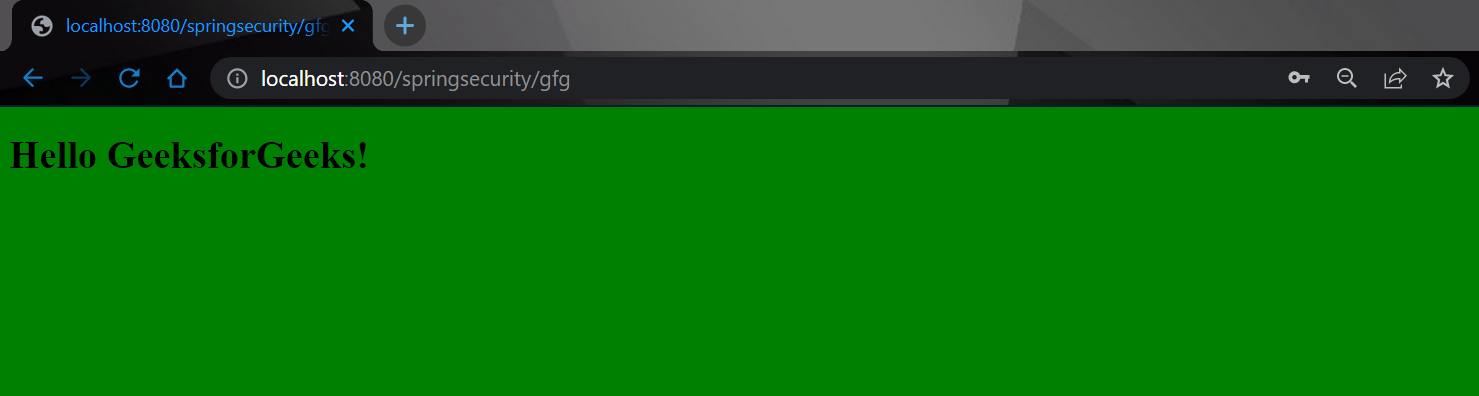
**File: hello-gfg.jsp
HTML `
Hello GeeksforGeeks!
`
Also, create another view named custom-login.jsp file.
**File: custom-login.jsp
HTML `
<%@ taglib prefix="form" uri="http://www.springframework.org/tags/form" %>
GFG Login PageCustom Login Page
<form:form>

    Username : <input type="text" name="username">
    <br/>
    Password : <input type="password" name="password">
    <br/>
    <input type="submit" value="Login">

</form:form>
`
Step 7: Setting Up ViewResolver in Spring MVC
Go to the src > main > java > MyAppConfig and set your ViewResolver like this
**File: MyAppConfig.java
Java `
package com.gfg.config;
import org.springframework.context.annotation.Bean; import org.springframework.context.annotation.ComponentScan; import org.springframework.context.annotation.Configuration; import org.springframework.web.servlet.config.annotation.EnableWebMvc; import org.springframework.web.servlet.view.InternalResourceViewResolver;
@Configuration @EnableWebMvc @ComponentScan("com") public class MyAppConfig {
@Bean
InternalResourceViewResolver viewResolver() {
    InternalResourceViewResolver viewResolver = new InternalResourceViewResolver();
    viewResolver.setPrefix("/WEB-INF/views/");
    viewResolver.setSuffix(".jsp");
    return viewResolver;
}
}
`
Step 8: Setting Up Spring Security Filter Chain
- Go to the src > main > java and create a class MySecurityAppConfig and annotate the class with @EnableWebSecurity annotation.
- This class will help to create the spring security filter chain.
**File: MySecurityAppConfig.java
Java `
package com.gfg.config;
import org.springframework.security.config.annotation.web.configuration.EnableWebSecurity;
// This class will help to create // spring security filter chain @EnableWebSecurity public class MySecurityAppConfig extends WebSecurityConfigurerAdapter {
}
`
Step 9: Create Spring Security Initilizer
- Go to the src > main > java and create a class SecurityInitializer.
- It will help to register the spring security filter chain with our application.
**File: SecurityInitializer.java
Java `
package com.gfg.config;
import org.springframework.security.web.context.AbstractSecurityWebApplicationInitializer;
// This class will help to register spring security // filter chain with our application public class SecurityInitializer extends AbstractSecurityWebApplicationInitializer {
}
`
Step 10: JDBC Authentication Implementation
Modify the MyAppConfig file. Here we are going to create the DataSource Bean. That means we are going to write the code for MySQL Database connection.
Java `
@Bean DataSource dataSource() { DriverManagerDataSource driverManagerDataSource = new DriverManagerDataSource();
    driverManagerDataSource.setUrl("jdbc:mysql://localhost:3306/gfgspringsecuritydemo");
    driverManagerDataSource.setUsername("root");
    driverManagerDataSource.setPassword("143@Arpilu");
    driverManagerDataSource.setDriverClassName("com.mysql.cj.jdbc.Driver");

    return driverManagerDataSource;
}
`
**File: MyAppConfig.java
Java `
package com.gfg.config;
import javax.sql.DataSource;
import org.springframework.context.annotation.Bean; import org.springframework.context.annotation.ComponentScan; import org.springframework.context.annotation.Configuration; import org.springframework.jdbc.datasource.DriverManagerDataSource; import org.springframework.web.servlet.config.annotation.EnableWebMvc; import org.springframework.web.servlet.view.InternalResourceViewResolver;
@Configuration @EnableWebMvc @ComponentScan("com") public class MyAppConfig {
@Bean
InternalResourceViewResolver viewResolver() {
    InternalResourceViewResolver viewResolver = new InternalResourceViewResolver();
    viewResolver.setPrefix("/WEB-INF/views/");
    viewResolver.setSuffix(".jsp");
    return viewResolver;
}

// Connect to MySQL Database
@Bean
DataSource dataSource() {
    DriverManagerDataSource driverManagerDataSource = new DriverManagerDataSource();

    driverManagerDataSource.setUrl("jdbc:mysql://localhost:3306/gfgspringsecuritydemo");
    driverManagerDataSource.setUsername("root");
    driverManagerDataSource.setPassword("143@Arpilu");
    driverManagerDataSource.setDriverClassName("com.mysql.cj.jdbc.Driver");

    return driverManagerDataSource;
}
}
`
Modify the MySecurityAppConfig file. Here we are going to implement the JDBC Authentication by overriding the configure() method.
**File: MySecurityAppConfig.java
Java `
package com.gfg.config;
import javax.sql.DataSource;
import org.springframework.beans.factory.annotation.Autowired; import org.springframework.security.config.annotation.authentication.builders.AuthenticationManagerBuilder; import org.springframework.security.config.annotation.web.builders.HttpSecurity; import org.springframework.security.config.annotation.web.configuration.EnableWebSecurity; import org.springframework.security.config.annotation.web.configuration.WebSecurityConfigurerAdapter; import org.springframework.security.crypto.password.NoOpPasswordEncoder;
// This class will help to create @SuppressWarnings("deprecation") // spring security filter chain @EnableWebSecurity public class MySecurityAppConfig extends WebSecurityConfigurerAdapter {
@Autowired
private DataSource datasource;

@Override
protected void configure(AuthenticationManagerBuilder auth) throws Exception {
    // load the users info from the database
    // username, password, and role
    auth.jdbcAuthentication().dataSource(datasource).passwordEncoder(NoOpPasswordEncoder.getInstance());
}

// Configuring Form Login through configure method
@Override
protected void configure(HttpSecurity http) throws Exception {
    http
    .authorizeHttpRequests()
    .antMatchers("/gfg").authenticated()
        .and()
        .formLogin().loginPage("/customLogin")
        .and()
        .httpBasic();
}
}
`
Step 11: Run Your Spring MVC Application
To run our Spring MVC Application right-click on your project > Run As > Run on Server. After that use the following URL to run your controller.
And it will ask for authentication to use the endpoint and a pop-up screen will be shown like this. But this time it's our custom login page.

Now sign in with your database credentials
- Username: ami
- Password: 123
And now you can access your endpoint.