Spring Security Registration and Login Process (original) (raw)
Last Updated : 25 Oct, 2025
Spring Security is a framework that enables developers to secure Spring-based web applications by integrating authentication and authorization mechanisms. In this article, we will implement a complete registration and login process using Spring Security with Spring MVC and JDBC Authentication.
We will build a web application where:
- A user can register through a form, and the details are stored in a MySQL database.
- A registered user can log in using Spring Security authentication.
Step-by-Step Implementation
Step 1: Project Setup and Server Configuration
**IDE: Spring Tool Suite 4 (STS)
**Server: Apache Tomcat 9+
**Build Tool: Maven
Create a Dynamic Web Project in STS and configure Tomcat. You can refer to this article to learn How to Create a Dynamic Web Project in STS/Eclipse.
Step 2: Create Database and Tables
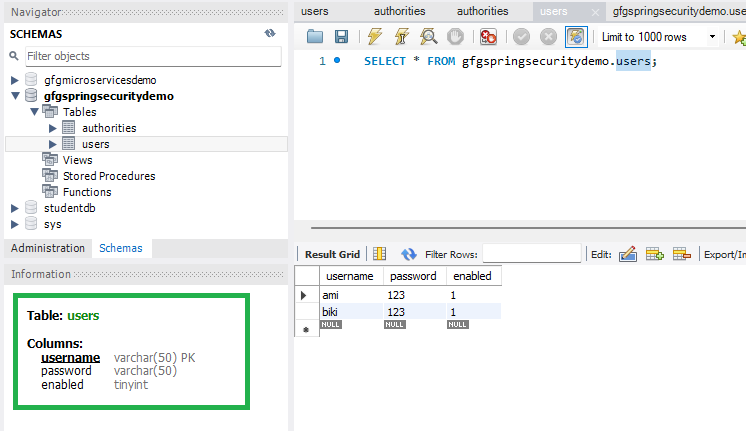
Create a new schema gfgspringsecuritydemo in MySQL Workbench and add the following tables:
**users Table:
CREATE TABLE users (
username VARCHAR(50) NOT NULL PRIMARY KEY,
password VARCHAR(100) NOT NULL,
enabled BOOLEAN NOT NULL
);
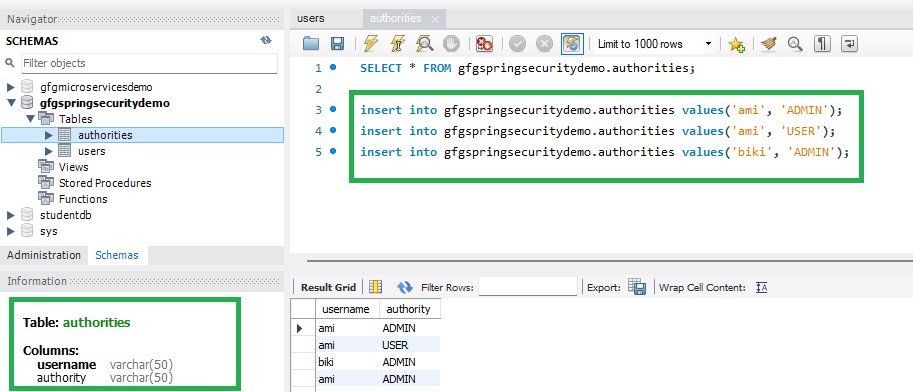
**authorities Table:
CREATE TABLE authorities (
username VARCHAR(50) NOT NULL,
authority VARCHAR(50) NOT NULL,
CONSTRAINT fk_authorities_users FOREIGN KEY (username) REFERENCES users(username)
);
**Note: Column names and schema must match the above definitions as per Spring Security JDBC authentication standards.
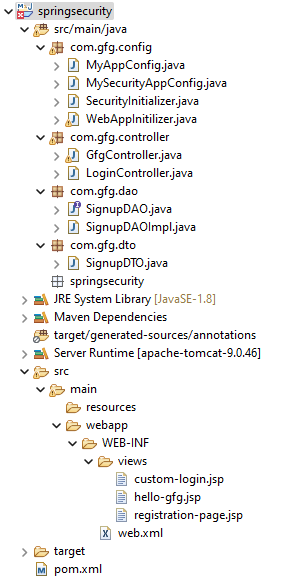
Step 3: Project Folder Structure
Step 4: Add Dependencies in pom.xml
Add the following dependencies to your pom.xml file
- Spring Web MVC
- Java Servlet API
- Spring Security Config
- Spring Security Web
- Spring JDBC
- MySQL Connector Java XML `
<!-- Servlet API -->
<dependency>
    <groupId>javax.servlet</groupId>
    <artifactId>javax.servlet-api</artifactId>
    <version>4.0.1</version>
    <scope>provided</scope>
</dependency>

<!-- Spring Security -->
<dependency>
    <groupId>org.springframework.security</groupId>
    <artifactId>spring-security-config</artifactId>
    <version>5.7.3</version>
</dependency>
<dependency>
    <groupId>org.springframework.security</groupId>
    <artifactId>spring-security-web</artifactId>
    <version>5.7.3</version>
</dependency>

<!-- Spring JDBC -->
<dependency>
    <groupId>org.springframework</groupId>
    <artifactId>spring-jdbc</artifactId>
    <version>5.3.24</version>
</dependency>

<!-- MySQL Connector -->
<dependency>
    <groupId>mysql</groupId>
    <artifactId>mysql-connector-java</artifactId>
    <version>8.0.28</version>
</dependency>
`
Step 5: Configuring Dispatcher Servlet
Now we are going to configure Dispatcher Servlet with our Spring MVC application. Go to the src > main > java and create a class WebAppInitilizer.
**WebAppInitilizer.java
Java `
package com.gfg.config;
import org.springframework.web.servlet.support.AbstractAnnotationConfigDispatcherServletInitializer;
public class WebAppInitializer extends AbstractAnnotationConfigDispatcherServletInitializer {
@Override
protected Class<?>[] getRootConfigClasses() {
    return null;
}

@Override
protected Class<?>[] getServletConfigClasses() {
    return new Class[] { MyAppConfig.class };
}

@Override
protected String[] getServletMappings() {
    return new String[] { "/" };
}
}
`
Step 6: Application Configuration
Create another class in the same location (src > main > java) and name it MyAppConfig.
**MyAppConfig.java
Java `
package com.gfg.config;
import javax.sql.DataSource; import org.springframework.context.annotation.*; import org.springframework.jdbc.core.JdbcTemplate; import org.springframework.jdbc.datasource.DriverManagerDataSource; import org.springframework.security.crypto.bcrypt.BCryptPasswordEncoder; import org.springframework.security.crypto.password.PasswordEncoder; import org.springframework.web.servlet.config.annotation.EnableWebMvc; import org.springframework.web.servlet.view.InternalResourceViewResolver;
@Configuration @EnableWebMvc @ComponentScan("com") public class MyAppConfig {
@Bean
InternalResourceViewResolver viewResolver() {
    InternalResourceViewResolver resolver = new InternalResourceViewResolver();
    resolver.setPrefix("/WEB-INF/views/");
    resolver.setSuffix(".jsp");
    return resolver;
}

@Bean
public JdbcTemplate jdbcTemplate() {
    return new JdbcTemplate(dataSource());
}

@Bean
DataSource dataSource() {
    DriverManagerDataSource ds = new DriverManagerDataSource();
    ds.setUrl("jdbc:mysql://localhost:3306/gfgspringsecuritydemo");
    ds.setUsername("root");
    ds.setPassword("143@Arpilu");
    ds.setDriverClassName("com.mysql.cj.jdbc.Driver");
    return ds;
}

@Bean
PasswordEncoder passwordEncoder() {
    return new BCryptPasswordEncoder();
}
}
`
Step 7: Create Controller
**LoginController.java
Java `
package com.gfg.controller;
import org.springframework.beans.factory.annotation.Autowired; import org.springframework.security.crypto.password.PasswordEncoder; import org.springframework.stereotype.Controller; import org.springframework.web.bind.annotation.*; import com.gfg.dao.SignupDAO; import com.gfg.dto.SignupDTO;
@Controller public class LoginController {
@Autowired
private PasswordEncoder passwordEncoder;

@Autowired
private SignupDAO signupDAO;

@GetMapping("/customLogin")
public String customLogin() {
    return "custom-login";
}

@GetMapping("/userRegister")
public String userRegistration(@ModelAttribute("signupdto") SignupDTO signupDTO) {
    return "registration-page";
}

@PostMapping("/process-registration")
public String processRegistration(SignupDTO signupDTO) {
    signupDTO.setPassword(passwordEncoder.encode(signupDTO.getPassword()));
    signupDAO.saveUser(signupDTO);
    return "redirect:/customLogin";
}
}
`
Step 8: DAO Layer
**Interface: SignupDAO.java
Java `
package com.gfg.dao;
import com.gfg.dto.SignupDTO;
public interface SignupDAO { void saveUser(SignupDTO signupDTO); }
`
**Implementation: SignupDAOImpl.java
Java `
package com.gfg.dao;
import org.springframework.beans.factory.annotation.Autowired; import org.springframework.jdbc.core.JdbcTemplate; import org.springframework.stereotype.Repository; import com.gfg.dto.SignupDTO;
@Repository public class SignupDAOImpl implements SignupDAO {
@Autowired
private JdbcTemplate jdbcTemplate;

@Override
public void saveUser(SignupDTO signupDTO) {
    String sql = "INSERT INTO users VALUES(?,?,?)";
    String sql2 = "INSERT INTO authorities VALUES(?,?)";
    jdbcTemplate.update(sql, signupDTO.getUsername(), signupDTO.getPassword(), true);
    jdbcTemplate.update(sql2, signupDTO.getUsername(), "USER");
}
}
`
Step 9: DTO Class
**File: SignupDTO.java
Java `
package com.gfg.dto;
public class SignupDTO {
private String username;
private String password;

public String getUsername() { return username; }
public void setUsername(String username) { this.username = username; }

public String getPassword() { return password; }
public void setPassword(String password) { this.password = password; }

@Override
public String toString() {
    return "SignupDTO [username=" + username + ", password=" + password + "]";
}
}
`
Step 10: Spring Security Configuration
**File: MySecurityAppConfig.java
Java `
package com.gfg.config;
import javax.sql.DataSource; import org.springframework.beans.factory.annotation.Autowired; import org.springframework.security.config.annotation.authentication.builders.AuthenticationManagerBuilder; import org.springframework.security.config.annotation.web.builders.HttpSecurity; import org.springframework.security.config.annotation.web.configuration.*; import org.springframework.security.crypto.password.PasswordEncoder;
@SuppressWarnings("deprecation") @EnableWebSecurity public class MySecurityAppConfig extends WebSecurityConfigurerAdapter {
@Autowired
private DataSource dataSource;

@Autowired
private PasswordEncoder passwordEncoder;

@Override
protected void configure(AuthenticationManagerBuilder auth) throws Exception {
    auth.jdbcAuthentication()
        .dataSource(dataSource)
        .passwordEncoder(passwordEncoder);
}

@Override
protected void configure(HttpSecurity http) throws Exception {
    http.authorizeHttpRequests()
            .antMatchers("/gfg").authenticated()
        .and()
            .formLogin().loginPage("/customLogin")
        .and()
            .httpBasic();
}
}
`
Step 11: Security Initializer
**SecurityInitializer.java
Java `
package com.gfg.config;
import org.springframework.security.web.context.AbstractSecurityWebApplicationInitializer;
public class SecurityInitializer extends AbstractSecurityWebApplicationInitializer { }
`
Step 12: JSP Views
**registration-page.jsp
HTML `
<%@ taglib prefix="form" uri="http://www.springframework.org/tags/form" %>
RegistrationRegister Here
Username:Password:
`
**custom-login.jsp
HTML `
<%@ taglib prefix="form" uri="http://www.springframework.org/tags/form" %>
LoginLogin Page
Username:Password:
`
Step 13: Run the Application
Run the application using: Run As → Run on Server
Then open in browser:
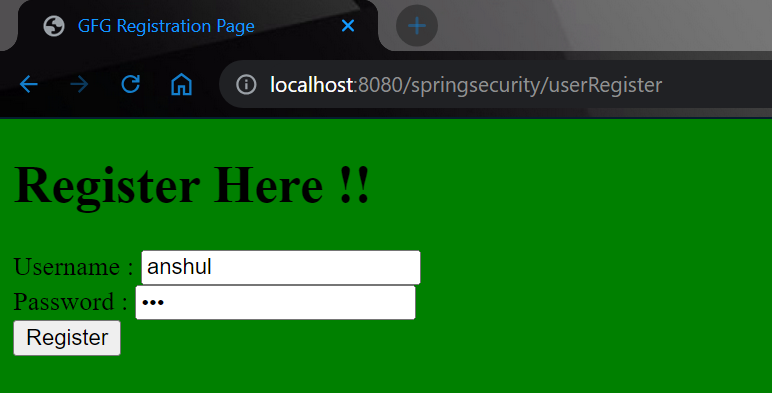
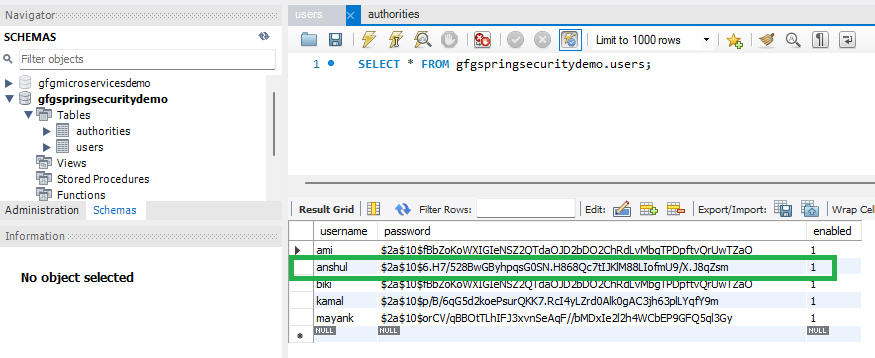
After clicking the registration button you can see the username and password have been stored in our database. You may notice that we are storing the password in an encrypted format.
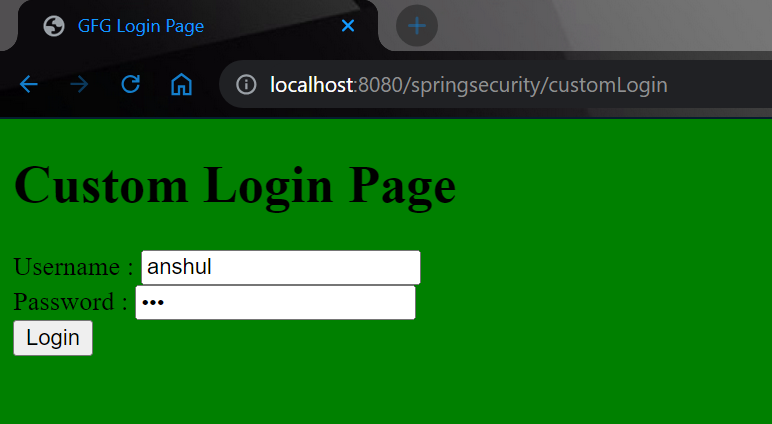
And it will redirect you to the login page.
Now login with your database credentials
- **Username: anshul
- **Password: 123