How to display Analog clock and Digital clock in Android (original) (raw)
Last Updated : 11 Jul, 2025
**Analog and digital clocks are used for display the time in android application.
- **Analog clock: Analog clock is a subclass of **View class. It represents a circular clock. Around the circle, numbers 1 to 12 appear to represent the hour and two hands are used to show instant of the time- shorter one for the hour and longer is for minutes.
- **Digital clock: Digital clock is subclass of **TextView Class and uses numbers to display the time in "HH:MM" format.
**Pre-requisites:
- Android App Development Fundamentals for Beginners
- Guide to Install and Set up Android Studio
- Android | Starting with first app/android project
- Android | Running your first Android app
In this Article, a simple android application is built to display the **Analog clock and Digital clock.
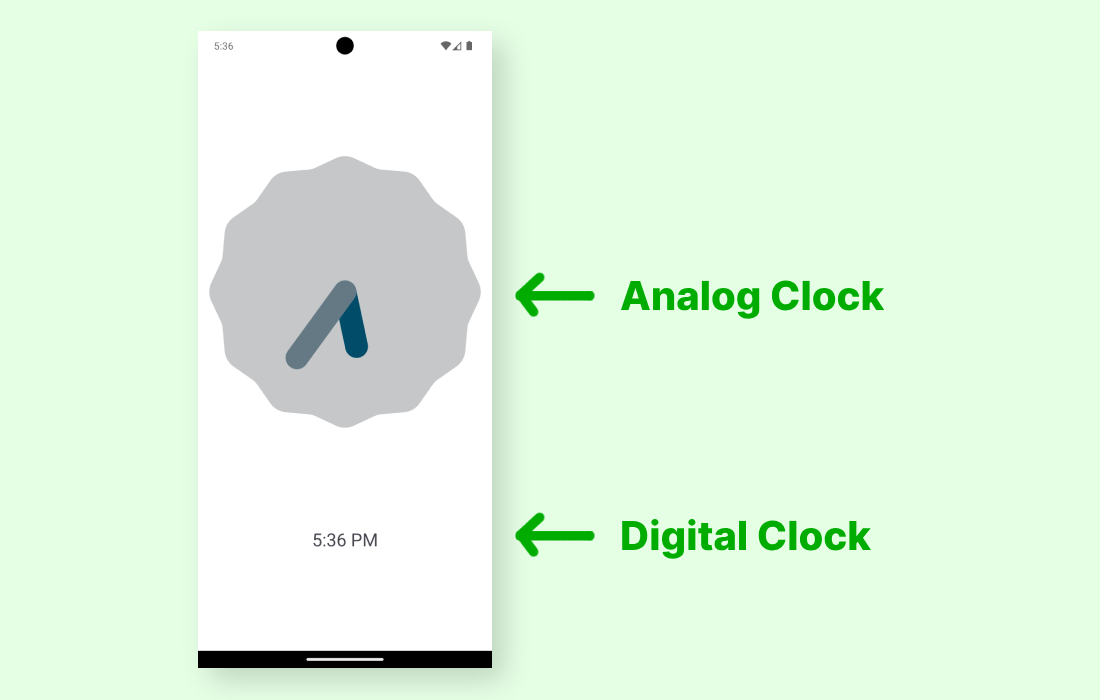
How to create a Android Analog clock and Digital clock?
This example will help to develop an Android App that displays an Analog clock and a Digital clock according to the example shown above:
**Step by Step Implementation
**Step 1: Create a new project in Android Studio
Firstly create a new Android Application. This will create an XML file “activity_main.xml” and a File “MainActivity”. Please refer the pre-requisites to learn more about this step.
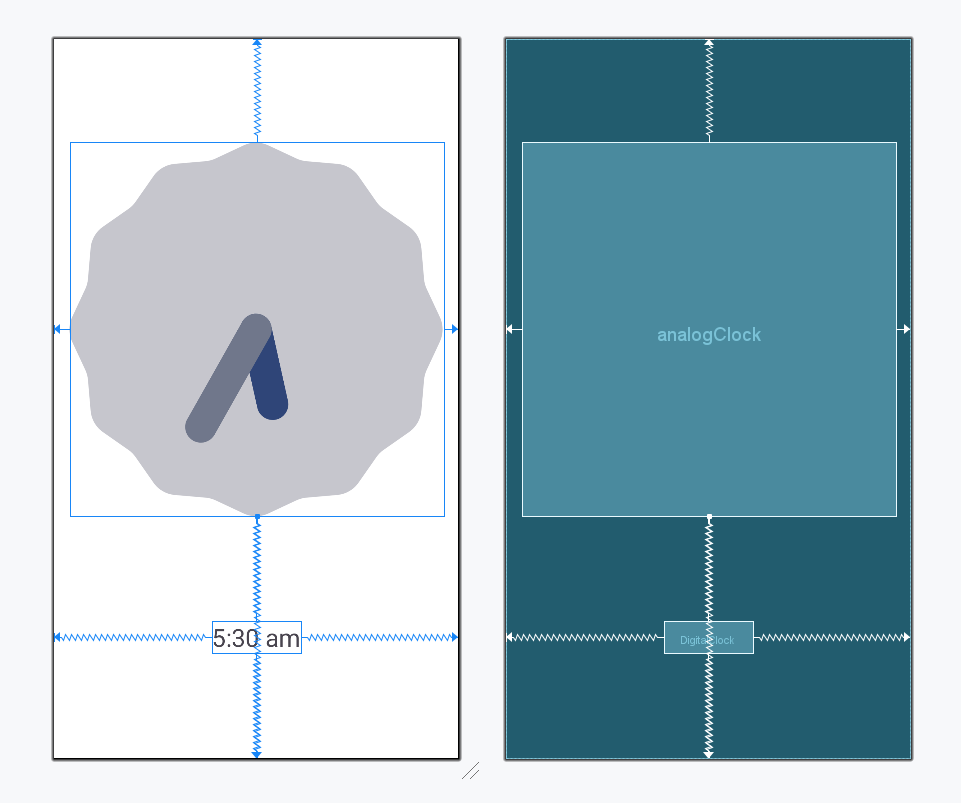
**Step2: Working with activity_main.xml
Open “activity_main.xml” file and add following widgets in a Constraint Layout:
- An **Analog clock
- A **Digital clock
This will make the UI of the Application. There is no need for assignment of IDs as these widgets will display the time by themselves.
**activity_main.xml:
XML `
<androidx.constraintlayout.widget.ConstraintLayout xmlns:android="http://schemas.android.com/apk/res/android" xmlns:app="http://schemas.android.com/apk/res-auto" xmlns:tools="http://schemas.android.com/tools" android:layout_width="match_parent" android:layout_height="match_parent" android:background="@color/white" tools:context=".MainActivity">
<AnalogClock
    android:id="@+id/analogClock"
    android:layout_width="wrap_content"
    android:layout_height="wrap_content"
    app:layout_constraintBottom_toBottomOf="parent"
    app:layout_constraintEnd_toEndOf="parent"
    app:layout_constraintStart_toStartOf="parent"
    app:layout_constraintTop_toTopOf="parent"
    app:layout_constraintVertical_bias="0.3" />

<DigitalClock
    android:layout_width="wrap_content"
    android:layout_height="wrap_content"
    android:textSize="25sp"
    app:layout_constraintBottom_toBottomOf="parent"
    app:layout_constraintEnd_toEndOf="parent"
    app:layout_constraintStart_toStartOf="parent"
    app:layout_constraintTop_toBottomOf="@+id/analogClock" />
</androidx.constraintlayout.widget.ConstraintLayout>
`
Design UI:
**Step3: Working with MainActivity File
Leave the MainActivity File code as it is, as shown below.
MainActivity.java `
package org.geeksforgeeks.demo;
import android.support.v7.app.AppCompatActivity; import android.os.Bundle;
public class MainActivity extends AppCompatActivity {
@Override
protected void onCreate(Bundle savedInstanceState)
{
    super.onCreate(savedInstanceState);
    setContentView(R.layout.activity_main);
}
}
MainActivity.kt
package org.geeksforgeeks.demo
import android.os.Bundle import androidx.appcompat.app.AppCompatActivity
class MainActivity : AppCompatActivity() {
override fun onCreate(savedInstanceState: Bundle?) {
    super.onCreate(savedInstanceState)
    setContentView(R.layout.activity_main)
}
}
`
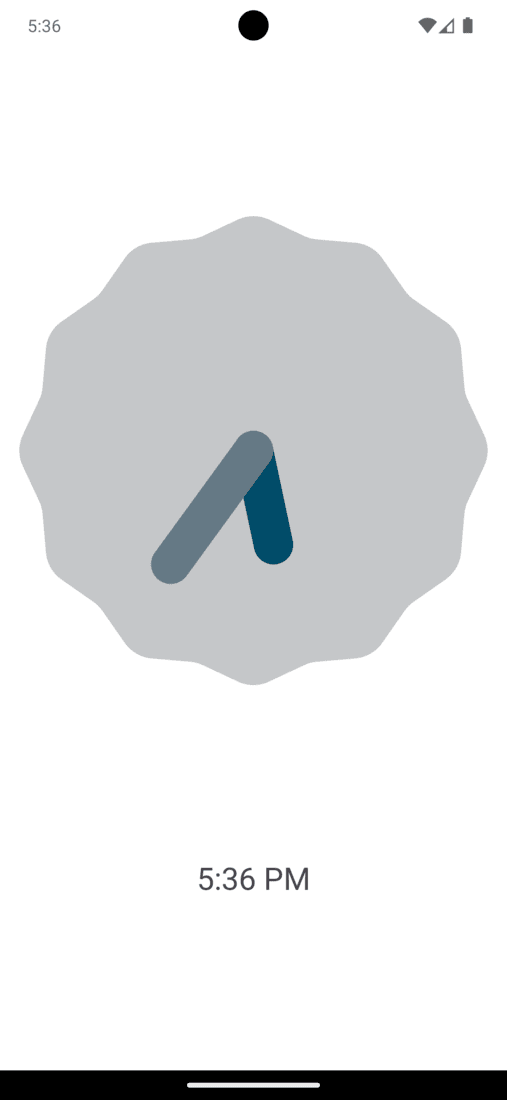
**Output: