Bottom Navigation Bar in Android (original) (raw)
Last Updated : 15 Jul, 2025
We all have come across apps that have a Bottom Navigation Bar. Some popular examples include Instagram, WhatsApp, etc__._ In this article, let's learn how to implement such a functional Bottom Navigation Bar in the Android app.

Why do we need a Bottom Navigation Bar?
- It allows the user to switch to different activities/fragments easily.
- It makes the user aware of the different screens available in the app.
- The user is able to check which screen are they on at the moment.
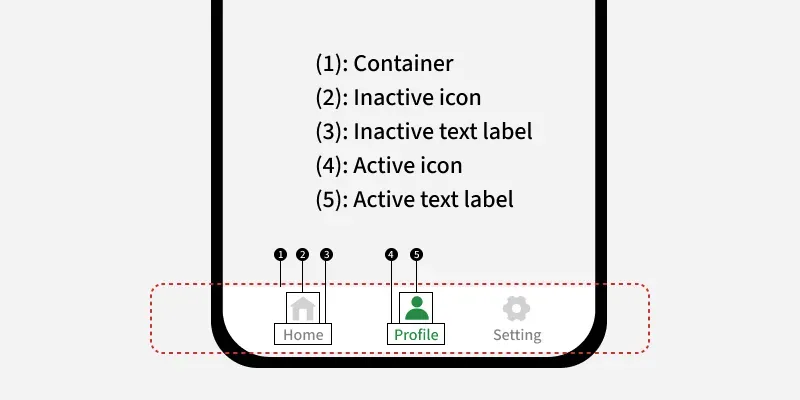
The following is an anatomy diagram for the Bottom Navigation Bar:
Steps for Creating Bottom Navigation Bar
**Step 1: Create a new Android Studio project
To create a new project in Android Studio please refer to How to Create/Start a New Project in Android Studio.
**Step 2: Adding the dependency to the build.gradle(:app) file
We will be using Android's Material Design Library so we need to import it in the build.gradle(:app) file . Here's the dependency we need to add:
implementation("com.google.android.material:material:1.12.0")
**Step 3: Working with activity_main.xml file
For this example, create a basic app with a FrameLayout and a Bottom Navigation Bar . The FrameLayout will contain Fragments which will change as the user click on the items in the Bottom Navigation Bar . This is how the activity_main.xml looks like:
**activity_main.xml:
XML `
<androidx.constraintlayout.widget.ConstraintLayout xmlns:android="http://schemas.android.com/apk/res/android" xmlns:app="http://schemas.android.com/apk/res-auto" xmlns:tools="http://schemas.android.com/tools" android:layout_width="match_parent" android:layout_height="match_parent" tools:context=".MainActivity">
<FrameLayout
    android:id="@+id/flFragment"
    android:layout_width="match_parent"
    android:layout_height="0dp"
    app:layout_constraintBottom_toTopOf="@+id/bottomNavigationView"
    app:layout_constraintEnd_toEndOf="parent"
    app:layout_constraintHorizontal_bias="0.5"
    app:layout_constraintStart_toStartOf="parent"
    app:layout_constraintTop_toTopOf="parent" />

<com.google.android.material.bottomnavigation.BottomNavigationView
    android:id="@+id/bottomNavigationView"
    android:layout_width="match_parent"
    android:layout_height="75dp"
    app:layout_constraintBottom_toBottomOf="parent"
    app:layout_constraintEnd_toEndOf="parent"
    app:layout_constraintHorizontal_bias="0.5"
    app:layout_constraintStart_toStartOf="parent"
    app:menu="@menu/bottom_nav_menu"/>
</androidx.constraintlayout.widget.ConstraintLayout>
`
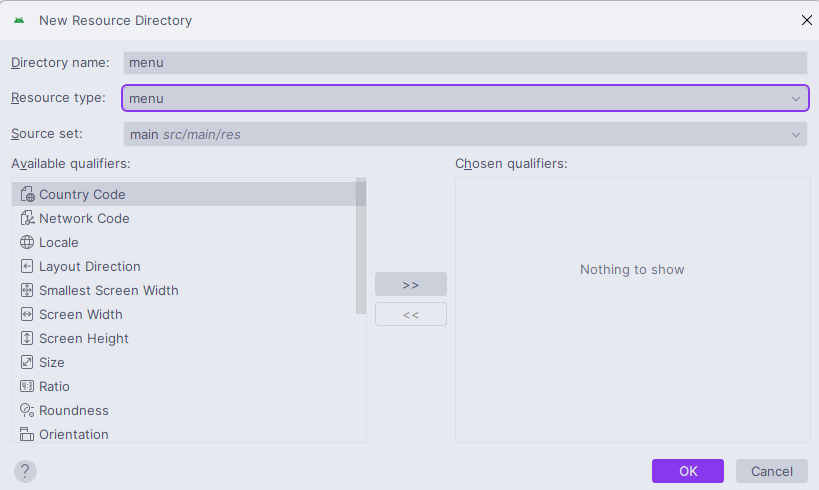
The Navigation Bar needs to have some items which will create using Menu. To create a **Menu, first create a **Menu Directory by right clicking on the res directory select **New > Android Resource Directory and select **Menu in the **Resource Type_.
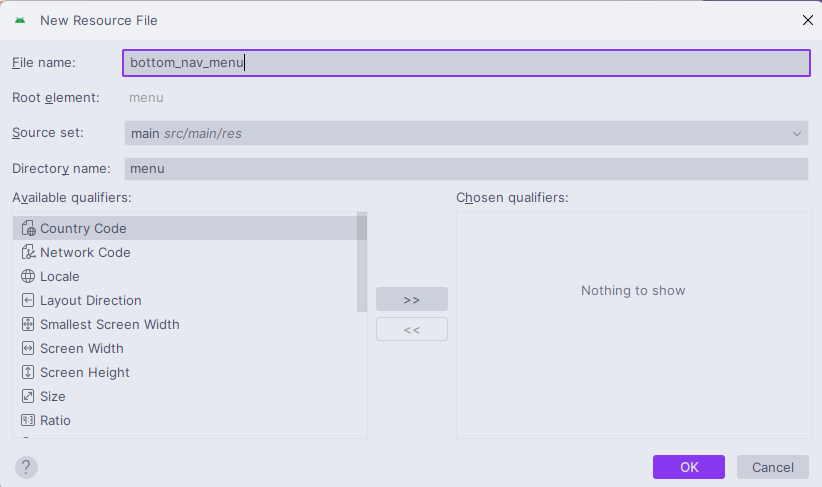
To create a **Menu Resource File, click on the **app > res > menu (right-click) > New > Menu Resource File and name it **bottom_nav_menu.xml.
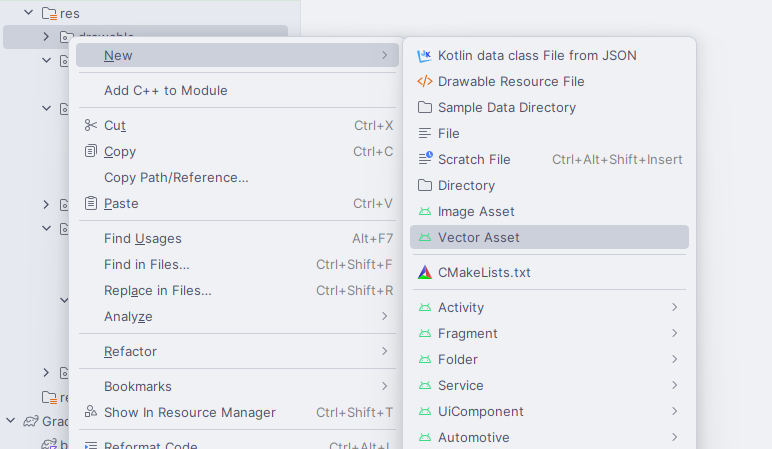
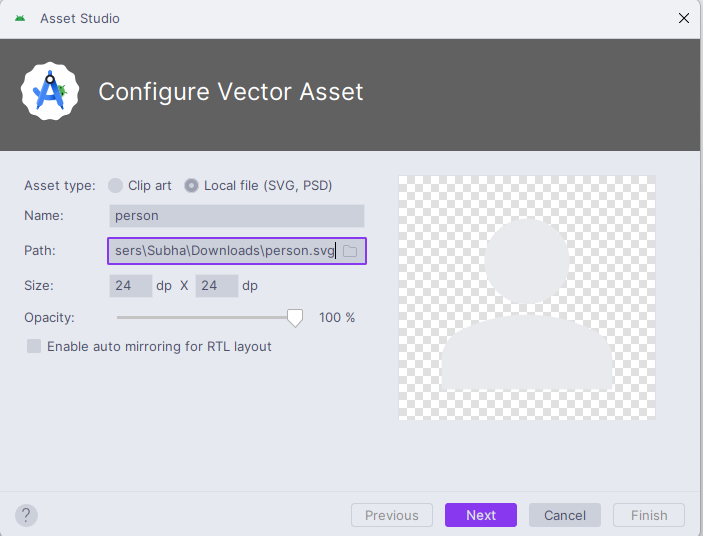
Now the user can create as many items as he wants in the **bottom_nav_menu.xml file. The user also needs to create an icon for each of these items. To create an icon, click on the app > res > drawable (right-click) > New > Vector Asset.
In the window that opens, the user can name the icon whatever he wants but it should not comprise any uppercase letter . The user can select the icon he wants by searching it and when the user is done, click Next -> Finish.
Now add these items in the bottom_nav_menu.xml . This is how the bottom_nav_menu.xml file looks like after adding the items:
**bottom_nav_menu.xml:
XML `
`
**Step 5: Changing the Action Bar style
Since we are using **Google's Material Design Library, we need to change the action bar's style to use the same library otherwise the Bottom Navigation Bar will be black and its items will be invisible. To change it, navigate to styles.xml by clicking on the **app > **res > **values > **themes.xml and change the **style opening tag as:
<style name="Theme.Demo" parent="Base.Theme.Demo" />`
**Step 6: Creating Fragments to display
Now that we have our Bottom Navigation Bar, we would want it to be functional by taking us to a different fragment/activity when an item is clicked. In this example, create a fragment for each item and navigate to them whenever a corresponding item is clicked. Since we created three items in the Bottom Navigation Bar, we will be creating three Fragments. To create a Fragment, click on the app (right-click) > New > Fragment > Fragment (Blank). Name the fragment as **FirstFragment and the corresponding XML file as **fragment_first. To keep things simple, all three of the fragments will just contain a TextView. However, we can tweak this as we want it to be in the app. This is how the **fragment_first.xml looks like after adding a **TextView :
**fragment_first.xml:
XML `
<!-- TODO: Update blank fragment layout -->
<TextView
    android:layout_width="match_parent"
    android:layout_height="match_parent"
    android:gravity="center"
    android:text="Home" />
`
Next, code the **FirstFragment to display the **fragment_first.xml. For this, delete all the previously written code in **FirstFragment and replace it with the below code. The below code just takes the layout we created for our fragment and inflates it.
Note: If we don't want our fragment to have any logic or perform any task, we will add that code in our **FirstFragment.
**FirstFragment file:
Java `
package org.geeksforgeeks.demo;
import android.os.Bundle; import android.view.LayoutInflater; import android.view.View; import android.view.ViewGroup; import androidx.annotation.NonNull; import androidx.annotation.Nullable; import androidx.fragment.app.Fragment;
public class FirstFragment extends Fragment {
@Nullable
@Override
public View onCreateView(@NonNull LayoutInflater inflater, @Nullable ViewGroup container, @Nullable Bundle savedInstanceState) {
    // Inflate the layout for this fragment
    return inflater.inflate(R.layout.fragment_first, container, false);
}
}
Kotlin
package org.geeksforgeeks.demo
import android.os.Bundle import androidx.fragment.app.Fragment import android.view.LayoutInflater import android.view.View import android.view.ViewGroup
class FirstFragment : Fragment() { override fun onCreateView( inflater: LayoutInflater, container: ViewGroup?, savedInstanceState: Bundle? ): View? { return inflater.inflate(R.layout.fragment_first, container, false) } }
`
Similarly, create two more fragments for the remaining two items.
**Step 7: Working with the MainActivity file
Now we have everything that we need and lastly, we just need to code the **MainActivity to connect everything to the application. Here, first, create a function called setCurrentFragment() that takes a Fragment as an argument and sets it in our FrameLayout of activity_main.xml file. Add a click listener to the items of the Bottom Navigation Bar so that we display the corresponding Fragment when an item is clicked. After adding all these codes, the MainActivity looks like this:
**MainActivity File:
Java `
package org.geeksforgeeks.demo;
import android.os.Bundle; import androidx.annotation.NonNull; import androidx.appcompat.app.AppCompatActivity; import androidx.fragment.app.Fragment; import com.google.android.material.bottomnavigation.BottomNavigationView;
public class MainActivity extends AppCompatActivity {
@Override
protected void onCreate(Bundle savedInstanceState) {
    super.onCreate(savedInstanceState);
    setContentView(R.layout.activity_main);

    BottomNavigationView bottomNavigationView = findViewById(R.id.bottomNavigationView);

    Fragment firstFragment = new FirstFragment();
    Fragment secondFragment = new SecondFragment();
    Fragment thirdFragment = new ThirdFragment();

    setCurrentFragment(firstFragment);

    bottomNavigationView.setOnNavigationItemSelectedListener(item -> {
        switch (item.getItemId()) {
            case R.id.home:
                setCurrentFragment(firstFragment);
                break;
            case R.id.profile:
                setCurrentFragment(secondFragment);
                break;
            case R.id.settings:
                setCurrentFragment(thirdFragment);
                break;
        }
        return true;
    });
}

private void setCurrentFragment(Fragment fragment) {
    getSupportFragmentManager()
            .beginTransaction()
            .replace(R.id.flFragment, fragment)
            .commit();
}
}
Kotlin
package org.geeksforgeeks.demo
import android.os.Bundle import androidx.appcompat.app.AppCompatActivity import androidx.fragment.app.Fragment import com.google.android.material.bottomnavigation.BottomNavigationView
class MainActivity : AppCompatActivity() {
override fun onCreate(savedInstanceState: Bundle?) {
    super.onCreate(savedInstanceState)
    setContentView(R.layout.activity_main)

    val bottomNavigationView: BottomNavigationView = findViewById(R.id.bottomNavigationView)

    val firstFragment = FirstFragment()
    val secondFragment = SecondFragment()
    val thirdFragment = ThirdFragment()

    setCurrentFragment(firstFragment)

    bottomNavigationView.setOnNavigationItemSelectedListener {
        when (it.itemId) {
            R.id.home -> setCurrentFragment(firstFragment)
            R.id.profile -> setCurrentFragment(secondFragment)
            R.id.settings -> setCurrentFragment(thirdFragment)

        }
        true
    }

}

private fun setCurrentFragment(fragment: Fragment) =
    supportFragmentManager.beginTransaction().apply {
        replace(R.id.flFragment, fragment)
        commit()
    }
}
`