How to Integrate Razorpay Payment Gateway in Android? (original) (raw)
Last Updated : 23 Jul, 2025
Many apps nowadays require to have a payment gateway inside their application so that users can do any transactions inside their apps to purchase any product or any service. Many apps use the payment gateway features but the integration of this payment gateway is a difficult task in Android applications. So to make this task simple and easy **Razorpay have provided a service with the help of this we can integrate the payment solutions in our app very easily and we can also manage all payment methods in our app. In this article, we will take a look at the implementation of a payment gateway in our Android app.
What we are going to build in this article?
We will be building a simple Android application in which we will be displaying an EditText and a button. Inside this screen, we have to add the amount which is to be paid and on clicking the button we will open the Razorpay payment gateway and will make a payment. In this article, we will be adding test credentials for implementing Razorpay in Android. A sample video is given below to get an idea about what we are going to do in this article. Note that we are going to implement this project using the **Java & **Kotlin language.
Step by Step Implementation
Step 1: Create a New Project
To create a new project in Android Studio please refer to How to Create/Start a New Project in Android Studio.
Step 2: Add dependency of Razor pay library in build.gradle file
Navigate to the **Gradle Scripts > build.gradle(Module:app) and add the below dependency in the dependencies section.
dependencies {
...
implementation ("com.razorpay:checkout:1.6.40")
}
After adding this dependency sync your project and now we will move towards the XML part.
Step 3: Adding permissions to the Internet
Navigate to the **app > manifests > AndroidManifest.xml file and add the below code to it.
Step 4: Working with the activity_main.xml file
Navigate to the **app > res > layout > activity_main.xml and add the below code to that file.
**activity_main.xml:
XML `
<!--EditText text to enter amount-->
<EditText
    android:id="@+id/idEdtAmount"
    android:layout_width="match_parent"
    android:layout_height="wrap_content"
    android:layout_margin="24dp"
    android:hint="Enter amount to be payed"
    android:inputType="number" />

<!--button to make payment-->
<Button
    android:id="@+id/idBtnPay"
    android:layout_width="wrap_content"
    android:layout_height="wrap_content"
    android:text="Pay using RazorPay" />
`
Step 5: Generating an API key for using Razorpay
Browser the Razorpay site in Google or you can click on the link here. After clicking on this link you simply have to signup with your email and password and add some basic information such as your phone number.
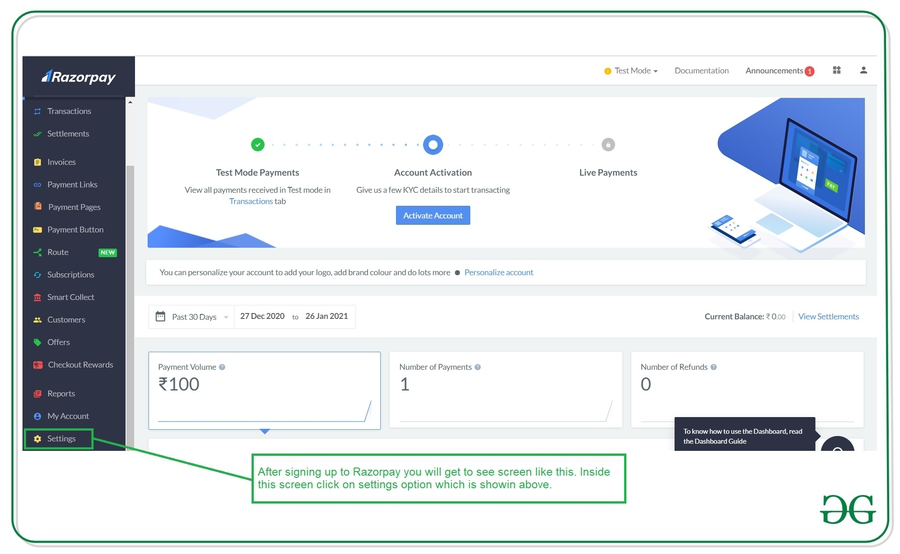
**Note: Here we are creating a testing credential for using Razor Pay.
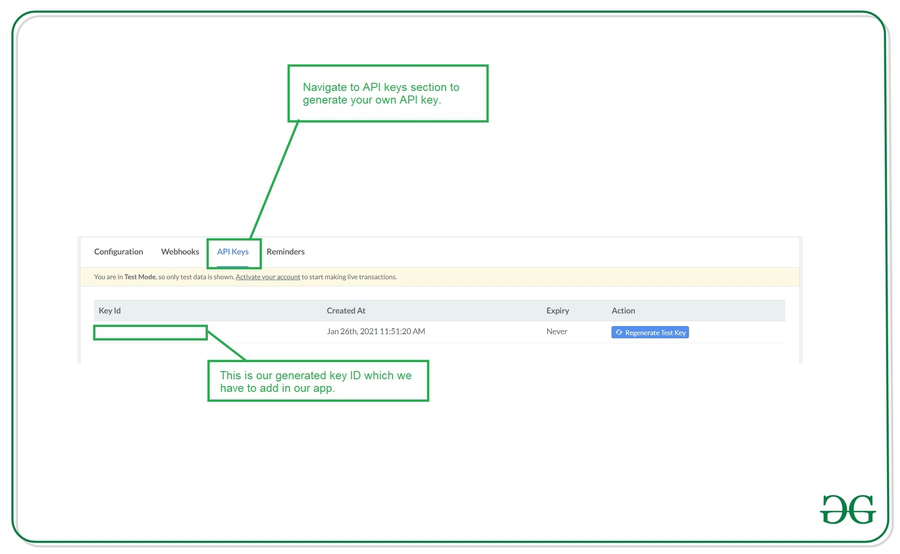
Inside the setting screen, click on Create a new key option your key will be generated. We will be using key ID in our application to test Razor pay. The key-id will start with **rzp_test
Step 6: Working with the MainActivity file
Go to the **MainActivity file and refer to the following code. Below is the code for the **MainActivity file. Comments are added inside the code to understand the code in more detail.
MainActivity.java `
package org.geeksforgeeks.demo;
import android.os.Bundle; import android.widget.Button; import android.widget.EditText; import android.widget.Toast; import androidx.appcompat.app.AppCompatActivity; import com.razorpay.Checkout; import com.razorpay.PaymentResultListener; import org.json.JSONException; import org.json.JSONObject;
public class MainActivity extends AppCompatActivity implements PaymentResultListener {
// Declare edit text and button variables
private EditText amountEdt;
private Button payBtn;

@Override
protected void onCreate(Bundle savedInstanceState) {
    super.onCreate(savedInstanceState);
    setContentView(R.layout.activity_main);

    // initialize all the variables
    amountEdt = findViewById(R.id.idEdtAmount);
    payBtn = findViewById(R.id.idBtnPay);

    // add on click listener to button
    payBtn.setOnClickListener(v -> {
        // get amount entered by user
        String userInput = amountEdt.getText().toString();

        // round off the amount
        int amount = Math.round(Float.parseFloat(userInput) * 100);

        // initialize Razorpay account
        Checkout checkout = new Checkout();

        // add your own key id here
        checkout.setKeyID("Enter your key id here");

        // set image
        checkout.setImage(R.drawable.gfg_logo);

        // initialize json object
        JSONObject jsonObject = new JSONObject();
        try {
            jsonObject.put("name", "Geeks for Geeks");
            jsonObject.put("description", "Test payment");
            jsonObject.put("theme.color", "");
            jsonObject.put("currency", "INR");
            jsonObject.put("amount", amount);
            jsonObject.put("prefill.contact", "9999999999");
            jsonObject.put("prefill.email", "geeksforgeeks1947@gmail.com");

            // open razorpay to checkout activity
            checkout.open(MainActivity.this, jsonObject);
        } catch (JSONException e) {
            e.printStackTrace();
        }
    });
}

@Override
public void onPaymentSuccess(String s) {
    // this method is called on payment success.
    Toast.makeText(this, "Payment is successful : " + s, Toast.LENGTH_SHORT).show();
}

@Override
public void onPaymentError(int i, String s) {
    // on payment failed.
    Toast.makeText(this, "Payment Failed due to error : " + s, Toast.LENGTH_SHORT).show();
}
}
MainActivity.kt
package org.geeksforgeeks.demo
import android.os.Bundle import android.widget.Button import android.widget.EditText import android.widget.Toast import androidx.appcompat.app.AppCompatActivity import com.razorpay.Checkout import com.razorpay.PaymentResultListener import org.json.JSONException import org.json.JSONObject
class MainActivity : AppCompatActivity(), PaymentResultListener {
// Declare edit text and button variables
private lateinit var amountEdt: EditText
private lateinit var payBtn: Button

override fun onCreate(savedInstanceState: Bundle?) {
    super.onCreate(savedInstanceState)
    setContentView(R.layout.activity_main)

    // initialize all the variables
    amountEdt = findViewById(R.id.idEdtAmount)
    payBtn = findViewById(R.id.idBtnPay)

    // add on click listener to button
    payBtn.setOnClickListener {
        // get amount entered by user
        val userInput = amountEdt.getText().toString()

        // round off the amount
        val amount = Math.round(userInput.toFloat() * 100)

        // initialize Razorpay account
        val checkout = Checkout()

        // add your own key id here
        checkout.setKeyID("Enter your key id here")

        // set image
        checkout.setImage(R.drawable.gfg_logo)

        // initialize json object
        val jsonObject = JSONObject()
        try {
            jsonObject.put("name", "Geeks for Geeks")
            jsonObject.put("description", "Test payment")
            jsonObject.put("theme.color", "")
            jsonObject.put("currency", "INR")
            jsonObject.put("amount", amount)
            jsonObject.put("prefill.contact", "9999999999")
            jsonObject.put("prefill.email", "geeksforgeeks1947@gmail.com")

            // open razorpay to checkout activity
            checkout.open(this@MainActivity, jsonObject)
        } catch (e: JSONException) {
            e.printStackTrace()
        }
    }
}

override fun onPaymentSuccess(s: String) {
    // this method is called on payment success.
    Toast.makeText(this, "Payment is successful : $s", Toast.LENGTH_SHORT).show()
}

override fun onPaymentError(i: Int, s: String) {
    // on payment failed.
    Toast.makeText(this, "Payment Failed due to error : $s", Toast.LENGTH_SHORT).show()
}
}
`
**Output:
As we are using test credentials so our payment will not be done. For making your payments live you have to make your application live in the Razorpay console and generate a new key.