Google Cloud Load Balancer (original) (raw)
Last Updated : 13 Mar, 2026
In todays fast-paced virtual world, making sure your web programs are accessible , reliable, and responsive is critical. One of the key components to obtain this goal is a good load balancing. Google Cloud Load Balancer is a powerful tool offered by Google Cloud Platform (GCP) that distributes incoming network site visitors throughout multiple servers to make sure no single server is crushed, thereby optimizing your software’s performance. In this newsletter, we will discover the features, benefits, and best practices associated with Google Cloud Load Balancer.
Google Cloud Load Balancer is a completely-distributed, software-described managed provider that allows you to distribute incoming network traffic throughout more than one backend times or services. It operates at the worldwide level, permitting you to balance site visitors throughout different areas and zones. Google Cloud Load Balancer offers several sorts to cater to various application needs:
- **HTTP(S) Load Balancing: Ideal for serving HTTP and HTTPS visitors, this load balancer can distribute requests based totally on content material, making it perfect for web applications and websites.
- **TCP/UDP Load Balancing: This type is designed for non-HTTP(S) site visitors, making it suitable for protocols like SMTP, FTP, DNS, and greater. It ensures that network traffic is evenly dispensed throughout backend instances.
- **Internal Load Balancing: It is used to distribute visitors inside a Virtual Private Cloud (VPC) network, permitting you to balance traffic among times that aren't exposed to the public internet.
Types of Google Cloud Load Balancers
Google Cloud provides several types of load balancers designed for different traffic types, network layers, and architectural needs. These load balancers can operate at Layer 4 (Transport Layer) or Layer 7 (Application Layer) depending on how traffic is handled.
1. Application Load Balancer (Layer 7)
Application Load Balancers operate at the HTTP/HTTPS layer and are used for web-based applications.
- Supports HTTP, HTTPS, and HTTP/2
- Advanced URL-based routing
- SSL/TLS termination
- Integration with Cloud CDN
- Global traffic distribution
**Types
**1. Global External Application Load Balancer
- Used for internet-facing applications.
- Distributes traffic across multiple regions worldwide.
- Ideal for high availability global applications.
**2. Regional External Application Load Balancer
- Handles traffic within a single region.
- Suitable for region-specific workloads.
**3. Internal Application Load Balancer
- Used for internal services within a VPC.
- Ideal for microservices communication inside a private network.
**Use Cases
- Web applications
- APIs
- Content delivery platforms
- SaaS platforms
2. Network Load Balancer (Layer 4)
Network Load Balancers operate at the transport layer and handle traffic based on IP address and TCP/UDP ports.
**Key Features
- Supports TCP, UDP, and SSL traffic
- Low latency and high throughput
- Suitable for non-HTTP workloads
- Preserves client source IP
**Types
**1. External Network Load Balancer
- Designed for internet-facing services.
- Handles TCP/UDP traffic.
**2. Internal Network Load Balancer
- Used within private networks (VPC).
- Commonly used for backend services such as databases or internal applications.
**Use Cases
- Gaming servers
- Real-time communication systems
- TCP-based applications
- Database clusters
3. Proxy Load Balancer
Proxy-based load balancers act as an intermediary between the client and backend servers, allowing advanced routing, security, and traffic management.
- Terminates the client connection
- Performs SSL/TLS termination
- Enables intelligent request routing
- Provides additional security layers
Proxy load balancers are commonly used in HTTP(S) load balancing environments.
Choosing the Right Google Cloud Load Balancer
Selecting the appropriate load balancer depends on several factors such as traffic type, scalability requirements, and whether the service is public or internal.
1. Traffic Type
- Determine the type of traffic your application needs to handle before choosing a load balancer.
- HTTP / HTTPS traffic is best handled by an Application Load Balancer (Layer 7).
- TCP / UDP traffic is handled by a Network Load Balancer (Layer 4).
- Application load balancers support advanced features like URL-based routing, SSL termination, and HTTP header inspection.
- Network load balancers are suitable for non-HTTP workloads such as databases, gaming servers, and custom TCP services.
2. Global vs Regional
Choose between global or regional load balancing depending on where your users are located.
**Global Load Balancers
- Distribute traffic across multiple regions worldwide.
- Route users to the nearest healthy backend using Google’s global network.
- Ideal for globally distributed applications and high availability.
**Regional Load Balancers
- Operate within a single region.
- Suitable for region-specific applications or internal enterprise workloads.
3. External vs Internal
The choice depends on whether the service should be accessible from the internet or only within a private network.
**External Load Balancers
- Expose applications to the public internet.
- Handle traffic from external clients worldwide.
- Commonly used for websites, APIs, and public services.
**Internal Load Balancers
- Used for private communication inside a VPC network.
- Enable load balancing between internal services or microservices.
- Improve security by preventing direct internet exposure.
4. Latency and Performance
- Consider the latency and performance requirements of your application.
- Network Load Balancers (Layer 4) provide lower latency and higher throughput because they perform minimal processing.
- Application Load Balancers (Layer 7) introduce slightly more overhead due to advanced request processing and routing features.
- Global load balancers reduce latency by routing traffic to the closest available backend region.
- For real-time or performance-sensitive workloads, Layer 4 load balancing is often preferred.
Steps To Configure cloud load balancer
**Step 1: Create a Google Cloud Project
If you haven’t already, create a new project in Google Cloud Platform. You can do this from the Google Cloud Console.
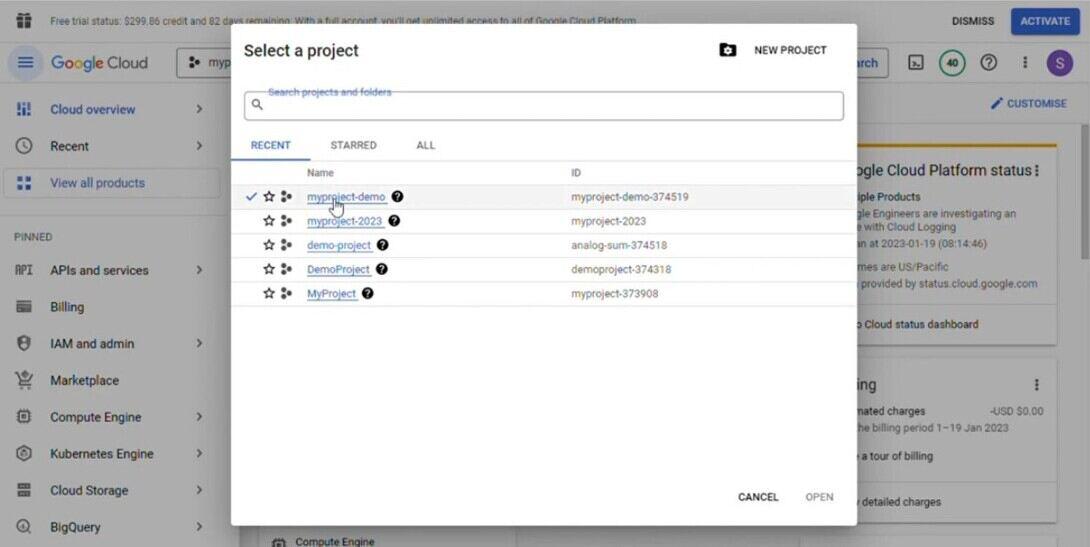
Select your Project
**Step 2: Enable Necessary APIs
Make sure the Compute Engine API and the Cloud Load Balancing API are enabled for your project. You can allow APIs from the “APIs & Services” > “Dashboard” phase of the Cloud Console.

**Step 3: Create Backend Services
Navigate to the “Compute Engine” segment within the Cloud Console.Click on “Backend services” under the “Load balancing” category.Click “Create Backend Service”.

Create backend service
Configure your backend service with the aid of specifying the backend instances and settings. You can pick out instances, specify balancing mode, session affinity, and so forth.
**Step 4: Create Instance Groups
Still inside the “Compute Engine” section, click on “Instance groups”.
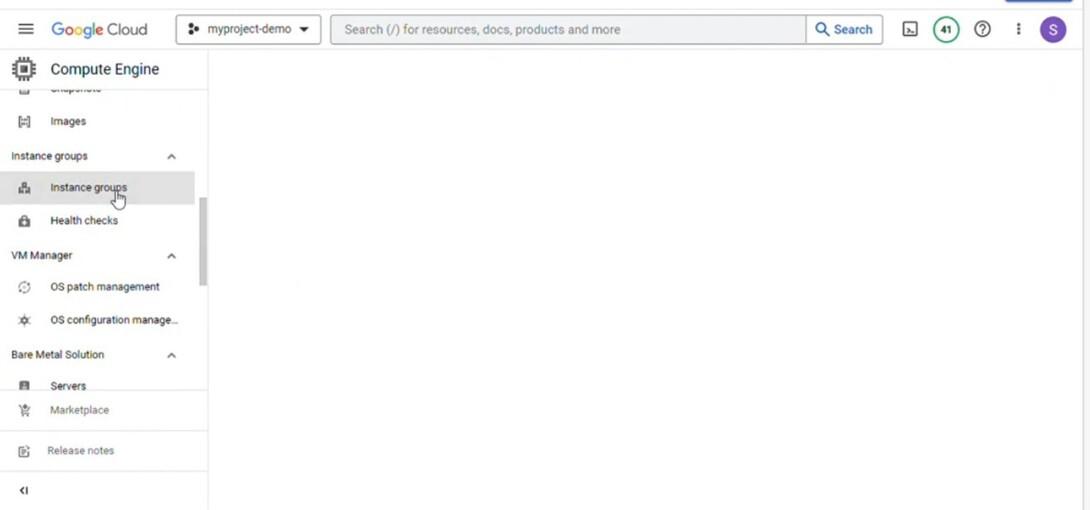
Cliick on instance group
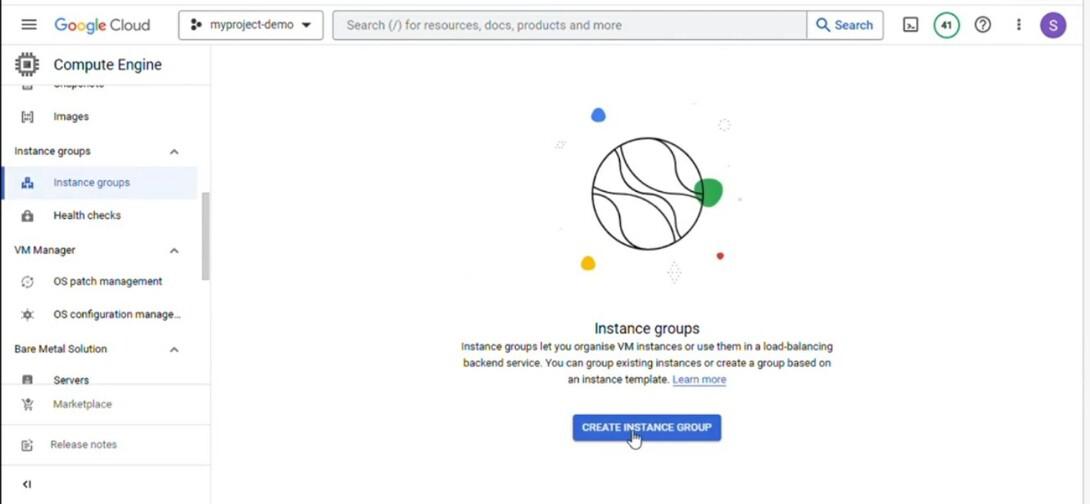
Click “Create Instance Group”.Add instances to the instance group. This can be completed by way of specifying individual VM instances, managed instance group, or unmanaged instance groups.
**Step 5: Set Up Health Checks
Health checks make certain that the instance for your instance group are healthful and available to visitors.Under the “Compute Engine” section, click on on “Health checks”.Click “Create a health check” and configure it according to your requirements.
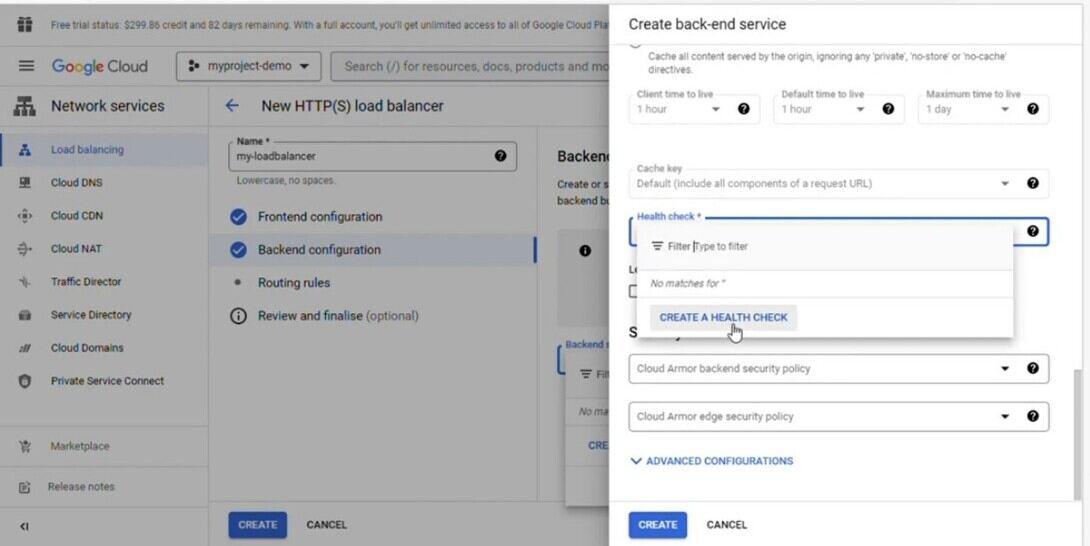
Create health check
**Step 6: Create a Load Balancer
Go to “Load balancing” in the Cloud Console.
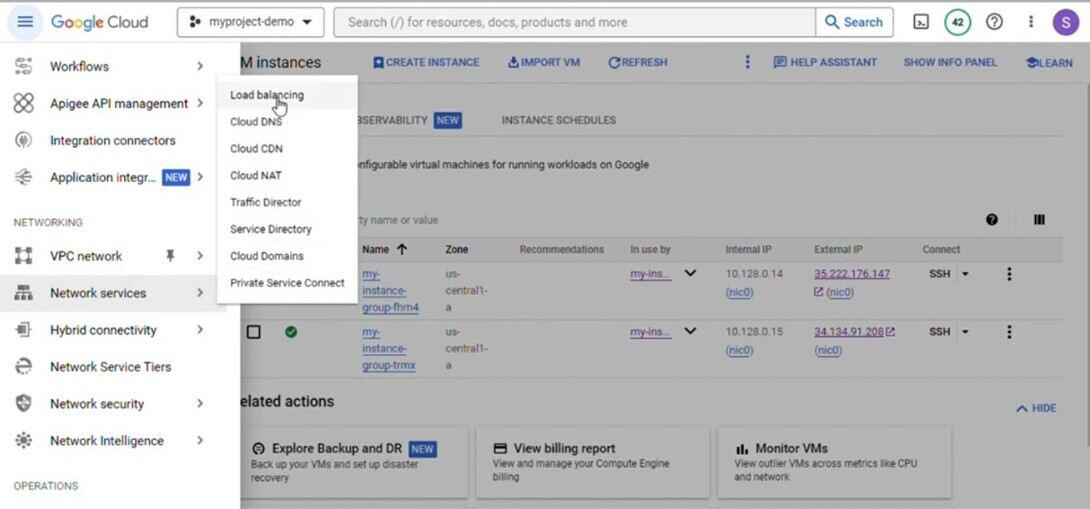
click on load balacing
Click “Create a load balancer”.

Click on load balancing
Choose the type of load balancer you want: “HTTP(S) Load Balancing” for web programs, “TCP/UDP Load Balancing” for non-HTTP traffic, or “Internal Load Balancing” for private/internal services.
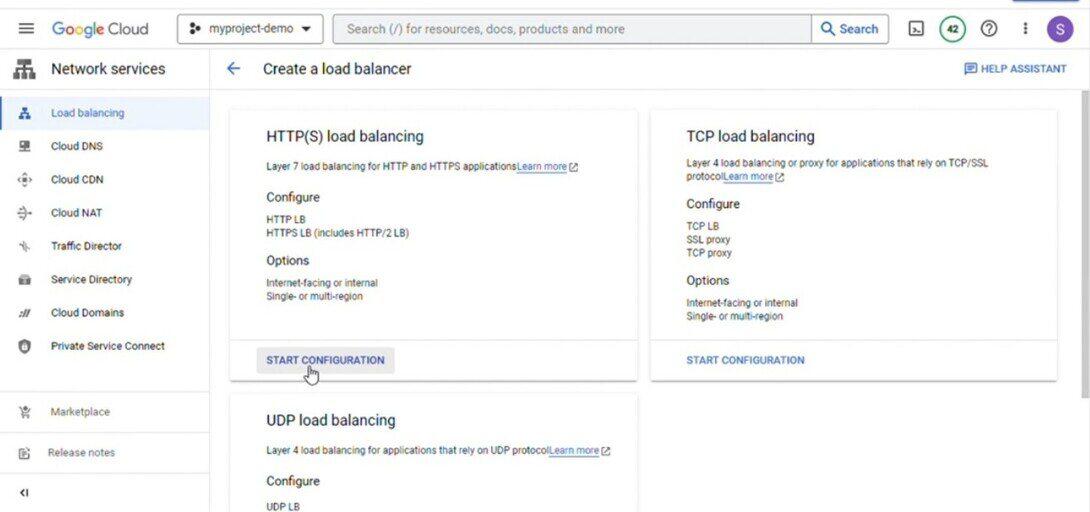
Choose the type of load balancer
Configure your frontend and backend settings. For example, in HTTP(S) Load Balancing, you will specify frontend IP and port configurations, and hyperlink them on your backend provider and health check.

Configure your frontend and backend
**Step 7: Configure DNS
If you’re using a global load balancer, you may need to configure your DNS settings to point to the load balancer’s IP address.
**Step 8: Testing and Monitoring
Test your load balancer to make certain traffic is distributed as predicted. You can use tools like cURL or on-line services to simulate visitors. Also, monitor your load balancer's performance the use of Google Cloud Monitoring and Logging.
**Step 9: Scaling and Optimization
Based to your application’s demand, configure auto-scaling policies for your instances. This ensures that your backend instances can deal with various tiers of visitors correctly.
Best Practices for Using Google Cloud Load Balancer
- **Health Checks: Regularly configure health checks to reveal the reputation of your backend times. This ensures that visitors is best directed to healthy instances, enhancing the overall reliability of your application.
- **Optimized Backend Instances: Ensure your backend instances are optimized for performance. Utilize Google Compute Engine instances with sufficient resources and leverage managed instance group for efficient control.
- **Use Content-based totally Routing: For HTTP(S) Load Balancing, utilize content material-based totally routing to direct specific type of requests to one of a kind backend service, improving flexibility and customization.
- **Monitoring and Logging: Implement sturdy tracking and logging to benefit insights into your load balancer’s overall performance. Utilize Google Cloud Monitoring and Google Cloud Logging to track metrics and diagnose troubles directly.
- **Automate Scaling: Leverage Autoscaler to automate the scaling of your backend instances based on call for. This guarantees that your application can handle varying degrees of traffic with out guide intervention.
Benefits of Google Cloud Load Balancer
- **High Availability: Google Cloud Load Balancer complements the reliability of your applications via dispensing traffic throughout multiple times and regions. If one instance or area fails, visitors is automatically redirected to healthy instances, making sure excessive availability.
- **Scalability: Load balancers are critical for handling increased visitors. Google Cloud Load Balancer can scale elastically to manage several hundreds all through peak times and minimize at some point of intervals of low visitors, ensuring efficient useful resource usage.
- **Global Load Balancing: By dispensing visitors throughout multiple regions, Google Cloud Load Balancer affords low-latency access in your applications, unless users geographical location.
- **Security: Load balancers offer Distributed Denial of Service (DDoS) protection through absorbing and mitigating attacks, safeguarding your packages from potential threats.
- **SSL/TLS Termination: Google Cloud Load Balancer can handle SSL/TLS termination, offloading the resource intensive encryption and decryption processes from your backend instance, for that reason improving performance.