Transfer Learning with Hugging Face (original) (raw)
Last Updated : 14 Apr, 2026
Transfer learning is a technique where pre-trained models are adapted for specific tasks using smaller, task-specific datasets. It helps leverage knowledge learned from large datasets to improve efficiency and performance.
- Reduces training time and computational cost
- Improves performance, especially with limited data
- Enables reuse of learned patterns across tasks
- Widely used in NLP with tools and models from Hugging Face
Hugging Face Features
Hugging Face provides tools and resources that make transfer learning easier and more efficient.
- **Pre-trained Models****:** Hugging Face offers a wide range of pre-trained models trained on large datasets, ready for fine-tuning across tasks like text classification and question answering, saving time and effort.
- **Datasets Library****:** Provides a collection of curated datasets for various NLP tasks, making it easier to find suitable data and improve model performance.
- **Simple API****:** Includes a user-friendly API that simplifies working with transformer models and reduces implementation complexity.
- **Model Hub****:** A community-driven platform to share and access pre-trained models, making it easier to find models for specific tasks.
Implementation
Here we will fine-tune a DistilBERT model on the AG News dataset to classify news articles into one of four categories: World, Sports, Business or Sci/Tech. Let's see the various steps involved in this implementation.
Step 1: Setup and Installing Necessary Libraries
Before we start, we need to ensure that the required libraries are installed.
!pip install transformers datasets evaluate -U
Step 2: Log In to Hugging Face Hub
Before uploading the model to Hugging Face, we must authenticate our session using our Hugging Face account. This step allows us to store models on the Hugging Face Model Hub making it easy to share and deploy models.
Python `
from huggingface_hub import notebook_login notebook_login()
`
Step 3: Importing Required Libraries
Here we will be importing all the necessary modules for loading the dataset, training the model and evaluating performance.
Python `
from datasets import load_dataset from transformers import Trainer from transformers import AutoTokenizer from transformers import pipeline from transformers import TrainingArguments from transformers import DataCollatorWithPadding from transformers import AutoModelForSequenceClassification import numpy as np import evaluate
`
Step 4: Loading the Dataset
Now we'll load the AG News dataset which is available in Hugging Face’s datasets library. This dataset contains news articles that will be used for multi-class classification (World, Sports, Business, Sci/Tech).
Python `
dataset = load_dataset("ag_news")
`
Step 5: Loading Tokenizer and Tokenizing the Dataset
We load the pre-trained **DistilBERT tokenizer which converts text into numerical tokens that the model can process. Next we apply the tokenizer to the dataset, ensuring that each article is tokenized into input IDs.
- **token_data = dataset.map(tokenize_function, batched=True): Applies the tokenize_function to the entire dataset in batches to tokenize the text.
- **batch_collator = DataCollatorWithPadding(tokenizer=tokenizer): Initializes a batch collator that will dynamically pad the sequences in a batch so they have consistent lengths. Python `
pretrained_model_name = "distilbert-base-uncased" tokenizer = AutoTokenizer.from_pretrained(pretrained_model_name)
def tokenize_function(row): return tokenizer(row["text"], truncation=True)
token_data = dataset.map(tokenize_function, batched=True) token_data = token_data.remove_columns(["text"]) token_data = token_data.rename_column("label", "labels") token_data.set_format("torch")
small_train_dataset = token_data["train"].shuffle(seed=42).select(range(1000)) small_eval_dataset = token_data["test"].shuffle(seed=42).select(range(1000)) batch_collator = DataCollatorWithPadding(tokenizer=tokenizer)
`
**Output:

Mapping function
Step 6: Preparing the Model for Fine-Tuning
Next we load the pre-trainedmodel for sequence classification. This model will be fine-tuned to classify AG News articles into one of the four categories. We specify the number of classes based on the dataset.
- **model = AutoModelForSequenceClassification.from_pretrained(pretrained_model_name, labels=labels): Loads the pre-trained DistilBERT model and specifies the number of output labels for multi-class classification. Python `
labels = dataset["train"].features["label"].num_classes model = AutoModelForSequenceClassification.from_pretrained( pretrained_model_name, num_labels=labels )
`
Step 7: Defining the Evaluation Metric
Here we set up the evaluation metric (accuracy) to assess the performance of the model during training and evaluation. The function compute_metrics will compare the model’s predictions to the true labels and calculate accuracy.
Python `
metric = evaluate.load("accuracy")
def compute_metrics(eval_pred): logits, labels = eval_pred predictions = np.argmax(logits, axis=-1) return metric.compute(predictions=predictions, references=labels)
`
Step 8: Defining Training Arguments
Now we define the training configuration. These parameters control how the model is trained such as the learning rate, batch size, number of epochs and strategies for saving and evaluating the model. We also enable mixed precision (fp16=True) to optimize training on GPUs.
Python `
model_name = "distilbert-ag-news-finetuned" training_args = TrainingArguments( output_dir=model_name, learning_rate=2e-5, per_device_train_batch_size=16, per_device_eval_batch_size=16, num_train_epochs=3, weight_decay=0.01, fp16=True,
eval_strategy="epoch",
save_strategy="epoch",
logging_strategy="epoch",

load_best_model_at_end=True,
metric_for_best_model="accuracy",
push_to_hub=True,
)
`
Step 9: Training the Model
The Trainer class is initialized with the model, training arguments and datasets. It handles the entire training loop, including logging, evaluation and optimization.
Python `
model_trainer = Trainer( model=model, args=training_args, train_dataset=token_data["train"], eval_dataset=token_data["test"], data_collator=batch_collator, compute_metrics=compute_metrics, ) model_trainer.train()
`
**Output:
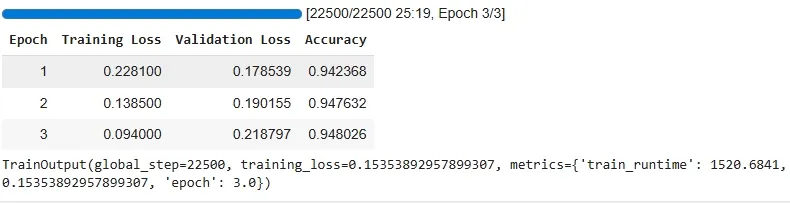
Training the Model
Step 10: Pushing the Model to Hugging Face Hub
After training, we can push the fine-tuned model to the Hugging Face Model Hub. This makes it publicly available for others to use or continue fine-tuning.
Python `
model_trainer.push_to_hub()
`
**Output:

Pushing the Model
Step 11: Making Predictions Using the Fine-Tuned Model
Once the model is fine-tuned and uploaded, we can use it to make predictions on new, unseen text. Let's see how we can classify a new news article.
Python `
text = "The home team won the championship after a thrilling match." classifier = pipeline("sentiment-analysis", model=f"your-model-choice/{model_name}")
prediction = classifier(text) print(prediction) print(dataset["train"].features["label"].names)
`
**Output:
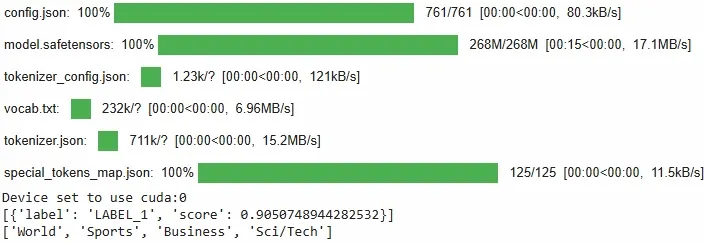
Making Predictions
You can download the source code from here.
Applications
- Used for sentiment analysis to classify text as positive, negative, or neutral
- Applied in Named Entity Recognition (NER) to identify entities like names, dates, and locations
- Enables text generation for writing, coding, and content creation
- Supports question answering by extracting relevant information from text
Advantages
- Reduces the need for large labeled datasets
- Saves time and computational resources compared to training from scratch
- Improves performance, especially on smaller datasets
Limitations
- Performance may drop if the source and target domains are very different
- Fine-tuning still requires computational resources
- Risk of overfitting when working with small datasets