AWS SitetoSite VPN (original) (raw)
AWS Site-to-Site VPN
Last Updated : 4 Feb, 2026
AWS Site-to-Site VPN provides a secure, encrypted connection between on-premises networks and Amazon VPCs over the internet, enabling reliable communication and resource sharing across locations.
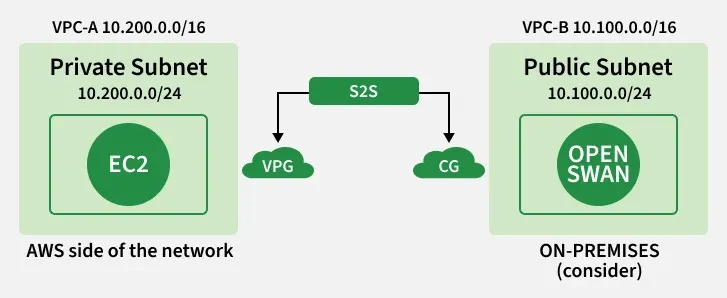
Site-to-Site VPN Connection
Setting up AWS Site-to-Site VPN Connection
The following are the steps that guides you on how to do AWS Site-to-Site VPN Connection:
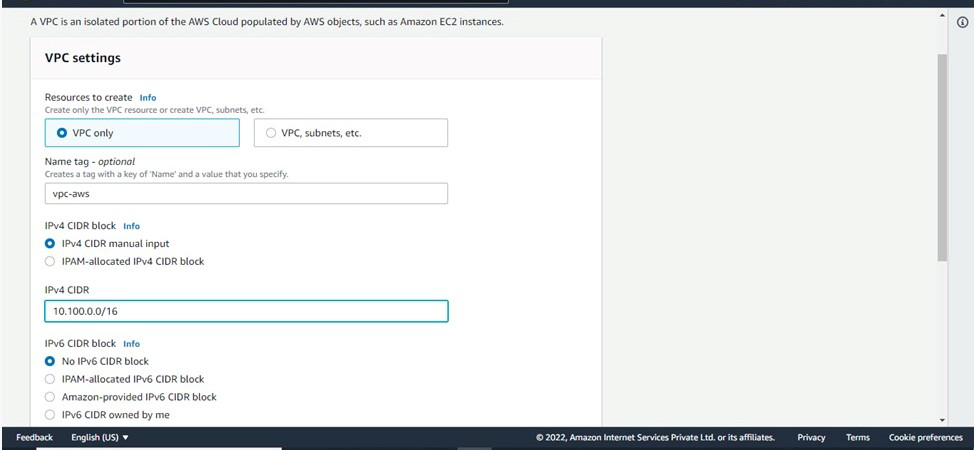
**Step 1: Log in to your AWS account > Choose a region (Here I have chosen the Mumbai region) >In the console page search for as follows,
- VPC > Go to VPC page > Click on create VPC > Click on VPC only > Give a name to your VPC(name-vpc-aws), IPv4 CIDR range.
- Here we have given 10.100.0.0/16), _Tenancy-default > Click on create VPC.
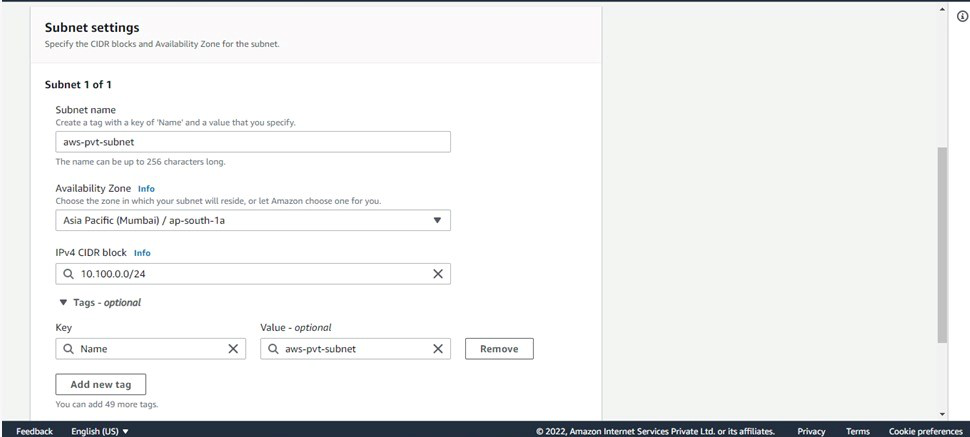
**Step 2: Create a Private subnet under it-
For that search, subnet > Click on create subnet > Fill in the details (Choose above created VPC, give a Name, Availability zone, CIDR range-10.100.0.0/24) > Click on create a subnet.
**Step 3: Go to _route table > Click on create route > Fill in the details(Give it name and choose VPC created on step-1) > Click on create.
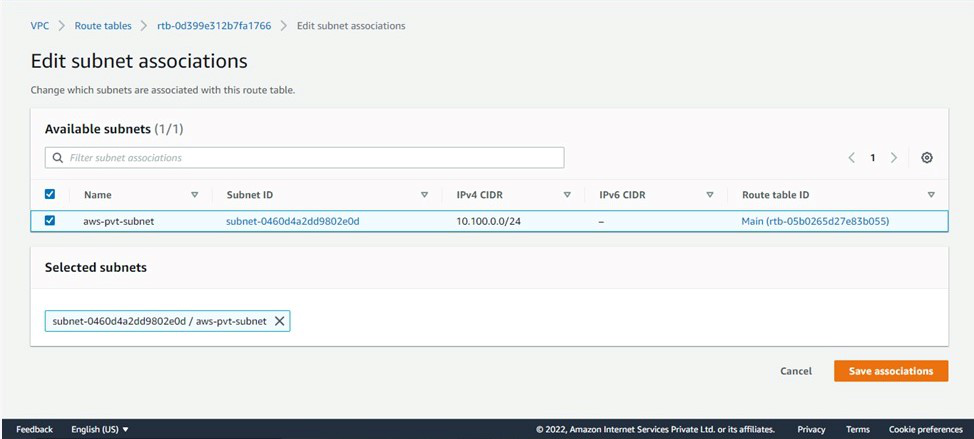
**Step 4: Associate route table with the _subnet- Select Route table > Subnet Associations > Edit Subnet Associations > Select above created Subnet > Save.
**Step 5: Now launch a _EC2 instance > Go to EC2 instance > Click on Launch an instance > Fill in the details( Type: t2.micro, Storage: Default, Tags – Name: give a name, Security: Give it according to your requirement, Keypair: your existing key pair or create new if you don’t have an existing keypair > Launch instance. The above steps form the AWS side network
**Step 6: Go to other regions (different from the previous one) > Then create a VPC as mentioned in Step-1(Give it CIDR -10.200.0.0/16)
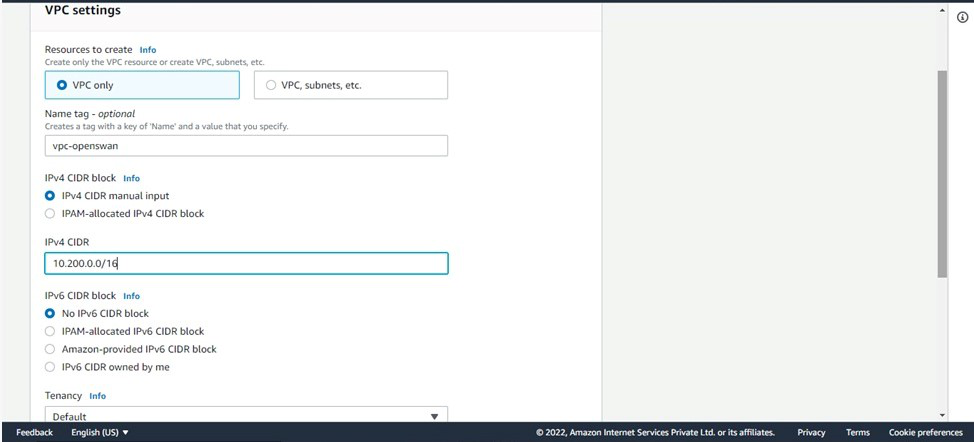
**Step 7: Create a Public subnet under it- For that search, _subnet > Click on create subnet > Fill in the details (Choose above created VPC, give a Name, Availability zone, CIDR range-10.200.0.0/24) > Click on create a subnet.

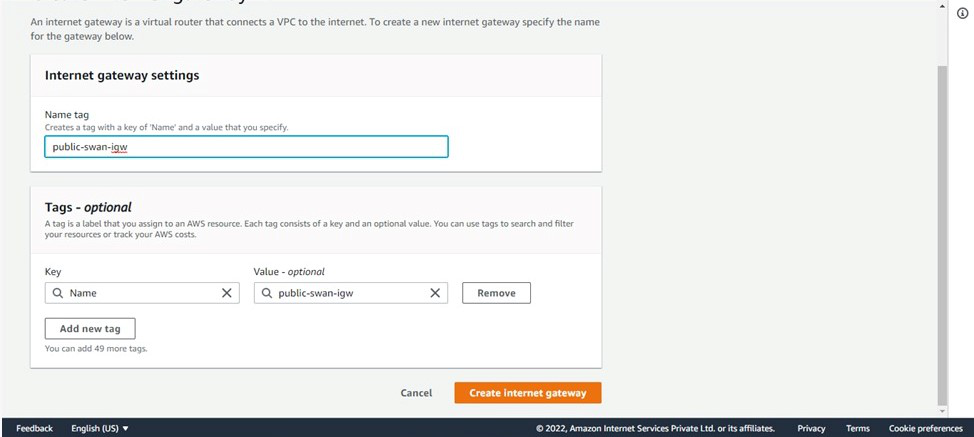
**Step 8: Since it is a public subnet it will have access to the internet so we need an Internet gateway.
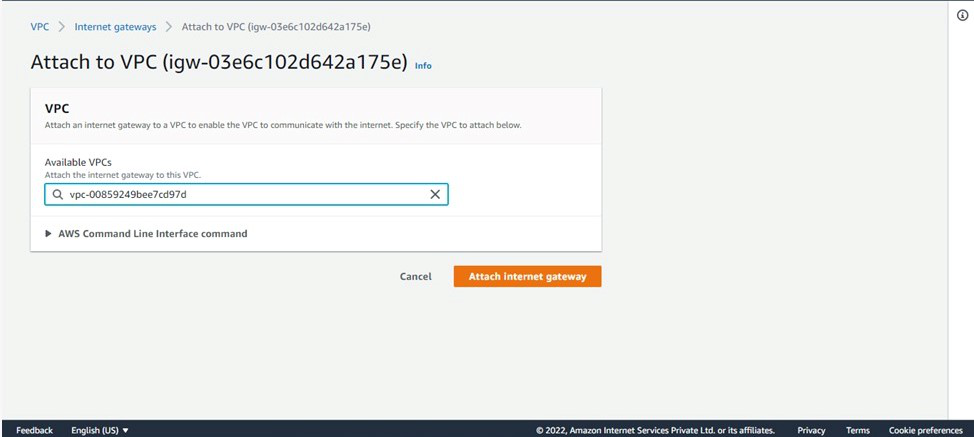
- Go to internet gateway _click on create internet gateway > Give it a name and create > click on created gateway(Actions > attach with vpc > give the above created VPC).
- Try to attach the VPC to the Internet Gateway, the following screenshot illustrates with effectively:
**Step 9: Go to _route table > Click on create route > Fill in the details(Give it name and choose VPC created on step-6) > Click on create.
**Step 10: Add a route entry for _Internet gateway- Select Route table > Go to Routes > Click Edit Routes > Add Route(give the internet gateway created) > Save.
_Associate route table with the subnet- Select Route table > Subnet Associations > Edit Subnet Associations > Select above created Subnet > Save.
**Step 11: Now launch a _EC2 instance >Go to EC2 instance > Click on Launch an instance >Fill in the details(Type: t2.micro, Storage: Default, Tags – Name: give a name, Security: Allow port 22 for your own IP and All _TCP _and ICMP-IPv4 from sources, Keypair: your existing key pair or create new if you don’t have an existing keypair>Launch instance.
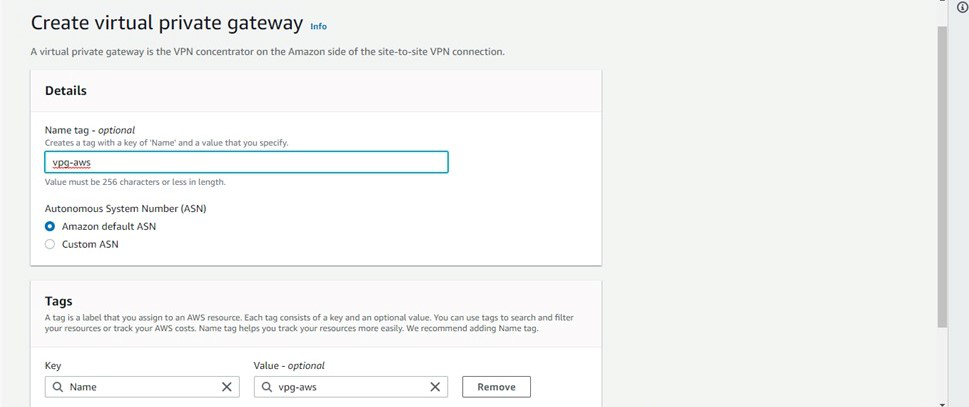
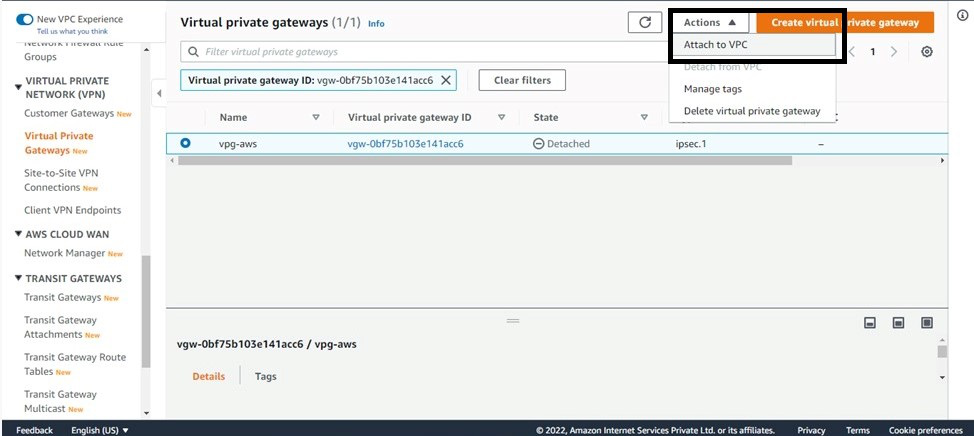
**Step 12: Now to _create Virtual Private Gateway > Search virtual private gateway > Click on create VPG > (Give it a name).
**Step 13: Now _go to actions > Attach VPC > Choose VPC-aws(VPC with private subnet).
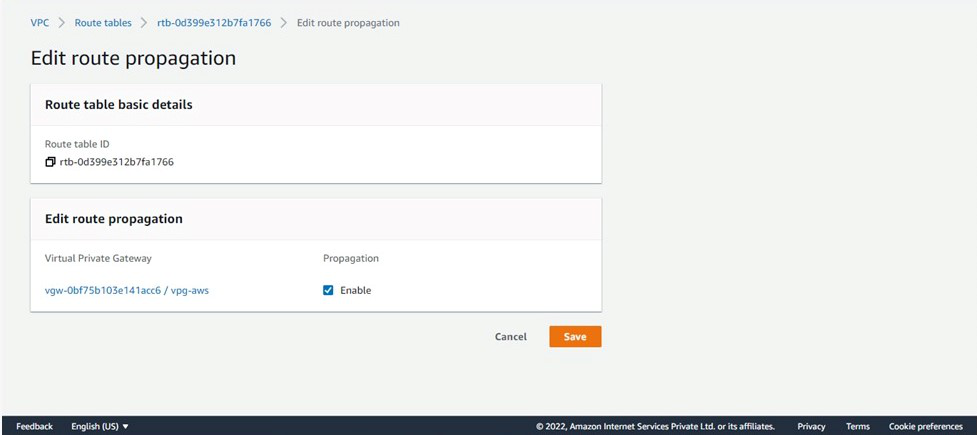
**Step 14: Go to _route table>Click on edit route propagation>Enable On your Virtual private gateway on all created route tables for both the vpc.
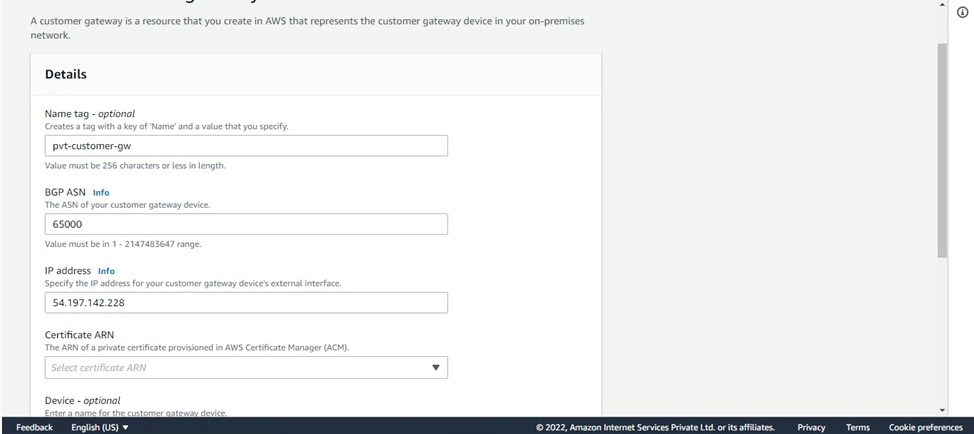
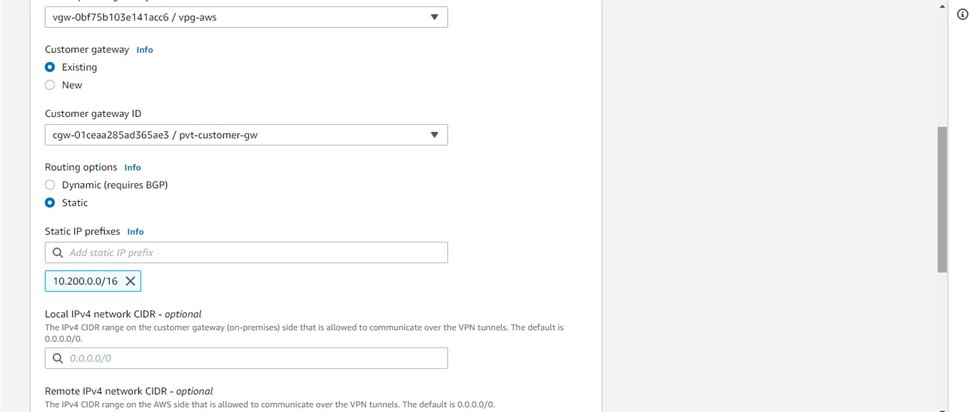
**Step 15: Now to create _Customer Gateway > Go to Customer Gateway > Click on create CGW > Give name, give _IP address _as Public IP of Instance you launched with public subnet > Select routing as static-Keep all other things as it is > click on create.
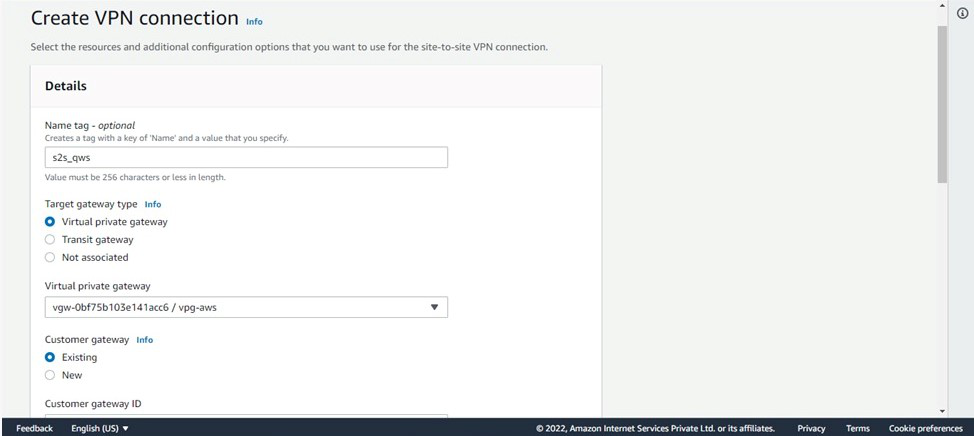
**Step 16: To create Site-To-Site connection: Go to _site-to-site VPN connections > Click on create VPN(Give a name, Target gateway-Virtual Private gateway(Give the VPG created above), Customer gateway-Existing(Give the CG you created above), Routing option-static) keep all others as it is and creates.
- Now, customize the existing gateway as shown in the figure:
- Wait till the state becomes available. After it is available.
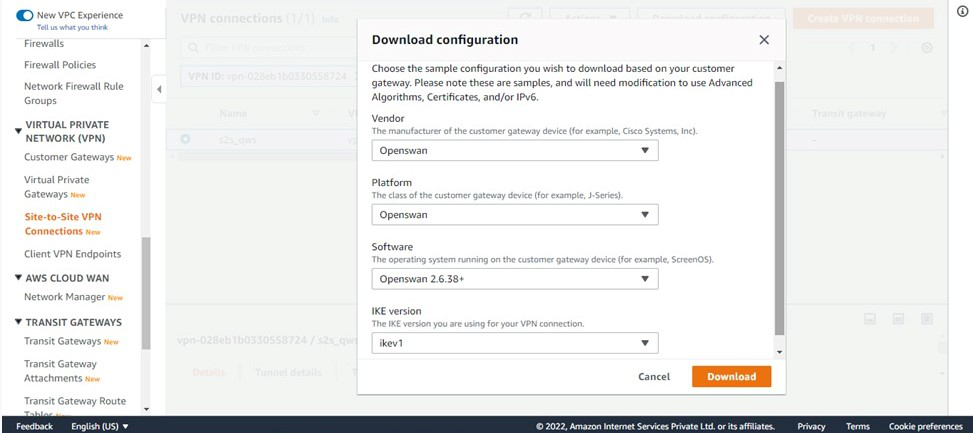
**Step 17: Download the configuration(select vendor as Openswan).
**Step 18: Now SSH into your instance created with a public subnet:
- Run the following commands:
sudo su
Install openswan: $ yum install openswan –y
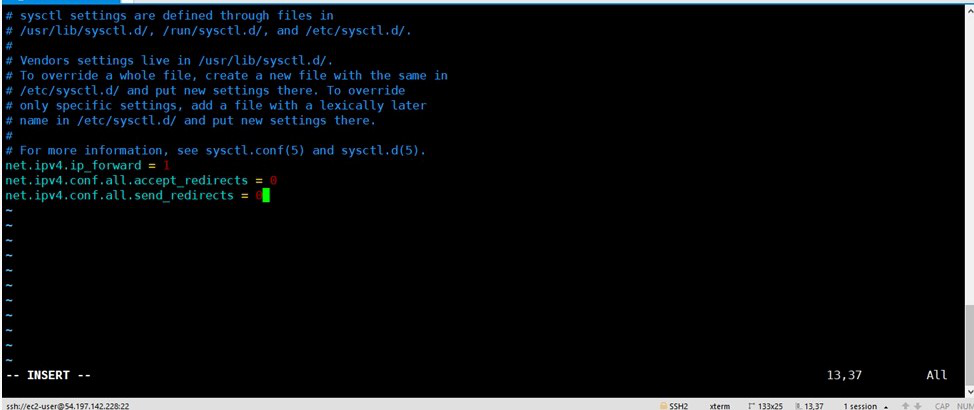
- Go to- vim /etc/sysctl.conf and update
net.ipv4.ip_forward = 1
net.ipv4.conf.all.accept_redirects = 0
net.ipv4.conf.all.send_redirects = 0
- Restart service Network- $ service network restart
- Create a file /etc/ipsec.d/aws.conf
- Inside that file paste the conn Tunnel1 details from downloaded configuration file.
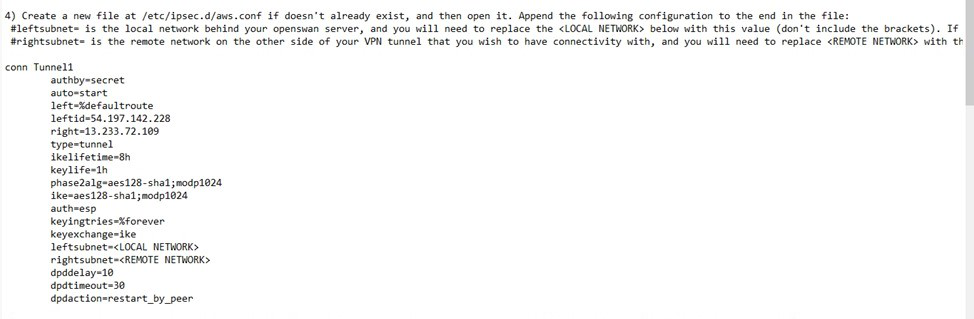
****(IMPORTANT- Remove auth=esp line, Replace leftsubnet=Customer end VPC CIDR range and rightsubnet=AWS side VPC CIDR)**
- Create another file /etc/ipsec.d/aws.secrets in that paste the key file present in configuration(In IPSEC Tunnel 1 5th point)
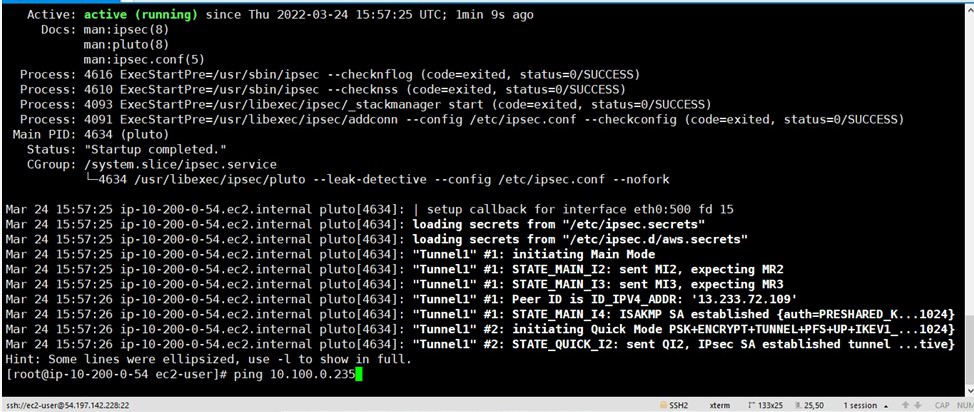
- **Start IPSEC service- $ systemctl start ipsec
- **Check status of ipsec - $ systemctl status ipsec
Now to you need to ping the private Instance from the open swan instance. Give the command: ping “the-private-IP –of-Instance” –If you get a response, the setup was successful.
Use Cases of AWS Site-to-Site VPN Connection
- **Moving Applications to the Cloud: A Site-to-Site VPN connection helps streamline the migration of applications to AWS. It enables you to securely host Amazon VPCs behind your company's firewall, allowing users to continue accessing these applications without any disruption during the migration process.
- **Safe Communication between Remote Offices: You can use AWS Site-to-Site VPN to create secure communication channels between different office locations, ensuring that data is transmitted safely between remote sites.
Benefits of AWS Site-to-Site VPN Connection
- **Enhanced Security: AWS Site-to-Site VPN establishes a secure, encrypted link between your on-premises network and AWS, safeguarding your data from unauthorized access.
- **Cost-Effective Solution: By utilizing the public internet for the VPN connection, businesses can reduce the expenses associated with dedicated leased lines while maintaining a secure communication channel.
- **Dependable Connectivity: The service offers the option to create multiple tunnels, ensuring high availability and minimizing potential downtime.
- **Seamless Integration: AWS Site-to-Site VPN integrates effortlessly with Amazon Virtual Private Cloud (VPC) and other AWS services, facilitating efficient data transfer and resource accessibility.
- **Flexible Network Design: Organizations can connect various VPCs or remote locations, providing a versatile network architecture that adapts to different business requirements.
- **Automatic Failover Mechanism: If the primary tunnel experiences an issue, the Site-to-Site VPN can automatically switch to a backup tunnel, ensuring continuous connectivity.
Pricing of AWS Site-to-Site VPN Connection
When you set up an AWS Site-to-Site VPN connection to your Amazon VPC, you'll be billed for every hour the VPN connection is active and available. If the connection is used for even part of an hour, it will still count as a full hour of usage. Furthermore, any data that is transmitted through the VPN connection will incur standard AWS data transfer charges.
Best Practices of AWS Site-to-Site Connection
The following are the best practices of AWS Site-to-Site Connection:
- **Use Redundant Connections: On setting up the multiple VPN tunnels, we can ensure high availability and failover protection.
- **Regularly Monitor and Maintain: By using the AWS CloudWatch we can monitor the VPN's health and performance, and promptly address any issues.
- **Implement Strong Encryption: It helps in ensuring that the data is encrypted using robust encryption algorithms and regularly update your security configurations.
- **Keep Security Groups Updated: It helps in regularly review and update security group rules to allow only necessary traffic and minimize exposure.
Troubleshooting of AWS Site-to-Site Connection
The following are the some of the troubleshooting of AWS Site-to-Site Connection:
- **Connection Failures: On ensuring that the VPN endpoints are correctly configured and that the IP addresses are correctly specified on both ends.
- **Tunnel Status Down: Ensure to check the status of the VPN tunnels in the AWS Management Console and try to verify that the required ports (UDP 500 and UDP 4500) are open on your firewall.
- **Routing Issues: Try to confirm that the routing tables in your VPC and on-premises network with including the appropriate routes to direct traffic through the VPN connection.
- **Security Policies: Make ensure that the security policies and encryption settings of match on both the AWS side and the on-premises VPN device to establish a secure connection.
Features of AWS Client VPN and AWS Site-to-Site VPN
1. Features of AWS Client VPN
- **Authentication Options: AWS Client VPN supports both Active Directory and certificate-based authentication. It integrates easily with AWS Directory Services, allowing it to connect to your existing on-premises Active Directory without requiring data migration to the cloud.
- **Control Over Access: You can set access rules based on Active Directory groups, helping you manage which users have access to specific networks within your environment.
- **Secure Data Transmission: The service uses the TLS VPN tunnel protocol to encrypt data traffic. Each VPN endpoint creates its own secure tunnel, ensuring safe access to both on-premises systems and AWS resources.
- **Monitoring and Logs: With Amazon CloudWatch Logs, you can monitor and store connection logs from AWS Client VPN, giving you a reliable way to track and analyze network activity.
- **Device Flexibility: AWS Client VPN is compatible with a range of devices, including Windows, Mac, iOS, Android, and Linux. It supports OpenVPN clients, giving your employees the freedom to connect from their preferred devices.
2. Features of AWS Site-to-Site VPN
- **Secured Connectivity: It uses OpenVPN for secure communication, ensuring data is exchanged over a TLS-encrypted control channel, protecting your network from unauthorized access.
- **Reliable and High Availability: By integrating with AWS Direct Connect, you can set up backup and failover solutions to ensure uninterrupted connectivity. CloudHub also enables remote sites to communicate with each other and with the VPC.
- **Customizable Tunnels: You can tailor the VPN connection with options such as setting internal tunnel IP addresses, pre-shared keys, and configuring Border Gateway Protocol Autonomous System Numbers (BGP ASN).
- **NAT Traversal Compatibility: The VPN supports NAT Traversal, allowing private IP addresses behind routers to use a single public IP address for internet-facing communication.
- **Private IP VPN: This feature lets you securely establish site-to-site VPN connections using private IP addresses over AWS Direct Connect, improving network security.
- **Comprehensive Monitoring: You can monitor VPN performance through CloudWatch, gaining insights into key metrics. Additionally, CloudWatch allows you to set up custom metrics and track performance data flexibly.