Setting Upstream Branch in Git (original) (raw)
Last Updated : 9 May, 2026
An upstream branch is the remote branch associated with a local branch that Git uses as the default reference for synchronization.
- It allows default git push and git pull without specifying the remote and branch each time.
- Usually a branch from the remote repository, such as origin/main.
- Can be configured using git push -u or git branch -u.
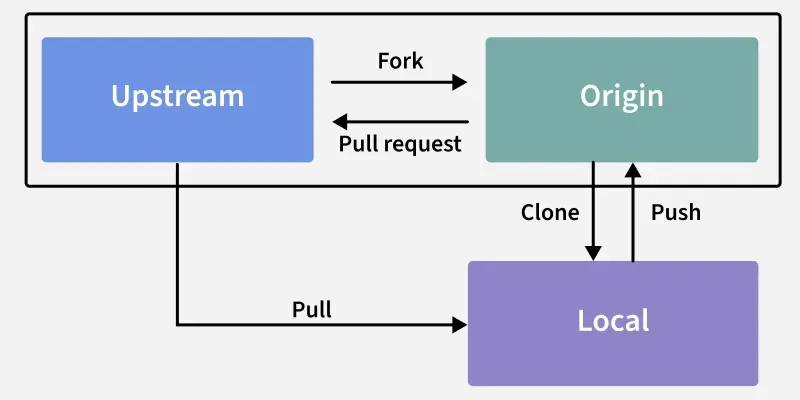
Git Upstream Branch Workflow
- **Fork: Create a personal copy of the repository (fork) from the Upstream (original source).
- **Clone: Download the forked repository to your local machine (Local).
- **Make Changes: Work on the local repository by making changes or additions.
- **Push: Upload changes from the local repository to your personal fork (Origin).
- **Pull Request: Propose changes to the Upstream by submitting a pull request from your fork.
- **Pull: Sync your local repository with the Upstream to incorporate updates.
Set Upstream Branch using Git Push command
To set an upstream branch using git push, first create and switch to a new branch using the -b option.
git checkout -b
After running the command, Git switches to the newly created branch and confirms the branch change.

Switching the branch confirmation
If the current branch (e.g., new_branch) has no upstream configured, running git push returns an error indicating that no upstream branch is set.

Set the upstream branch using the git push command with the -u option, replacing with the name of your local branch.
git push -u origin
Alternatively, you can use the '--set-upstream' command as well to set the Upstream branch
git push --set-upstream origin

Change Upstream Branches in Git
To change the upstream branch of the current local branch, use:
git branch -u <remote/branch name>
**Example:
git branch main -u <origin/new_branch>
git branch main -u <origin/main>
After running the command, Git prints a confirmation message indicating that the upstream branch has been updated.


Check Upstream Tracking Branches
To view which local branches are tracking upstream branches, use the -vv option with git branch.
git branch -vv
![]()
The main branch tracks origin/main, the test branch tracks origin/test, and the new_branch branch tracks origin/new_branch.