What Is Git Version Control? (original) (raw)
Last Updated : 29 Nov, 2025
In software development, tracking changes, managing code versions, and collaborating smoothly are essential, and Version Control Systems (VCS) make this possible. Git is the most widely used VCS, helping developers work efficiently on personal projects or large team-based codebases.
- Tracks every change made to your project.
- Maintains multiple versions without manual file copies.
- Enables smooth collaboration across individuals and teams.
Version Control
Before starting to discuss Git, it is important to understand the concept of version control. In simple terms, version control is a system that tracks changes made to files over time. It allows developers to:
- **Save and track changes: Every modification made to the codebase is recorded.
- **Revert to previous versions: If something breaks or a feature doesn’t work as expected, you can revert to a stable version.
- **Collaborate: Multiple developers can work on the same project without overwriting each other’s work.
- **Branching and Merging: Developers can create branches for different features, work on them independently, and merge them back to the main codebase when ready.
Introduction to Git
Git is a distributed version control system, meaning that it allows developers to work on their own local copies of a project, while still enabling them to push changes to a shared repository. Created by Linus Torvalds in 2005, Git has since become the standard for version control in the software development industry.
- Git manages and tracks code changes in a decentralized way.
- Every developer has a full copy of the project’s complete history.
- This design makes Git fast, scalable, and resilient to server failures.
Capabilities of Git
The following are the key features of Git:
- **Version Tracking: Git follows all adjustments done in one record, letting you revert to old releases without trouble.
- **Collaboration: Different programmers can work on a similar task at the same time without clash.
- **Branching: You have the option to create distinct branches for new attributes, bug repairs or tests.
- **Distributed System: Every programmer has an entire version of the project implying that it is decentralized software.
- **Log of Commits: With this feature, Git maintains an account of all commit actions (changes), which makes understanding how a project has evolved over time much easier.
Benefits of Using Git
In collaborative development, Git is a widely trusted tool that helps developers manage code changes smoothly. Since it is a distributed system, every contributor has a full copy of the project’s history, enabling flexible work, even offline.
The Benefits of Git and a Distributed Version Control System:
- **Distributed Nature: Each developer has the complete project history, allowing independent work without relying on a central server and enabling offline development.
- **Smooth Collaboration: Branching and merging allow multiple developers to work on the same codebase without conflicts.
- **Clear Version History: Every change is stored in an organized log, making it easy to track progress and troubleshoot issues.
- **Easy Branching & Merging: Lightweight branches allow experimentation with new features before merging them into the main code.
- **High Performance: Git handles large projects efficiently with fast operations and minimal storage overhead.
Various Approaches to Use Git for Version Control
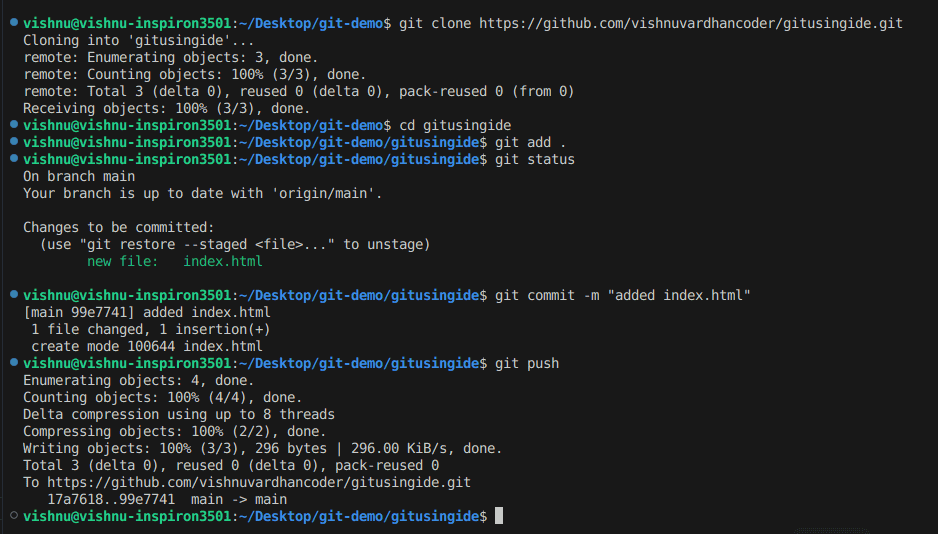
Approach 1: Git via Command Line
This is the most common method where developers use terminal commands to interact with Git. By utilizing git through command prompt, one has exhaustive authority over git functions.
Step 1: Install Git.
- Download and install Git from the official website : Git Downloads.
- After Installation, verify Git by running the following command in your terminal.
git --version
Step 2: Initialize a Git Repository
- Navigate to your project folder in the terminal.
- Initialize Git in the project folder by running:
git init
This creates a hidden .git folder that tracks your project.
Step 3: Staging Changes
To start tracking files, you need to stage them. This moves the files into a "staging area" before committing them:
git add
or to add all files:
git add .
Step 4: Committing Changes
After staging, commit your changes with a message describing what you have done:
git commit -m "Initial commit"
Step 5: Viewing Commit History
You can view the history of commits using:
git log
Step 6: Creating and working with Branches
Create a new branch for a feature or experiment:
git checkout -b
Switch back to the main branch:
git checkout main
Step 7: Pushing to a Remote Repository
To collaborate with others, push your changes to a remote repository like GitHub:
git remote add origin
git push -u origin main
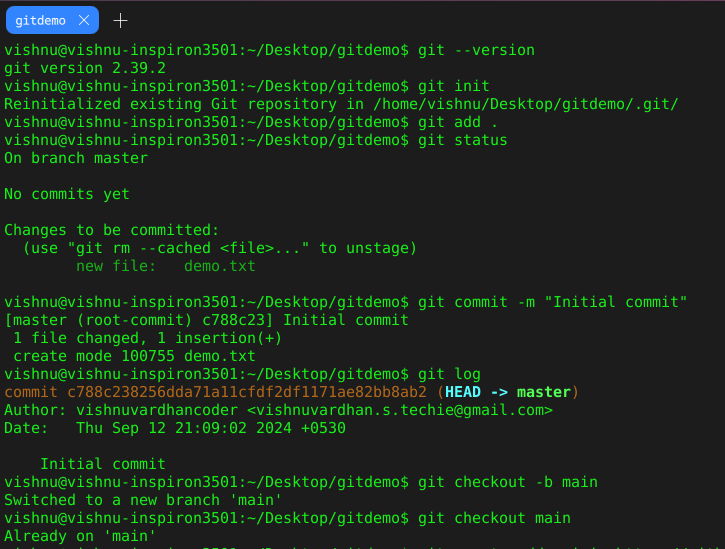
Git via Command Line
Approach 2: Git with GUI Clients
Many Git GUI clients provide a visual interface to work with Git repositories. Examples include GitHub Desktop, Sourcetree, and GitKraken. Using a GUI client is much more user-friendly because it has a graphical interface for executing Git operations.
**Step 1: Install a Git GUI/Client.
Get and Install a Git GUI Client (example, GitHub Desktop, Sourcetree, GitKraken Desktop).
**Step 2: Clone or Create a Repository
Launch the client program and create an image repository or clone from one on GitHub.
**Step 3: Stage and Commit Changes
Files can be added to the staging area by dragging them over or using buttons in the GUI to commit changes.
**Step 4: Push to Remote
Once your changes are committed, select push and this will upload the modified file(s) back to GitHub or any other remote location selected.
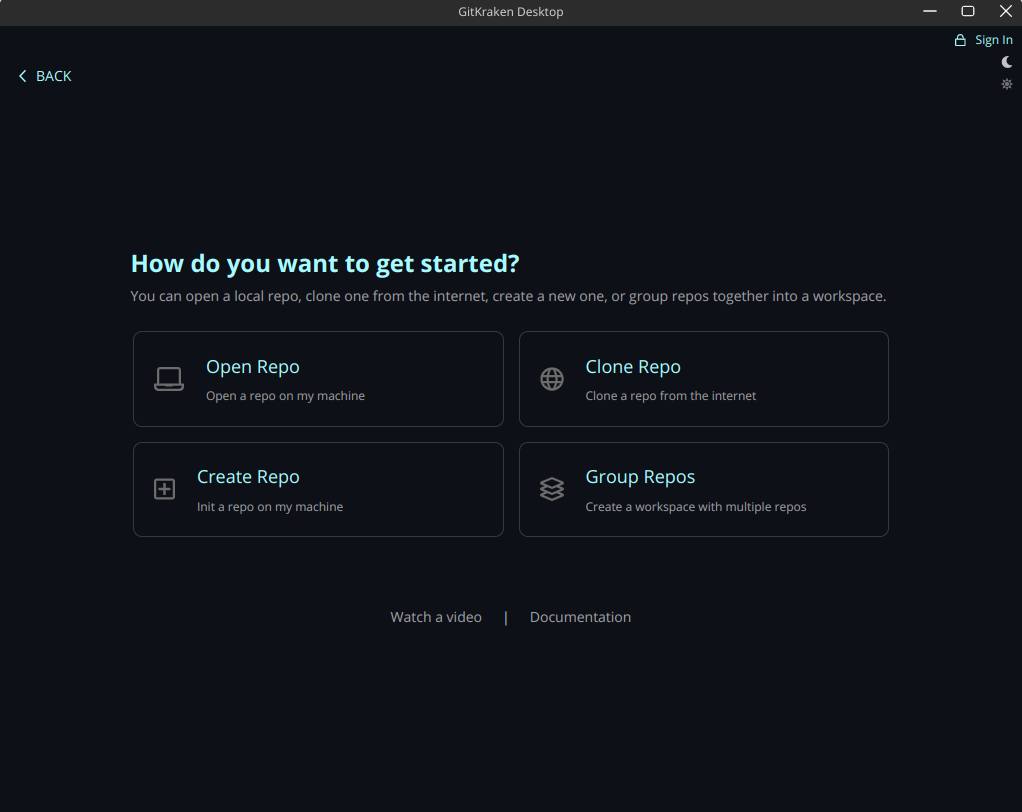
GitKraken GUI

creating a repo in GitKraken
Approach 3: Git in Integrated Development Environments (IDEs)
Popular IDEs like Visual Studio Code, IntelliJ IDEA, and PyCharm have built-in Git support, allowing you to perform Git operations from within the editor.
Step 1: Configure Git in the IDE
Start your IDE and switch on the built-in Git functionality (if not enabled by default) within its configuration parameters.
Step 2: Cloning or initializing repository
Use the graphical user interface options to either clone an existing repository or to initialize a new one using the option available on GUI itself.
Step 3: Use stage/commit/push
With this approach one can stage, commit and push changes to remotes via their visual inerface without need for command line interaction at all.
Git in Integrated Development Environments