How to Setup RabbitMQ in Linux Server? (original) (raw)
Last Updated : 23 Jul, 2025
RabbitMQ is a robust message broker that is open source, used between two different applications to great advantage in handling asynchronous messaging; it is, in turn, very effective at delivering the reliable routing of messages between services. The following guide will show you how to install and configure RabbitMQ on your Linux server.
Prerequisites
- A Linux server with root or sudo access
- Basic knowledge of Linux terminal commands
Installation
The installation process varies a little depending on your Linux flavor. It is described below for Debian/Ubuntu systems and RPM-based systems such as CentOS, RHEL, Fedora:
Debian/Ubuntu
**1. Update your package lists:
sudo apt-get update
Update packages
**2. Install Erlang, a dependency for RabbitMQ:
sudo apt-get install erlang

Install erlang
**3. Update package lists again and install RabbitMQ:
sudo apt update
sudo apt-get install rabbitmq-server

Install rabbitmq server
**4. Start and Enable RabbitMQ
After installation, start the RabbitMQ service and enable it to start on boot:
sudo systemctl start rabbitmq-server
**Verifying Installation
Once all the required installation is complete, then we need to verify that RabbitMQ is running or not:
sudo systemctl status rabbitmq-server

Verification
This command will show that the RabbitMQ service is active and running at this instance.
Securing RabbitMQ (Optional but Recommended)
With default, The RabbitMQ has some minimal security configurations. Here are some basic step that need to secure RabbitMQ :
Set a strong password for the default user "guest":

Setup login credentials
Enabling Management Plugin
The RabbitMQ Management Plugin provides different web interface for the complete managment of your RabbitMQ instance. To simply enable it:
sudo rabbitmq-plugins enable rabbitmq_management
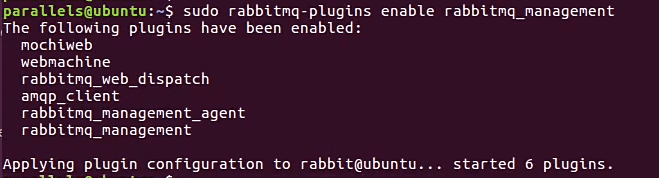
Enable plugins
Accessing Management Console
By default, the management console is available at port **15672. Open your web browser and type **http://localhost:15672. You will be asked for a username and password. Type the user name "**guest" and the password you set above.
.png)
Management console
Additional Considerations
This document describes a very simplified, basic RabbitMQ setup only. For configuration and features more advanced than what is covered here. There are several issues that you might want to investigate further, including:
- Virtual hosts and user access control levels Exchange types for message routing in more complex patterns
- Setting up cluster nodes for high availability
Conclusion
RabbitMQ is the most powerful tool to implement asynchronous messaging between applications working on your Linux server. Following the steps described in this guide will get you started with a basic setup of RabbitMQ. Refer to official documentation for in-depth configuration and explore features like the Management Plugin for web-based administration. It allows for reliable and scalable communication within your application ecosystem using RabbitMQ.