Face recognition using Artificial Intelligence (original) (raw)
Last Updated : 4 Jun, 2026
Face Recognition is a technology that identifies or verifies a person from an image or video by analyzing unique facial features. It uses machine learning and deep learning models to extract facial patterns and compare them against stored embeddings to confirm identity.
- Extracts unique facial features for accurate identification
- Converts faces into numerical embeddings for similarity matching
- Works efficiently in real-time authentication and security systems
- Robust even with changes in lighting, pose or expression
Working
Face Recognition follows a sequence of AI-driven steps that detect, align, encode and match facial features to identify or verify a person.
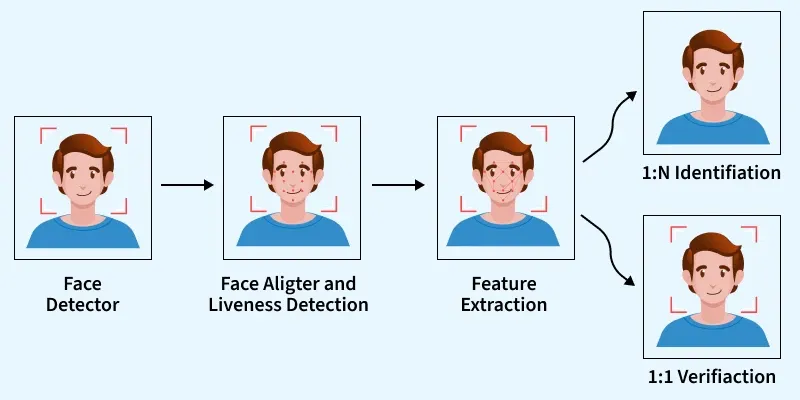
Face Recognition
1. Face Detection
The first step identifies the region where a face is present in an image or video frame. Popular algorithms include:
- **Haar Cascades****:** Traditional, fast, low accuracy
- **HOG (Histogram of Oriented Gradients)****:** Classical ML-based detection
- **Dlib CNN Detector****:** Deep learning based face detector
- **YOLOv8-Face****:** Modern, real-time, high-precision detectors
2. Face Alignment
Once a face is detected, the system aligns it by adjusting key facial landmarks such as the eyes, nose, and lips. Alignment helps handle variations caused by rotation, tilt, lighting or facial expressions, ensuring that the model works on a normalized and correctly oriented face.
Deep learning models convert each face into a numerical vector called an embedding. This embedding uniquely represents facial features. These embeddings allow comparison between two faces using similarity scores. Some widely used AI models for face embeddings include:
- **FaceNet: Produces a 128 dimensional embedding vector and uses Triplet Loss to maximize distance between different identities and minimize distance within the same identity.
- **VGG-Face: A pre trained deep CNN based model that provides highly discriminative facial representations for recognition tasks.
- **ArcFace: Achieves state of the art accuracy by applying Additive Angular Margin Loss, improving inter class separability.
- **DeepFace: A high speed and production ready framework, originally developed by Meta AI suitable for real time applications.
- **ViT-Face / Swin Transformer: Transformer based face recognition models that provide impressive performance and accuracy.
4. Face Matching
After extracting embeddings, the system compares them to identify or verify the person. Common similarity techniques:
- **Euclidean Distance: Measures the straight line distance between two face embeddings to check how close they are.
- **Cosine Similarity: Computes the angle between embedding vectors to determine how similar two faces are.
- **ML Classifiers (SVM, K-NN): Use machine learning models to classify embeddings into known identities.
- **Softmax Classification: Assigns a probability score to each known person, used in closed-set face recognition.
Lower distance means higher similarity and a greater chance that the two faces belong to the same person.
AI/ML Pipeline for Training Facial Recognition
Building a facial recognition system involves a systematic pipeline that covers data preparation, model training, evaluation, and deployment. Each step ensures that the system becomes accurate, robust and ready for real world use.
1. Data Collection
- The pipeline begins with collecting a large and diverse dataset of human faces.
- A strong dataset must include variations in lighting, angle, age, expression, and background to make the model robust.
2. Data Labeling
- Labeling involves assigning the correct identity to each face image.
- This step is crucial because supervised learning models require labeled images to learn differences between individuals.
3. Data Pre-processing
- Before training, images undergo several transformations to standardize them.
- Pre-processing helps models focus only on meaningful patterns.
4. Training the Model
CNNs or Transformer-based networks learn facial features and generate embeddings using losses like Triplet Loss or ArcFace.
5. Testing and Validation
The model is evaluated on unseen data using metrics like accuracy, FAR and similarity thresholds to ensure reliability.
6. Deployment
After achieving the desired accuracy, the trained face recognition system is optimized and integrated into real applications. Deployment steps include:
- **Model Compression: Quantization, pruning or distillation for faster inference.
- **API Integration: REST APIs or on device SDKs for real time recognition.
- **Edge Deployment: Running the model on mobile devices, CCTV cameras, IoT systems.
- **Real time Processing: Handling live video streams with low latency.
Implementation
Here we capture a known and a test face using the webcam, encodes them compares the faces and labels the test image based on whether it matches the known person.
Step 1: Install Required Libraries
Installs the required libraries for face recognition, image processing and visualization.
Python `
!pip install face_recognition opencv-python matplotlib
`
Step 2: Import Required Modules
- face_recogination for face detection and face encoding.
- NumPy for array handling
- OpenCV for image decoding and saving
- Imports Base64 to decode image data from JavaScript Python `
from IPython.display import display, Javascript from google.colab.output import eval_js import numpy as np import cv2 import base64 import face_recognition
`
Step 3: Define Webcam Image Capture Function
- Uses JavaScript to access the browser webcam
- Captures an image when the user clicks Capture
- Converts the image from Base64 to OpenCV format Python `
def take_photo(filename='photo.jpg', quality=0.8): js = Javascript(''' async function takePhoto(quality) { const div = document.createElement('div'); const capture = document.createElement('button'); capture.textContent = 'Capture'; div.appendChild(capture);
      const video = document.createElement('video');
      video.style.display = 'block';

      const stream = await navigator.mediaDevices.getUserMedia({video: true});
      document.body.appendChild(div);
      div.appendChild(video);
      video.srcObject = stream;
      await video.play();

      await new Promise((resolve) => capture.onclick = resolve);

      const canvas = document.createElement('canvas');
      canvas.width = video.videoWidth;
      canvas.height = video.videoHeight;
      canvas.getContext('2d').drawImage(video, 0, 0);

      stream.getVideoTracks()[0].stop();
      div.remove();

      return canvas.toDataURL('image/jpeg', quality);
    }
''')

display(js)
data = eval_js(f'takePhoto({quality})')

image_bytes = base64.b64decode(data.split(',')[1])
np_arr = np.frombuffer(image_bytes, np.uint8)
img = cv2.imdecode(np_arr, cv2.IMREAD_COLOR)

cv2.imwrite(filename, img)
return img
`
Step 4: Capture Known Person Face
- Captures the reference face
- Stores the image as known.jpg
- This face will be used for comparison Python `
print("Capture KNOWN face") known_frame = take_photo('known.jpg')
`
Step 5: Generate Encoding for Known Face
- Loads the known image from disk.
- Converts the face into a 128-D embedding.
- num_jitters equal to 50 improves accuracy. Python `
known_image = face_recognition.load_image_file('known.jpg') known_encoding = face_recognition.face_encodings( known_image, num_jitters=50, model='large' )[0]
`
Step 6: Capture Test Face
- Captures a new image for verification
- Stores the image as test.jpg
- This face will be matched with known face Python `
print("Capture TEST face") test_frame = take_photo('test.jpg')
`
Step 7: Detect Faces and Generate Encodings
- Detects face locations in test image.
- Generates encodings for each detected face.
- Uses fewer jitters for faster execution. Python `
face_locations = face_recognition.face_locations(test_frame) face_encodings = face_recognition.face_encodings( test_frame, face_locations, num_jitters=23, model='large' )
`
Step 8: Compare Faces and Draw Bounding Boxes
- Compares test face encoding with known face.
- Draws rectangle and name on detected face. Python `
for (top, right, bottom, left), face_encoding in zip(face_locations, face_encodings): match = face_recognition.compare_faces([known_encoding], face_encoding)[0]
label = "Recognized" if match else "Unrecognized"
color = (0, 255, 0) if match else (0, 0, 255)

cv2.rectangle(test_frame, (left, top), (right, bottom), color, 2)
cv2.putText(test_frame, label, (left, top - 10),
            cv2.FONT_HERSHEY_SIMPLEX, 0.9, color, 2)

print("Recognized" if match else "Unrecognized")
`
Step 10: Display Final Output Image
- Converts image from BGR to RGB.
- Displays the annotated image.
- Removes axes for clean visualization. Python `
import matplotlib.pyplot as plt
plt.imshow(cv2.cvtColor(test_frame, cv2.COLOR_BGR2RGB)) plt.axis('off') plt.show()
`
**Output:
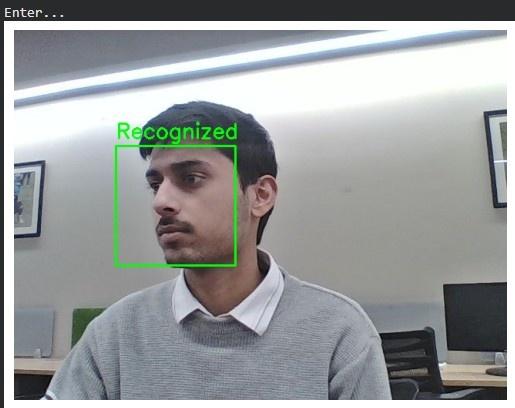
Output
We can see our model is working fine.
You can download full code from here
Face Recognition vs Face Detection
| Aspect | Face Detection | Face Recognition |
|---|---|---|
| **Definition | Detects and locates faces in an image or video | Identifies or verifies a person using facial features |
| **Main Goal | Find faces | Recognize or verify identity |
| **Output | Face location or bounding box | Name, ID, or similarity score |
| **Input | Image or video frame | Detected face image |
| **Data Requirement | Does not require labeled identities | Requires labeled face data |
| **Common Algorithms | Haar Cascades, HOG, CNN detectors | FaceNet, ArcFace, DeepFace |
| **Applications | Face filters, autofocus, crowd analysis | Phone unlock, attendance, surveillance |
Applications
- Face unlock features and automated attendance marking in schools and offices.
- Detecting mood, stress or engagement levels using facial expression analysis.
- Matching suspects in CCTV footage and aiding law enforcement investigations.
- Securing online transactions and verifying user identity for onboarding.
- Tailoring ads and digital content based on viewer demographics and emotional reactions.
Advantages
- Enables quick identity verification without physical contact or passwords.
- Improves access control and reduces the risk of unauthorized entry.
- Modern AI models can recognize faces efficiently in live video streams.
- Reduces manual verification efforts in attendance, surveillance, and banking systems.
- Simplifies login and verification processes in smartphones and digital platforms.
Challenges
- Recognition becomes difficult when faces appear at side angles or under extreme head rotations.
- Facial expressions such as smiling, crying, or surprise can alter facial geometry and reduce accuracy.
- Natural aging changes facial features over time, affecting long-term recognition reliability.
- Poor lighting, masks, sunglasses, or partially covered faces can reduce detection and matching performance.
- Imbalanced training datasets may cause the system to perform better for certain demographic groups than others.
- Systems can be fooled using photographs, videos, masks, or AI-generated deepfakes without anti-spoofing mechanisms.