Python | Image Classification using Keras (original) (raw)
Last Updated : 11 Jul, 2025
Image classification is a method to classify way images into their respective category classes using some methods like :
- Training a small network from scratch
- Fine-tuning the top layers of the model using VGG16
Let's discuss how to train the model from scratch and classify the data containing cars and planes.
- Train Data: Train data contains the 200 images of each car and plane, i.e. in total, there are 400 images in the training dataset
- Test Data: Test data contains 50 images of each car and plane i.e., includes a total. There are 100 images in the test dataset
To download the complete dataset, click here.
Prerequisite: Image Classifier using CNN
Model Description: Before starting with the model, first prepare the dataset and its arrangement. Look at the following image given below:
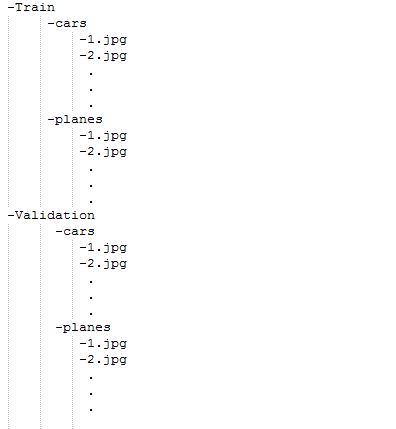
For feeding the dataset folders they should be made and provided into this format only. So now, Let's begin with the model:
For training the model we don't need a large high-end machine and GPU's, we can work with CPU's also. Firstly, in given code include the following libraries:
Python3 `
Importing all necessary libraries
from keras.preprocessing.image import ImageDataGenerator from keras.models import Sequential from keras.layers import Conv2D, MaxPooling2D from keras.layers import Activation, Dropout, Flatten, Dense from keras import backend as K
img_width, img_height = 224, 224
`
Every image in the dataset is of the size 224*224.
Python3 `
train_data_dir = 'v_data/train' validation_data_dir = 'v_data/test' nb_train_samples =400 nb_validation_samples = 100 epochs = 10 batch_size = 16
`
Here, the train_data_dir is the train dataset directory. validation_data_dir is the directory for validation data. nb_train_samples is the total number of train samples. nb_validation_samples is the total number of validation samples.
Checking format of Image:
Python3 `
if K.image_data_format() == 'channels_first': input_shape = (3, img_width, img_height) else: input_shape = (img_width, img_height, 3)
`
This part is to check the data format i.e the RGB channel is coming first or last so, whatever it may be, the model will check first and then input shape will be fed accordingly.
Python3 `
model = Sequential() model.add(Conv2D(32, (2, 2), input_shape=input_shape)) model.add(Activation('relu')) model.add(MaxPooling2D(pool_size=(2, 2)))
model.add(Conv2D(32, (2, 2))) model.add(Activation('relu')) model.add(MaxPooling2D(pool_size=(2, 2)))
model.add(Conv2D(64, (2, 2))) model.add(Activation('relu')) model.add(MaxPooling2D(pool_size=(2, 2)))
model.add(Flatten()) model.add(Dense(64)) model.add(Activation('relu')) model.add(Dropout(0.5)) model.add(Dense(1)) model.add(Activation('sigmoid'))
`
About the following terms used above:
Conv2D is the layer to convolve the image into multiple images
Activation is the activation function.
MaxPooling2D is used to max pool the value from the given size matrix and same is used for the next 2 layers. then, Flatten is used to flatten the dimensions of the image obtained after convolving it.
Dense is used to make this a fully connected model and is the hidden layer.
Dropout is used to avoid overfitting on the dataset.
Dense is the output layer contains only one neuron which decide to which category image belongs.
Compile Function:
Python3 `
model.compile(loss='binary_crossentropy', optimizer='rmsprop', metrics=['accuracy'])
`
Compile function is used here that involve the use of loss, optimizers and metrics. Here loss function used is binary_crossentropy, optimizer used is rmsprop.
Using DataGenerator:
Python3 `
train_datagen = ImageDataGenerator( rescale=1. / 255, shear_range=0.2, zoom_range=0.2, horizontal_flip=True)
test_datagen = ImageDataGenerator(rescale=1. / 255)
train_generator = train_datagen.flow_from_directory( train_data_dir, target_size=(img_width, img_height), batch_size=batch_size, class_mode='binary')
validation_generator = test_datagen.flow_from_directory( validation_data_dir, target_size=(img_width, img_height), batch_size=batch_size, class_mode='binary')
model.fit_generator( train_generator, steps_per_epoch=nb_train_samples // batch_size, epochs=epochs, validation_data=validation_generator, validation_steps=nb_validation_samples // batch_size)
`
Now, the part of dataGenerator comes into the figure. In which we have used:
ImageDataGenerator that rescales the image, applies shear in some range, zooms the image and does horizontal flipping with the image. This ImageDataGenerator includes all possible orientation of the image.
train_datagen.flow_from_directory is the function that is used to prepare data from the train_dataset directory Target_size specifies the target size of the image.
test_datagen.flow_from_directory is used to prepare test data for the model and all is similar as above.
fit_generator is used to fit the data into the model made above, other factors used are steps_per_epochs tells us about the number of times the model will execute for the training data.
epochs tells us the number of times model will be trained in forward and backward pass.
validation_data is used to feed the validation/test data into the model.
validation_steps denotes the number of validation/test samples.
Python3 `
model.save_weights('model_saved.h5')
`
At last, we can also save the model.
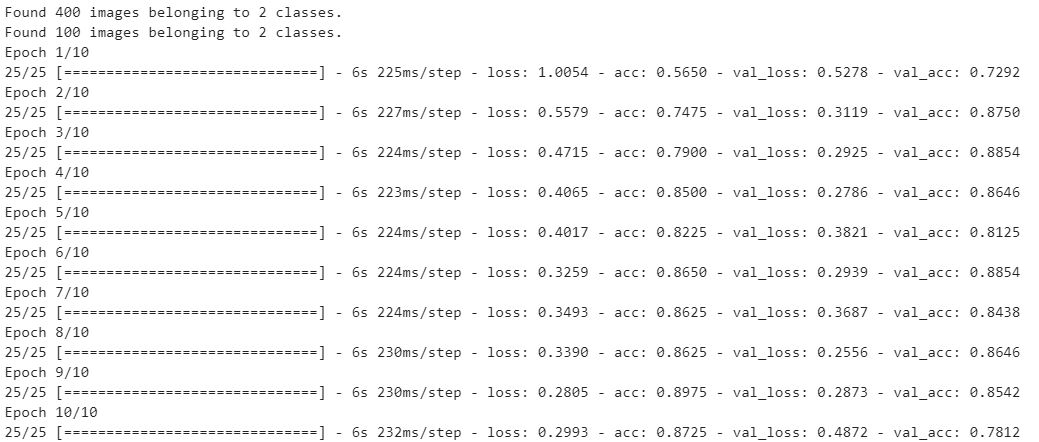
Model Output:
Loading and Prediction
- Load Model with "load_model"
- Convert Images to Numpy Arrays for passing into ML Model
- Print the predicted output from the model. Python3 `
from keras.models import load_model from keras.preprocessing.image import load_img from keras.preprocessing.image import img_to_array from keras.applications.vgg16 import preprocess_input from keras.applications.vgg16 import decode_predictions from keras.applications.vgg16 import VGG16 import numpy as np
from keras.models import load_model
model = load_model('model_saved.h5')
image = load_img('v_data/test/planes/5.jpg', target_size=(224, 224)) img = np.array(image) img = img / 255.0 img = img.reshape(1,224,224,3) label = model.predict(img) print("Predicted Class (0 - Cars , 1- Planes): ", label[0][0])
`
Output :
Predicted Class (0 - Cars , 1- Planes): 1