Installing and Configuring TCP/IP - Tech-FAQ (original) (raw)
Installing TCP/IP
TCP/IP is installed automatically when the Windows Server 2003 setup process runs. It is not usually necessary to install TCP/IP after the Windows Server 2003 setup process completed.
The instances when you might need to manually install TCP/IP are listed below:
- TCP/IP was disabled when the Windows Server 2003 setup process executed.
- TCP/IP was uninstalled from the computer.
How to install the TCP/IP protocol suite
- Click Start, Control Panel, and then click Network Connections
- In the Network Connections window, right-click the network connection for which you want to install TCP/IP and then click Properties from the shortcut menu.
- If you are working with the local area connection, you will use the General tab in the following step. If you are working with any other connection, you will use the Networking tab
- Click Install, and then click Protocol.
- Click Add to open the Select Network Protocol dialog box.
- Click Internet Protocol (TCP/IP) in the dialog box.
- Click OK
- Confirm that the Internet Protocol (TCP/IP) checkbox is enabled.
Manually Assigning IP Addresses
When you manually assign IP addresses, you assign a particular IP address to a TCP/IP host or client. This statically assigned IP address only changes via a manual configuration.
You would normally manually assign IP addresses under the following conditions:
- There are no configured DHCP servers on the network and the network haves multiple network segments.
- You are configuring a computer as a DHCP server, and need to assign that computer a static IP addresses.
- You are configuring computers as important network servers such as domain controllers, or DNS servers. You would manually assign the IP address to these computers.
When you configure the properties of the TCP/IP protocol using the properties of a particular network connection, you can perform the following tasks:
- Assign an IP address and subnet mask
- Assign the default gateway
- Assign DNS servers and WINS servers.
How to manually assign IP Addresses to TCP/IP hosts or clients
- Click Start, Control Panel, and then click Network Connections.
- Right-click the network connection you want to work with, and then click Properties from the shortcut menu.
- If you working with the local area connection, you will use the General tab in the following step. If you are working with any other connection, you will use the Networking tab
- On either of these tabs, select Internet Protocol (TCP/IP), and then click the Properties button.
- The Internet Protocol (TCP/IP) Properties dialog box opens.
- Select the Use The Following IP Address option.
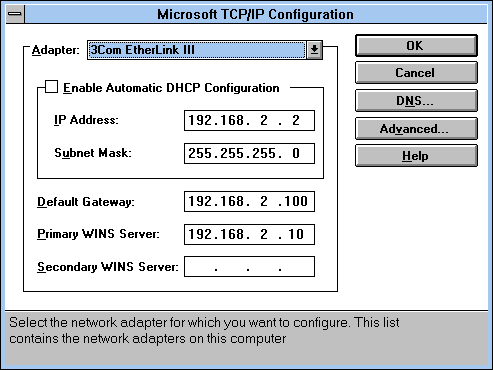
- If you are working with the local area connection enter the address, subnet mask, and default gateway in the available fields.
- If you are working with any other network connection, assign the proper IP address.
- If you want to configure the DNS server settings of the computer, select the Use The Following DNS Server Addresses option, and then enter the primary and secondary DNS server addresses in the Preferred DNS Server text box, and in the Alternate DNS Server text box respectively.
- If you want to configure a WINS server, click the Advanced button.
- Click OK.
How to configure Advanced DNS settings
- Click Start, Control Panel, and then click Network Connections.
- Right-click the network connection you want to work with, and then click Properties from the shortcut menu.
- If you working with the local area connection, on the General tab, select Internet Protocol (TCP/IP), and then click the Properties btton.
- When the Internet Protocol (TCP/IP) Properties dialog box opens, click the Advanced button.
- The Advanced TCP/IP Settings dialog box contains four tabs (IP Settings, DNS, WINS, Option) which you can use to either extend or override the settings from the Internet Protocol (TCP/IP) Properties dialog box.
- Click the DNS tab.
- The DNS Server Addresses, In Order Of Use list displays all the DNS servers configured for this particular client. The DNS Server Addresses, In Order Of Use list can contain up to 20 different DNS servers. A DNS query is sent to the first server in the list. If this DNS server is unable to service the query, the query is sent to the second DNS server in the list, and so forth, until a DNS server returns a valid answer, or until all DNS servers have been tried.
- To add, remove, and edit DNS servers from the DNS Server Addresses, In Order Of Use list, click the appropriate button: Add button, Edit button, Remove button.
- To change the order of the DNS servers listed in the DNS Server Addresses, In Order Of Use list, click the server whose order you want to change, and then use the Up and Down arrows to position the server.
- Click the Append Primary And Connection Specific DNS Suffixes option if you want DNS to automatically append the primary DNS suffix and all other connection specific suffixes when DNS requests are made.
- Click the Append Parent Suffixes Of The Primary DNS Suffix checkbox if you want the parent suffixes of the primary suffix appended.
- Click the Append These DNS Suffixes (In Order) option if you want to specify the list of suffixes for DNS, rather than using any primary and connection specific suffixes.
- If you want to define a default connection suffix to append to DNS queries, enter it in the DNS Suffix For This Connection text box.
- Select the Register This Connection’s Addresses In DNS checkbox if you want the DHCP client to register its name and IP address with the closest dynamic DNS server.
- Select the Use This Connection’s DNS Suffix In DNS Registration checkbox if you want the primary or connection specific DNS suffix to be used in the client registration with the dynamic DNS service.
- Click OK to close the Advanced TCP/IP Settings dialog box.
- Click OK to close the Internet Protocol (TCP/IP) Properties dialog box.
How to configure a WINS client
WINS listens to NetBIOS over TCP/IP (NBT) and then collects these broadcasts to a central source. If your clients are set up to utilize a WINS server, NBT addresses can be resolved without broadcasts being used. The method which your client would use is determined by the node type configured for the client. The NTB settings which you configure on the WINS tab of the Advanced TCP/IP Settings dialog box determine the client’s node type.
The NetBIOS node types are listed below:
- B-node, broadcast: For name registration, and name resolution, NBT queries are broadcasted.
- P-node, peer to peer node: A NetBIOS name server or a WINS server is used to resolve NetBIOS names.
- M-node, mixed: By default, this is similar to b-node. P-node is used if it cannot resolve a NetBIOS name.
- H-node, hybrid: By default, this is similar to p-node. B-node is used if it cannot a name.
To configure a WINS client,
- Click Start, Control Panel, and then click Network Connections.
- Right-click the network connection you want to work with, and then click Properties from the shortcut menu.
- If you working with the local area connection, on the General tab, select Internet Protocol (TCP/IP), and then click the Properties button.
- When the Internet Protocol (TCP/IP) Properties dialog box opens, click the Advanced button.
- The Advanced TCP/IP Settings dialog box contains four abs (IP Settings, DNS, WINS, Options) which you can use to extend or override the settings of the Internet Protocol (TCP/IP) Properties dialog box dialog box.
- Click the WINS tab.
- Click Add
- In the TCP/IP WINS Server dialog box, enter the IP address of the WINS server, and then click the Add button.
- The initial server in the WINS address list group must be the server physically nearest to the actual client machine.
- You can enter additional WINS servers and change the order of the servers.
- If you want to enable LMHOSTS lookups for _all_connections which are using TCP/IP, click the Enable LMHOSTS Lookup checkbox.
- The settings which you can configure in the NetBIOS Setting portion of the WINS tab are listed below:
- Default: Use NetBIOS Setting From The DHCP Server; this option forces the client to use the settings of the DHCP server over the WINS settings and LMHOSTS file settings.
- Enable NetBIOS Over TCP/IP; this option overrides DHCP settings
- Disable NetBIOS Over TCP/IP; this option disables NetBIOS Over TCP/IP.
- Click OK to close the Advanced TCP/IP Settings dialog box.
- Click OK to close the Internet Protocol (TCP/IP) Properties dialog box.
Dynamically Assigning IP Addresses
In Windows Server 2003, dynamic IP addressing is enabled by Dynamic Host Configuration Protocol (DHCP). The Dynamic Host Configuration Protocol (DHCP) is a protocol and service that functions at the application layer of the TCP/IP protocol suite. The DHCP protocol automates the configuration of TCP/IP clients because IP addressing occurs through the system. You can configure a computer as a DHCP server so that the DHCP server can automatically assign IP addresses to DHCP clients, and with no manual intervention. IP addresses that are assigned via a DHCP server are regarded as dynamically assigned IP addresses. The DHCP server assigns IP addresses from a predetermined IP address range(s).
Using dynamic IP addressing leads the following benefits:
- Simpler management of IP addressing. You can manage IP addressing from a central location.
- Because the system assigns IP addresses, it leads to less incorrect configurations of IP addresses.
- Duplicated IP addresses are prevented.
- Dynamic addressing also easily scales from small to large networking environments.
For dynamic IP addressing to occur, the following tasks has to be completed:
- A DHCP server must be installed in your networking environment.
- Your clients must be configured to obtain their address configuration data automatically.
- You can optionally specify that clients obtain other TCP/IP configuration information or parameters automatically as well, such as:
- DNS server address
- WINS server address
- Default gateway
- A DHCP server must be installed in your networking environment.
To install the DHCP server, you would need to perform the following steps:
- Install the DHCP service on the client computer
- Configure the range of IP addresses which the DHCP server assign IP addresses from. This range of IP addresses is called a scope.
- Activate the scope.
- If you are using the Active Directory directory service, you can authorize the DHCP server in the Active Directory.
A _scope_can be defined as a set of IP addresses which the DHCP server can allocate or assign to DHCP clients. A scope contains specific configuration information for clients that have IP addresses which are within the particular scope. Scope information for each DHCP server is specific to that particular DHCP server only, and is not shared between DHCP servers. Scopes for DHCP servers are configured by administrators.
Microsoft Windows computers running TCP/IP automatically install the DHCP client service as a component of TCP/IP. This includes servers and workstations running:
- Windows 98, Windows ME, Windows NT, Windows XP, Windows 2000, and Windows Server 2003
How to install the DHCP service
- Log on to the server using Administrative privileges.
- Click Start, Control Panel, and then click Add Or Remove Programs.
- When the Add Or Remove Programs dialog box opens, click Remove Windows Components.
- This starts the Windows Components Wizard.
- In the Components list box, select Networking Services, and then click the Details button.
- The Networking Services dialog box opens.
- In the Sub-components Of Networking Services list box, check the Dynamic Host Configuration Protocol (DHCP) checkbox.
- Click OK.
- Click Next.
- When The Completing The Windows Components Wizard page is displayed, click Finish.
How to authorize the DHCP server
- Click Start, All Programs, Administrative Tools and then click DHCP to open the DHCP management console.
- In the console tree, expand the DHCP server node.
- Click the DHCP server.
- Click the Action menu, and then select Authorize.
How to create and configure a DHCP scope for the DHCP server
- Click Start, All Programs, Administrative Tools and then click DHCP to open the DHCP management console.
- In the console tree, expand the DHCP server node.
- Select the DHCP server.
- Click the Action menu, and then select New Scope
- The New Scope Wizard starts.
- Click Next on the initial page of the New Scope Wizard.
- On the Scope Name page, enter a name for the new scope in the Name text box.
- Enter a description in the Description text box. Click Next.
- On the IP Address Range page, enter the start IP address and end IP address that defines the range of new scope in the Start IP Address text box, and End IP Address text box respectively.
- The server automatically provides the mask in the Subnet Mask text box.
- Select the value in the Length spin box. The subnet length mask is automatically defined as 24. Click Next.
- On the Add Exclusions page, using the Start IP Address End IP Address text boxes, define any exclusion. Click Add. Click Next.
- On the Lease Duration page, you can change the default lease duration of 8 days. Click Next.
- On Configure DHCP Options page, click the No, I Will Configure These Options Later option to indicate that you will configure the DHCP options later. Click Next.
- On the Completing The New Scope Wizard page, click Next.
How to configure TCP/IP for dynamic addressing from a DHCP server
- Click Start, Control Panel, and then click Network Connections.
- Right-click the network connection you want to work with, and then click Properties from the shortcut menu.
- If you are working with the local area connection, on the General tab, select Internet Protocol (TCP/IP), and then click the Properties button
- When the Internet Protocol (TCP/IP) Properties dialog box opens, click the Obtain An IP Address Automatically option.
- If you want the client to automatically obtain DNS server information from the DHCP server, select the Obtain DNS Server Address Automatically option.
- Click OK.
How to configure an Alternate IP Addressing Configuration
You can configure alternate IP address configuration parameters which can be used if the DHCP server cannot be accessed. Configuring the alternate IP address configuration is ideal for laptop computers which connect to a number of different networks.
An alternate I addressing configuration contains the following settings:
- IP address, subnet mask and default gateway
- DNS server IP address
- WINS server IP address
To configure an alternate IP addressing configuration,
- Click Start, Control Panel, and then click Network Connections.
- Right-click Local Area Connection, and then click Properties from the shortcut menu.
- On the General tab, select Internet Protocol (TCP/IP), and then click the Properties button.
- On the Internet Protocol (TCP/IP) Properties dialog box select the Obtain IP Address Automatically option.
- Click the Alternate Configuration tab.
- The Automatic Private IP address option is selected by default on the Alternate Configuration tab.
- Click the User configured button.
- Enter the appropriate information in the provided text boxes:
- IP address
- Subnet mask
- Default gateway
- Preferred DNS server
- Alternate DNS server
- Preferred WINS server
- Alternate WINS server
- Click OK
Troubleshooting TCP/IP Addressing
One of the more common issues that arise in TCP/IP networks is the duplication of IP addresses. Duplicated IP addresses result in packets being sent to the incorrect destination computers. Windows operating systems can however detect the duplication of IP addresses.
The process that occurs to detect duplicate IP addresses is illustrated below:
- When the computer starts, the system checks for any duplicate IP addresses
- The TCP/IP protocol stack is disabled on the computer when the system detects duplicate IP addresses.
- An error message is shown that indicates the hardware address of the other system that this computer is in conflict with.
- The computer that initially owned the duplicate IP address experiences no interruptions, and operates as normally.
- You have to reconfigure the conflicting computer with a unique IP address so that the TCP/IP protocol stack can be enabled on that particular computer again.
A few strategies for troubleshooting TCP/IP addressing issues are briefly discussed below:
- If a computer cannot communicate with any other systems on the network verify that the correct subnet mask is configured for the computer. Incorrectly configured subnet masks would prevent computers on the same subnet from communicating.
- If a TCP based computer cannot communicate with systems on other LANs, but can communicate with systems on the same LAN, the problem is probably due to an incorrectly configured default gateway. The computer uses the default gateway when it needs to communicate with computers that are located on other networks. Computers that have no specified default gateway can only communicate with computers on the same LAN. It cannot communicate with systems on other LANs.
- Communication could not be occurring between computers because an issue exists that pertains to name resolution. In TCP based networks, communication is based on IP addresses. If names cannot be resolved to IP addresses, the computers would not have the IP addresses required to communicate. If you are using the Active Directory directory service, DNS is used for name resolution. DNS name resolution is also necessary to establish a connection to the Internet. To use DNS for name resolution, the computer must have the IP address of a DNS server specified in its TCP/IP properties.
- If a DHCP server is configured to dynamically assign IP addresses and you have a computer that was assigned the incorrect IP address, it was probably due to the computer not being able to contact the DHCP server. When this occurs, the computer assigns its own IP address through Automatic Private IP Addressing (APIPA). Computers cold be unable to contact the DHCP server for a number of reasons:
- A problem might exist with the hardware or software of the DHCP server.
- A Data-link protocol issue could be preventing the computer from communicating with the network.
- The DHCP server and the client are on different LANs and there is no DHCP relay agent. A DHCP relay agent enables a DHCP server to handle IP address requests of clients that are located on a different LAN.
- If you have clients that cannot obtain IP addresses from the DHCP server, even though they can contact the DHCP server, verify the following:
- Verify that the DHCP Server service is running on the particular server.
- Check the actual TCP/IP configuration settings on the DHCP server.
- If you are using the Active Directory directory service, verify that the DHCP server is authorized by Active Directory.
- The DHCP server could be configured with the incorrect scope. Check that the scope is correct on the DHCP server, and verify that it is active.