Getting Started — Guide to Core ML Tools (original) (raw)
Getting Started#
Core ML Tools can convert trained models from other frameworks into an in-memory representation of the Core ML model. This example demonstrates how to convert an image classifier model trained using TensorFlow’s Keras API to the Core ML format.
During the course of this example you will learn the following:
- How to create a model with the MobileNetV2 architecture, similar to the model hosted on Apple’s model gallery.
- How to use the converted model in the sample code for classifying images using the Vision framework.
In this example, you will do the following:
- Download the model and ensure that the model interface is set correctly for image inputs and classifier outputs.
- Convert the model from TensorFlow 2 to the Core ML format.
- Set the model metadata to take advantage of Xcode preview and other Xcode features.
- Make predictions using the model (on macOS), to verify that the conversion is correct.
- Save and load the model.
- Use the model with Xcode to incorporate the model into your app.
Requirements#
To run this example, first install TensorFlow version 2.2.0, H5PY version 2.10.0, NumPy version 1.21, and Pillow. Then install the newest version of Core ML Tools (see Installing Core ML Tools). Use the following commands:
pip install tensorflow==2.2.0 h5py==2.10.0 numpy==1.21 Pillow pip install -U coremltools
Download the Model#
Download the previously trained MobileNetV2 model, which is based on the tensorflow.keras.applications API:
import tensorflow as tf
Download MobileNetv2 (using tf.keras)
keras_model = tf.keras.applications.MobileNetV2( weights="imagenet", input_shape=(224, 224, 3,), classes=1000, )
Retrieve the class labels from a separate file, as shown in the example below. These class labels are required for your application to understand what the predictions refer to, and are often provided separately in popular machine learning frameworks.
Download class labels (from a separate file)
import urllib label_url = 'https://storage.googleapis.com/download.tensorflow.org/data/ImageNetLabels.txt' class_labels = urllib.request.urlopen(label_url).read().splitlines() class_labels = class_labels[1:] # remove the first class which is background assert len(class_labels) == 1000
make sure entries of class_labels are strings
for i, label in enumerate(class_labels): if isinstance(label, bytes): class_labels[i] = label.decode("utf8")
Now that the model is loaded and the class labels are collected, you can convert the model to Core ML.
Tip
Before converting the model, a good practice for improving device performance is to know in advance the types and shapes, and to consider the model’s interface, including the names and types of inputs and outputs. For this example, the application is an image classifier, and therefore the model’s input is an ImageType of a specified size. When using inputs of an ImageType, it is also important to find out how the model expects its input to be preprocessed or normalized. For details, see Image Input and Output.
Convert the Model#
Use the following code to convert the model to Core ML with an image as the input, and the class labels baked into the model:
import coremltools as ct
Define the input type as image,
set pre-processing parameters to normalize the image
to have its values in the interval [-1,1]
as expected by the mobilenet model
image_input = ct.ImageType(shape=(1, 224, 224, 3,), bias=[-1,-1,-1], scale=1/127)
set class labels
classifier_config = ct.ClassifierConfig(class_labels)
Convert the model using the Unified Conversion API to an ML Program
model = ct.convert( keras_model, inputs=[image_input], classifier_config=classifier_config, )
The Unified Conversion API convert() method in this example produces an ML program model.
Add code to print a message showing that the model was converted:
Print a message showing the model was converted.
print('Model converted to an ML Program')
Set the Model Metadata#
After converting the model, you can set additional metadata for the model in order to take advantage of Xcode features:
- Xcode can display a Preview tab of the model’s output for a given input. The classifier model for this example does not need further metadata to display the Preview tab. For other examples, see Xcode Model Preview Types.
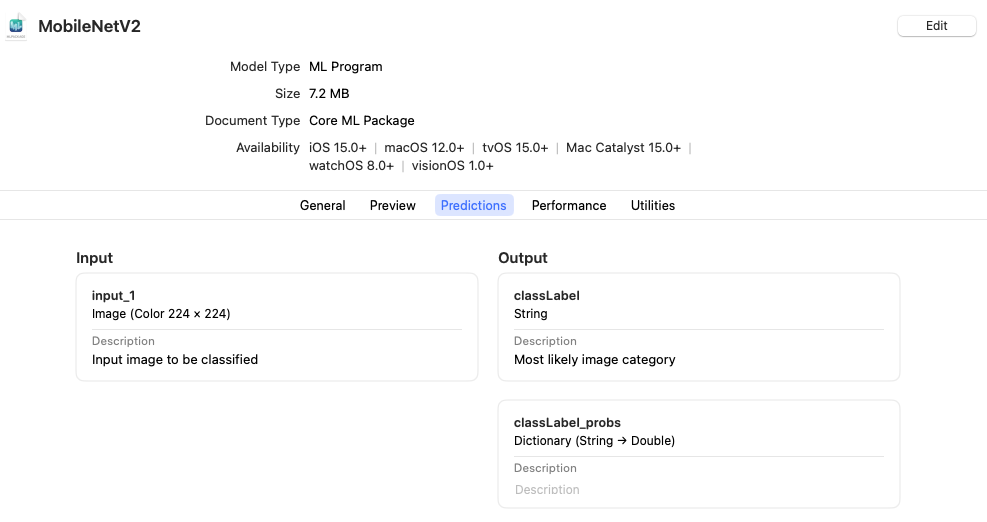
- Xcode can show descriptions of inputs and outputs as code comments for documentation, and display them under the Predictions tab.
- Xcode can also show additional metadata (such as the license and author) within the Xcode UI.
Set feature descriptions (these show up as comments in XCode)
model.input_description["input_1"] = "Input image to be classified" model.output_description["classLabel"] = "Most likely image category"
Set model author name
model.author = '"Original Paper: Mark Sandler, Andrew Howard, Menglong Zhu, Andrey Zhmoginov, Liang-Chieh Chen'
Set the license of the model
model.license = "Please see https://github.com/tensorflow/tensorflow for license information, and https://github.com/tensorflow/models/tree/master/research/slim/nets/mobilenet for the original source of the model."
Set a short description for the Xcode UI
model.short_description = "Detects the dominant objects present in an image from a set of 1001 categories such as trees, animals, food, vehicles, person etc. The top-1 accuracy from the original publication is 74.7%."
Set the preview type
model.user_defined_metadata["com.apple.coreml.model.preview.type"] = "imageClassifier"
Set a version for the model
model.version = "2.0"
For a detailed example, see Integrating a Core ML Model into Your App.
Make Predictions#
To verify the conversion programmatically, Core ML Tools provides the predict() API method to evaluate a Core ML model. This method is only available on macOS, as it requires the Core ML framework to be present.
Compare predictions made by the converted model with predictions made by the source model:

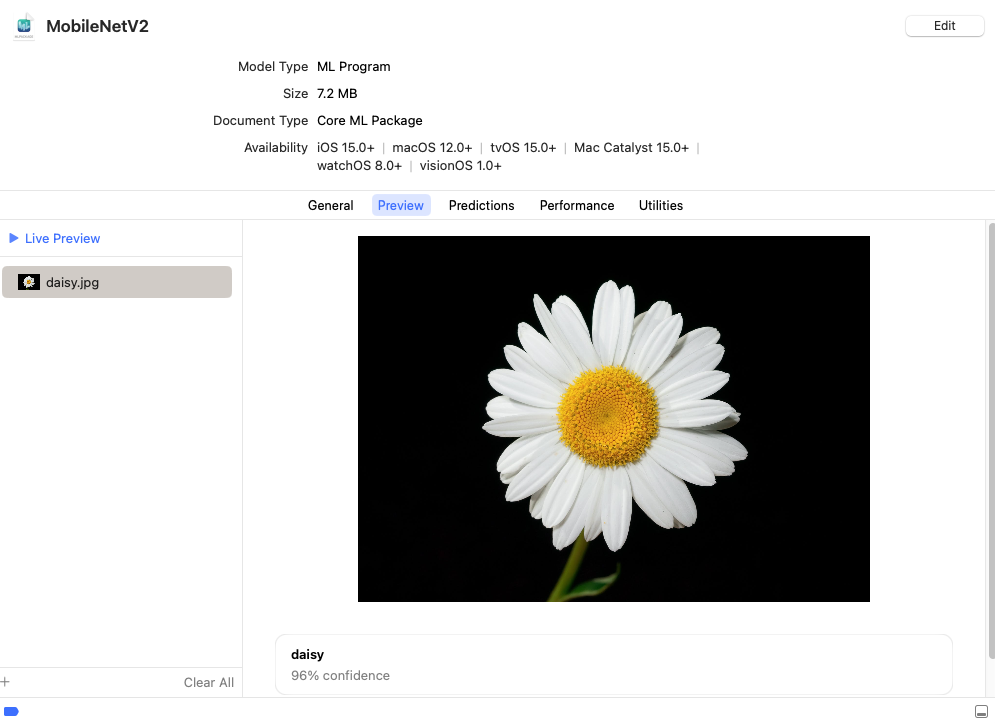
An example test image (daisy.jpg). Right-click and choose Save Image to download.#
Use PIL to load and resize the image to expected size
from PIL import Image example_image = Image.open("daisy.jpg").resize((224, 224))
Make a prediction using Core ML
out_dict = model.predict({"input_1": example_image})
Print out top-1 prediction
print(out_dict["classLabel"])
Note
You may find differences between predictions on macOS and your target platform (such as iOS or watchOS), so you still need to verify on your target platform. For more information on using the predict API, see Model Prediction.
Save and Load the Model#
With the converted ML program model in memory, you can save the model into the Core ML model package format by specifying .mlpackage with the save() method. You can then load the model into another session:
Save model as a Core ML model package
model.save("MobileNetV2.mlpackage")
Load the saved model
loaded_model = ct.models.MLModel("MobileNetV2.mlpackage")
Run the Example#
Run the example code:
python getting-started.py
The output shows the following during the conversion process, followed by the prediction (daisy) and the model save and load message:
Running TensorFlow Graph Passes: 100%|██████████████████████████████████████████████████████████████| 6/6 [00:00<00:00, 11.78 passes/s] Converting TF Frontend ==> MIL Ops: 100%|████████████████████████████████████████████████████████| 428/428 [00:00<00:00, 1097.67 ops/s] Running MIL frontend_tensorflow2 pipeline: 100%|███████████████████████████████████████████████████| 7/7 [00:00<00:00, 205.06 passes/s] Running MIL default pipeline: 100%|███████████████████████████████████████████████████████████████| 71/71 [00:02<00:00, 24.50 passes/s] Running MIL backend_mlprogram pipeline: 100%|████████████████████████████████████████████████████| 12/12 [00:00<00:00, 305.78 passes/s] Model converted to an ML Program daisy model saved and loaded
Use the Model with Xcode#
The code creates the newly converted model as a file in the same directory titled MobileNetV2.mlpackage. Double-click this file in the Mac Finder to launch Xcode and open the model information pane:
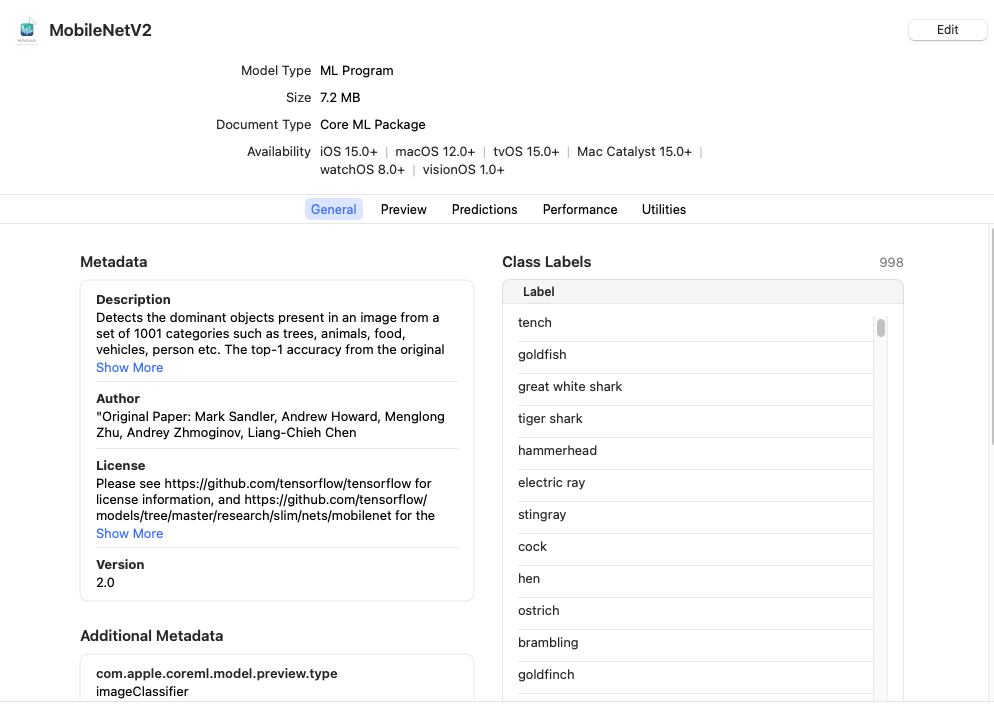
The General tab shows the model metadata. The Preview tab appears for models that have added preview metadata as described in Xcode Model Preview Types.
Tip
To use the model with an Xcode project, drag the model file to the Xcode Project Navigator. Choose options if you like, and click Finish. You can then select the model in the Project Navigator to show the model information.
Click the Predictions tab to see the model’s input and output.
To preview the model’s output for a given input, follow these steps:
- Click the Preview tab.
- Drag an image into the image well on the left side of the model preview.
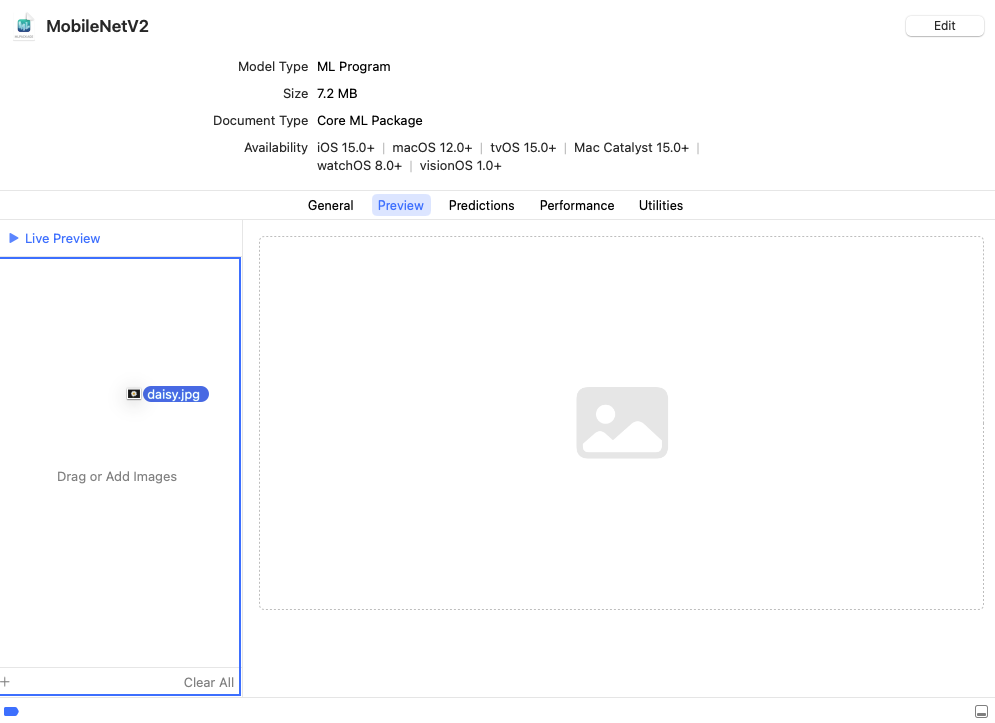
- The output appears in the preview pane under the image.
For more information about using Xcode, see the Xcode documentation.
Produce a Neural Network#
If you include the convert_to="neuralnetwork" parameter, the method produces a neural network with the neuralnetwork model type rather than an ML program. The following is the same code as the previous example, using the convert_to parameter in convert():
import coremltools as ct
Define the input type as image,
set pre-processing parameters to normalize the image
to have its values in the interval [-1,1]
as expected by the mobilenet model
image_input = ct.ImageType(shape=(1, 224, 224, 3,), bias=[-1,-1,-1], scale=1/127)
set class labels
classifier_config = ct.ClassifierConfig(class_labels)
Convert the model using the Unified Conversion API to a neural network
model = ct.convert( keras_model, convert_to="neuralnetwork", inputs=[image_input], classifier_config=classifier_config, )
If you converted the model to the neural network model type, you can save the model into either the model package format as in the previous example, or into the older .mlmodel file format. The following example saves the model in an .mlmodel file and loads the model into another session:
Save model in a Core ML mlmodel file
model.save("MobileNetV2.mlmodel")
Load the saved model
loaded_model = ct.models.MLModel("MobileNetV2.mlmodel")