NGC on Google Cloud Platform Virtual Machines (original) (raw)
NVIDIA makes available on Google Cloud Platform (GCP) GPU-optimized VMIs for GCP VM instances with NVIDIA A100, V100 or T4 GPUs.
For those familiar with GCP, the process of launching the instance is as simple as logging into GCP and creating a deployment solution using the Google Cloud Launcher. After deploying the NVIDIA GPU-Optimized Image of choice,you can SSH into your VM and start building a host of AI applications in deep learning, machine learning and data science by leveraging the wide range of GPU-accelerated containers, pre-trained models and resources available from the NGC Catalog.
This document provides step-by-step instructions for accomplishing this, including how to use the gcloud CLI.
1.1. Security Best Practices
Cloud security starts with the security policies of your CSP account. Refer to the following link for how to configure your security policies for your CSP:
Users must follow the security guidelines and best practices of their CSP to secure their VM and account.
1.2. Prerequisites
- You have a Google Cloud account - https://console.cloud.google.com/ .
- Browse the NGC website and identify an available NGC container and to run on the Virtual Machine Instance (VMI).
- You have installed the gcloud SDK if you plan to use the CLI. See setup instructions below.
- Windows Users: The CLI code snippets are for bash on Linux or Mac OS X. If you are using Windows and want to use the snippets as-is, you can use the Windows Subsystem for Linux and use the bash shell (you will be in Ubuntu Linux).
1.3. Before You Get Started
Be sure you are familiar with the information in this chapter before starting to use the NVIDIA GPU Cloud Image on the Google Cloud Platform (GCP).
1.3.1. Set Up Your SSH Key
The Google Compute Engine generates and manages an SSH key automatically for logging into your instance (see the Google Cloud documentation Connecting to Instances.). However, to facilitate logging into the NGC container registry upon the initial connection to the VM instance, you need to -
- Generate your own SSH keys (see Creating a new SSH key for instructions), and then
- Add them to the metadata for your project (see Adding or Removing Project-Wide Public SSH Keys for instructions).
If you do not prepare your SSH keys before launching and connecting to your VM instance, you will not be able to access the NGC initially. In that case you will need to
Add yourself to the docker group after connecting to the instance.
`
sudo usermod -aG docker $USER
`
2. Restart the session.
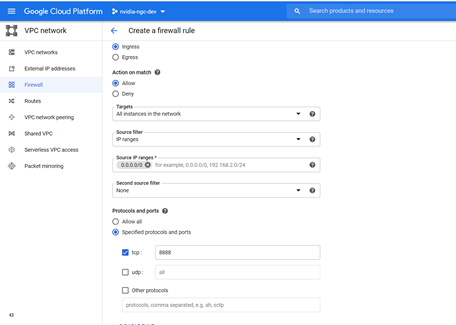
1.3.2. Set Up Firewall Rules
NVIDIA recommends setting firewall rules to allow external access to ports 443 (HTTPS), 8888 (DIGITS), and any other ports that may be needed. This should be done before launching an instance to avoid having to stop the instance when setting any firewall rules later.
- Log in to https://console.cloud.google.com
- Verify you are in the correct Project.
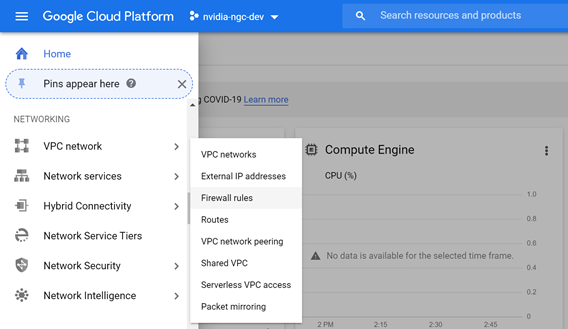
- Click the Products and Servicesmenu icon, then scroll down to the Networking section and click VPC Network->Firewall Rules.
- Click Create Firewall Rule.
- Enter the following information to specify the firewall rule you want to create.
- Name: NVIDIA recommends the following naming format
For HTTPS: “default-allow-https”
For DIGITS: “default-allow-digits”
You can also create rules for other DIGITS versions, such as DIGITS4 - Direction of traffic: "Ingress"
- Action on match: "Allow"
- Targets: "All instances in the network"
- Source filter: "IP ranges"
- Source IP ranges: "0.0.0.0/0"
- Protocols and ports: "Specified protocols and ports", then enter
For HTTPS: “tcp:443”
For DIGITS: “tcp:8888”
You can enter ports for other DIGITS versions as well
Security Warning
It is important to use proper precautions and security safeguards prior to granting access, or sharing your AMI over the internet. By default, internet connectivity to the AMI instance is blocked. You are solely responsible for enabling and securing access to your AMI. Please refer to Google Cloud Platform guides for managing security groups.
- Name: NVIDIA recommends the following naming format
- Click Create.
Your new firewall rules should appear on the Firewall Rules page.
1.4. Creating an NGC Certified Virtual Machine Using the GCP Console
1.4.1. Log In and Create VM
- Log in to https://console.cloud.google.com.
- Verify you are in the correct project.
- Open the Google Cloud Platform Marketplace page.
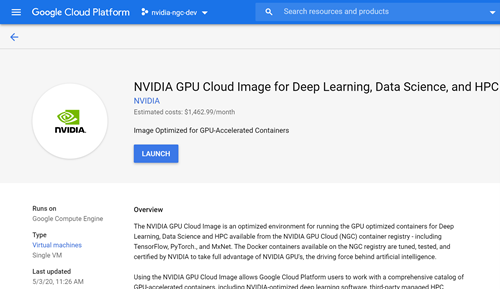
Click the Products and Services menu icon and select Marketplace. - Search for "nvidia".
- Select your choice of the three flavors of NVIDIA GPU-optimized images published by NVIDIA.
- From the image information page, click Launch.
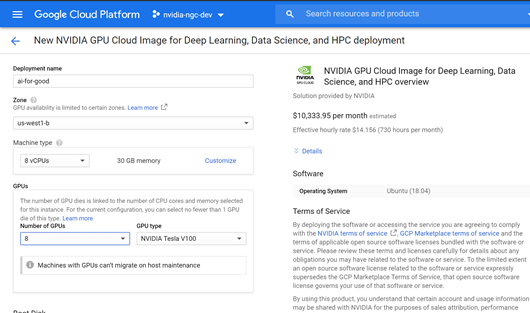
- Configure the NVIDIA GPU Cloud Image deployment.
- In "Name", enter your new deployment name.
- In "Zone", select the zone to create the instance (select one that features the appropriate GPU).
- In the "Machine Type" section, click Customize to open the customize view.
- Under the GPU section, select the GPU type and Number of GPUs.
Assign the Cores (vCPUs) and Memory. The following ratio is recommended: 1x GPU : 10x vCPU: 60 GB mem - In the "Boot disk" section, select Standard Persistent Disk.
- Make other changes as needed for Networking, Firewall and IP.
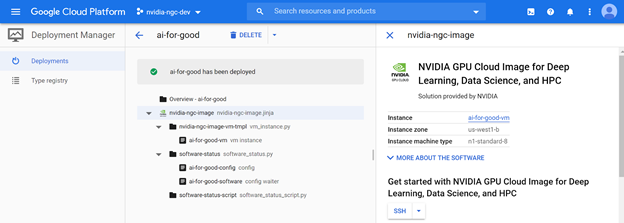
- Click Deploy from the bottom of the page. It may take a few minutes for the deployment process to complete.
1.4.2. Connect to Your VM Instance
- If you are still on the Deployment page, you can click SSH to connect to your instance.
- If you are no longer on the Deployment page, you can return to your instance and connect as follows.
- Click the Products and Services menu icon, then scroll down to the Compute Engine section and click VM Instances.
- Either click SSH by your listed deployed instance, or click your deployed instance and then click SSH from the VM instance details page.
Start/Stop Your VM Instance
Select your GPU instance, either from the Deployment Manager->your deployment page or from the Compute Engine->VM Instances page.
The top menu lets you edit, stop a running instance, or start a stopped instance.
Delete VM and Assocated Resources
Select your GPU instance, either from the Deployment Manager->your deployment page or from the Compute Engine->VM Instances page.and then click Delete.
1.5. Create an NGC Certified Virtual Machine Using the gcloud CLI
This section explains how to create a GPU Cloud instance using the gcloud CLI.
This flow and the code snippets in this section are for Linux or Mac OS X. If you are using Windows, you can use the Windows Subsystem for Linux and use the bash shell (where you will be in Ubuntu Linux). Many of these CLI commands can have significant delays.
For more information about creating a deployment using gcloud CLI, see Creating a Deployment using gcloud or the API.
1.5.1. Install and Set Up gcloud CLI
Follow the instructions at https://cloud.google.com/sdk/docs/quickstarts. These include instructions for Linux, Mac, and Windows.
The instructions walk you through the platform specific install and initial gcloud login.
For at least the Mac, you will be given a large list of additional gcloud components to install such as extensions for GO, Python and Java. You can use the defaults for now, and use the gcloud components command later to list, install, or remove them.
Once the setup is complete, start a new shell since your environment has been updated.
1.5.2. Set Up Instance Options
You will need to specify the following options when creating the custom GPU instance.
| OPTION [1] | VALUE | NOTES |
|---|---|---|
| Name of your choosing. Ex. “my-ngc-instance” | Must be all lowercase, with no spaces. Hyphens and numbers are allowed. | |
| --project | "" | This is the project in which the VM will be created. Use gcloud projects list to view PROJECT ID to use for this field. |
| --zone | One of the following zones that contain GPUs: "us-west1-b" "us-east1-c" "us-east1-d" "europe-west1-b" "europe-west1-d" "asia-east1-a" "asia-east1-b" | Pick one nearest you and with the GPUs you want to use. |
| --machine-type | One of the following: "custom-10-61440" (for 1x P100 or V100) "custom-20-122880" (for 2x P100) "custom-40-212992" (for 4x P100) "custom-80-491520" (for 8x V100) | vCPU/Memory configuration of the VM in "custom-<#vCPUs>-" format. Recommended ratio is 1 GPU : 10 vCPUs : 60 GB memory |
| --subnet | “default”, or the name of the VPC network to use | |
| --metadata | "ssh-keys=:ssh-rsa " | |
| --maintenance-policy | "TERMINATE" | What to do with your instance when Google performs maintenance on the host |
| --service-account | Compute Engine identity attached to the instance. Use Copy Copied! gcloud iam service-accounts list to view the email for your account. | |
| --scope | "https://www.googleapis.com/auth/devstorage.read\_only", "https://www.googleapis.com/auth/logging.write", "https://www.googleapis.com/auth/monitoring.write", "https://www.googleapis.com/auth/servicecontrol", "https://www.googleapis.com/auth/service.management.readonly", "https://www.googleapis.com/auth/trace.append" | Default values (recommended). Specifies the permissions for your instance. |
| --accelerator | nvidia-tesla-p100,count=[1,2,4] | Which GPU to attach, and how many |
| --min-cpu-platform | "Intel Broadwell" (for P100 instances) | |
| --image | Name of the latest NVIDIA GPU Cloud Image (See the NGC GCP VMI Release Notes for the current name.) | |
| --image-project | "nvidia-ngc-public" | Project name in which the NVIDIA GPU Cloud Image is located |
| --boot-disk-size | 32 | |
| --boot-disk-type | "pd-standard" | |
| --boot-disk-device-name | Name of your choosing | Recommend using the same name as your VM instance for easy correlation |
1.5.3. Launch Your VM Instance
Use the Python scripts provided at https://github.com/nvidia/ngc-examples/tree/master/ncsp to create your custom GPU instance. You can also enter the following, using the information gathered in the previous section:
`gcloud compute
--project ""
instances create ""
--zone ""
--machine-type ""
--subnet ""
--metadata ""
--maintenance-policy ""
--service-account ""
--scopes "https://www.googleapis.com/auth/devstorage.read_only","https://www.googleapis.com/auth/logging.write","https://www.googleapis.com/auth/monitoring.write","https://www.googleapis.com/auth/servicecontrol","https://www.googleapis.com/auth/service.management.readonly","https://www.googleapis.com/auth/trace.append"
--accelerator type=
--min-cpu-platform ""
--image ""
--image-project ""
--boot-disk-size "32"
--boot-disk-type "pd-standard"
--boot-disk-device-name ""
`
1.5.4. Connect to Your VM Instance
(Use a CLI on Mac or Linux. Windows users: use OpenSSH on Windows PowerShell or use the Windows Subsystem for Linux)
If you ran the scripts from https://github.com/nvidia/ngc-examples/tree/master/ncsp you should be connected to your instance. Otherwise, run ssh to connect to your GPU instance, or enter the following gcloud command.
Command syntax:
`gcloud compute --project "" ssh --zone "" ""
`
See https://cloud.google.com/compute/docs/instances/connecting-to-instance for more information about connecting to your GPU instance.
Stop/Stop Your VM Instance
Once an instance is running, you can stop and (re)start your instance.
Stop:
`gcloud compute instances stop
`
Start or Restart:
`gcloud compute instances start
`
Access Jupyter Notebooks in Your GPU Virtual Machine
Accessing Jupyter notebooks you create or download from the NGC Catalog in your Google Cloud virtual machine is simple and straightforward.
Follow the below steps to configure your virtual machine instance with the right network settings to be able to run a JupyterLab server on your VM and access Jupyter notebooks via a browser on your local machine.
- Create a NGC certified virtual machine instance on Google Cloud by following the steps listed above. (LINK TO ‘CREATING AN NGC CERTIFIED VIRTUAL MACHINE USING THE GOOGLE CLOUD CONSOLE’ SECTION ABOVE) Refer to Creating an NGC Certified Virtual Machine Using the GCP Console
- Create a static external IP address.
This static external IP address will be used as hostname when you access the Jupyter notebook from your local browser. (example: http://:8080)- Navigate to Networking (from menu) → VPC network → External IP addresses.

- Identify the virtual machine instance you created and change the the type from “Ephemeral” to “Static”

- Copy the external IP in the corresponding External Address column for use later.
- Navigate to Networking (from menu) → VPC network → External IP addresses.
- Navigate to Networking (from menu) → VPC network → Firewall rules to create a new firewall rule with the following parameters (or add a new rule to an existing VPC if you already created one).
- Name:
- Targets: All instances in the network
- Source IP ranges: 0.0.0.0/0
- Protocols and ports: Select “Specified protocols and ports” option. tcp: 8080
That’s it! Now you’re all set to create and edit Jupyter notebooks that are in your virtual machine instance.
Now you can pull any container from NGC and access Jupyter notebooks from within the container as well.
While running the container, make sure to include the port you configured for the JupyterLab while creating the VPC (in this example, the port used was 8080)
For example:
`$ docker run --gpus '"device=1"' --rm -it
-p 8080:8080
-p 6006:6006
--shm-size=1g
--ulimit memlock=-1
--ulimit stack=67108864
--name bert_gcp
$ docker pull nvcr.io/nvidia/tensorflow:20.08-tf1-py3
`
You can now access the Jupyter notebooks in your Google Cloud virtual machine by simply navigating to https://<externalip>:8080 on any browser on your local machine. (External IP to be included in the URL is the same as the external IP you made a note of in step 2c)

1.7. Persistent Data Storage for GCP Virtual Machines
GCP recommends using Persistent SSD Disks for Compute Engine storage. A minimum of 1 TB of storage is recommended for storing deep learning datasets. However, a much larger disk or a software RAID, using mdadm, can be used to create a volume with multiple SSD Persistent Disks for achieving the the maximum performance supported by GCP on a Compute Engine instance. See instructions on how to set up software RAID on local disks. Persistent SSD disks can also be set up for software RAID using the same instructions.
1.7.1. Create a Data Disk Using the GCP Console
You can create a persistent SSD dataset disk from the GCP console as follows.
- Log on to the Google Cloud Platform.
- Create the SSD disk.
- Click Compute Engine-> Disks in the left-side navigation pane.
- Click Create Disk from the top of the page.

- Specify the following and then click Create when done:
- Zone: Select the same zone as the VM instance you created.
- Disk Type: SSD persistent disk
- Source type: None (blank disk)
- Size: At least 1024 GB
If you choose to provide your own encryption key, You must provide a key that is a 256-bit string encoded in RFC 4648 standard base64 to Compute Engine. See Customer-Supplied-Encryption-Keys for details on how to provide a custom Encryption Key globally for all your operations.
- Attach the disk to the VM instance.
- Go to the Compute Engine->VM Instance page.
- Click your VM instance from the list.
- Click Stop.
You must stop a running VM Instance as changes cannot be performed when the instance is running. - Click Edit.
- Scroll down to the Additional Disks and click + Add Item.
- Under Name, select the disk that you created and want to attach to the VM instance.
- Click Save.
- Start the VM instance.
1.7.2. Create a Data DIsk Using the gcloud CLI
Create the disk using the following command.
`
$ gcloud compute disks create ngc-ssd --zone --description “” --type=pd-ssd --size=1000GM
`
2. Attach the disk to a VM instance using the following command..
` $ gcloud compute instances attach-disk --disk ngc-ssd --zone
`
1.7.3. Delete a Data Disk
Be aware that once you delete a Persistent SSD Disk, you cannot undelete it.
gcloud CLI
`$ gcloud compute instances detach-disk --disk ngc-ssd --zone
`
GCP Console
- Click the disk to delete from the Compute Engine->Disks page.
- On the top of the page, click Delete.
- Click Delete at the Delete a disk confirmation dialog. .