Install Notebooks — OpenVINO™ documentation (original) (raw)
The notebooks can be run in various environments. This guide will show you how to install them on your local system.
Contents:
Installation Guide#
The table below lists the supported operating systems and Python versions.
| Supported Operating System (64-bit) | Python Version (64-bit ) |
|---|---|
| Ubuntu 20.04 LTS, 64-bit | 3.10, 3.11, 3.12 |
| Red Hat Enterprise Linux 8 | 3.10, 3.11, 3.12, 3.13, 3.14 |
| CentOS 7, 64 bit | 3.10, 3.11, 3.12, 3.13, 3.14 |
| macOS 10.15.x versions or higher | 3.10, 3.11, 3.12, 3.13, 3.14 |
| Windows 10, 64-bit Pro, Enterprise | 3.10, 3.11, 3.12, 3.13, 3.14 |
| Windows 10, 64-bit Pro, Enterprise or Education editions | 3.10, 3.11, 3.12 |
| Windows Server 2016 or higher | 3.10, 3.11, 3.12 |
OpenVINO Notebooks also require Git. Follow the guide below for your operating system or environment.
Installing prerequisites#
Windows
- Install Python
Download 64 bit version of Python software (3.10 - 3.14) from python.org
Run the installer by double clicking it. Follow the installation steps to set up the software.
While installing, make sure you check the box to add Python to system PATH. Also, it is recommended to use the installer option to disable the PATH length limit.
Note
Python software available in the Microsoft Store is not recommended. It may require additional packages. - Install GIT
Download 64 bit version of GIT fromgit-scm.org
Run the installer by double clicking it. Follow the installation steps to set up the software. - Install Drivers for GPU, and NPU (AI PC)
It is recommended to perform a “Clean Install” of theWHQL Certified GPU driverto ensure the underlying libraries are correctly configured.
For AI PC, install the latestIntel® NPU driver(or last known working driver -Windows 32.0.100.3053) to avoid any potential issues in compiling NPU kernels. - Install C++ Redistributable (Required)
- DownloadMicrosoft Visual C++ Redistributable.
- Run the installer and follow the instructions.
- Install FFMPEG (Optional)
Download FFMPEG binary from here
Set FFMPEG’s path (e.g.,C:\ffmpeg\bin) to the PATH environmental variable on Windows.
Linux
- Install Python and GIT
Note
Linux Systems may require installation of additional libraries.
The following installation steps should work on a clean install of Ubuntu Desktop 20.04, and should also work on Ubuntu 22.04 and 20.10, and on Ubuntu Server.
sudo apt-get update
sudo apt-get upgrade
sudo apt-get install python3-venv build-essential python3-dev git-all libgl1-mesa-dev ffmpeg
For an Intel Integrated Graphics Card, you can install theIntel Graphics Compute Runtimeto enable inference on this device. The command for Ubuntu 20.04 is:
Note
Execute this command only if you have not installed OpenCL drivers yet:
sudo apt-get install intel-opencl-icd
Follow the instructions discussedhereto make sure the right permissions are enabled.
The following installation steps should work on a clean install of Red Hat, CentOS, Amazon Linux 2 or Fedora. If any issues occur, see theTroubleshooting section.
sudo yum update
sudo yum upgrade
sudo yum install python36-devel mesa-libGL
macOS
Alternatively, you may skip steps 1-3 if you prefer to manually installPython 3 and Git.
- Install Xcode Command Line Tools
- Install Homebrew
/bin/bash -c "$(curl -fsSL https://raw.githubusercontent.com/Homebrew/install/HEAD/install.sh)"
After you install it, follow the instructions from the Homebrew installation to set it up. - Install Python and dependencies
brew install python@3.10
brew install protobuf
optional but recommended
brew install ffmpeg
Run each step below in a terminal.
Note
If OpenVINO is installed globally, do not run any of these commands in a terminal where setupvars.sh is sourced.
Azure ML
- Adding a Compute Instance
In Azure ML Studio,add a compute instanceand pick any CPU-based instance. At least 4 CPU cores and 8GB of RAM are recommended.
- Start the Terminal
Once the compute instance has started, open the terminal window and then follow the installation steps below.
Docker
To run the notebooks inside a Linux-based Docker container, use the Dockerfile:
FROM quay.io/thoth-station/s2i-thoth-ubi8-py38:v0.29.0
LABEL name="OpenVINO(TM) Notebooks"
maintainer="helena.kloosterman@intel.com"
vendor="Intel Corporation"
version="0.2.0"
release="2021.4"
summary="OpenVINO(TM) Developer Tools and Jupyter Notebooks"
description="OpenVINO(TM) Notebooks Container"
ENV JUPYTER_ENABLE_LAB="true"
ENABLE_MICROPIPENV="1"
UPGRADE_PIP_TO_LATEST="1"
WEB_CONCURRENCY="1"
THOTH_ADVISE="0"
THOTH_ERROR_FALLBACK="1"
THOTH_DRY_RUN="1"
THAMOS_DEBUG="0"
THAMOS_VERBOSE="1"
THOTH_PROVENANCE_CHECK="0"
USER root
Upgrade NodeJS > 12.0
Install dos2unix for line end conversion on Windows
RUN dnf --disableplugin=subscription-manager remove -y nodejs &&
dnf --disableplugin=subscription-manager module -y reset nodejs &&
dnf --disableplugin=subscription-manager module -y enable nodejs:20 &&
dnf --disableplugin=subscription-manager install -y nodejs mesa-libGL dos2unix libsndfile &&
dnf --disableplugin=subscription-manager -y update-minimal --security --sec-severity=Important --sec-severity=Critical --sec-severity=Moderate
GPU drivers
RUN dnf --disableplugin=subscription-manager install -y 'dnf-command(config-manager)' &&
dnf --disableplugin=subscription-manager config-manager --add-repo https://repositories.intel.com/gpu/rhel/8.6/lts/2350/unified/intel-gpu-8.6.repo
RUN rpm -ivh https://vault.centos.org/centos/8/AppStream/x86_64/os/Packages/mesa-filesystem-21.1.5-1.el8.x86_64.rpm &&
dnf --disableplugin=subscription-manager install --refresh -y
intel-opencl intel-media intel-mediasdk libmfxgen1 libvpl2
level-zero intel-level-zero-gpu
intel-metrics-library intel-igc-core intel-igc-cm
libva libva-utils intel-gmmlib &&
rpm -ivh http://mirror.centos.org/centos/8-stream/AppStream/x86_64/os/Packages/ocl-icd-2.2.12-1.el8.x86_64.rpm &&
rpm -ivh https://dl.fedoraproject.org/pub/epel/8/Everything/x86_64/Packages/c/clinfo-3.0.21.02.21-4.el8.x86_64.rpm
Copying in override assemble/run scripts
COPY .docker/.s2i/bin /tmp/scripts
Copying in source code
COPY .docker /tmp/src COPY .ci/patch_notebooks.py /tmp/scripts COPY .ci/validate_notebooks.py /tmp/scripts COPY .ci/ignore_treon_docker.txt /tmp/scripts
Git on Windows may convert line endings. Run dos2unix to enable
building the image when the scripts have CRLF line endings.
RUN dos2unix /tmp/scripts/* RUN dos2unix /tmp/src/builder/*
Change file ownership to the assemble user. Builder image must support chown command.
RUN chown -R 1001:0 /tmp/scripts /tmp/src USER 1001 RUN mkdir /opt/app-root/notebooks COPY notebooks/ /opt/app-root/notebooks RUN /tmp/scripts/assemble RUN pip check USER root RUN dos2unix /opt/app-root/bin/*sh RUN yum remove -y dos2unix RUN chown -R 1001:0 . RUN chown -R 1001:0 /opt/app-root/notebooks USER 1001
RUN jupyter lab build
CMD /tmp/scripts/run
Amazon SageMaker
- Log into your Amazon SageMaker Studio Environment and
Add user.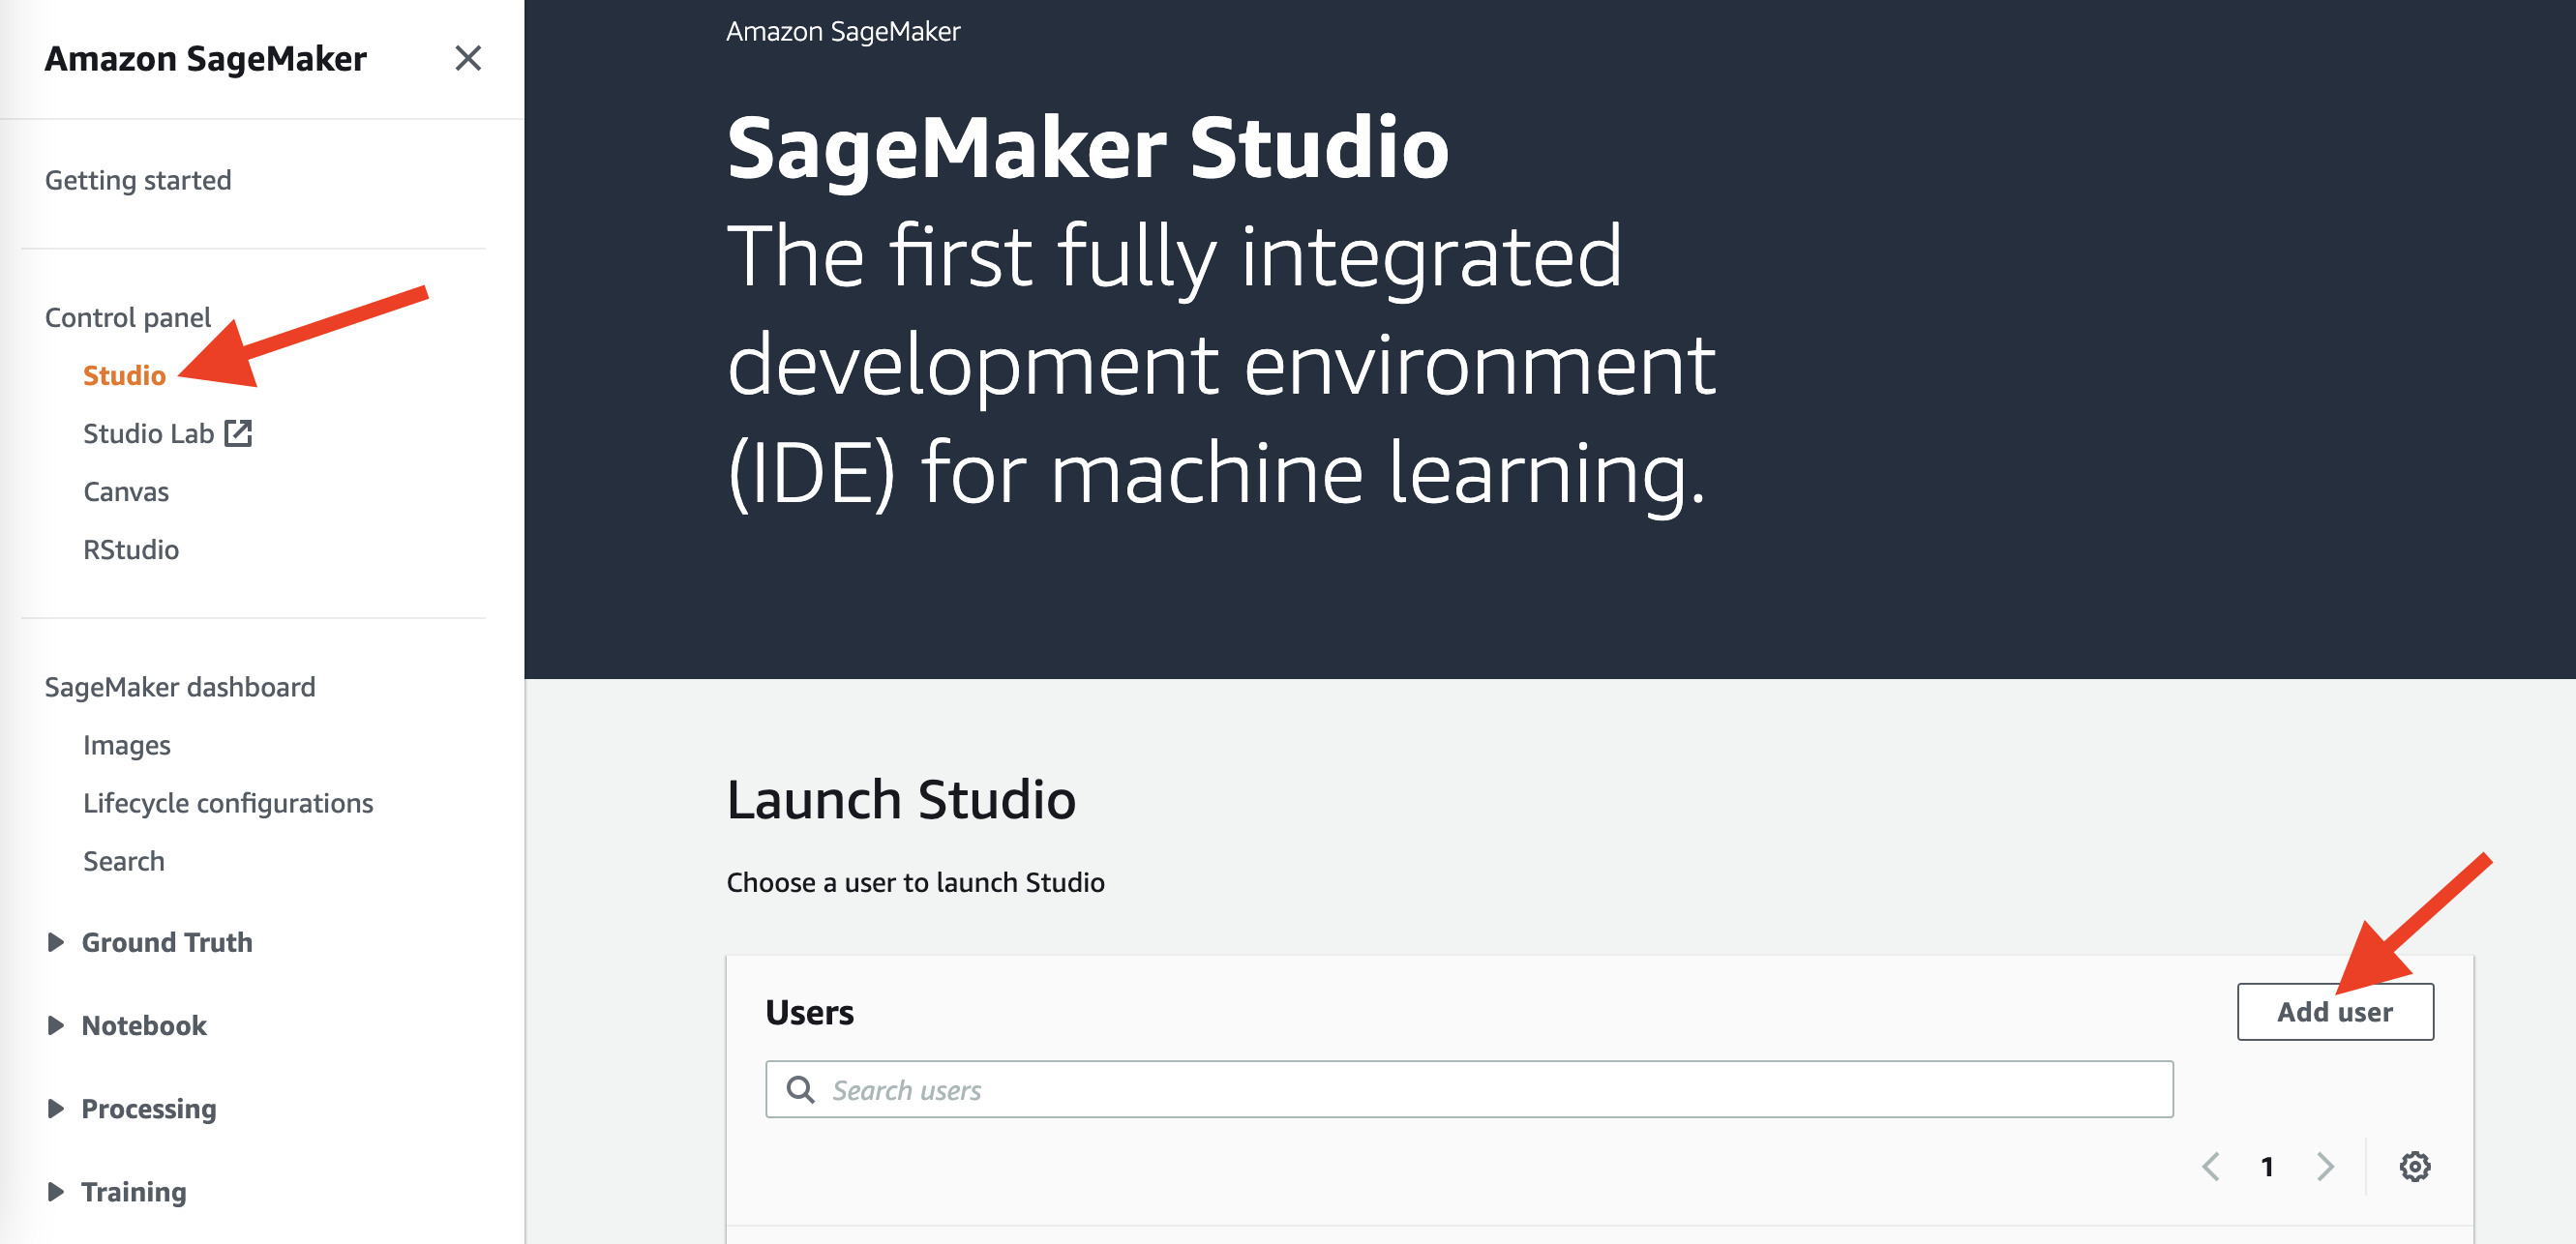
- Choose desired user profile name
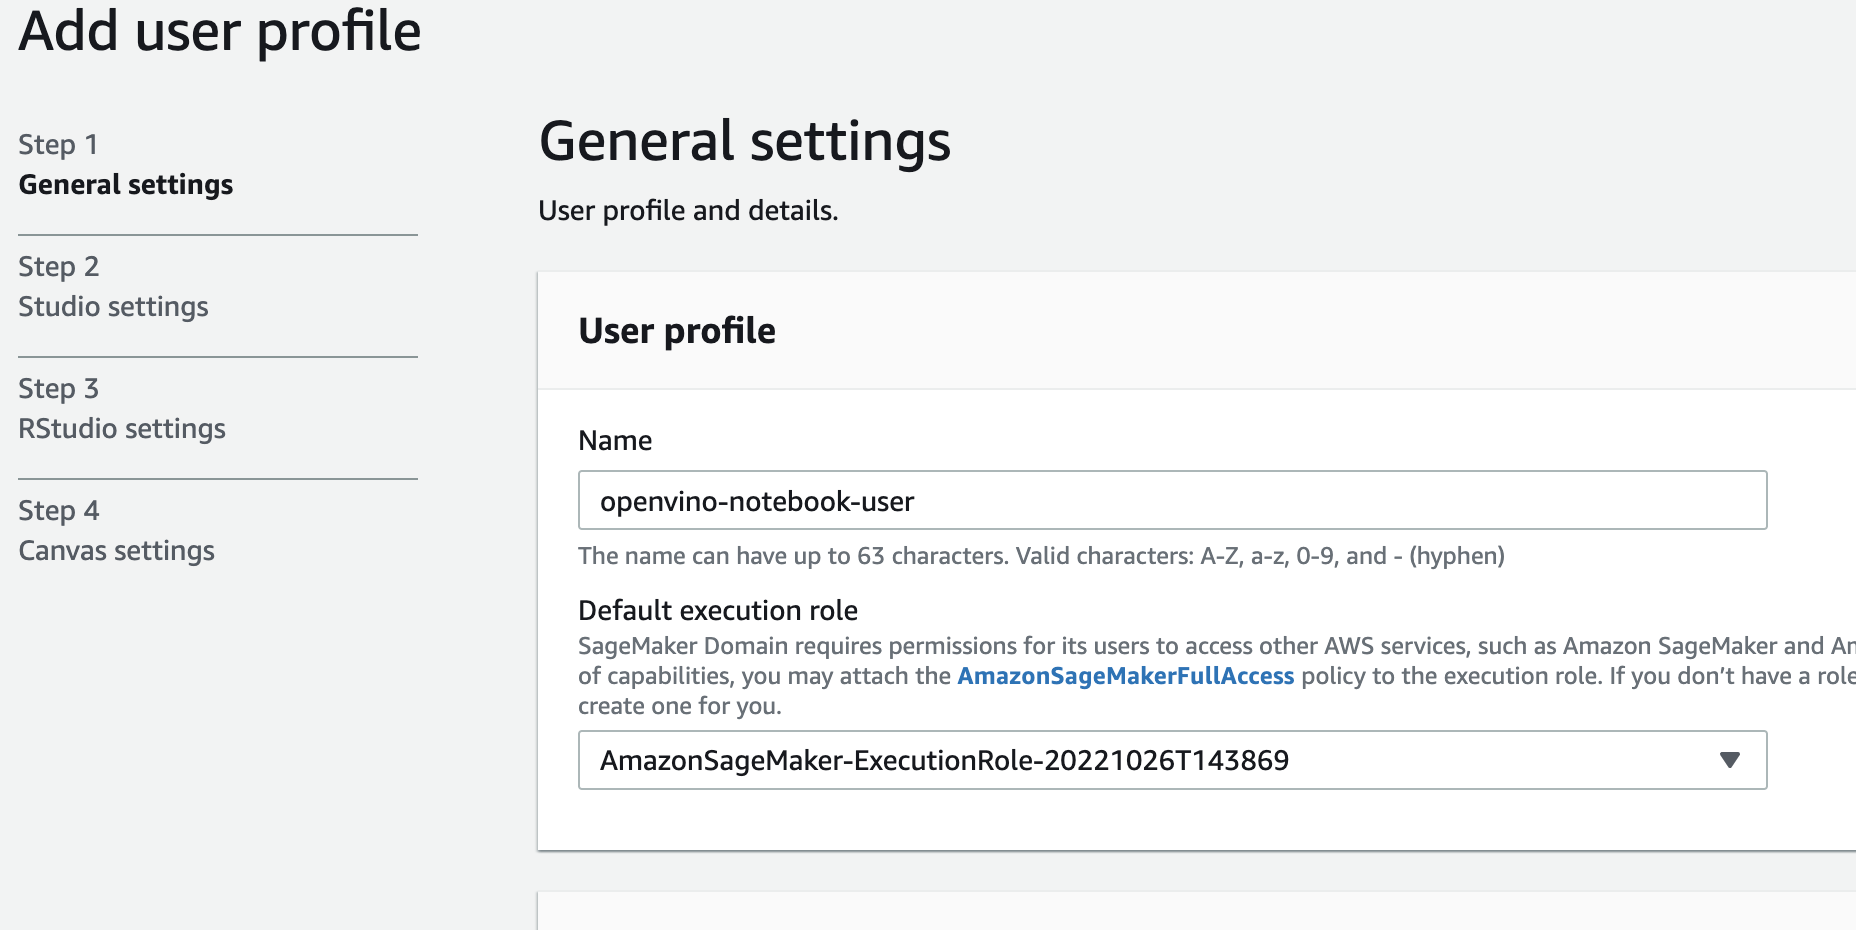
- Choose Jupyter Lab version 3.0
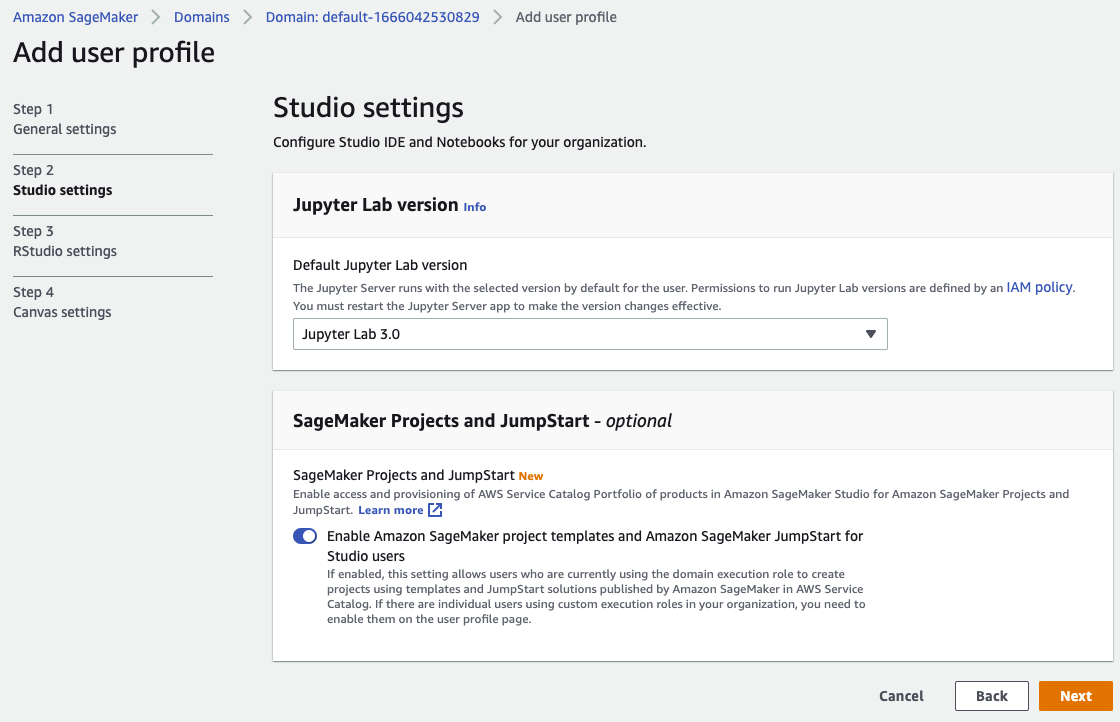
- Choose the remaining default setting and click “Submit” to add a user.
- Launch the Amazon SageMaker Studio environment.
Click “Open Studio” to start the environment: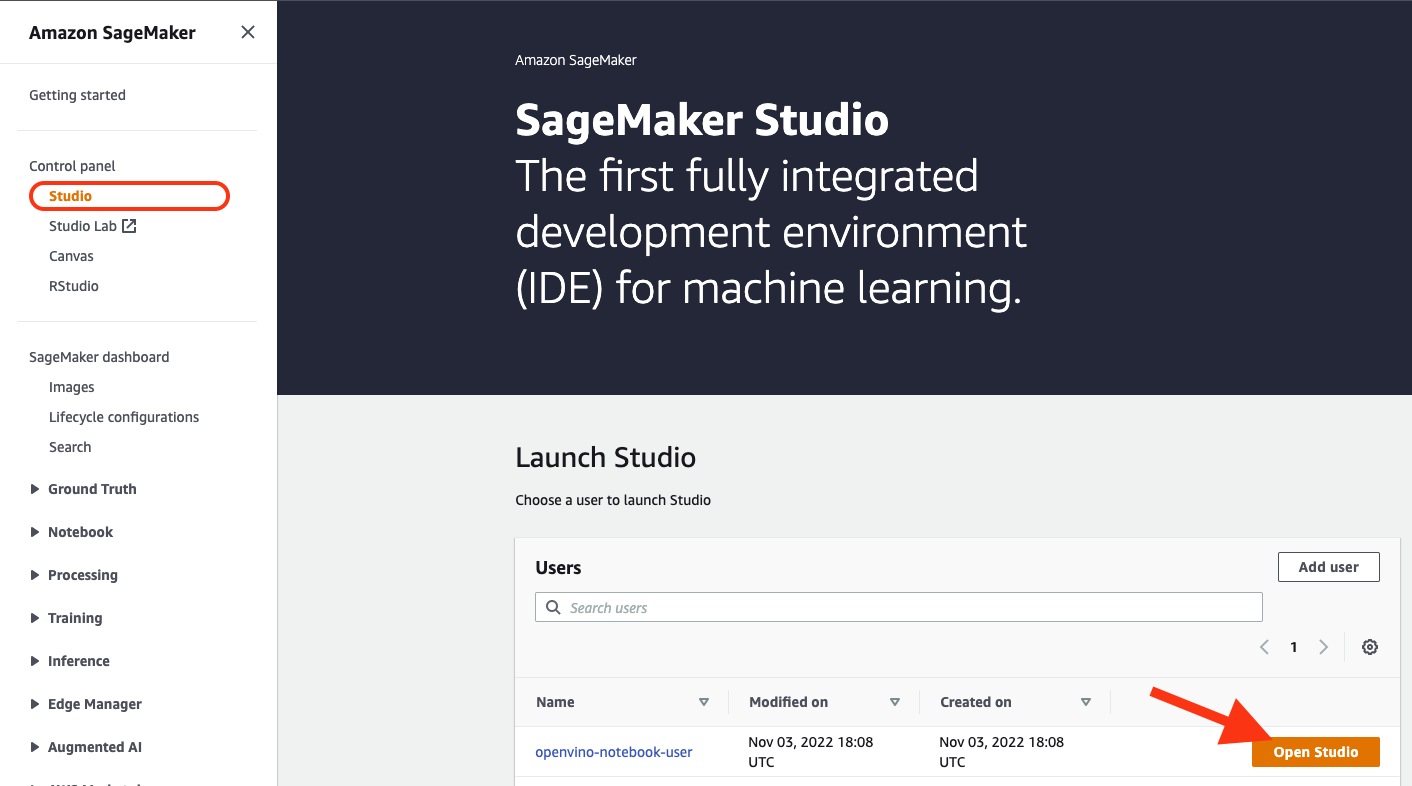
Note
You are using anml.t3.mediuminstance, which is for free for 250 hours per month for the first 2 months on Studio notebook. - Wait for a couple of minutes for your environment to load.
You should be able to see the following screen:
- Select a SageMaker image.
ChooseData Science 3.0in the “Select a SageMaker image” drop-down, under “Notebooks and compute resources”.
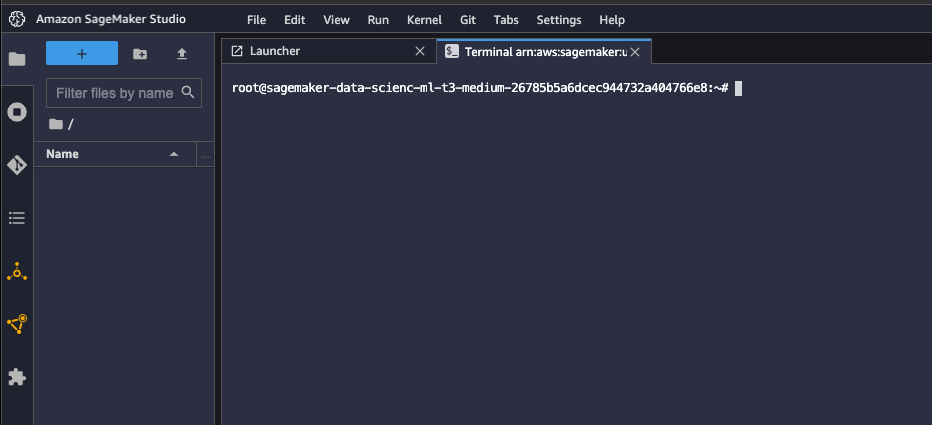
Then, click + on “Image Terminal” to start a terminal session: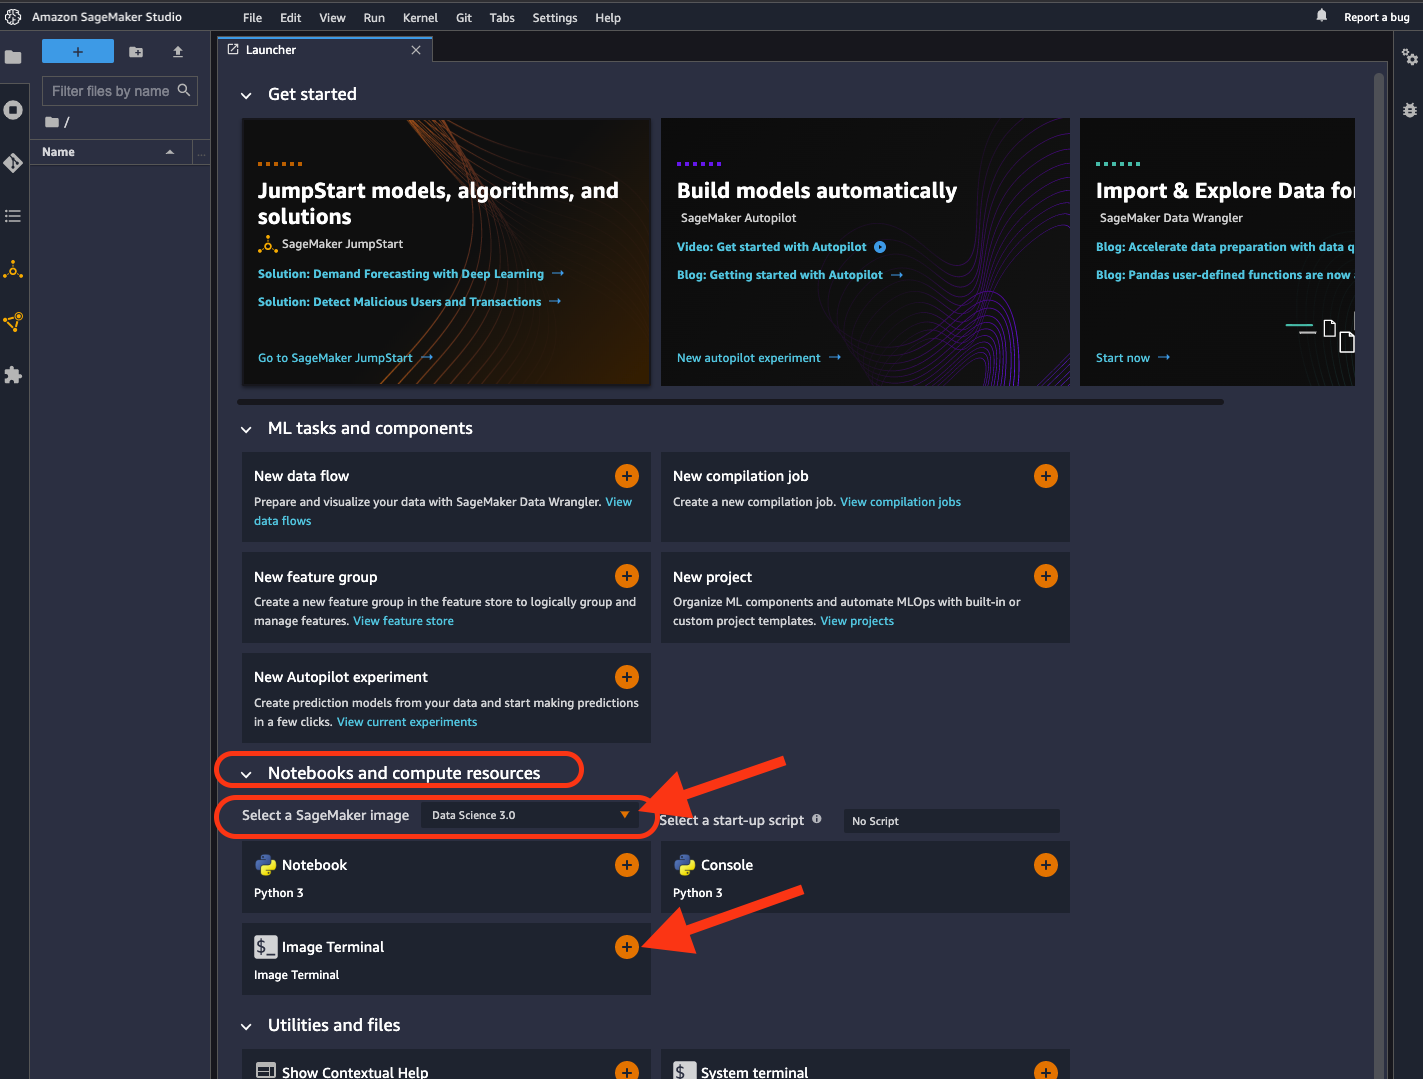
Installing notebooks#
Windows
Important
- Use Command Prompt (cmd.exe), not PowerShell, to run the commands below.
- If OpenVINO is installed globally, do not run any of the following commands in a terminal, where
setupvars.batis sourced.
- Create a Virtual Environment
python -m venv openvino_env - Activate the Environment
openvino_env\Scripts\activate - Clone the Repository
Use the--depth=1option for git cloning to reduce the download size.
git clone --depth=1 https://github.com/openvinotoolkit/openvino_notebooks.git
cd openvino_notebooks - Upgrade PIP
python -m pip install --upgrade pip wheel setuptools - Install required packages
pip install -r requirements.txt
Important
In case of problems with accessing HuggingFace in PRC, set-up the networking environment before you launch the notebooks:
pip install -U huggingface_hub
set HF_ENDPOINT = https://hf-mirror.com
For more information, visit HF-Mirror HuggingFace.
Linux
- Create a Virtual Environment
python3 -m venv openvino_env - Activate the Environment
source openvino_env/bin/activate - Clone the Repository
Using the –depth=1 option for git clone reduces download size.
git clone --depth=1 https://github.com/openvinotoolkit/openvino_notebooks.git
cd openvino_notebooks - Upgrade PIP
python -m pip install --upgrade pip
pip install wheel setuptools - Install required packages
pip install -r requirements.txt
.. important::
In case of problems with accessing HuggingFace in PRC, set-up the networking
environment before you launch the notebooks:
.. code-block::
pip install -U huggingface_hub
set HF_ENDPOINT = https://hf-mirror.com
For more information, visitHF-Mirror HuggingFace <https://hf-mirror.com>__.
macOS
- Create a Virtual Environment
python3 -m venv openvino_env - Activate the Environment
source openvino_env/bin/activate - Clone the Repository
Using the –depth=1 option for git clone reduces download size.
git clone --depth=1 https://github.com/openvinotoolkit/openvino_notebooks.git
cd openvino_notebooks - Upgrade PIP
python -m pip install --upgrade pip wheel setuptools - Install required packages
pip install -r requirements.txt
Azure ML
- Create a Conda environment
conda create --name openvino_env python=3.9 -y - Activate the environment
conda activate openvino_env - Clone OpenVINO notebooks
git clone https://github.com/openvinotoolkit/openvino_notebooks.git - Change directory to
openvino_notebooks - Upgrade
pipand install required dependencies.
python -m pip install --upgrade pip
pip install -r requirements.txt - Add
openvino_envto PATH
set PATH="/anaconda/envs/openvino_env/bin;%PATH%" - Run the notebooks.
- To run the notebooks, click on “Notebooks” and refresh your “Files”:

- Select a notebook:

- Next, run all cells:

- Happy coding!
Important
Make sure you are using theopenvino_envenvironment (not Python 3).
- To run the notebooks, click on “Notebooks” and refresh your “Files”:
Docker
- Clone the Repository
git clone https://github.com/openvinotoolkit/openvino_notebooks.git
cd openvino_notebooks - Build the Docker Image
docker build -t openvino_notebooks . - Run the Docker Image
- Command for CPU only:
docker run -it -p 8888:8888 openvino_notebooks
Note
For using model training notebooks, allocate additional memory:
docker run -it -p 8888:8888 --shm-size 8G openvino_notebooks - Command for CPU and GPU (requires system with integrated or discrete Intel GPU):
docker run -it --device=/dev/dri --group-add=$(stat -c "%g" /dev/dri/render* | head -n 1) -p 8888:8888 openvino_notebooks
- Command for CPU only:
- Start the browser
Copy the URL printed in the terminal window and open in a browser.
If it is a remote machine, replace 127.0.0.1 with the correct IP address.
The Dockerfile can be used to run a local image on Windows, Linux or macOS. It is also compatible with Open Data Hub and Red Hat OpenShift Data Science. The base layer is aUBI 8-based image provided by Project Thoth.
Note
While running the container on Windows and macOS, only CPU devices can be used. To access the iGPU, install the notebooks locally, following the instructions above.
Amazon SageMaker
Use the terminal and follow the steps below.
- Install system dependencies.
apt update
apt install build-essential -y
apt install libpython3.10-dev -y
apt install libgl1-mesa-glx -y - Setup OpenVINO conda environment.
conda create --name openvino_env python=3.10
conda activate openvino_env
conda install ipykernel
set PATH="/anaconda/envs/openvino_env/bin;%PATH%" - Setup OpenVINO Notebooks.
git clone https://github.com/openvinotoolkit/openvino_notebooks.git
cd openvino_notebooks
Install OpenVINO and OpenVINO notebook Requirements
python -m pip install --upgrade pip
pip install -r requirements.txt
4. Run the Notebooks
- To run the notebooks, click the top level “openvino_notebooks” folder and navigate to your example:

- Choose “Image” -
Data Science 3.0, “Kernel” -Python [conda env:openvino_env],“Instance type”- your desired compute instance.
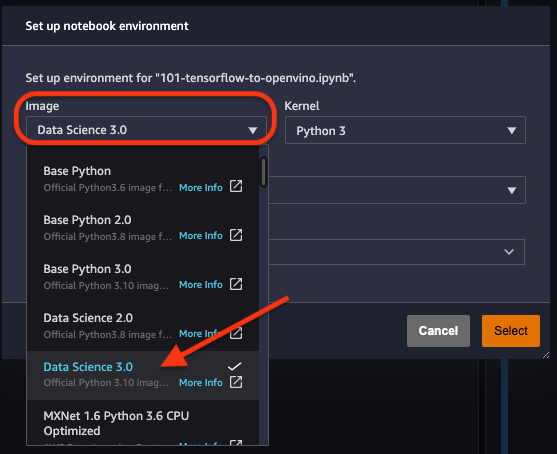
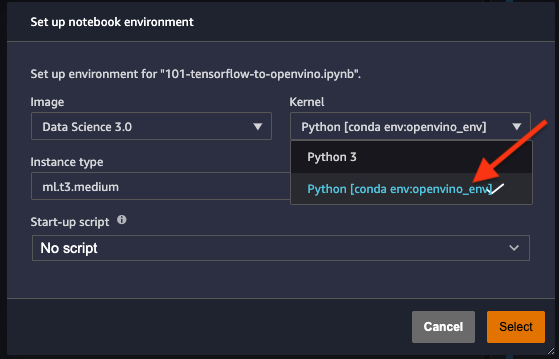

Note
Make sure you use thePython [conda env:openvino_env]environment (notPython 3). - Next, run the cells of the notebook. You may try other notebooks to explore OpenVINO features and examples.
Great! You have completed the installation. To learn how to launch and manage the notebooks, see the Run Notebooks article.
Troubleshooting#
For solutions to common issues during installation, refer to theTroubleshootingandFAQsections in openvino_notebooksrepository.
If the above tips do not solve your problem, feel free to open adiscussion topicor create anissue on Github.