Get Started with Samples — OpenVINO™ documentation (original) (raw)
To use OpenVINO samples, install OpenVINO using one of the following distributions:
- Archive files (recommended) - Linux | Windows | macOS
- APT or YUM for Linux
- Docker image
- Build from source
If you install OpenVINO Runtime via archive files, sample applications are created in the following directories:
<INSTALL_DIR>/samples/python<INSTALL_DIR>/samples/cpp<INSTALL_DIR>/samples/c
Before you build samples, refer to the system requirements page and make sure that all the prerequisites have been installed. Next, you can perform the following steps:
- Build Samples.
- Select a Sample.
- Download a suitable model.
- Download media files used as input, if necessary.
Once you perform all the steps, you can run inference with the chosen sample application to see the results.
Build the Sample Applications#
Select a sample you want to use from the OpenVINO Samples page, and follow the instructions below to build it in your operating system.
Note
Some samples may also require OpenCV to run properly. Make sure to install it for use with vision-oriented samples.
Instructions below show how to build sample applications with CMake. If you are interested in building them from source, check the build instructions on GitHub .
Linux
Python
Each Python sample directory contains the requirements.txt file, which you must install before running the sample:
cd /samples/python/ python3 -m pip install -r ./requirements.txt
C and C++
To build the C or C++ sample applications for Linux, go to the <INSTALL_DIR>/samples/c or <INSTALL_DIR>/samples/cpp directory, respectively, and run the build_samples.sh script:
Once the build is completed, you can find sample binaries in the following folders:
- C samples:
~/openvino_c_samples_build/<architecture>/Release - C++ samples:
~/openvino_cpp_samples_build/<architecture>/Releasewhere the is the output ofuname -m, for example,intel64,armhf, oraarch64.
You can also build the sample applications manually:
Note
If you have installed the product as a root user, switch to root mode before you continue: sudo -i .
- Navigate to a directory that you have write access to and create a samples build directory. This example uses a directory named
build:
Note
If you ran the Image Classification verification script during the installation, the C++ samples build directory is created in your home directory:~/openvino_cpp_samples_build/ - Go to the created directory:
- Run CMake to generate the Make files for release configuration. For example, for C++ samples:
cmake -DCMAKE_BUILD_TYPE=Release /samples/cpp - Run
maketo build the samples:
cmake --build . --parallel
For the release configuration, the sample application binaries are in <path_to_build_directory>/<architecture>/Release/; for the debug configuration — in <path_to_build_directory>/<architecture>/Debug/.
Windows
Python
Each Python sample directory contains the requirements.txt file, which you must install before running the sample:
cd \samples\python<SAMPLE_DIR> python -m pip install -r requirements.txt
C and C++
Note
If you want to use Microsoft Visual Studio 2019, you are required to install CMake 3.14 or higher.
You can build the C or C++ sample applications on Windows with either PowerShell or Command Prompt.
PowerShell
To build Samples with PowerShell, run the following command:
& /build_samples.ps1
Command Prompt
To build Samples with CMD, go to the <INSTALL_DIR>\samples\c or <INSTALL_DIR>\samples\cpp directory, respectively, and run the build_samples_msvc.bat batch file:
By default, the script automatically detects the highest Microsoft Visual Studio version installed on the system and uses it to create and build a solution for a sample code
Once the build is completed, you can find sample binaries in the following folders:
- C samples:
C:\Users\<user>\Documents\Intel\OpenVINO\openvino_c_samples_build\<architecture>\Release - C++ samples:
C:\Users\<user>\Documents\Intel\OpenVINO\openvino_cpp_samples_build\<architecture>\Releasewhere the is the output ofecho PROCESSOR_ARCHITECTURE%, for example,intel64(AMD64), orarm64.
You can also build a generated solution manually. For example, if you want to build C++ sample binaries in Debug configuration, run the appropriate version of the Microsoft Visual Studio and open the generated solution file from the C:\Users\<user>\Documents\Intel\OpenVINO\openvino_cpp_samples_build\Samples.sln directory.
macOS
Python
Each Python sample directory contains the requirements.txt file, which you must install before running the sample:
cd /samples/python/ python3 -m pip install -r ./requirements.txt
C and C++
To build the C or C++ sample applications for macOS, go to the <INSTALL_DIR>/samples/c or <INSTALL_DIR>/samples/cpp directory, respectively, and run the build_samples.sh script:
Once the build is completed, you can find sample binaries in the following folders:
- C samples:
~/openvino_c_samples_build/<architecture>/Release - C++ samples:
~/openvino_cpp_samples_build/<architecture>/Release
You can also build the sample applications manually. Before proceeding, make sure you have OpenVINO™ environment set correctly. This can be done manually by:
cd / source setupvars.sh
Note
If you have installed the product as a root user, switch to root mode before you continue: sudo -i
- Navigate to a directory that you have write access to and create a samples build directory. This example uses a directory named
build:
Note
If you ran the Image Classification verification script during the installation, the C++ samples build directory was already created in your home directory:~/openvino_cpp_samples_build/ - Go to the created directory:
- Run CMake to generate the Make files for release configuration. For example, for C++ samples:
cmake -DCMAKE_BUILD_TYPE=Release /samples/cpp - Run
maketo build the samples:
For the release configuration, the sample application binaries are in <path_to_build_directory>/<architecture>/Release/; for the debug configuration — in <path_to_build_directory>/<architecture>/Debug/.
Sample Application Setup#
First, select a sample from the Sample Overview and read the dedicated article to learn how to run it.
Download the Models#
You need a model that is specific for your inference task. You can get it from one of model repositories, such as TensorFlow Zoo, HuggingFace, or TensorFlow Hub.
Convert the Model#
If Your model requires conversion, check the article for information how to do it.
Download a Media to use#
Most of the samples require you to provide an image or a video as input for the model. OpenVINO provides several sample images and videos for you to run code samples and demo applications:
To run the sample applications, you can use images and videos from the media files collection available here . As an alternative, you can get them from sites like Pexels or Google Images .
Run Inference on a Sample#
To run the code sample with an input image using the IR model:
- Set up the OpenVINO environment variables:
Linux
source /setupvars.sh
Windows
\setupvars.bat
macOS
source /setupvars.sh
Note
OpenVINO environment variables can be set up by running the following command in PowerShell:
. /setupvars.ps1
- Go to the code samples release directory created when you built the samples earlier:
Linux
cd ~/openvino_cpp_samples_build/intel64/Release
Windows
cd %USERPROFILE%\Documents\Intel\OpenVINO\openvino_samples_build\intel64\Release
macOS
cd ~/openvino_cpp_samples_build/intel64/Release - Run the code sample executable, specifying the input media file, the IR for your model, and a target device for performing inference:
Python
Linux
python <sample.py file> -m -i -d
Windows
python <sample.py file> -m -i -d
macOS
python <sample.py file> -m -i -d
C++
Linux
<sample.exe file> -i -m -d
Windows
<sample.exe file> -i -m -d
macOS
<sample.exe file> -i -m -d
Examples#
Running Inference on CPU#
The following command shows how to run the Image Classification Code Sample using the dog.bmp file as an input image, the model in IR format from the ir directory, and the CPU as the target hardware:
Note
- Running inference on Intel® Processor Graphics (GPU) requires additional hardware configuration steps, as described earlier on this page.
- Running on GPU is not compatible with macOS.
Python
Linux
python classification_sample_async.py -m ~/ir/googlenet-v1.xml -i ~/Downloads/dog.bmp -d CPU
Windows
python classification_sample_async.py -m %USERPROFILE%\Documents\ir\googlenet-v1.xml -i %USERPROFILE%\Downloads\dog.bmp -d CPU
macOS
python classification_sample_async.py -m ~/ir/googlenet-v1.xml -i ~/Downloads/dog.bmp -d CPU
C++
Linux
./classification_sample_async -i ~/Downloads/dog.bmp -m ~/ir/googlenet-v1.xml -d CPU
Windows
.\classification_sample_async.exe -i %USERPROFILE%\Downloads\dog.bmp -m %USERPROFILE%\Documents\ir\googlenet-v1.xml -d CPU
macOS
./classification_sample_async -i ~/Downloads/dog.bmp -m ~/ir/googlenet-v1.xml -d CPU
When the sample application is complete, you are given the label and confidence for the top 10 categories. The input image and sample output of the inference results is shown below:
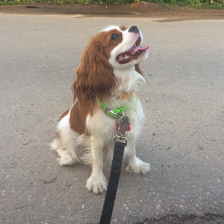
Top 10 results:
Image dog.bmp
classid probability label
156 0.6875963 Blenheim spaniel 215 0.0868125 Brittany spaniel 218 0.0784114 Welsh springer spaniel 212 0.0597296 English setter 217 0.0212105 English springer, English springer spaniel 219 0.0194193 cocker spaniel, English cocker spaniel, cocker 247 0.0086272 Saint Bernard, St Bernard 157 0.0058511 papillon 216 0.0057589 clumber, clumber spaniel 154 0.0052615 Pekinese, Pekingese, Peke
Other Samples#
Articles in this section describe all sample applications provided with OpenVINO. They will give you more information on how each of them works, giving you a convenient starting point for your own application.