Create Custom Library - MATLAB & Simulink (original) (raw)
Create a custom library to store and manage group of similar blocks and subsystems, and reuse them in Simulink® models. When you add a block from a library to a model, the library block acts as the prototype, and its instance in the model becomes the linked block, that appears and behaves just like the prototype. Using linked blocks is particularly useful when you want a consistent behavior across all instances of a block you frequently reuse in models.
For example, you can create a custom automotive control library containing blocks for engine control, transmission control, braking system, vehicle dynamics, and driver assistance. Then use blocks from this library across different vehicle models and projects to maintain consistency and reduce development time. You can also share this library with your team.
Advantages of Using Custom Libraries
Custom libraries provide several advantages:
- Block Organization and Reusability — You can organize similar blocks and subsystems in a custom library, to enable easy maintenance and reuse of components that you frequently use and require minimal modifications.
- Maintain Consistency — Use instances of a library block to ensure consistent use across all its linked instances.
- Prevent Unintentional Modifications — Lock the links between a library and its linked blocks to prevent other users from making changes to a library block instance.
Create Custom Library
This example shows how you can create a custom library, add blocks and annotations, and configure library settings.
Use these steps to create a library:
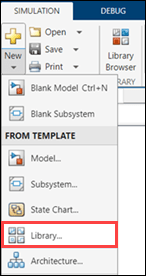
1. Open an empty Library window by using any of these methods:
- On the Simulink start page, in the Simulink product group, click Blank Library.
- In the Simulink Toolstrip, on the Simulation tab, select New and click Library.
- Use the new_system command to create a library named
myLibrary:
new_system("myLibrary","Library"); open_system("myLibrary");
2. Save the library as a .slx file, similar to the way you save a model. However, unlike a model, you cannot run simulations directly within a library. You can save the library in a location that is accessible to the models that use its blocks.
Add Blocks and Subsystems in Library
After you create a library you can add blocks, subsystems, and charts configured for your purpose. You can also modify the blocks by changing their parameters, adding masks, or adding blocks within subsystems. For specialized functionalities, you can create custom blocks in a library. For more information, see Design and Create a Custom Block.
To add content in myLibrary, use these steps:
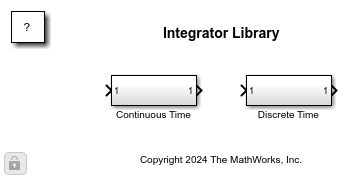
- Add a Subsystem block named as
Continuous Time. - Inside
Continuous Time, add Inport, Integrator, and Outport blocks and connect them. - Add another Subsystem block named as
Discrete Time. - Inside
Discrete Time, add Inport, Discrete-Time Integrator, and Outport blocks and connect them.
If your library contains several blocks, you can improve organization by grouping them into separate sublibraries. For example, you can enhance the organization of a custom automotive control library, by creating sublibraries based on functionality. One sublibrary, Engine Control, can include blocks for the fuel injection system, ignition timing control, emission control, and throttle control. Another sublibrary, Driver Assistance, can contain blocks for cruise control, lane-keeping assist, adaptive headlights, and collision avoidance systems. For more information, see Add Sublibrary to Library in Add Libraries to Library Browser and Quick Insert.
Lock and Unlock Libraries
When you close a library, it becomes locked for editing. To make changes the next time you open it, you must unlock it.
Use any of these options to unlock a library.:
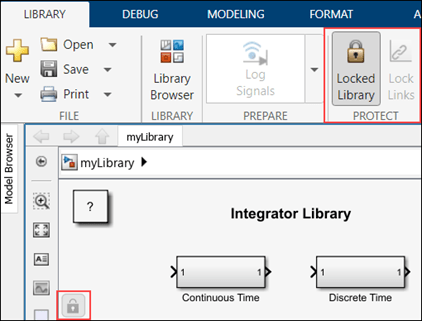
- In the Library window, click the lock badge in the lower-left corner.
- In the Library tab of the Simulink Toolstrip, in the Protect section, click Locked Library.
- In the MATLAB Command window, use the
set_paramfunction to set theLockparameter of the library:
set_param("myLibrary","Lock","off")
Prevent Disabling of Library Links
By default, users of your library blocks can disable the link to the parent library. If you want to control editing of linked blocks and prevent the block users from disabling links, you can lock the links between a parent library block and its linked blocks. Locking the library links prevents the users from making any changes to its linked instances. For information on how a block user interacts with blocks from locked libraries, see Lock Links to Blocks in a Library.
Use any of these options to lock links of a library. The library must be first unlocked to change these settings.
- In the Library window, on the Library tab, click Lock Links.
- In the command window, use the
set_paramfunction to set theLockLinksToLibraryparameter:
set_param("myLibrary","LockLinksToLibrary","on");
Add Annotations to Library
Use text, equation, or image annotations to add background information or instructions for a library. You can add callout lines from annotations to blocks in a library or create annotations that perform an action when clicked.
To add an annotation in myLibrary, double-click the canvas where you want the annotation, click Create Annotation in the quick insert menu, and add the annotation text as Integrator Library. For more information on setting annotations, see Annotate Models.
To display all the annotations of myLibrary use these commands:
ann = find_system("myLibrary","FindAll","on","Type","annotation"); get_param(ann,"PlainText")
ans =
2×1 cell array
{'Copyright 2024 The MathWorks, Inc.'}
{'Integrator Library'                }
You can also specify block properties of each block in a library. For more information, see Specify Block Properties.
Add Library Block Description
To add a description that appears in the linked block, mask the library block and add the description in the Documentation pane of the mask. Descriptions added to the library block through the block properties do not appear on the linked block. For information on creating masks, see Create a Simple Mask.
Hide Library Block Details
You can hide the implementation details of a Subsystem block in a custom library to prevent any accidental changes to custom library blocks.
To hide the implementation details of the Subsystem block Continuous Time, select the Subsystem block. In the Simulink Toolstrip, on the Subsystem Block tab, in the Look Inside section, click 'Look Inside' is Allowed. This will disable the option to view the implementation details of the Subsystem block, through the user interface and programmatically by using open_system(blk,"force"), where blk is the full name or path of the Subsystem block in the open or loaded model.
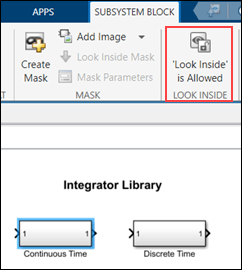
To enable the option to view the details of a library block, select the Subsystem block in the library and in the Subsystem Block tab, click 'Look Inside' is Disallowed in the Look Inside section.
These changes apply only to the selected block within the library and not the entire library.
Prevent Library Block from Linking to Instance
By default, when you add a library block to a model, the added block becomes a linked block. However, you can configure a library block such that the instances created from it are independent copies rather than linked blocks.
To achieve this behavior for the Continuous Time block, in the Block Properties window of the block, use the Callbacks tab to set the CopyFcn callback of the library block as:
set_param(gcbh,"LinkStatus","none");
Here, LinkStatus parameter is used to set the connection between a library block and its instances. You can configure the link status of a library block in various ways. For more information, see Link Status.
Considerations While Using Custom Libraries
- When you modify the block properties of a parent library block after adding it to a model, the changes do not automatically propagate to its linked instances.