Test Sequence Editor - MATLAB & Simulink (original) (raw)
The Test Sequence Editor enables you to define and modify test sequences for Test Sequence and Test Assessment blocks. To open the Test Sequence Editor, double-click a Test Sequence or Test Assessment block.
Define Test Sequences
A test sequence consists of test steps arranged in a hierarchy. Test steps can contain transitions that define how a test progresses in response to the simulation. Test steps can also have a When decomposition that uses logic similar to anif-elseif-else statement. By default:
- New Test Sequence blocks contain two standard transition test steps.
- New Test Assessment blocks contain a
Whendecomposition test step with two sub-steps.
For more information, see Transition Types.
To define a test sequence:
- Add test steps, as described in Manage Test Steps.
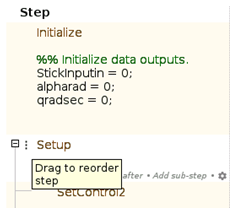
- In the Step cell, define outputs and assessments.
- To add a transition from a test step:
- Point to the Transition cell and click Add transition.
- In the Transition cell, define the conditions for exiting the step.
- In the Next Step cell, select the next test step from the drop-down list.
- To define a step with a
Whendecomposition:- Right-click a test step and select When decomposition. The step displays the icon
 .
. - Add sub-steps, as described in Manage Test Steps.
- In the Step cell of each sub-step, enter the
whenoperator, followed by a condition. Do not add a condition to the last sub-step.
- Right-click a test step and select When decomposition. The step displays the icon
Test Sequence Scenarios
To define multiple test sequences in a single Test Sequence block, use scenarios. In the left pane of the Test Sequence Editor, click Scenarios, then clickUse Scenarios. The existing test steps and transitions are moved into a scenario tab named Scenario_1. Add more scenarios to define more test sequences. For more information on Test Sequence scenarios, see Use Test Sequence Scenarios in the Test Sequence Editor and Test Manager.
Manage Test Steps
In the Test Sequence Editor, you can add and delete test steps to your test sequence. You can also reorder the test steps and change their position in the hierarchy.
Add and Delete Test Steps
To add a test step, right-click an existing step and select or .
To add a test step in a lower hierarchy level, right-click the parent step and select .
To delete a test step, right-click the step and select . If the test sequence contains only one test step, you cannot delete it. You can delete its contents by selecting .
Copy and Paste Test Steps
To copy a test step, right-click the area to the left of the step name and select . Alternatively, select the test step and use the shortcut Ctrl+C.
To cut a test step, right-click the area to the left of the step name and select . Alternatively, select the test step and use the shortcut Ctrl+X.
To paste a test step, right-click the area to the left of a step name and select , then:
Alternatively, select the test step and use the shortcutCtrl+V.
Reorder Test Steps and Transitions
To reorder the test steps in a test sequence:
- Point to a test step. The icon
 appears to the left of the step name.
 - Click and drag the icon to reorder the test step.
You can reorder test steps within the same hierarchy level. When you move a test step, sub-steps move with the test step.
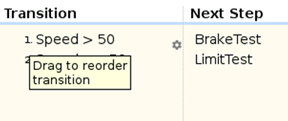
To reorder a transition within the same test step, click and drag the transition number to the new location. The corresponding next step moves with the transition.
Change Test Step Hierarchy
To move a test step to a lower level in the hierarchy, right-click the step and select . You can only indent a test step when the preceding step is at the same hierarchy level. You cannot indent the first test step in a sequence or the first step in a hierarchy group.
To move a test step to a higher level in the hierarchy, right-click the step and select . You can only move the last step in a hierarchy group to a higher level in the hierarchy.
Manage Input, Output, and Data Objects
In the Symbols sidebar of the Test Sequence Editor, you add, edit, or delete symbols in the Test Sequence block. You can access these symbols from test steps at any hierarchy level. To show or hide theSymbols sidebar, click the Symbols Sidebar button on the Test Sequence Editor toolbar.
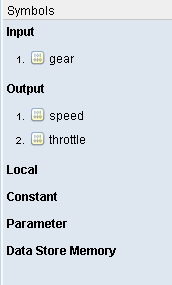
To add a data symbol, point to the node for a symbol type and click an add symbol button. Available options and additional setup steps depend on the symbol type.
| Symbol Type | Description | Procedure for Adding Symbol |
|---|---|---|
| Input | Options for input entries include: DataMessages | In the Symbols sidebar, point to theInput node and click either: |
| Output | Options for output entries include: DataMessagesFunction CallsTriggers | In the Symbols sidebar, point to theOutput node and click: |
| Local | Local data entries are available only inside the Test Sequence block in which they are defined. | In the Symbols sidebar, point to theLocal node and click |
| Constant | Constants are read-only data entries available only inside the Test Sequence block in which they are defined. | In the Symbols sidebar, point to theConstant node and click |
| Parameter | Parameters are available inside and outside the Test Sequence block. | Using the Model Explorer, add a parameter in the workspace of the model that contains the Test Sequence block.In the Symbols sidebar, point to theParameter node and click |
| Data Store Memory | Data Store Memory entries are available inside and outside the Test Sequence block. | Using the Model Explorer, add a Simulink.Signal object in the workspace of the model that contains the Test Sequence block. Alternatively, add a Data Store Memory block to the model. To set or modify global parameters in the Test Sequence block, you can use Simulink.Signal objects as Data Store Memory.In the Symbols sidebar, point to the Data Store Memory node and click |
To edit a data symbol, point to the name of the symbol and click![]() Edit.
Edit.
To delete a data symbol, point to the name of the symbol and click![]() Delete.
Delete.
Find and Replace
You can find and replace text in Test Sequence actions, transitions, and descriptions by using the Find & Replace tool in the Test Sequence Editor.
- To open the Find & Replace tool, click the
 icon in the toolbar.
 - In the field, enter the text you want to locate.
- In the field, enter the updated text.
- To locate the text, click or .
- To replace the old text with the updated text, click .
When running a search, the Find & Replace tool searches descriptions only if the description column is open.
Automatic Syntax Correction
The Test Sequence Editor changes the syntax automatically for:
- Increment and decrement operations, such as
a++anda--. For example,a++is changed toa=a+1. - Assignment operations, such as
a+=expr,a–=expr,a*=expr, anda/=expr. For example,a+=bis changed toa=a+b. - Evaluation operations, such as
a!=exprand!a. For example,a!=bis changed toa~=b. - Explicit casts for literal constant assignments. For example, if
yis defined as typesingle, theny=1is changed toy=single(1).
Output and View Active Step Data
When you run a test, the current step in the test sequence is the active step. When you enable creating active step data, a new output port is added to the Test Sequence block for the active step signal. You can analyze the active step data or use the output signal as an input to other blocks in your test harness. For example, a Test Assessment block can use the active step input as a trigger signal. You can also plot the active step data in the Simulation Data Inspector to see how the active step changes over time.
Enable Active Step Output
To create the active step data:
- From the Test Sequence Editor, open the Model Explorer. Alternatively, open the Property Inspector from the test harness or model that contains the Test Sequence or Test Assessment block.
- Enable Create data to monitor the active step.
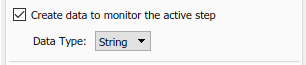
- Set Data Type to
StringorEnum. The default value isString.String— Output the active step data as a string. Use this option if you use duplicate step names across scenarios or if you use duplicate substep names in different steps of the same scenario. When you selectString, the output includes the step name and indicates which scenario is active. The step name string is<scenario>.<step>.<substep>. If the block does not have an active step at a time step, the output is an empty string. This situation might occur if a step uses an enabled subsystem and that subsystem is not enabled during that time step.Enum— Output the active step as an enumerated value. SelectingEnumenables the Enum name parameter. The data is output in the format<Enum name>.<step name>. The scenario of that step is not included in the active step name. You cannot useEnumfor the active step output if you have duplicate step or substep names in your test sequence.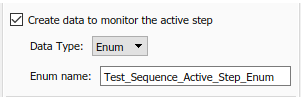
- Click Apply.
View Active Step Data
You can view the active step output data in the Simulation Data Inspector, or if you run your test in the Test Manager, in the Test Manager Results pane. Before running the test, in the harness, right-click the active data output signal of the Test Sequence block and click Log Selected Signal. If you want to plot the active step output, you do not need to connect the active step output signal to any component.
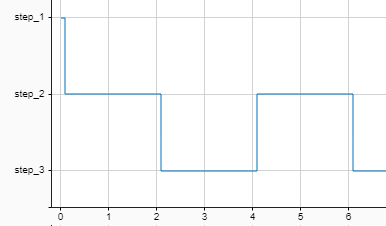
After running a test, open the Simulation Data Inspector or the Test ManagerResults. The format of the active step plot differs depending on whether the output is an enumerated or string type.
- Enumerated type — The _x_-axis is time and the_y_-axis is the step.
- String type — The _x_-axis is time. Steps appear as blocks of time during the period they are active. If there is not enough space to show the full string names, the Simulation Data Inspector truncates the beginning of the names so the step name displays.
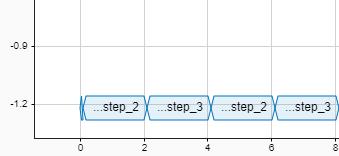
If there are too many step blocks to display in the plot, only the steps that fit are shown.
You can add the active step data plot to a Test Results report in the same way you include other test results.
Use Active Step Output as Input to Another Block
To use the active step output signal as input to another block, such as a Test Assessment block, connect the signal to the input port of the block. You can then use the signal to trigger actions and assessments based on the active step.
See Also
Test Assessment | Test Sequence