Auto tracker - Clockify Help (original) (raw)
Auto tracker lets you automatically monitor programs that are active while you’re tracking time. This feature helps you generate accurate timesheets based on the time you spent on different tasks.
Download and installation #
Auto tracker is available for these platforms:
Download Windows app
Download Linux app
Download Mac app
For macOS users: Make sure you installed the Mac app from the Clockify website. The version downloaded from the Mac App Store doesn’t include the Auto tracker.
Enable auto tracker #
After the desktop app is installed and you are logged in:
1. Click the A icon located at the top of the application window
2. Click the Start Recording button on the pop-up window
The auto tracker is now active and will begin monitoring your computer activity.
![]()
By default, the auto tracker only records activities (programs or websites) you view for more than 10 seconds. Any activity shorter than this threshold will not be recorded.
This rule is to prevent clutter from quick window switches. You can adjust or override this time limit within the auto tracker’s settings.
To do this, open the Clockify desktop app.
1. Click on the three-dot icon
2. Select Preferences
3. Go to Auto tracker4. Set your preferred duration (in seconds) next to the option Track only apps that are active for longer than.

The default duration upon installation are as follows:
- Windows – 15 seconds
- MacOS – 60 seconds
- Linux – 15 seconds
Data and privacy #
It’s important to understand how this feature tracks your data. Here’s how auto tracking works:
| Feature | Details |
|---|---|
| Storage location | All recorded data is stored locally on your computer. |
| Privacy | Only the person using the app can see recorded activities and add them as time entries |
| Automatic deletion | Data older than 45 days is automatically and permanently deleted from your local storage |
If a regular user didn’t add activities as time entries, admins won’t be able to see them.
What is tracked #
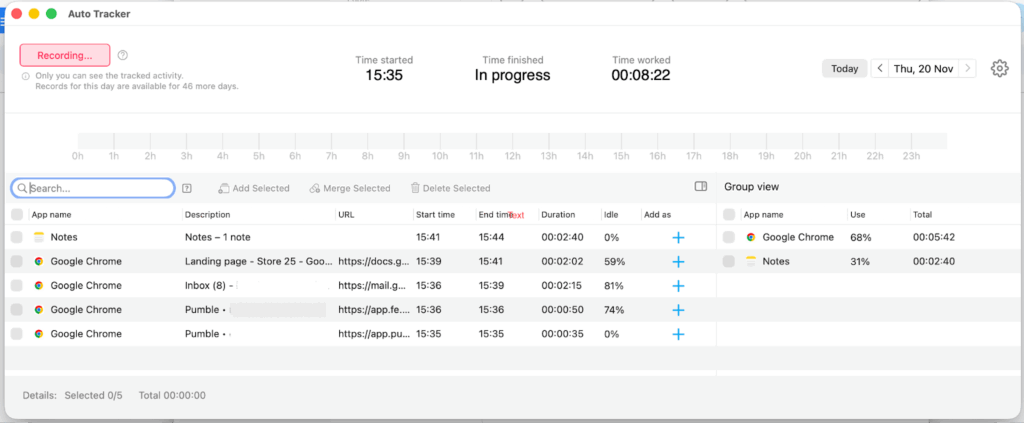
Auto tracker creates a new record every time you switch to a different application, browser tab, or document. Here is the data it captures:
- Programs and window titles: The names of the applications and documents you are using.
- Website URLs: Visited website URLs are tracked by default. (This feature can be disabled in the auto tracker settings if you prefer more privacy).
- Idle time: The Idle column shows the percentage of time you were inactive (no mouse or keyboard movement) within that recorded activity block.
Create time entries from activities #
Recorded activities only appear in the auto tracker window and aren’t automatically added to your timesheet. You must manually convert them into time entries.
1. Click the A icon
2. Click the plus (+) sign next to the activity
3. Add a project and a description for the task
4. Click Save5. Close the auto tracker window
You should now see the added time entry on the main page.
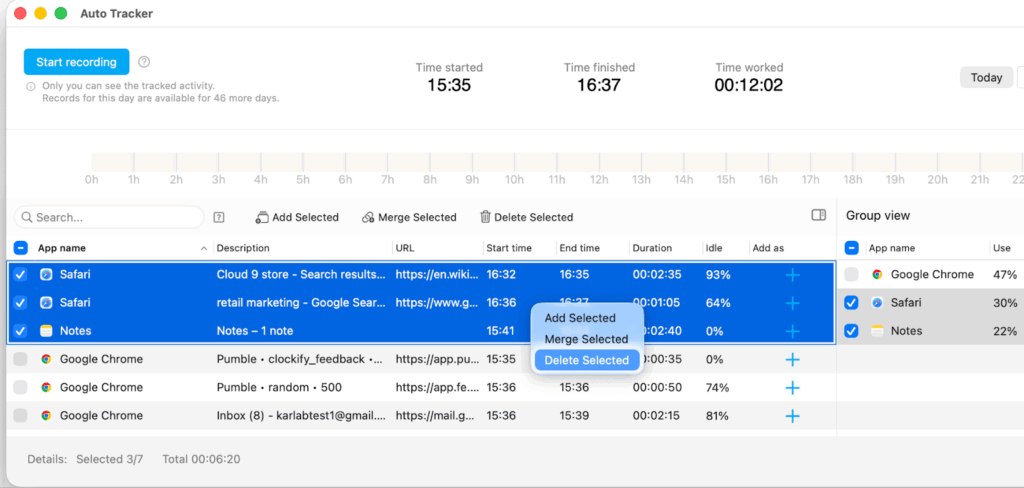
You can select multiple items by clicking on one item, then holding down the Shift key and selecting more items. Right click and do one of the following:
- Add Selected – All selected items will be added as separate time entries
- Merge Selected – All selected items will be merged to create one time entry
- Delete Selected – All selected items will be deleted
Hide added items #
You can modify your auto tracker settings to hide activities added to your timesheet.
1. Click on the three-dot icon on your Clockify desktop app
2. Select Preferences
3. Go to Auto Tracker
4. Enable the option Hide added items from Auto Tracker

Was this article helpful?
Thank you! If you’d like a member of our support team to respond to you, please drop us a note at support@clockify.me