Draft A Basic BODICE Pattern - SewGuide (original) (raw)
A bodice is the foundational template for making a garment you wear on your torso – the garment which you wear on the upper part of the body. The method I have described here is a very simple bodice pattern which you can draft and sew with the bare minimum sewing knowledge – one which gives you a custom fit, based on your body measurements.
You can experiment with this, add any fabric manipulations any type of sleeves (draft different types of sleeves), change necklines (Draft different neckline) or add any embellishment to make it your own. This is where everything starts.
How to draft a Bodice pattern
You can either make the sewing pattern on a paper or draw directly on the cloth with chalk. Start by marking on paper assuming the line A-B is folded cloth . If you are directly marking on the cloth take the two front and back pieces and fold in half and take the folded side as AB in the diagram and start marking

Measurements You Need TO MAKE THE BODICE PATTERN
Take all measurements in inches.
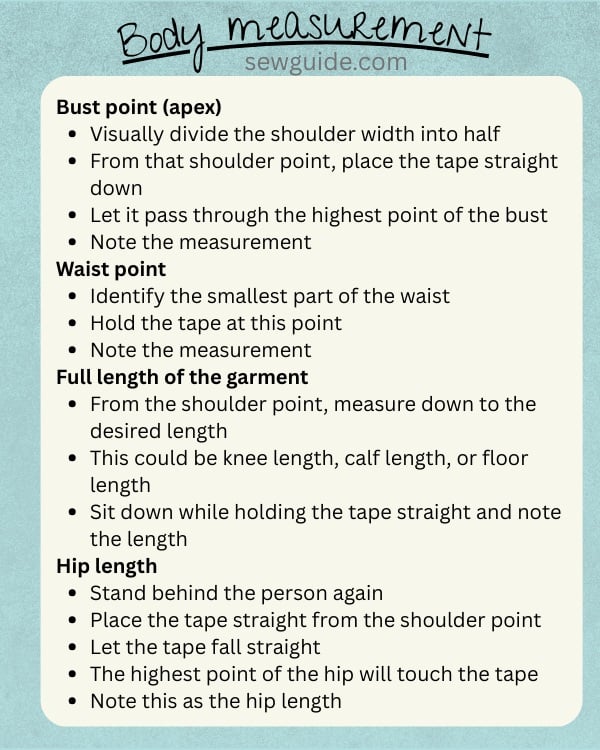
Desired length → shoulder to where you want the bodice to end (add 2” for hem)
Waist length → shoulder (neck point) to waist
Shoulder → neck to shoulder tip
Bust → fullest part
Waist → natural waist
Hip → fullest part (measure loosely)
Sleeve length (optional)
Sleeve round (optional)
Neck depth → front & back
Take all of your measurements with the same standard ruler. Ensure that the measurements on your ruler is correct. Stand straight, don’t suck in. Bad measurements = bad fit.
body measurement checklist
If you are new to sewing checkout this post with many tutorials on tips on learning to sew ; Checkout this detailed post on taking the basic body measurements . If you would like to know more about reading a tape measure properly checkout this post.
Before cutting, do this:
Mark which piece is front and which is back
Label line AC as your centre front (CF) or centre back (CB)
This is your fold line — place it on fold of fabric when cutting
Draw a grainline parallel to this line
Step 1: Mark the Vertical Length
Enter your measurements below to get the exact values you need to make your bodice
Bodice Block Calculator
Enter your measurements (in inches):
Enter measurements to see results.
Now start marking. Start with your base line – AC – the center fold line.

A–C = full length (shoulder to hip or desired length) + 2”
If you don’t want to measure everything, you can use the standard measurement:
Shoulder to bust = 10”
Bust to waist = 6”
Waist to hip = 8”
But if you have your own measurements, always use those.
Points L and D are marked using the calculated waist and hip widths
Step 2: Mark the Main Widths
This is where most people go wrong — keep it consistent.
Bust line = Bust ÷ 4 + ½” ease
Waist line = Waist ÷ 4 + 1” ease
Hip line = Hip ÷ 4 + 1” ease
Don’t randomly add extra inches everywhere — that’s how garments turn baggy.
Step 3: Neck and Shoulder
Neck width (A–E) = 3” minimum
Neck depth → mark as you like (front deeper, back shallow – usually back is marked 1.5″)
For shoulder:
A–F = ½ shoulder
From F, go down ¾”–1” → this is your shoulder slope. Some people give a 1.5″ slope.
Join neck to shoulder.
This slope matters more than people think — it affects the entire fit.
Step 4: Armhole (Armscye)
Use this formula:
Armhole depth = Bust ÷ 8 (+ 2” to 3” as ease)
Smaller value of ease will give you a more fitted armscye and a larger ease will give you more comfort – for casual blouses go easier.
Then:
Draw a smooth curve from shoulder to bust line
Slightly curve inward (don’t make it too tight)
A french curve can be used to shape your armhole line.
Watch this video for learning how to draft this part of the bodice:
Step 5: Bust Line & Side Seam
Mark bust width using your calculation
Drop a straight line down to waist and hip
This becomes your side seam guide.
Step 6: Dart (THIS is the key step)
If your bodice doesn’t fit well, it’s usually the dart.
First calculate dart intake:
(Bust − Waist) ÷ 4
This is how much shaping you need per side.
Front Dart
Mark bust point (apex)
Find center line:
½ of bust point to bust point distance
Draw dart:
Width = your calculated dart intake
Length = stop 1–1.5” before bust point
Never let the dart touch the bust point — that’s a beginner mistake. If you mark dart on the bust point your bodice will look awkwardly pointy and a no-no.
Back Dart
Start from waist
Align roughly with front dart position
Dart ends 2–3” above hip
Step 7: Shape the Armhole
Refine your curve
Slight inward shaping at bust line
Smooth transition (no sharp angles)
This is where your bodice starts looking “professional”
Final Checks (Don’t Skip This)
Before cutting fabric:
Check bust, waist, hip widths
Make sure both sides are symmetrical
Recheck dart width
Smooth all curves
Back armhole – Mark a line F down to meet the chest line. ( measure the distance and divide by two) . Mark the point as X . Make a curved shape of the armhole meeting these points – this is the back sleeve line.
To mark the front sleeve line Mark from the line to the inside 3/4 inch for adults and 1/2 inch for kids. Using a french curve mark a curved line for your front armhole line.
Give the neckline you want – refer here for different necklines
Make sleeves as per the instructions here and you are good to go sewing.Checkout the post on different sleeve types for your options
Ease – I have added 2 inch ease to the body measurements . You can alter this to your preference as per the standard chart of ease given below

Chart for ease in clothes
What I do when making this pattern to sew tops is to draw directly on to the cloth with chalk. Both the front piece and the back piece will be kept folded . I will draw the pattern on the top piece ( which finally will turn out to be the front piece), cut out the back sleeve line and neck, remove the back piece ( which is the back piece now) , then continue cutting the front sleeve line and neckline on the remaining cloth with the marking lines already there. This way, no need to mark the front and back bodices seperately .Cut the two pattern pieces and makes sure that the lines drawn are all cut away.


The front and back joined together

Checkout this tutorial to see how to make facings for the necklines for a clean and neat finish

Do the same for the back neck and front neck.Join the shoulder seams .
Checkout the different types of seams you can use in your bodice. Join the sleeves. You can add this to a skirt to make a dress or adopt different design features to make it your own.

I decided to add this bodice to a paneled skirt to make a long gown.

If you would rather make a more casual top with a looser fit along the body you can make the bodice as per the pattern below

A-C = Length of the top
A-B = 3 1/2″
A-G = 8 1/4″
H-J = A-G
H-I = 3/4″
D-E = 3″ (OR 4″)
A-H = 1/2 of shoulder point to shoulder point + 1/4″
G-F = 1/4 of Bust round + 3/4″
E-L = 1/4 of Hip round + 2 “
K-J = 1/2 of F-J
If you want a more fitting pattern with a close body fit you can add darts – this will ensure that the bodice fits the contours of your body. Check out this post on adding darts to your sewing patterns

The sewing tutorial to make an A-line dress has the method to sew the bodice explained in a different way than given below .

Sewing a basic bodice block for kids
You can make a similar bodice block for kids . Checkout the post on sewing for children and a ready reckoner of body measurements here.
Happy sewing
Related posts :More Free sewing patterns ; Crossover top sewing tutorial