GridView Using BaseAdapter in Android with Example (original) (raw)
Last Updated : 23 Jul, 2025
Here, we are designing an Android app to demonstrate the use of **GridView layout. The GridView layout is a ViewGroup that groups view in a two-dimensional scrolling grid of rows and columns. Items in the grid view are inserted using a ListAdapter. The layout by default is scrollable and we don't need to use **ScrollView.
An example of GridView is your default Gallery.
**Attributes of a GridView
| Attributes | Description |
|---|---|
| id | Like all other views, android uses the id element to uniquely identify an element. |
| numColumns | The number of columns to display. It can be an integer or auto_fit which will display as many possible columns to fill the screen of the device. If they don't specify this attribute then the grid view will behave like a listview. |
| horizontalSpacing | horizontalSpacing property is used to define the default horizontal spacing between columns. This could be in pixel(px), density pixel(dp), or scale-independent pixel(sp). |
| verticalSpacing | The vertical spacing property is used to define the default vertical spacing between rows. This should be in px, dp or sp. |
**GridView Example Using Different Adapters in Android
An Adapter is a connection between the UI components****(**TextView****, **ImageView****)** and the data source. An adapter helps fill the UI element with the appropriate data. In Android commonly used adapters that fill data in GridView are:
- **ArrayAdapter
- **BaseAdapter
- **Custom ArrayAdapter
This tutorial will be using the BaseAdapter, following is the structure of the class that extends the base adapter.
Java `
public class MyAdapter extends BaseAdapter { @Override public int getCount() { return 0; }
@Override public Object getItem(int i) {
  return null;
}

@Override public long getItemId(int i) {
  return 0;
}

@Override
public View getView(int i, View view, ViewGroup viewGroup) {
    return null;
}
}
`
**Method Description:
- **getCount(): this method returns the count of the total elements to be displayed.
- **getItem(int i): this method takes in an index and returns an object.
- **getItemId(int i): this method takes in an index and returns the id of the item being displayed in the GridView.
- getView(int I, View view, ViewGroup group): this is the most important method which returns a view that is displayed in the grid view. The int i is the index, the view can be (ImageView or TextView), and the view group is the container that hosts the View e.g **LinearLayout, **RelativeLayout****, etc.**
**Example
A sample GIF is given below to get an idea about what we are going to do in this article. Note that we are going to implement this application in both Java and Kotlin Programming Languages for Android.
Step By Step Implementation
Step 1: Create a New Project in Android Studio
To create a new project in Android Studio please refer to **How to Create/Start a New Project in Android Studio. The code for that has been given in both Java and Kotlin Programming Language for Android.
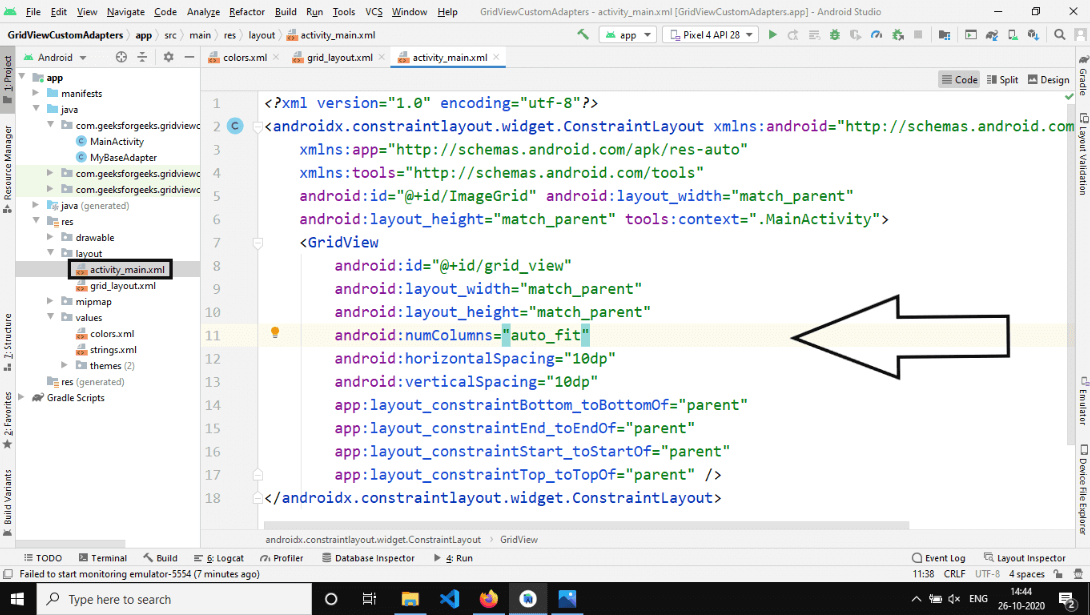
**Step 2: Working with the activity_main.xml file
Open the **activity_main.xml file and insert a GridView component in it. The Layout will look blank initially but will be inflated by the custom adapter class during runtime.
Step 2
activity_main.xml `
<androidx.constraintlayout.widget.ConstraintLayout xmlns:android="http://schemas.android.com/apk/res/android" xmlns:app="http://schemas.android.com/apk/res-auto" xmlns:tools="http://schemas.android.com/tools" android:id="@+id/ImageGrid" android:layout_width="match_parent" android:layout_height="match_parent" tools:context=".MainActivity">
<GridView
    android:id="@+id/grid_view"
    android:layout_width="match_parent"
    android:layout_height="match_parent"
    android:horizontalSpacing="10dp"
    android:numColumns="auto_fit"
    android:verticalSpacing="10dp"
    app:layout_constraintBottom_toBottomOf="parent"
    app:layout_constraintEnd_toEndOf="parent"
    app:layout_constraintStart_toStartOf="parent"
    app:layout_constraintTop_toTopOf="parent" />
</androidx.constraintlayout.widget.ConstraintLayout>
`
**Step 3: Creating a new layout XML file
Creating a new file named **grid_layout.xml in the same folder as the **activity_main.xml file. This Custom View will host an **ImageView. The main reason to use custom adapters is to display complex views in the **GridView or **ListViewinstead of some simple text. The custom view is named **grid_layout.xml with the LinearLayout as its root and a simple ImageView.
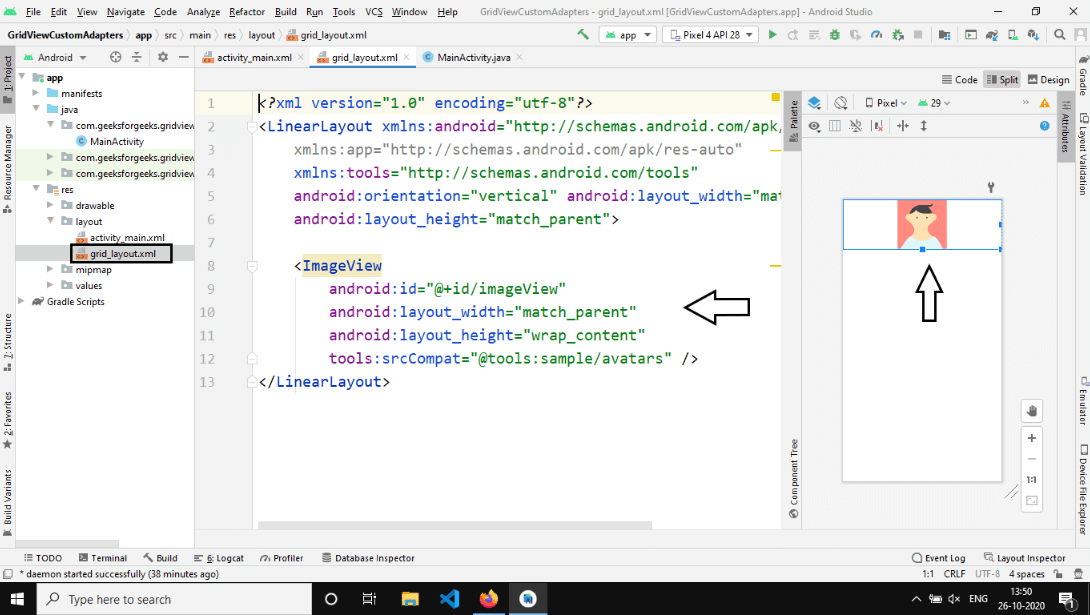
Step 3
grid_layout.xml `
<ImageView
    android:id="@+id/imageView"
    android:layout_width="match_parent"
    android:layout_height="wrap_content"
    android:scaleType="center"
    tools:srcCompat="@tools:sample/avatars" />
`
**Step 4: Creating a Custom Adapter class
Will name this class MyBaseAdapter which will extend BaseAdapter class and inherit the methods shown above. The main method we need to walk through is the getView method.
@Override public View getView(int i, View view, ViewGroup viewGroup) { if (view == null) { LayoutInflater inflater = (LayoutInflater)c.getSystemService(Context.LAYOUT_INFLATER_SERVICE); view = inflater.inflate(R.layout.grid_layout, viewGroup); }
ImageView imageView = view.findViewById(R.id.imageView);
imageView.setImageResource(items[i]);
return view;
}
The **LayoutInflator is what is responsible for parsing our custom grid_layout.xml file. do note that this operation is expensive and should only be performed when needed. hence its place inside an if statement. Finally, we get a reference to the layout and store it in the view variable. then using that we can initialize the image view and set the image and return the view. In this example, the view shown is quite simple but we can have a more complete view like displaying the id of a person who can have a custom view of the Image, TextView, etc.
The entire code of the **MyBaseAdapter is given below.
Java `
import android.content.Context; import android.view.LayoutInflater; import android.view.View; import android.view.ViewGroup; import android.widget.BaseAdapter; import android.widget.ImageView;
public class MyBaseAdapter extends BaseAdapter { Context c; int items[];
MyBaseAdapter(Context c, int arr[]) {
    this.c = c;
    items = arr;
}

@Override public int getCount() { return items.length; }

@Override public Object getItem(int i) { return null; }

@Override public long getItemId(int i) { return 0; }

@Override
public View getView(int i, View view,ViewGroup viewGroup) {
    if (view == null) {
        LayoutInflater inflater = (LayoutInflater)c.getSystemService(Context.LAYOUT_INFLATER_SERVICE);
        view = inflater.inflate(R.layout.grid_layout, null);
    }
    ImageView imageView = view.findViewById(R.id.imageView);
    imageView.setImageResource(items[i]);
    return view;
}
}
Kotlin
import android.content.Context import android.view.View import android.view.ViewGroup import android.widget.BaseAdapter import android.widget.ImageView
class MyBaseAdapter internal constructor(var c: Context, var items: IntArray) : BaseAdapter() { override fun getCount(): Int { return items.size }
override fun getItem(i: Int): Any? {
    return null
}

override fun getItemId(i: Int): Long {
    return 0
}

override fun getView(i: Int, view: View, viewGroup: ViewGroup): View {
    val view = view
    val imageView = view.findViewById<ImageView>(R.id.imageView)
    imageView.setImageResource(items[i])
    return view
}
}
`
**Step 5: **Working with the MainActivity file
The data will use using images of different android studio logos saved in the **drawable folder****.**

To use these images we need to store them in an array and pass it to the custom adapter.
**Java: int[] itemsarray = new int[] { R.drawable.android_1, R.drawable.android_2, R.drawable.android_3, R.drawable.android_4, R.drawable.android_5, R.drawable.android_1, R.drawable.android_2, R.drawable.android_3, R.drawable.android_4, R.drawable.android_5 };
**Kotlin: var itemsarray = intArrayOf( R.drawable.android_1, R.drawable.android_2, R.drawable.android_3, R.drawable.android_4, R.drawable.android_5, R.drawable.android_1, R.drawable.android_2, R.drawable.android_3, R.drawable.android_4, R.drawable.android_5 )
Notice that the same 5 images are repeated. Now setting up the custom base adapter in the **MainActivity file.
GridView gridView = findViewById(R.id.grid_view);
// create a object of myBaseAdapter MyBaseAdapter baseAdapter = new MyBaseAdapter(this, itemsarray); gridView.setAdapter(baseAdapter);
First, we get a reference of the grid layout from the XML file using the **fineViewById() method, then we create the object of myBaseAdapter which takes two arguments Context, and the items array. Finally, we set the adapter. Below is the complete code for the **MainActivity file. Comments are added inside the code to understand the code in more detail.
Java `
import android.os.Bundle; import android.widget.GridView; import androidx.appcompat.app.AppCompatActivity;
public class MainActivity extends AppCompatActivity {
int[] itemsarray = new int[] {
    R.drawable.android_1, R.drawable.android_2,
    R.drawable.android_3, R.drawable.android_4,
    R.drawable.android_5, R.drawable.android_1,
    R.drawable.android_2, R.drawable.android_3,
    R.drawable.android_4, R.drawable.android_5
};

@Override
protected void onCreate(Bundle savedInstanceState) {
    super.onCreate(savedInstanceState);
    setContentView(R.layout.activity_main);

    GridView gridView = findViewById(R.id.grid_view);

    // create a object of myBaseAdapter
    MyBaseAdapter baseAdapter = new MyBaseAdapter(this, itemsarray);
    gridView.setAdapter(baseAdapter);
}
}
Kotlin
import android.os.Bundle import android.widget.GridView import androidx.appcompat.app.AppCompatActivity
class MainActivity : AppCompatActivity() { var itemsarray = intArrayOf( R.drawable.android_1, R.drawable.android_2, R.drawable.android_3, R.drawable.android_4, R.drawable.android_5, R.drawable.android_1, R.drawable.android_2, R.drawable.android_3, R.drawable.android_4, R.drawable.android_5 )
override fun onCreate(savedInstanceState: Bundle?) {
    super.onCreate(savedInstanceState)
    setContentView(R.layout.activity_main)
    val gridView = findViewById<GridView>(R.id.grid_view)

    // create a object of myBaseAdapter
    val baseAdapter = MyBaseAdapter(this, itemsarray)
    gridView.adapter = baseAdapter
}
}
`