How To Use Compute Engine To Launch And Manage Virtual Machines ? (original) (raw)
Last Updated : 20 Mar, 2026
Google Compute Engine is a core compute service of Google Cloud Platform that delivers Infrastructure as a Service (IaaS). It enables users to create, configure, and manage virtual machines on Google’s global infrastructure.
The service follows a pay-per-use pricing model, ensuring users pay only for the resources they consume.
- Provides full control over virtual machines, including custom operating system images.
- Built on Google’s secure and scalable cloud infrastructure.
- Uses a flexible pay-as-you-go pricing model.
Virtual Machine
A Virtual Machine is a software-based emulation of a physical computer that runs its own operating system and applications on shared cloud hardware. With the help of a Virtual Machine, a user can deploy various applications on the cloud, host a website, create and manage APIs as well as Microservices and many more cloud services.
In this article, I will walk you through a step-by-step guide on how to use a computing engine to Launch and Manage Virtual Machines.
Steps To Launch Virtual Machines
**Step 1: Goto GCP Cloud Console
**Step 2: Create a project
If you haven't created a GCP account or a project in GCP, you can refer to this article.
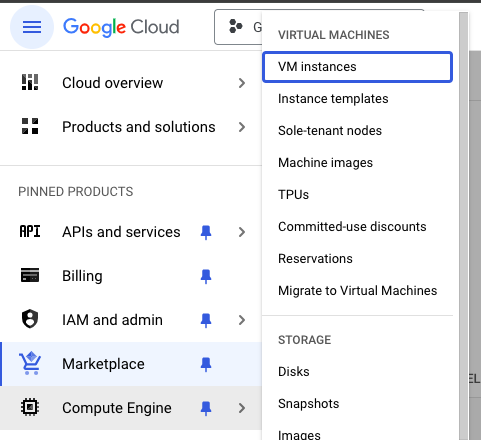
**Step 3: Navigate to Compute Engine -> VM Instances
- To do this, you can click the menu option in the top left and navigate to VM Instances as shown in the below image.
**Step 4: Enable Compute Engine API if not done already
- To enable the API, the GCP asks for a billing account. Make sure to set up the billing account.
**Step 5: Create a new instance
- The instance is the Virtual Machine instance that we need to launch.
- Click on the **CREATE INSTANCE button on the top right and fill in all the required parameters for your project.
- The parameters include the name of your instance, the preferred region and zone of the instance, CPU and memory type, preferred OS, size of disk etc.
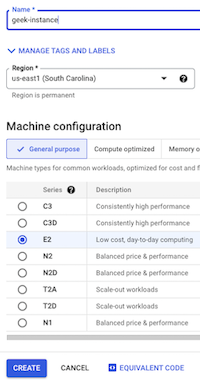
- After filling in the parameters, click on the CREATE button. It will take a few minutes to create your VM instance.
**Step 6: Connect to the VM instance
- Once the instance is created, you can view it on the VM instances page. Click on the SSH button to connect to your machine through the command line.

**Step 7: (Optional) Connect to VM instance from local computer.
- You can also connect to a VM instance from your local computer. Open the terminal and enter the below ssh command.
ssh YOUR_USERNAME@VM_EXTERNAL_IP
You can get the username and VM_EXTERNAL_IP from the GCP console.
Steps To Manage Your Virtual Machines
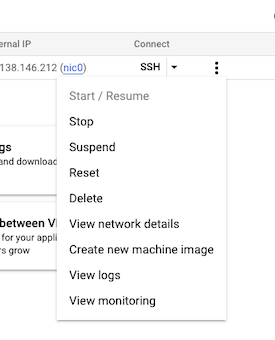
**Step 1: Start, Stop or Resize the VM instance
- Navigate to Compute Engine -> VM Instances. Here, you can see the list of VM instances. You can stop, restart, resize or delete a VM instance.
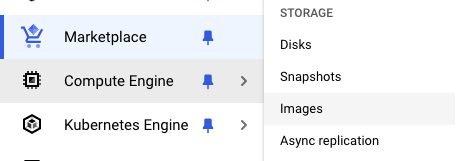
**Step 2: Create a custom image or snapshot.
- You can create a custom image or snapshot of your VM instance.
- An image contains all the data of the VM machine while a snapshot captures the data at a specific point in time.
- This can be used for backup and restore purposes.
- To create an image/snapshot, navigate to Compute Engine -> images/snapshots as shown below.
**Step 3: Creating health checks
Navigate to **Compute Engine -> Health Checks same as above. Health checks are used to check whether applications in VMs respond to requests. You can create health checks for the applications in your VM instance.
Congratulations, you have successfully launched and managed a VM instance using GCE. In this way, you can easily launch and manage VM instances using the Compute Engine option. Do explore and experiment with various options provided by GCE.