Internet of Things with Python (original) (raw)
favouredInternet of Things (IoT) is transforming how we interact with technology, integrating it into every facet of our lives. Here are some key reasons why IoT is so important:
- **Automation: Reduces manual intervention by enabling devices to perform tasks automatically.
- **Real-Time Monitoring: Continuously collects and tracks data from connected devices and sensors.
- **Remote Access and Control: Allows users to monitor and manage devices from anywhere using the internet.
- **Data-Driven Decisions: Provides valuable insights through collected data, helping improve operations and planning.
- **Improved Efficiency: Optimizes resource usage and reduces operational costs in homes, businesses, and industries.
Python for IoT
Python is favoured for IoT due to its simplicity, readability, and a rich ecosystem of libraries. Python is a popular choice for developing Internet of Things (IoT) applications due to several compelling advantages:
- **Easy to Learn: Simple syntax enables faster development and easier maintenance.
- **Extensive Libraries: Provides libraries for hardware control, networking, data processing, and cloud integration.
- **Hardware Support: Works with platforms such as Raspberry Pi, Arduino, ESP8266, and ESP32.
- **Rapid Prototyping: Allows developers to quickly build and test IoT solutions.
- **Cloud Integration: Supports communication with databases, APIs, and cloud platforms.
- **Data Processing: Can analyze and visualize data collected from IoT devices.
- **Large Community Support: Backed by extensive documentation and a large developer community.
Python Libraries for IoT
- **GPIO Zero: Simplifies GPIO programming on Raspberry Pi.
- **PyFirmata: Enables Python communication with Arduino boards.
- **MicroPython: Runs Python directly on microcontrollers such as ESP8266 and ESP32.
- **Paho MQTT: Supports MQTT-based communication between IoT devices.
- **Flask: Used for building lightweight IoT dashboards and APIs.
Popular Platforms for Python-Based IoT Development
| Platform | Use Case |
|---|---|
| Raspberry Pi | Full Linux-based IoT projects |
| Arduino + PyFirmata | Hardware control through Python |
| ESP8266 | Wi-Fi enabled IoT devices |
| ESP32 | Wi-Fi + Bluetooth IoT applications |
Python on Raspberry Pi
Raspberry Pi is a IoT platform that combines computing capabilities, GPIO support and Python compatibility, enabling the development of connected and automated systems. It's a low-cost, credit-card-sized computer that plugs into a computer monitor or TV and uses a standard keyboard and mouse.
**Example: The following code uses the GPIO Zero library to control an LED using a push button connected to a Raspberry Pi. When the button is pressed, the LED turns on, and when the button is released, the LED turns off.
Python `
from gpiozero import LED, Button from signal import pause
led = LED(17) button = Button(2)
button.when_pressed = led.on button.when_released = led.off
pause()
`
**Output
Pressing the button lights up the LED connected to the Raspberry Pi. Releasing the button turns the LED off.
**Explanation:
- LED(17) creates an LED object connected to GPIO pin 17.
- Button(2) creates a button object connected to GPIO pin 2.
- button.when_pressed = led.on automatically turns the LED on when the button is pressed.
- button.when_released = led.off turns the LED off when the button is released.
- pause() keeps the program running and continuously listens for button events.
Control Arduino with Python and pyFirmata
Python and pip should be Installed in your system. Then you can run the following command to install the PyFirmata module in your system.
pip install pyFirmata
Upload StandardFirmata to Arduino
Before running Python code with PyFirmata, the StandardFirmata sketch must be uploaded to the Arduino board. StandardFirmata acts as a bridge, allowing Python programs to communicate with and control Arduino pins.
**Step 1: Connect the Arduino
Connect the Arduino board to your computer using a USB cable.
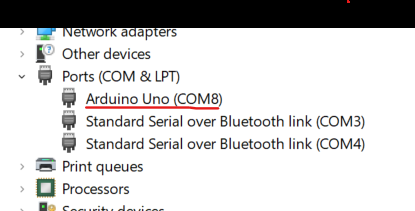
**Step 2: Identify the Serial Port
Find the port assigned to the Arduino:
- Windows: COM3, COM4, COM5, etc.
- Linux: /dev/ttyUSB0, /dev/ttyACM0, etc.
- macOS: /dev/cu.usbmodemXXXX or /dev/cu.usbserialXXXX
**Step 3: Open StandardFirmata
Launch the Arduino IDE and open the StandardFirmata example:
File → Examples → Firmata → StandardFirmata
**Step 4: Select the Board and Port
Click the Upload button in the Arduino IDE to upload the StandardFirmata sketch to the board. Once the upload is complete, the Arduino is ready to receive commands from Python through the PyFirmata library.
Connections:

Connect four LEDs to Arduino digital pins 10, 11, 12, and 13 as shown in the circuit diagram. Each LED should be connected through an appropriate current-limiting resistor.
Implementation
Python `
from pyfirmata import Arduino from time import sleep
board = Arduino("COM8")
leds = [ board.get_pin("d:13:o"), board.get_pin("d:12:o"), board.get_pin("d:11:o"), board.get_pin("d:10:o") ]
while True: for num in range(16):
    binary = f"{num:04b}"

    for led, bit in zip(leds, binary):
        led.write(int(bit))

    print(binary)
    sleep(1)
`
**Output:
0000
0001
0010
0011
0100
0101
0110
0111
1000
1001
1010
1011
1100
1101
1110
1111
...
Here is the Simulation Output:
**Explanation:
- Arduino("COM8") establishes a connection between Python and the Arduino board through the specified serial port.
- The leds list stores the four LED output pins (13, 12, 11, and 10) for easier management.
- range(16) generates decimal values from 0 to 15, representing all possible 4-bit binary combinations.
- f"{num:04b}" converts each number into a 4-bit binary string (e.g., 5 becomes 0101).
- zip(leds, binary) pairs each LED with its corresponding binary digit.
- led.write(int(bit)) turns an LED ON (1) or OFF (0) based on the binary value.
- print(binary) displays the current binary number in the terminal.
- sleep(1) keeps each binary pattern visible for one second.
- The while True loop continuously cycles through all binary values, creating a repeating 4-bit binary counter.
ESP8266 and ESP32 with MicroPython
ESP8266 and ESP32 are low-cost Wi-Fi microchips with full TCP/IP stack and microcontroller capability. They are highly popular for IoT projects due to their wireless capabilities.
Benefits of Using ESP8266 and ESP32 in IoT:
- **Wireless Functionality: Both chips support Wi-Fi, which is essential for IoT devices needing to communicate over the network.
- **Cost-Effective: These chips are very affordable, making them a go-to choice for building networked machines at a lower cost.
- **MicroPython Support: Running MicroPython on these devices allows developers to leverage Python’s simplicity to control hardware functionality easily and effectively.
- **Powerful Features: The ESP32, being the successor to ESP8266, includes Bluetooth capabilities and better power efficiency, enhancing its usability in IoT projects that require low energy consumption and connectivity.
Example of a Simple MicroPython Script:
- **Installation: First, install the esptool module using pip with the command:
$ pip install esptool.
- **Firmware: Download the latest MicroPython firmware from the official website. Use esptool to flash this firmware onto your device. Remember to erase the flash memory of the board before installing the new firmware to ensure a clean setup.
- **Development Environment: You can write your MicroPython code on a standard computer using any compatible IDE designed for MicroPython. After coding, compile and transfer the script to the ESP8266 or ESP32's memory.
Implementation
Here's a basic example demonstrating how to control an LED with an ESP8266 or ESP32 using MicroPython:
Python `
from machine import Pin import time
Initialize a pin for the LED
ledPin = Pin(2, Pin.OUT)
Toggle the LED on and off in a loop
while True: ledPin.on() # Turn on the LED time.sleep(1) # Wait for one second ledPin.off() # Turn off the LED time.sleep(1) # Wait for another second
`
**Explanation:
- **Libraries: We import Pin from machine to interact with GPIO pins, and time for handling delays.
- **LED Control: We define ledPin as an output pin connected to the LED. The loop continuously turns the LED on and off every second, demonstrating basic pin control with MicroPython.
Python in IoT Backend
Python is an excellent choice for developing the backend systems of IoT applications due to its versatility, ease of use, and robust ecosystem. Here’s why Python is well-suited for the backend side of IoT:
- **Data Processing: Libraries like Pandas and NumPy help analyze and process IoT data efficiently.
- **API Development: Flask and Django simplify the creation of APIs for device communication.
- **Asynchronous Processing: asyncio enables concurrent task execution for better performance.
- **Database Support: Integrates with SQL and NoSQL databases for flexible data storage.
- **Scalability: Works well with Docker and Kubernetes for deploying large-scale IoT applications.
- **Security: Provides tools for secure communication and authentication.
- **Machine Learning Integration: Supports intelligent analytics through TensorFlow and PyTorch.
- **Community Support: Backed by extensive documentation and a large developer ecosystem.
**Example: Sending Sensor Data to a Flask API
IoT devices often send sensor readings such as temperature, humidity, or pressure to a server for processing and storage. The following example creates a Flask API that receives sensor data through an HTTP POST request and displays it on the server.
Install flask using following command:
pip install flask
Create a file named app.py and add the following code:
Python `
from flask import Flask, request
app = Flask(name)
@app.route("/sensor", methods=["POST"]) def sensor_data(): data = request.json
print("Received Data:", data)

return {"status": "received"}
app.run(debug=True)
`
Create another file named client.py and add the following code:
Python `
import requests
sensor_data = { "temperature": 28, "humidity": 65 }
response = requests.post( "http://127.0.0.1:5000/sensor", json=sensor_data )
print(response.json())
`
**Output
Server Output:
Received Data: {'temperature': 28, 'humidity': 65}
Client Output:
{'status': 'received'}
**Explanation:
- Flask(__name__) creates a Flask application instance.
- @app.route("/sensor", methods=["POST"]) defines an API endpoint that accepts POST requests.
- request.json retrieves the JSON data sent by the IoT device.
- print() displays the received sensor readings on the server.
- requests.post() sends sensor data to the API endpoint.
- app.run() starts the Flask development server and listens for incoming requests.