Build and Execute Generated Code Remotely - MATLAB & Simulink (original) (raw)
You can use a Secure Shell (SSH) connection to remotely build your generated code on the target platform, and then reuse the connection to execute the code remotely on the same target platform. Remote build over SSH connections is supported for external mode simulation and Processor-in-the-Loop (PIL) simulation. For more information, see External Mode Simulation by Using XCP Communication and Processor-in-the-Loop Simulation.
To remotely build and execute your code over an SSH connection, add these steps to your workflow:
- Use the
RunsOnproperty of the execution tool object to specify remote execution over SSH connection.
executionTool.RunsOn = target.ExecutionContext.SSH;
Remote execution over SSH connections is supported for target.SystemCommandExecutionTool and target.HostProcessExecutionTool objects. - Use the
RunsOnproperty of the target.Toolchain object to specify remote build over an SSH connection.
toolchain.RunsOn = target.ExecutionContext.SSH; - Use the target.connection.open function to open the SSH connection. Open the connection with the target board name that is associated with the toolchain and the execution tool.
target.connection.open(targetBoardName, ...
IPAddress=targetIPAddress, ...
Username=targetUserName);
The example Build and Execute Generated Code Remotely with Processor-in-the-Loop Simulation demonstrates how you can use an SSH connection to run PIL simulation on an ARM Cortex-A based Linux® target machine remotely over an SSH connection. In the example, you build the generated code over the SSH connection and then reuse the connection to execute the code on the target machine.
Build and Execute Generated Code Remotely with Processor-in-the-Loop Simulation
This example shows how to perform Processor-in-the-Loop (PIL) simulation over a Secure Shell (SSH) connection. In this example:
- Your generated code is built on the target machine over an SSH connection.
- The SSH connection is reused to execute the PIL application on the target machine.
Prepare Target Machine
This example assumes that an ARM Cortex-A based Linux® computer is available in your local network, for example, through the local IP address 192.168.0.10. Before running the example, update the code below to store the IP address of your target machine and the username for the SSH connection in the variables targetIPAddress and targetUserName.
targetIPAddress = "192.168.0.10"; targetUserName = "pi";
Define Target Board
Create a target.Board object that provides MATLAB® with a description of your target hardware.
targetBoard = target.create("Board",Name="Remote ARM Cortex-A based Linux Board");
To support code generation on the target, create a target.Processor object that contains a language implementation. The target computer uses an ARM® processor with an ARM language implementation.
targetProcessor = target.create("Processor",Name="ARM Cortex-A"); targetProcessor.LanguageImplementations = target.get( "LanguageImplementation", ... "ARM Compatible-ARM Cortex");
Use the Processors property of the board object to associate it with the processor object.
targetBoard.Processors = targetProcessor;
Set Up PIL Target Connectivity
To use PIL simulation you need to provide the target hardware with details about the communication channel and about the Communications rtiostream API implementation. To learn more about setting up the connectivity to allow using PIL simulation, see Set Up PIL Connectivity by Using Target Framework.
Create a target.CommunicationInterface object.
communicationInterface = target.create("CommunicationInterface"); communicationInterface.Name = "PIL Comm Interface"; communicationInterface.Channel = "TCPChannel";
Create a target.APIImplementation object.
apiImplementation = target.create("APIImplementation"); apiImplementation.Name = "x86 RTIOStream Implementation"; apiImplementation.API = target.get("API","rtiostream");
Create a target.BuildDependencies object to specify the source files that are compiled with the target application for the rtiostream API.
apiImplementation.BuildDependencies = target.create("BuildDependencies"); apiImplementation.BuildDependencies.SourceFiles = fullfile("$(MATLAB_ROOT)", ... "toolbox", ... "coder", ... "rtiostream", ... "src", ... "rtiostreamtcpip", ... "rtiostream_tcpip.c");
Create a target.MainFunction object to pass arguments to the target application.
apiImplementation.MainFunction = target.create("MainFunction", ... Name="TCP RtIOStream Main"); apiImplementation.MainFunction.Arguments = ["-blocking","1", ... "-port","$(CONNECTION.CommunicationChannel.Port)"];
Associate the API implementation object with the communication interface object and associate the target board object with the communication interface object.
communicationInterface.APIImplementations = apiImplementation; targetBoard.CommunicationInterfaces = communicationInterface;
Set Up Execution Tool
In this section you define the execution tool and set it to execute the target application remotely on the target machine, over an SSH connection.
Create a target.HostProcessExecutionTool object.
remoteExecutionTool = target.create("HostProcessExecutionTool"); remoteExecutionTool.Name = "Remote SSH Execute Tool";
Define system commands for starting and stopping the target application.
remoteExecutionTool.StartCommand.String = "$(EXE)"; targetBoard.Tools.ExecutionTools = remoteExecutionTool;
Use the RunsOn property of the execution tool object to specify remote execution over SSH connection.
remoteExecutionTool.RunsOn = target.ExecutionContext.SSH;
Set Up Toolchain
In this section you create a CMake toolchain, and set it to build the target application over SSH connection. You do not need to have MATLAB installed on the remote computer, but you do need CMake and a working toolchain to be installed on it.
Create a target.Toolchain object and associate it with a target.CMakeBuilder object. Specify the builder generator as UNIX® makefiles.
toolchain = target.create("Toolchain"); toolchain.Name = "Remote SSH Build Toolchain"; toolchain.Builder = target.create("CMakeBuilder"); toolchain.Builder.Generator = "Unix Makefiles";
Use the RunsOn property of the toolchain object to specify remote build over SSH connection.
toolchain.RunsOn = target.ExecutionContext.SSH;
Associate the toolchain definition with the board.
toolchain.SupportedHardware = target.create("HardwareComponentSupport",Component=targetBoard);
Set Up Connection Between Development Computer and Target Hardware
Create a target.TCPChannel object.
tcpChannel = target.create("TCPChannel"); tcpChannel.Name = "External Process TCPCommunicationChannel"; tcpChannel.IPAddress = targetIPAddress; tcpChannel.Port = "4001";
Create a target.TargetConnection object.
targetConnection = target.create("TargetConnection"); targetConnection.Name = "Host Process Connection";
Associate the TCP channel and board objects with the target connection object.
targetConnection.CommunicationChannel = tcpChannel; targetConnection.Target = targetBoard;
Register Target Objects
Use the target.add function in the Command Window to add the toolchain and target connection objects to the Target Framework database. Because these two objects are associated with all the other target objects you created, adding them automatically adds the others as well.
target.add([targetConnection,toolchain]);
target.add summary:
Objects added to internal database for current MATLAB session:
    target.APIImplementation           "x86 RTIOStream Implementation"
    target.Board                       "Remote ARM Cortex-A based Linux Board"
    target.CommunicationInterface      "PIL Comm Interface"
    target.HostProcessExecutionTool    "Remote SSH Execute Tool"
    target.MainFunction                "TCP RtIOStream Main"
    target.Processor                   "ARM Cortex-A"
    target.TCPChannel                  "External Process TCPCommunicationChannel"
    target.TargetConnection            "Host Process Connection"
    target.Toolchain                   "Remote SSH Build Toolchain"
3 objects not added because they already exist.
Open SSH Connection
Use the target.connection.show function to determine if you need to open a new SSH connection.
If the connection to your board exists, you see its details in the output, including the name of the board. If the connection does not exist, use the target.connection.open function in the Command Window to open it. Otherwise, you can skip this step of opening of the connection.
target.connection.open(targetBoard.Name,IPAddress=targetIPAddress,Username=targetUserName);
SSH connection to board "Remote ARM Cortex-A based Linux Board":
IP = 192.168.0.10 Port = 22 Username = pi Authentication mode = Password
If the connection is not open, do not proceed with the example.
Open and Prepare Model
Open your model.
remoteBuildAndPILModel = "remoteBuildAndPIL"; open_system(remoteBuildAndPILModel);
To use your development computer as the target hardware for PIL simulation, specify the hardware board of the model as the board you defined previously in the example:
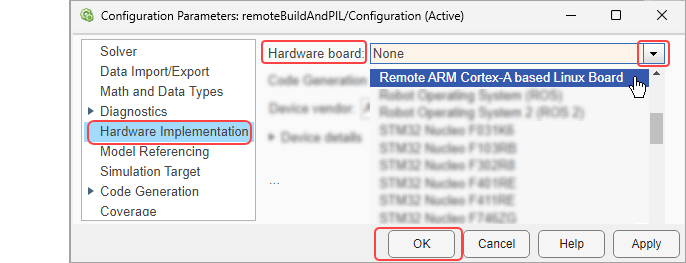
- Open the Configuration Parameters dialog box and navigate to the Hardware Implementation pane.
- From the Hardware board list, select
Remote ARM Cortex-A based Linux Board. - Click OK.
Alternatively, you can specify the board programmatically, by entering this in the Command Window:
set_param(remoteBuildAndPILModel,HardwareBoard=targetBoard.Name)
You do not need to explicitly specify the toolchain for the model because it is associated with the board. When you specify the board for the model, the associated toolchain object is automatically specified for the model.
Simulate Model
To simulate the model with PIL simulation:
- In the Simulink editor toolstrip, select the Apps tab.
- Click on the arrow to open the list of applications.
- In the section Code Verification, Validation, and Test, click SIL/PIL Manager.
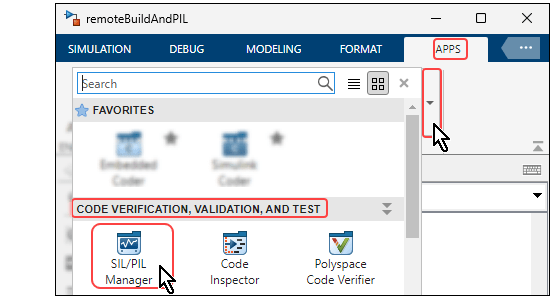
The application opens and a new SIL/PIL tab, is added to the Simulink toolstrip.
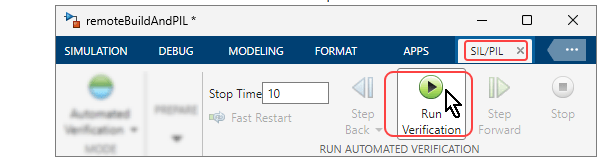
4. Select the SIL/PIL tab in the Simulink toolstrip and click Run Verification.
Alternatively, you can run the simulation programmatically by entering these commands in the Command Window:
% Specify the simulation mode of the model as PIL. set_param(remoteBuildAndPILModel,SimulationMode="processor-in-the-loop (pil)")
% Run the simulation. sim(remoteBuildAndPILModel)
In the simulation output you can see the path of the executable that was built on the remote target machine and then executed.
- If you started the simulation by clicking Run Verification, the output appears in the Diagnostic Viewer.
- If you started the simulation programmatically from the Command Window, the output appears in the Command Window.
Searching for referenced models in model 'remoteBuildAndPIL'.
Total of 1 models to build.
Starting build procedure for: remoteBuildAndPIL
Successful completion of build procedure for: remoteBuildAndPIL
Build Summary
Top model targets:
Model Build Reason Status Build Duration
remoteBuildAndPIL Information cache folder or artifacts were missing. Code generated and compiled. 0h 0m 46.954s
1 of 1 models built (0 models already up to date) Build duration: 0h 0m 48.559s
Connectivity configuration for component "remoteBuildAndPIL": Remote ARM Cortex-A based Linux Board
Preparing to start PIL simulation ...
Building with 'MinGW64 Compiler (C)'. MEX completed successfully.
Starting application: '/home/pi/testExampleFolder/testExampleFolder/remoteBuildAndPIL_ert_rtw/pil/remoteBuildAndPIL'
Application stopped
Tip: Search for the output line that starts with ### Starting application.
Clean Target Objects from Internal Database
To remove the objects you added to the internal database, use the target.remove function in the Command Window:
target.remove([targetConnection,toolchain],IncludeAssociations=true);
See Also
target | target.connection.open | target.connection.show | Target Framework | Diagnostic Viewer