Branch Manager - View Git repository history and manage local and remote Git branches and repositories - MATLAB (original) (raw)
View Git repository history and manage local and remote Git branches and repositories
Since R2025a
Description
The Branch Manager is an interactive tool for visualizing and managing local and remote Git™ branches, worktrees, and repositories.
Use the Branch Manager to:
- Manage multiple Git repositories and create, merge, and delete branches.
- Create, switch, merge, and delete branches or worktrees.
- Rebase branches.
- Find, compare, and squash commits.
- Create branches and worktrees from a tag or a revision.
- View the history of a Git repository.
- Manage multiple Git repositories at the same time.
- Manage remote repositories from local Git repositories.
- Add, edit, and delete remote repositories.
- Fetch from all remotes or individual remotes.
- Prune remote branches from all or individual remotes.
- Open remotes in a web browser.
- Create new local branches that track remote branches.
- Delete remote branches.
- Convert a shallow clone into a full clone.
- Manage and work with submodules in Git repositories.
- Add submodules to a Git repository.
- Update a submodule to the commit specified by the parent Git repository.

Open the Branch Manager
Open the Branch Manager from one of these locations:
- In the Source Control panel, in a Git repository, click the Branch Manager button
 .
.
If the Source Control icon is not in the sidebar, click the Open more panels button and select the Source Control panel.
 - In the Files panel, right-click and select Source Control > Branch Manager.
- In the Project panel, right-click and select Source Control > Branch Manager.
- In the Project toolstrip, in the Source Control section, clickBranch Manager.
Examples
When you open the Branch Manager for a Git repository, by default, the tool shows the entire Git commit graph in the center; the list of branches, remotes, and tags on the left; and the details about selected commits on the right. In the graph, to understand the current state of different lines of development and important checkpoints in your project history, branches and tags are visually represented using different colors and labels.
To inspect a commit, click on the commit in the graph to see its detailed information. The Commit Details pane on the right shows information including the commit message, the username, email, and avatar of the author, the commit date and ID, and any associated changes and commit differences.
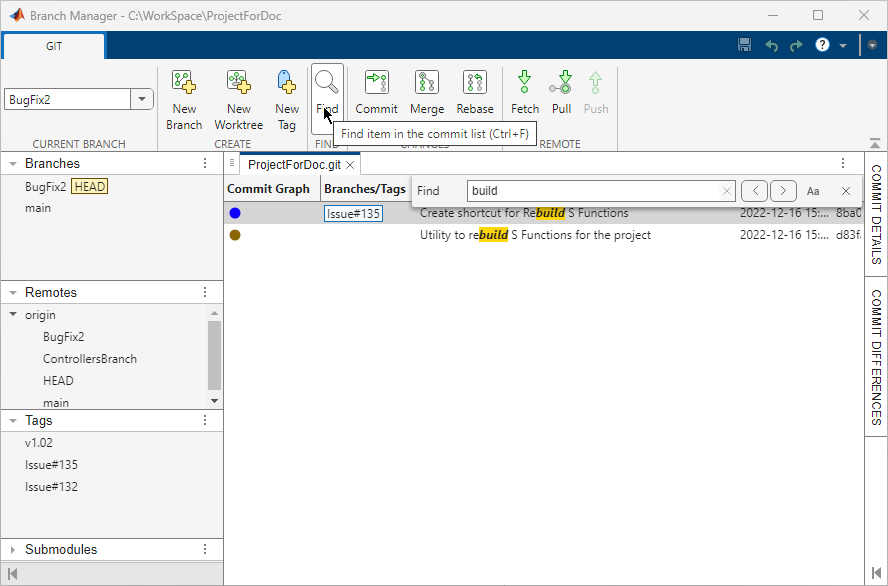
In the Branch Manager, you can filter the graph by branch and to search the commit history for specific terms. Filtering the graph helps you isolate relevant pieces of history in large repositories.
You can find a commit by searching for a term in the commit message, for the author name or email, for the date of the commit, or for the commit ID. In the Branch Manager toolstrip, click Find, and enter your search term in theFind tool. The Branch Manager only keeps the commits that match your search and highlights the matching text in yellow.
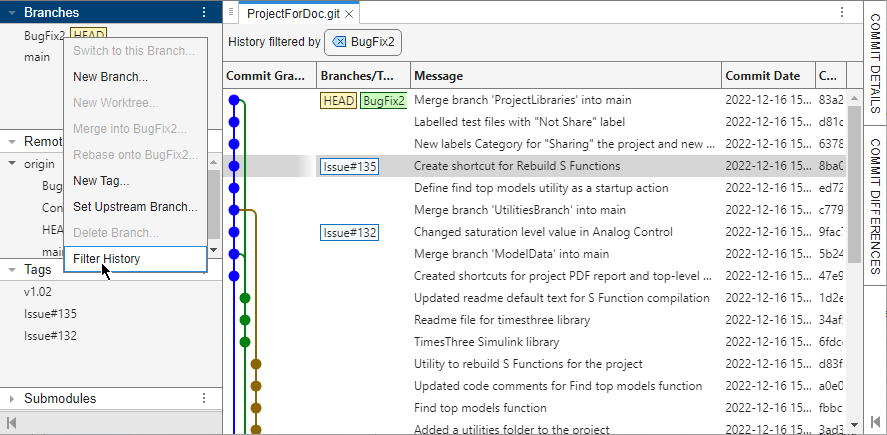
To filter the commit history to a specific branch, in the left pane, right-click the branch name and select Filter History. The Branch Manager restricts the history to the selected branch. To clear the filter, click the History filtered by branchname filter.
You can tag a commit to mark a new version or a stable release. Tags provide an easy way to navigate to an important commit in the code history. Commonly, Continuous integration and continuous delivery (CI/CD) pipelines rely on tags to trigger specific actions, such as building and deploying a new version of your application.
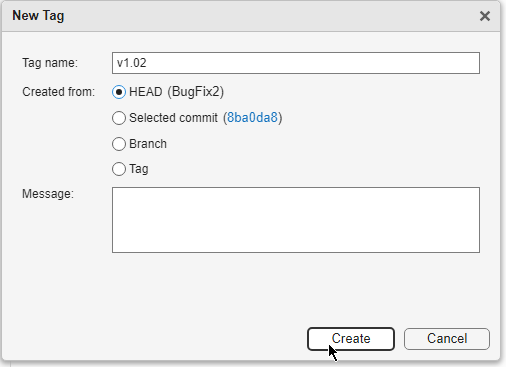
To create a tag, in the Branch Manager toolstrip, click New Tag. In the New Tag dialog box, specify the tag name and clickCreate. By default, Branch Manager creates a tag from theHEAD commit. You can also create a tag from a selected commit, branch, or tag.
The left pane of the Branch Manager lists all tags from the most recent to the oldest in the Tags section.
To navigate to a tagged commit in the history graph, in the left pane of the Branch Manager, in the Tags section, click a tag. The Branch Manager selects the corresponding commit and navigates to it.
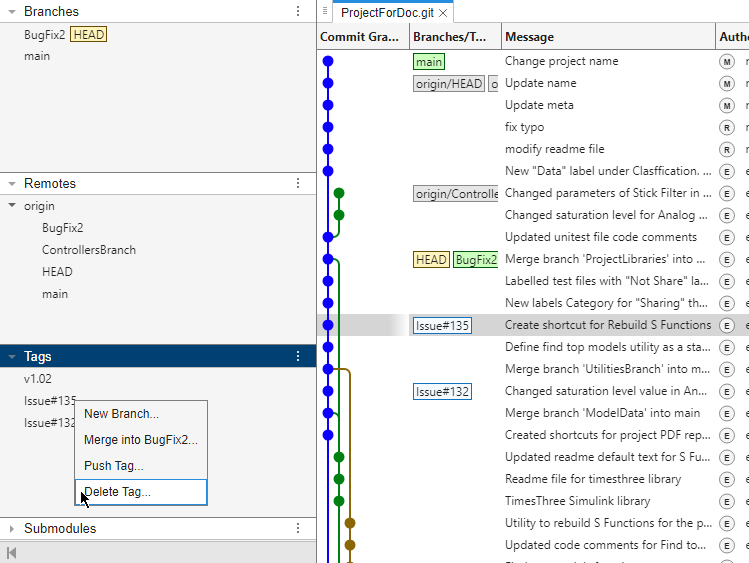
To delete a tag, in the left pane of the Branch Manager, right-click a tag in theTags section and select Delete Tag.
To push a tag to a remote, in the left pane of the Branch Manager, in theTags section, right-click the tag you want to push and selectPush Tag. Then, in the Push Tag dialog box, specify the remote you want to push the tag to and click Push.
To fetch tags, in the left pane of the Branch Manager, in theRemotes section, right-click the remote you want to fetch from and select Fetch Tags.
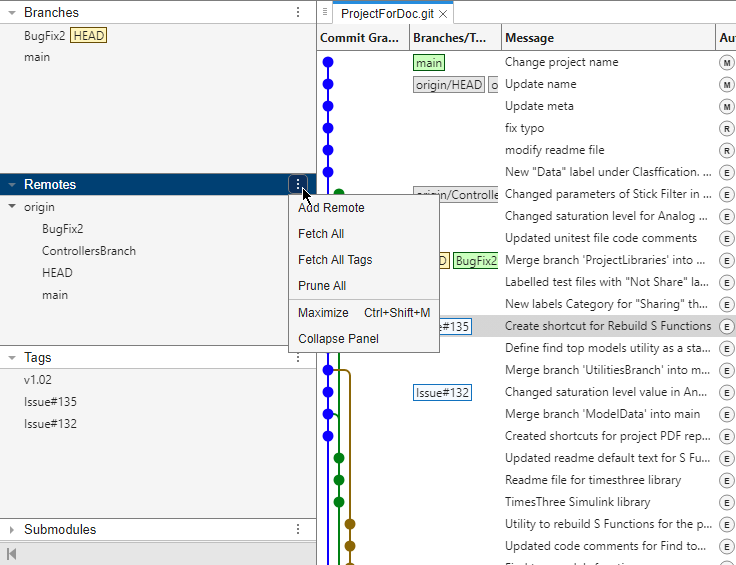
To fetch all tags from all remotes including newly added tags to commits you already have, in the left pane of the Branch Manager, under the Remotes actions button in theRemotes section, select Fetch All Tags.
You can also create a branch from a tag. For more information, see Create, Manage, and Merge Git Branches.
You can compare file changes between two tags. For more information, see Compare Files Between Commits or Branches.
In the Branch Manager, you can compare file changes between two revisions, including revisions on different branches.
To examine the differences between two revisions, in the commit graph, hold theCtrl key and select the two different revisions.
The pane on the right lists the files that changed between the two branches, including added and deleted files, under Differences between_id1_ and id2.
Tip
If you select only one commit, by default, the right pane lists the files that change between the selected commit and its parent commit.
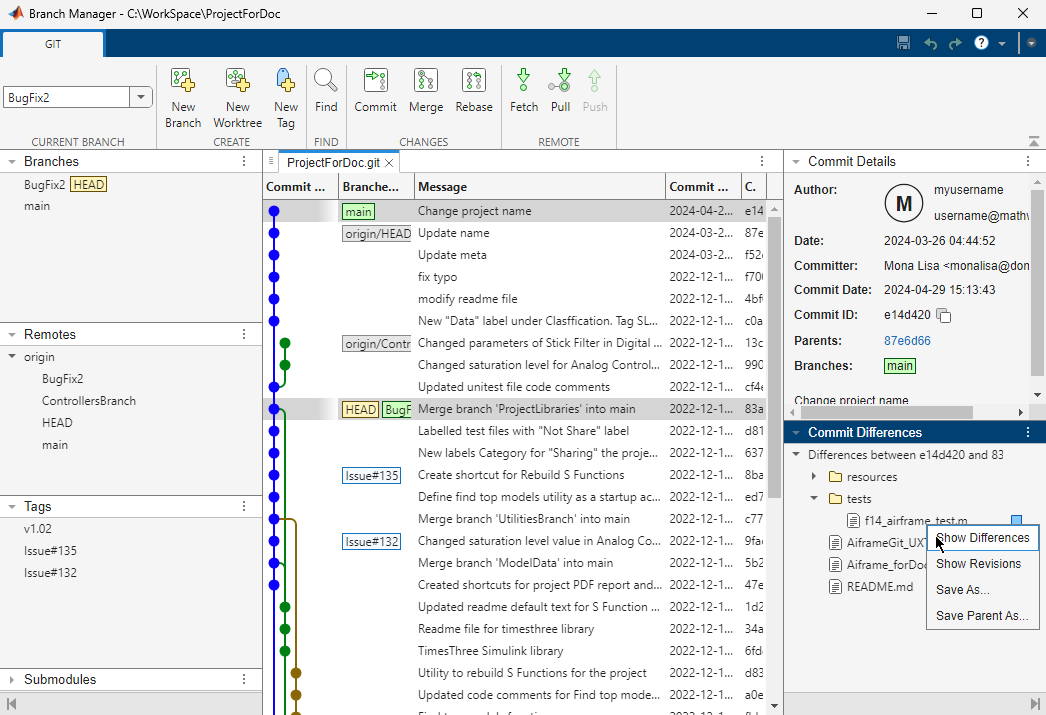
To understand changes in a file, run a comparison analysis. Right-click the file and select Show Differences.
You can save a copy of the file you select for either revision. Right-click a file and select Save As to save a copy of the file revision you select. Select Save Parent As to save a copy of the file for the prior revision. Save copies of files if you want to test how the code ran in previous revisions or on other branches.
When you create a local Git repository in MATLAB®, you must add a remote before you push changes. For an example on how to initialize a local Git repository, see Create Local Git Repository in MATLAB.
To add a remote URL to your local repository, in the toolstrip of the Branch Manager, click Add Remote.
Alternatively, in the left pane of the Branch Manager, under the Remotes actions button in the Remotes section, select Add Remote.
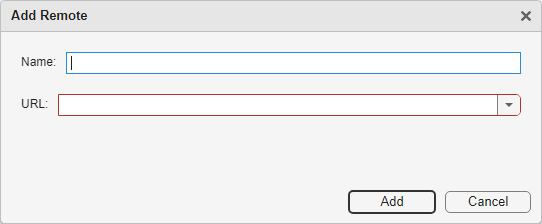
After you create a remote on the platform that will host your repository, such as on GitLab® or BitBucket, specify the name and the URL of the remote you created in the Add Remote dialog box. Then, click Add.
Push your changes to the remote repository. In the Branch Manager, clickPush.
Git worktrees allow you to work on multiple branches of the same repository simultaneously without needing to clone the repository multiple times.
Create a worktree for the main branch in your repository.
Make sure you switch to a different branch that the main branch. Then, in the Branch Manager toolstrip, click New Worktree.
Alternatively, in the left pane of the Branch Manager, in theBranches section, right-click the branch you want to associate with the worktree and select New Worktree.

In the New Worktree dialog box, in the Worktree folder field, specify the folder you want to use for the new worktree. If you do not want to change the current folder to the worktree folder, clear the Change current folder to worktree folder check box before you clickCreate.

The Branch Manager creates the worktree and opens the correspondingworktreefolder.git document.
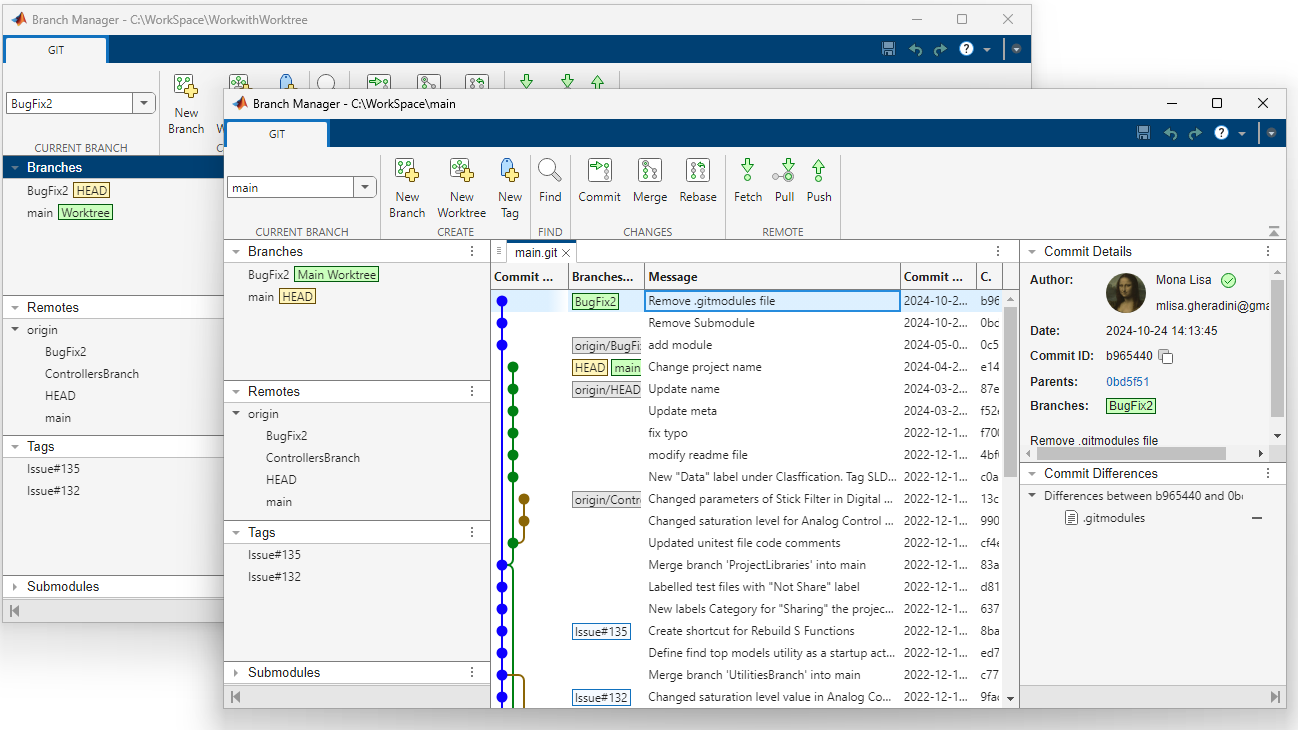
You can identify a worktree by a Worktree label .
.
The Branch Manager labels the working folder that contains the.git folder with a Main Worktree label . It is not possible to delete the main worktree.
If you clear the Change current folder to worktree folder check box when you create the worktree, you must switch to the worktree before making changes. In the left pane of the Branch Manager, right-click the worktree and selectSwitch to this Worktree.

To delete a worktree, right-click the worktree and select Delete Worktree.
Note
Before you delete a worktree, make sure you commit all changes in the worktree to the branch associated with the worktree.
Using the Branch Manager, you can manage remote branches and repositories from a local Git repository.
If you have not set a remote repository for your local repository, see Add Git Remote.
You can perform these tasks in Branch Manager to manage a remote repository.
- Rename a remote – In the left pane, in the Remotes section, right-click the name of the remote you want to change, for example
origin, and select Edit. Then, update the name and click Edit. - Open a remote repository in a web browser. In the left pane, in theRemotes section, right-click the name of the remote, for example
origin, and select Open in Browser. MATLAB opens the remote URL in a web browser. - Get the latest changes from a remote repository – In the left pane, in theRemotes section, right-click the name of the remote, for example
origin, and select Fetch. - Delete a remote repository – In the left pane, in theRemotes section, right-click the name of the remote, for example
origin, and select Delete. - Remove remote-tracking branches that no longer exist on a remote, for example
origin– In the left pane, in the Remotes section, right-click the name of the remote and selectPrune. 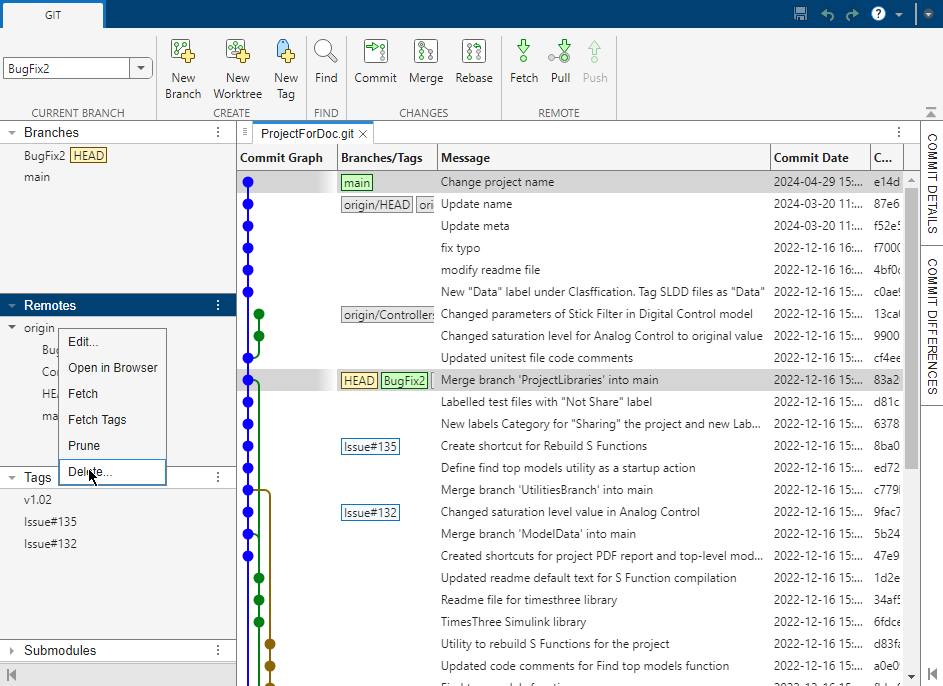
You can perform these tasks in Branch Manager to manage a remote branch.
- Create a local branch that tracks a remote branch – In the left pane, under theRemotes section, right-click the name of the remote branch you want to track and select, for example
ControllersBranch, and select Switch to this Branch. - Delete a remote branch – In the left pane, under theRemotes section, right-click the name of the remote branch you want to delete, for example
ControllersBranch, and selectDelete Branch. 
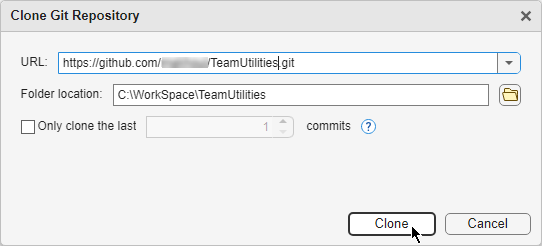
By default, MATLAB performs a full clone of a Git repository. To create a shallow clone instead, specify the number of commits to clone in the Clone Git Repository dialog box. For more information, see Create Local Git Repository in MATLAB.
To convert a shallow clone to a full clone, in the toolstrip of the Branch Manager, click Unshallow Repository.
The Branch Manager clones the remaining commits and updates the commit history graph to show the complete history.
Git cherry-picking is the process of picking a commit from a branch and applying it to another branch. Cherry-picking can be useful for restoring a revision and undoing changes. For example, if a user commits a change to the wrong branch, you can switch to the correct branch and cherry-pick the commit to it.
To cherry-pick a commit from the featureBranch to themainbranch , follow these steps.
- In the Branch Manager toolstrip, switch to the
mainbranch. - In the commit graph, right-click the commit you want to cherry-pick and selectCherry-pick into main.
- In the Cherry-Pick dialog box, keep the default option selected. Then, clickCherry-Pick.
To cherry-pick a tag instead, select the Tag option and choose from the available tags. Then, clickCherry-Pick.
If a conflict occurs during the cherry-picking process, you see a dialog box to resolve the conflict. For information on how to resolve conflicts, see Resolve Git Conflicts.
You can also discard the cherry-picking process and restore to the state of your repository before the cherry-pick. In the Branch Manager toolstrip, clickDiscard Cherry-Pick.
After you complete the cherry-picking process, the commit graph shows the cherry-picked commit in the main branch.
Related Examples
- Share Git Repository to Remote
- Create, Manage, and Merge Git Branches
- Resolve Git Conflicts
- Add Git Submodules to Repository
- Rebase Git Branch in MATLAB
- Squash Git Commits in MATLAB
- Work with Git Submodules in MATLAB
Version History
Introduced in R2025a