File Compression in Linux Using the Compress Command (original) (raw)
Last Updated : 16 Feb, 2026
The compress command in Linux is used to reduce the size of files using the Lempel–Ziv (LZ78) compression algorithm. It mainly works on individual files and replaces the original file with a compressed version having the .Z extension.
- Helps save disk space
- Useful for file transfer and storage
- Works on single or multiple files
- Replaces original files by default
Installation of `compress` Command in Linux
On Ubuntu and Debian-based systems, the compress command is provided by the ncompress package.
**Command:
sudo apt install ncompress
**Output:

Compress command installation
Examples of the `compress` Command:
1. Compressing a Single File
This example compresses a single file and creates a compressed file with the .Z extension.
**Command:
compress example.txt
**Output:
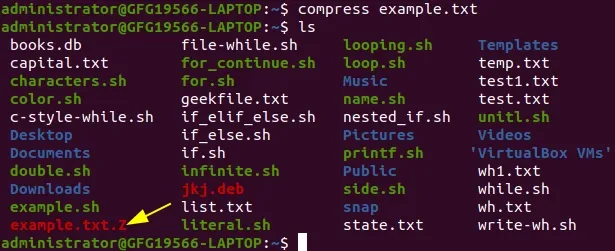
Compressing a single file using compress
**Note: The file example.txt is compressed and replaced by example.txt.Z in the same directory.
Use the `ls` command to verify that the compressed file has been created successfully.
2. Compress Multiple Files
The `compress` command supports the compression of multiple files simultaneously.
**Command:
compress file1.txt file2.txt file3.txt4
**Output:

Compressing Multiple Files Using compress Commnad
**Note: Each file is compressed individually. All original files are replaced by their compressed versions in the same directory.
3. Decompressing a File
To restore a file that was compressed using compress, the uncompress command is used.
**Command:
uncompress file1.txt.Z
**Output:
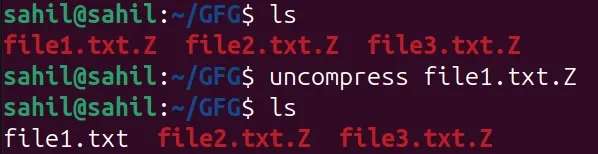
Decompressing a File Using uncompress Command
This command decompresses the file file1.txt.Z and restores it to its original form as file1.txt. The .Z file is removed after successful decompression.
Syntax
The basic syntax of the compress command is as follows:
compress [options] filename
- **[options]: Optional flags that modify how compression works
- **filename: Name of the file to be compressed
**Note: By default, the compress command replaces the original file with a compressed version and adds the .Z extension to the filename.
Options Available in compress Command
The compress command provides several options to control compression, decompression, output handling, and display behavior. Some commonly used options are explained below.
Option 1: -d or --decompress (Decompress a File)
The -d option is used to decompress a file that was compressed using the compress command.
**Syntax:
compress -d filename.Z
- -d: Decompresses the compressed .Z file
**Example:
compress -d example.txt.Z
**Output:
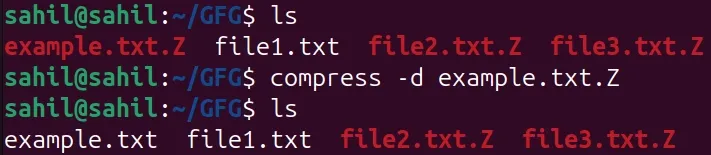
Decompressing a file that was compressed using the compress command
**Note: After decompression, the original file example.txt is restored and the .Z file is removed.
Option 2: -c (Save Compressed Output Without Replacing Original File)
The -c option is used to create a compressed output without removing the original file. Instead of replacing the file, the compressed data is sent to output, which can then be redirected to a new file.
**Syntax:
compress -c filename > filename.Z
- **-c : Generates compressed data without deleting the original file
- **> : Redirects the compressed data into a new file
- **filename.Z : New compressed file created
**Example:
compress -c example.txt > compressed_output.Z
**Output:

Redirecting compressed Output
**Note: The original file remains unchanged.
**Option 3: -v (Show Compression Percentage)
The -v option displays the percentage of file size reduction after compression. It helps in understanding compression efficiency.
**Syntax:
compress -v filename
- **-v: Displays compression percentage
**Example:
compress -v example.xls
**Output:

-v option
The output shows the percentage of size reduction after compression.
**Note: This option is ignored if the -c option is used.
Option 4****:** -r (Recursive Compression) in Linux
The -r option compresses all files inside a directory and its subdirectories recursively. It is helpful to combine the _-r option with _-v to see exactly what the command is doing.
**Syntax:
compress -r directory_name
- **-r: Enables recursive compression
**Example:
compress -r demofile
**Output:
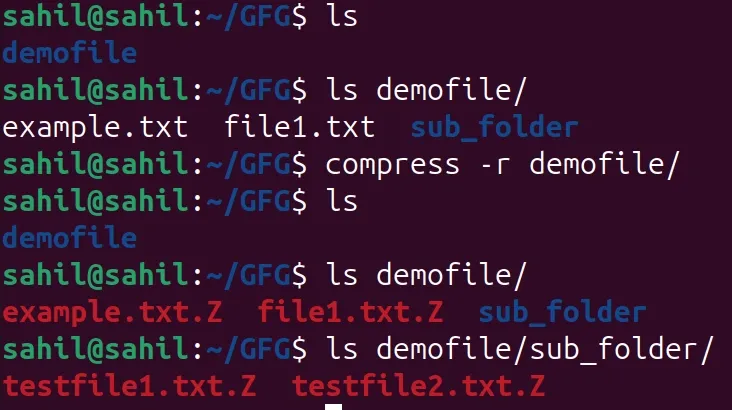
Compressing all files inside a directory and its subdirectories recursively
**Note: Only files are compressed; directory structure remains unchanged.
Option 5: -f (Force Compression) in Linux
This will compress files without any guarantee of size reduction, meaning it will compress files even if the file size is not reduced.
**Syntax:
compress -f filename
- **-f: Forces creation of .Z file
- **filename: File to be compressed
**Example:
compress -f test.txt
**Output:
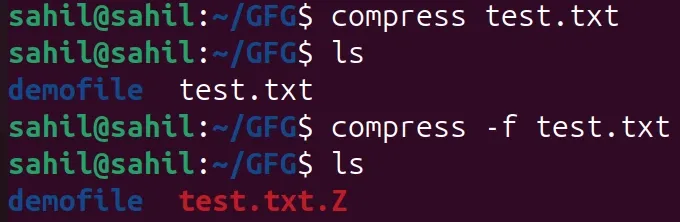
Force compression of a file
**Note: Without the -f option, compress may refuse to create a .Z file if the file size does not reduce. Using -f overrides this behavior and ensures that the compressed file is created.
Other Ways to Compress Files in Linux
Linux provides several other commands to compress files more efficiently than the compress command. These tools are widely used in modern systems and offer better compression and flexibility.
1. Using gzip Command
The gzip command is the most commonly used compression tool in Linux. It provides better compression than compress and is supported on almost all Linux distributions.
**Example:
gzip file.txt
This creates a compressed file named file.txt.gz.
2. Using bzip2 Command
The bzip2 command offers higher compression ratios than gzip, but compression and decompression take more time.
**Example:
bzip2 file.txt
This creates a compressed file named file.txt.bz2.
3. Using xz Command
The xz command provides very high compression efficiency and is often used for large files and software distributions.
**Example:
xz file.txt
This creates a compressed file named file.txt.xz.
4. Using tar with Compression
The tar command can combine multiple files and compress them using gzip, bzip2, or xz.
**Example:
tar -czf archive.tar.gz file1 file2
This creates a compressed archive containing multiple files.