The Pacific War Online Encyclopedia: Leyte Gulf (original) (raw)
|  The Pacific War Online Encyclopedia | |
| -------------------------------------------------------------------------------- | |
The Pacific War Online Encyclopedia | |
| -------------------------------------------------------------------------------- | |
Leyte Gulf is a somewhat exposed anchorageon the eastern edge of the Philippines, with a smallport at Taclobanon Leyte. It was the site of an American invasionin October 1944 that led to a full-scale naval battle between the U.S. and Japanesefleets.
Battle of Leyte Gulf
By 12 September 1944, the Allies were firmly established in the Marianas and western New Guinea and were poised to seize Morotai, Peleliu, Yap, and Ulithi. The Philippines had been chosen over Formosain July 1944 as the ultimate objective of the Southwest Pacific and Central Pacific counteroffensives, and their liberation would cut the remaining sea lanes between Japan and the resources of the Netherlands East Indies.
MacArthur originally planned to invade Mindanao at Sarangani Bay on 25 October 1944, in order to secure airfields from which to cover the invasion of Leyte on 15 November. However, Halsey encountered very little air opposition during his carrier strikes in the area in mid-September 1944, and a pilot from Hornet who had crashed on Leyte and been spirited out by guerrillas reported that there were few Japanese on the island. Halsey proposed Mindanao be bypassed and Leyte seized with naval air cover alone. This suggestion was adopted at the OCTAGON conference on 15 September 1944, and the invasion date for Leyte was advanced to 20 October 1944.
The invasion would be a massive operation, supported by most of the naval power of Kinkaid's 7 Fleet and Halsey's 3 Fleet. Unfortunately, command arrangements for the Leyte campaign were muddled, as the Philippines lay close to the theater boundaries for the Southwest Pacific Area, Pacific Ocean Areas, and China-Burma-Indiatheaters. Although MacArthur commanded Kinkaid's 7 Fleet in immediate support of the landing operations, distant cover was provided by the fast carriers of 3 Fleet, which was the main striking force of Pacific Fleetunder Nimitz. There was not even a direct communication channel between Halsey and Kinkaid, and messages relayed through Manus sometimes took hours to arrive. This divided command would have important consequences during the battle. In particular, Halseywas under orders to make the destruction of the Japanese Fleet, not the protection of the amphibious forces, his highest priority.
Another command complication was that the amphibious elements of 3 Fleet were transferred to 7 Fleet for the landings. This left Halsey with little more than Task Force 38 under his command, and Halsey could not resist the temptation to bypass the highly competent Mitscher and issue orders directly to the individual task groups within Task Force 38.
The Japanese anticipated that the next Allied move would likely be against either the Philippines, Formosa, or the Ryukyus and, if successful, would cut off Japan's supply of oil. Faced with this looming disaster, the Japanese prepared a set of contingency plans (Sho Go, "Victory Operation") for committing their entire remaining naval strength against the Allied move. However, the unexpected swiftness of the Allied offensive caught the Japanese off-balance and poorly prepared.
The Japanese contingency plan for the defense of the Philippines, Sho Ichi Go ("Victory Operation One"), was activated on 22 October 1944, when word reached Tokyo that the Americans had begun landings at Leyte. Because of massive attrition at the Battle of the Philippine Sea and over Formosa and a shortage of fuel to complete the training of new pilots, the Japanese had virtually no aircraft or pilots for Ozawa's remaining carriers. However, the Japanese Navy still had powerful surface forces (under Kurita) built around the _Yamato_and Musashi. These were based at Singapore in order to be close to their fuel supplies, while the carrier forces remained in the Inland Sea to conduct as much pilot training as the fuel supply permitted. In order to give Kurita a chance to reach and destroy the American amphibious force, Ozawa was ordered to deliberately allow his force to be spotted and pursued by Halsey. While Halsey was thus diverted to the north, Kurita was to split his force, taking the main body through San Bernardino Strait north of Leyte Gulf while a detachment under Nishimura would enter Leyte Gulf through Surigao Strait to the south in order to trap the Allied transports between them. Nishimura was to be joined by Shima, who was coming south with a small force of cruisersand destroyers that had eluded a trap set by Halsey off Formosa. Meanwhile, a small detachment from Kurita's fleet was assigned to transport reinforcements from Manila to Leyte.
Because of their lack of carrier aircraft, the Japanese were forced to rely primarily on land-based aircraft. There were several hundred aircraft scattered throughout the Philippines, but serviceability rates were low and not more than about 200 aircraft participated in the battle. These would be employed primarily in strikes against the American carriers, rather than as air cover for the Japanese naval surface forces, because it was believed that the inexperienced Japanese pilots would have a better chance of protecting the fleet by disabling the American flight decks than by attempting to intercept American air strikes. Postwar, staff officers from 2 Air Fleet claimed that they always kept ten fighters above Kurita's force, but Kurita claimed that he never saw any air cover.
The Japanese plan was overly complex and went badly from the start. It relied too heavily on close coordination of widely separated forces who communications proved highly unreliable during the battle. Furthermore, the Japanese command structure was at least as muddled as that of the Allies. Ozawa should have been the overall commander of the operation, but the reduction of his carrier fleet to adecoy force left Kurita as commander of the most crucial fleet element. Nishimura was an unimaginative officer with a death wish who did not get along with Shima, who commanded the weaker force but was slightly senior. This may explain why the plan did not call for Shima and Nishimura to join forces until the last moment. What is harder to understand is why the Japanese did not assign Shima to carry out the transport mission from Manila to Leyte in place of a detachment from Kurita's force.
Kurita's force was discovered off Palawan on 23 October 1944 by submarines Darterand Dace, which sank Atagoand Maya and severely damaged Takao. Kurita also detailed two destroyers to escort Takao to safety, which took them out of the battle. The American submarine commanders found their approach simplified by the low speed of Kurita's force, just 16 knots, and by Kurita's failure to station any picket destroyers ahead of his main force. Furthermore, Kurita had chosen a narrow passage west of Palawan that was out of range of Allied airreconnaissance but gave him little room for maneuver. The contact report from the American submarines was the first indication to Allied intelligence that the main strength of the Japanese Navy was coming out to contest the Leyte landings. However, Darter ran aground in the poorly charted reefsof Palawan while maneuvering for a second attack (there had been no opportunity for a navigational fix in over 24 hours) and had to be scuttled, her crew being taken off by Dace.
That same day, submarine Bream spotted and torpedoed Aoba with Sakonju's Transport Force. Only one of the six torpedoes in the salvo hit the cruiser, but this was sufficient to cripple the cruiser, which was never repaired.
On receiving Darter and Dace's contact report, Halsey immediately alerted the fleet and recalled McCain'sTask Group 38.1, which was on its way to Ulithi for rest and replenishment. The next four days saw the largest fleet action in history. Historians have generally divided the battle into four major engagements and a number of lesser engagements.
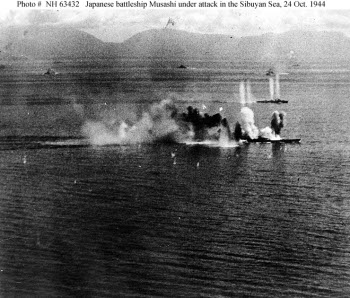
Naval Historical Center #NH 63432
Battle of the Sibuyan Sea. All through 24 October 1944, Kurita's force was hammered from the air by strikes from Halsey's carriers. The giant battleship Musashisank after taking 17 bomb hits and 19 torpedo hits. Her commander attempted to beach her, but she capsized at 1935 with the loss of 1,096 of her crew. Battleships Yamato and Nagatoeach took two bomb hits that inflicted significant damage to their upper works, hindering fire control and communications, and heavy cruiser Myokotook a torpedo hit that damaged two shafts and forced her to withdrawFighter protection from land bases was nonexistent, and the Japanese antiaircraft fire, while voluminous, was largely ineffective. Just 18 Allied aircraft were shot down out of 259 sorties against the Japanese force. At 1600, Kurita finally reverse course while broadcasting pleas for air cover.
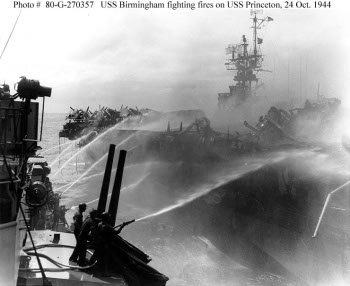
National Archives #80-G-270357
The American carriers also came under attack from land-based aircraft and Ozawa's small force of carrier aircraft. While the American combat air patrol was driving off three Japanese strikes of about 50-60 land-based aircraft, a single Judy dive bomber broke through the cloud cover and put its bomb through the flight deck of light carrier Princeton. The blast ignitedgasoline in the hangar deck and the flames began detonating torpedoes loaded on TBF Avengers. The crew fought the fire for almost six hours before the flames reached the torpedo magazine and a massive explosion blew up the stern of the ship. There were heavy casualties on cruiser Birmingham, alongside assisting with firefighting, and Princetonwas scuttled shortly thereafter.
Meanwhile, Ozawa was trying to be detected by the Americans, unaware that his radio transmitter was malfunctioning and preventing his radio traffic from being heard by either friend or foe. However, he had launched his own strike, which was broken up by the American Hellcatssome 45 miles (70 km) northeast of Sherman's task group. This suggested to the the Americans that the Japanese carriers were somewhere to the north, and a search plane finally spotted Ozawa at 1540. Halsey, overestimating the damage to Kurita's force and believing it was retiring for good, took off in hot pursuit of Ozawa with all his forces. Now it was the Americans whose plans were thrown into confusion. Halsey had transmitted a contingency plan for detaching his battle line as Task Force 34 to guard San Bernardino Strait. However, with Kurita seemingly in retreat, Halsey decided this was unnecessary. But the original message was the only one seen by other senior commanders (such as Kinkaid with 7 Fleet in Leyte Gulf), and they were left with the mistaken impression that San Bernardino Strait was being watched.
At 1935 a night reconnaissanceflight from Independence found that Kurita's force had returned to a course for San Bernardino Strait. It is unclear why Halsey did not then detach Task Force 34 to cover the strait. Mitscher, possibly smarting from having been bypassed all day by Halsey (who issued orders directly to Mitscher's task group commanders), declined to radio such a recommendation to Halsey. Three of Halsey's task force commanders also wondered at the order, and Boganwent so far as to contact Halsey's staff with the information that the navigation lights in San Bernardino Strait were lit. He was brushed off, and made no further protest. Lee, the battle line commander, correctly deduced that Ozawa's force was a decoy with little striking power, but his signal to Halsey warning that Kurita was likely to come out of San Bernardino Strait was also brushed off. Halsey's failure to guard the strait must be judged one of the great blunders of the Pacific War.
Battle of Surigao Strait. Nishimura's force was sighted around 0950 on 24 October, but no strikes were launched against him and no further sightings were made that day. However, Kinkaidcorrectly guessed Nishimura's intentions to come through Surigao Strait during the night. Thinking his rear was covered, Kinkaid ordered Oldendorf to take the heavy units of 7 Fleet to lay an elaborate trap for Nishimura's force. Nishimura's ships were attacked by waves of PT boatsand destroyers even before coming within range of Oldendorf's waiting battle line. Only one Japanese destroyer escaped out of the original force of two battleships, a cruiser, and four destroyers. American losses were limited to one PT boat sunk and several damaged and serious damage to destroyer Albert W. Grant, which was caught in the crossfire between the two forces and hit by shells from both sides. Shima, who had already had a destroyer crippled by the PT boats, encountered the shattered remnants of Nishimura's fleet, suffered a collision between Nachi and Mogami, and prudently withdrew.
Battle off Samar. Meanwhile, Kurita had reversed course again and slipped through San Bernardino Strait, albeit seven hours later than the Japanese had originally planned. He found to his surprise that the strait was unguarded. As dawn broke, his lookouts spotted several escort carriers protected by destroyers anddestroyer escorts, which he mistook for fleet carriersprotected by cruisers and destroyers. The American ships were completely outgunned and at least twelve knots slower than Kurita’s cruisers, but fought fiercely, and American aircraft in the area made repeated passes against Kurita’s ships even after expending whatever munitions they were carrying. Kurita believed he was up against much stronger forces than was the case, and he retreated back through San Bernardino Strait after sinking three destroyers and an escort carrier. He left one of his own cruisers sinking.
At about the same time, land-based air units carried out the first kamikaze attacks of the war, sinking the escort carrier St. Lo and badly damaging two others.
Battle of Cape Engano. Meanwhile, Halsey was in the process of annihilating Ozawa’s force (he had already sunk Chitose and Chiyoda) when a message reached him from Nimitzin Hawaii. The original message was a simple query: “Where is Task Force 34?” However, Nimitz’ communications technician, perhaps sensing a certain urgency in the query, saw fit to slightly strengthen the message. A further gaffe occurred due to a poor choice of padding: Like all codedU.S. messages, the message had been padded at its beginning and end with phrases that were supposed to be nonsense. The end padding sufficiently resembled part of the message that it was left in place by Halsey’s decoders, and the message ultimately handed to Halsey read: “WHERE IS RPT WHERE IS TASK FORCE 34 XX THE WORLD WONDERS”. Halsey reportedly threw his hat on the deck and started weeping with rage, then returned with his battleship force and one of his carrier task forces to San Bernardino Strait — too late to catch Kurita, although Halsey's carrier task force was able to sink a cruiser and two destroyers from Kurita's fleeing force. It hardly mattered; the Japanese Navy was practically finished as a fighting fleet. Halsey's other two carrier task groups were able to finish off carriers Zuiho and Zuikakuand sink an additional cruiser and two destroyers from Ozawa's force before they, too, were forced to break off the pursuit.
The Battle of Leyte Gulf was a decisive American victory, yet it did not reflect all that well on the Americans, who had overwhelming superiority in numbers. Halsey's blunder (few historians now call it anything else) was the most serious mistake on the American side, but most of the men of 3 Fleet were exhausted from prolonged operations, and it showed. The air strikes against Kurita on 24 October 1944 scored only 45 hits with 259 strike aircraft. On the other hand, the Japanese performance was even worse than that of the Americans. Kurita badly mismanaged the battle off Samar even before giving the command to withdraw, and the Japanese gunfireagainst the American escort carriers was notably inaccurate. The battle resembled the final round of a heavyweight prize fight, with both boxers exhausted and barely able to remain on their feet.
Japanese order of battle, 18 October 1944
| 14 Area Army (Yamashita) | ||||||
|---|---|---|---|---|---|---|
| 35 Army (Suzuki) | ||||||
| 16 Division (Makino) | ||||||
| Combined Fleet (Toyoda) | ||||||
| Mobile Force (Ozawa) | ||||||
| Main Body (Northern Force) (Ozawa) | ||||||
| Carrier Division 3 (Ozawa) | Combined air strength: 80 A6M Zero, 25 B6N Jill, 4 B5N Kate, 7 D4Y Judy | |||||
| CV ZuikakuCVL ZuihoCVL ChitoseCVL Chiyoda80 A6M Zero25 B6N "Jill"4 B5N "Kate"7 D4Y "Judy" | SunkSunkSunkSunk | |||||
| Carrier Division 4 (Matsuda) | ||||||
| CVBB HyugaCVBB Ise | ||||||
| Destroyer Division 61 | ||||||
| DD HatsuzukiDD AkitsukiDD WakatsukiDD Shimotsuki | SunkSunkOn loan from Destroyer Division 41 | |||||
| Escort Squadron 31 (Edo) | ||||||
| CL Isuzu | ||||||
| Destroyer Division 43 | ||||||
| DE MakiDE KiriDE KuwaDE Sugi | ||||||
| CL OyodoCL Tama | Sunk | |||||
| Supply Unit | ||||||
| DD Akikaze CD-22 CD-29 CD-31 CD-33 CD-43 CD-132AO Jinei Maru AO Takane Maru | Sunk | |||||
| First Striking Force (Kurita) | ||||||
| Force "A" (Center Force) (Kurita) | ||||||
| First Section (Kurita) | ||||||
| Battleship Division 1 (Ugaki) | ||||||
| BB YamatoBB MusashiBB Nagato | Sunk | |||||
| Cruiser Division 4 (Kurita) | ||||||
| CA AtagoCA TakaoCA ChokaiCA Maya | SunkSeverely damagedSunkSunk | |||||
| Cruiser Division 5 (Hashimoto) | ||||||
| CA MyokoCA Haguro | ||||||
| Destroyer Squadron 2 (Hayakawa) | ||||||
| CL NoshiroDD Shimakaze | Sunk | |||||
| Destroyer Division 2 | ||||||
| DD HayashimoDD Akishimo | ||||||
| Destroyer Division 31 | ||||||
| DD KishinamiDD OkinamiDD NaganamiDD Asashimo | ||||||
| Destroyer Division 32 | ||||||
| DD HamanamiDD Fujinami | ||||||
| Second Section (Suzuki) | ||||||
| Battleship Division 3 (Suzuki) | ||||||
| BB KongoBB Haruna | ||||||
| Cruiser Division 7 (Shiraishi) | ||||||
| CA KumanoCA SuzuyaCA ChikumaCA Tone | SunkSunk | |||||
| Destroyer Squadron 10 (Kimura) | ||||||
| CL YahagiDD NowakiDD Kiyoshimo | Sunk | |||||
| Destroyer Division 17 | ||||||
| DD UrakazeDD YukikazeDD HamakazeDD Isokaze | ||||||
| Force "C" (Van of Southern Force) (Nishimura) | ||||||
| Battleship Division 2 (Nishimura) | ||||||
| BB YamashiroBB FusoCA Mogami | SunkSunkSunk | |||||
| Destroyer Division 4 | ||||||
| DD MichishioDD AsagumoDD YamagumoDD Shigure | SunkSunkSunkOn loan from Destroyer Squadron 2 | |||||
| Southwest Area Force (Mikawa; at Manila) | ||||||
| Second Striking Force (Rear of Southern Force) (Shima) | ||||||
| Cruiser Division 21 (Shima) | ||||||
| CA NachiCA Ashigara | ||||||
| Destroyer Squadron 1 (Kimura) | ||||||
| CL Abukuma | Sunk | |||||
| Destroyer Division 7 | ||||||
| DD AkebonoDD Ushio | ||||||
| Destroyer Division 18 | ||||||
| DD KasumiDD Shiranuhi | Sunk | |||||
| Destroyer Division 21 | ||||||
| DD WakabaDD HatsushimoDD Hatsuharu | Sunk | |||||
| Troop Transport Unit (Sakonju) | ||||||
| Cruiser Division 16 (Sakonju) | ||||||
| CA AobaCL KinuDD UranamiAPD T-6LS T-101LS T-102LS T-131 | Severely damagedSunkSunkSunk | |||||
| Fifth Base Air Force and First Air Fleet (Onishi; at Clark) | Adequate records were never found from which to reconstruct the order of battle for Japanese land-based air forces. Most sources simply speak of several hundred land-based aircraft in the Philippines. During the air battles of 24 October, the American carrier groups were raided by a total of perhaps 200-300 aircraft, but these include Ozawa's carrier aircraft. There were additional kamikaze raids during the Battle of Samar. | |||||
| 6 Fleet (Miwa) | ||||||
| AS Tsukushi Maru | ||||||
| 1 Submarine Force (Miwa) | ||||||
| "A" Division | ||||||
| SS I-26SS I-45SS I-53SS I-54SS I-56 | SunkSunkSunk | |||||
| "B" Division | ||||||
| SS I-38SS I-41SS I-44SS I-46SS Ro-41SS Ro-43SS Ro-46 | ||||||
| "C" Division | ||||||
| SS Ro-109SS Ro-112 | ||||||
| Ulithi Attack Group | ||||||
| SS I-36SS I-37SS I-47 | Sunk |
Allied order of battle, 18 October 1944
| Southwest Pacific Area (MacArthur) | |||||||
|---|---|---|---|---|---|---|---|
| 6 Army (Krueger; in Wasatch) | |||||||
| X Corps (Sibert; in Blue Ridge) | |||||||
| 24 Division (Irving) | |||||||
| 1 Cavalry Division (Mudge) | |||||||
| XXIV Corps (Hodge) | |||||||
| 7 Division (Arnold) | |||||||
| 96 Division (Bradley) | |||||||
| 7 Fleet (Kinkaid; in Wasatch) | |||||||
| Task Force 77 (Kinkaid; in Wasatch) | |||||||
| Task Group 77.1 Fleet Flagship Group (Kinkaid; in Wasatch) | |||||||
| AGC WasatchCL NashvilleDD AmmenDD MullanyDD Abner ReadDD Bush | |||||||
| Task Force 78 Northern Attack Force (Barbey) | Embarking X Corps (Sibert) | ||||||
| Task Group 78.1 Palo Attack Group (Barbey) | Embarking 24 Division (Irving) minus 21 Regimental Combat Team | ||||||
| AGC Blue Ridge | |||||||
| Transport Unit | |||||||
| Transport Division 24 | |||||||
| APA Du PageAPA FullerAPA ElmoreAPA WayneAKA AquariusAP John LandLSD Gunston Hall | |||||||
| Transport Division 6 | |||||||
| APA FayetteAPA OrmsbyAPA LeedstownAKA TitaniaAK HerculesLSD Epping ForestLSD Carter Hall | |||||||
| Screen | |||||||
| DD John RodgersDD MurrayDD HarrisonDD McKee3 PC1 SC2 LCI(G)5 LCI(R)9 LCI3 PCE1 FP3 LSMAT ApacheAT Quapah | |||||||
| LST Group 20 | |||||||
| 12 LST | |||||||
| Task Group 78.2 San Ricardo Attack Group (Fechteler) | Embarking 1 Cavalry Division (Mudge) | ||||||
| APA Fremont | |||||||
| Transport Unit | |||||||
| Transport Division 32 | |||||||
| APA HarrisAPA BarnstableAP Herald of the MorningAKA ArnebLSD White Marsh | |||||||
| Transport Division 20 | |||||||
| APA Leonard WoodAPA PierceAPA James O'HaraAP La SalleAKA ElectraLSD Oak Hill9 LSM | |||||||
| Destroyer Screen | |||||||
| DD FletcherDD La ValletteDD JenkinsDD Anderson4 PC1 SC2 LCI(G)6LCI(R)AT Sonoma | Sunk | ||||||
| LST Flotilla 7 | |||||||
| 14 LST | |||||||
| Fire Support Unit North (Weyler) | |||||||
| BB MississippiBB MarylandBB West VirginiaDD ConyDD AulickDD Sigourney | |||||||
| Task Group 78.3 Panaon Attack Group (Struble) | Embarking 21 Regimental Combat Team, 24 Division | ||||||
| DD HughesLSI KanimblaLSI ManooraLSI WestraliaCM Ariadne | |||||||
| Escorts | |||||||
| DD SchroederDD SigsbeeDD RinggoldDD Dashiell | |||||||
| Control and Support Unit | |||||||
| 2 PC2 LCI(G)2 LCI(R)1 LCI(D) | |||||||
| Task Group 78.4 Dinagat Attack Group (Struble) | Embarking 6 Ranger Battalion and Company B, 21 Regiment | ||||||
| APD KiltyAPD SchleyAPD WardAPD HerbertAPD CrosbyAT Chickasaw | |||||||
| Escorts | |||||||
| DD LangDD StackPF GallupDE Bisbee | |||||||
| Task Group 78.6 Reinforcement Group One | Arriving 22 October 1944 | ||||||
| APA Crescent CityAPA WarrenAPA WindsorAPA CallawayAPA LeonAPA SumterAP Storm KingAK JupiterARL Achilles4 other AK12 LCI | |||||||
| LST Flotilla 8 | |||||||
| 32 LST | |||||||
| Escort | |||||||
| Destroyer Squadron 2 | |||||||
| DD MorrisDD HoworthDD StevensDD MustinPF Carson CityPF Burlington | |||||||
| Task Group 78.7 Reinforcement Group Two | Arriving 24 October 1944 | ||||||
| LST Flotilla 14 | |||||||
| 33 LST | |||||||
| 24 cargo ships, mostly Liberty Ships | |||||||
| Destroyer Squadron 21 | |||||||
| DD NicholasDD O'BannonDD HopewellDD TaylorPF MuskogeePF San Pedro | |||||||
| Task Group 78.8 Reinforcement Group Three | Arriving 29 October 1944 | ||||||
| 6 LST19 Liberty and Victory ships | |||||||
| Destroyer Squadron 5 | |||||||
| DD FlusserDD MahanDD DraytonDD SmithDD LamsonPF EugenePF El PasoPF Van BurenPF Orange | |||||||
| Task Force 79 Souther Task Force (Wilkinson) | Embarking XXIV Corps (Hodge) | ||||||
| AGC Mount Olympus | |||||||
| Task Group 79.1 Attack Group "Able" (Conolly) | Embarking 7 Division (Arnold) | ||||||
| AGC Appalachian | |||||||
| Task Group 79.3 Transport Group "Able" | |||||||
| Transport Division 7 | |||||||
| APA CavalierAPA J. Franklin BellAPA FelandAP Golden CityAKA ThubanLSD Lindenwald | |||||||
| Transport Division 30 | |||||||
| APA KnoxAPA CalvertAPA CusterAPH RixeyAKA CharaLSD Ashland | |||||||
| Transport Division 38 | |||||||
| APA LamarAPA AlpineAPA HeywoodAP StarlightAP MonitorAK Alshain | |||||||
| Transport Division "X-Ray" | |||||||
| APA George ClymerAPA President HayesAK Mercury | |||||||
| Screen | |||||||
| Destroyer Squadron 48 | |||||||
| DD ErbenDD WalkerDD HaleDD AbbotDD BlackDD ChaunceyDD BraineDD Gansevoort | |||||||
| Task Group 79.5 LST Flotilla 16 | |||||||
| 31 LST | |||||||
| Task Group 79.11 Destroyer Screen for LST and LCI of "Able" and "Baker" | |||||||
| Destroyer Squadron 54 | |||||||
| DD RemeyDD MertzDD MonssenDD McDermutDD McGowanDD McNairDD Melvin | |||||||
| 3 PCE(R) | |||||||
| Control Vessels | |||||||
| DD Stembel3 PC3 PC(S)3 SC | |||||||
| LCI Gunboat Unit | |||||||
| 18 LCI(G) | |||||||
| Salvage and Firefighting Unit | |||||||
| 2 LCI(L) | |||||||
| LCT Unit | |||||||
| 12 LCT | |||||||
| Task Group 79.2 Attack Group "Baker" (Royal) | Embarking 96 Division (Bradley) | ||||||
| AGC Rocky Mount | |||||||
| Task Group 79.4 Transport Group "Baker" | |||||||
| Transport Division 10 | |||||||
| APA ClayAPA Arthur MiddletonAPA BaxterAPA William P. BiddleAPA George F. ElliottAKA CapricornusVehicle Landing Ship Catskill | |||||||
| Transport Division 18 | |||||||
| APA CambriaAPA MonroviaAPA Frederick FunstonAP War HawkAKA AlcyoneLSD Casa GrandeLSD Rushmore | |||||||
| Transport Division 28 | |||||||
| APA BolivarAPA SheridanAPA DoyenAP CometAKA AlmaackAK AurigaLSD Belle Grove | |||||||
| Destroyer Screen | |||||||
| Destroyer Squadron 49 | |||||||
| DD PickingDD SprostonDD FletcherDD IsherwoodDD Charles J. BadgerDD HalliganDD HaradenDD TwiggsDD MacDonough | |||||||
| LST Flotilla 3 | |||||||
| DD Luce24 LST | |||||||
| Control Unit | |||||||
| 3 PC4 SC3 YMS | |||||||
| LCI Flotilla 14 | |||||||
| 4 LCI(M)4 LCI(E)9 LCI(G)2 LCI(L) | |||||||
| LSM Unit | |||||||
| 6 LSM | |||||||
| LCT Unit | |||||||
| 11 LCT | |||||||
| Fire Support Unit South (Oldendorf; in Louisville) | |||||||
| Battleship Division 2 (Chandler) | |||||||
| BB TennesseeBB CaliforniaBB Pennsylvania | |||||||
| Cruiser Division 4 (Oldendorf) | |||||||
| CA LouisvilleCA PortlandCA Minneapolis | |||||||
| Cruiser Division 9 (Ainsworth) | |||||||
| CL Honolulu | |||||||
| Cruiser Division 12 (Hayler) | |||||||
| CL DenverCL Columbia | |||||||
| Destroyer Screen | |||||||
| Destroyer Squadron 56 | |||||||
| DD LeutzeDD NewcombDD BennionDD Heywood L. EdwardsDD Richard P. Leary | |||||||
| Destroyer Division 112 | |||||||
| DD RobinsonDD RossDD Albert W. GrantDD BryantDD HalfordDD ClaxtonDD ThornDD Welles | |||||||
| Task Group 77.4 Escort Carrier Group (T.L. Sprague) | |||||||
| "Taffy 1" (T.L. Sprague) | |||||||
| CVE Sangamon | |||||||
| Air Group 37:12 F6F-3 Hellcat, 5 F6F-5 Hellcat9 TBM-1C Avenger | |||||||
| CVE Sangamon | |||||||
| Air Group 60:22 F6F-3 Hellcat9 TBM-1C Avenger | |||||||
| CVE Sangamon | |||||||
| Air Group 35:22 F6F-3 Hellcat9 TBM-1C Avenger | |||||||
| CVE Santee | |||||||
| Air Group 26:24 FM-2 Wildcat6 TBF-1C Avenger, 3 TBM-1C Avenger | |||||||
| Carrier Division 28 (Henderson) | |||||||
| CVE Saginaw Bay | |||||||
| VC-78: 15 FM-2 Wildcat, 12 TBM-1C Avenger | |||||||
| CVE Petrof Bay | |||||||
| VC-76: 16 FM-2 Wildcat, 10 TBM-1C Avenger | |||||||
| Screen | |||||||
| DD McCordDD TrathenDD HazelwoodDE EdmondsDE Richard S. BullDE Richard M. RowellDE EversoleDE Coolbaugh | Sunk | ||||||
| "Taffy 2" (Stump) | |||||||
| CVE Natoma Bay | |||||||
| VC-81: 16 FM-2 Wildcat, 12 TBM-1C Avenger | |||||||
| CVE Manila Bay | |||||||
| VC-80: 16 FM-2 Wildcat, 12 TBM-1C Avenger | |||||||
| Carrier Division 27 (Sample) | |||||||
| CVE Marcus Island | |||||||
| VC-21: 12 FM-2 Wildcat, 11 TBM-1C Avenger | |||||||
| CVE Kadashan Bay | |||||||
| VC-20: 15 FM-2 Wildcat, 11 TBM-1C Avenger | |||||||
| CVE Savo Island | |||||||
| VC-27: 16 FM-2 Wildcat, 12 TBM-1C Avenger | |||||||
| CVE Ommaney Bay | |||||||
| VC-75: 16 FM-2 Wildcat, 11 TBM-1C Avenger | |||||||
| Screen | |||||||
| DD HaggardDD FranksDD HaileyDE Richard W. SuesensDE AbercrombieDE OberrenderDE LeRay WilsonDE Walter C. Wann | |||||||
| "Taffy 3" (C.A.F. Sprague) | |||||||
| CVE Kadashan Bay | |||||||
| VC-68: 16 FM-2 Wildcat, 12 TBM-1C Avenger | |||||||
| CVE St. Lo | Sunk | ||||||
| VC-65: 17 FM-2 Wildcat, 12 TBM-1C Avenger | |||||||
| CVE White Plains | |||||||
| VC-4: 16 FM-2 Wildcat, 12 TBM-1C Avenger | |||||||
| CVE Kalinin Bay | |||||||
| VC-3: 16 FM-2 Wildcat, 1 TBF-1C Avenger, 11 TBM-1C Avenger | |||||||
| Carrier Division 26 (Ofstie) | |||||||
| CVE Kitkun Bay | Damaged | ||||||
| VC-4: 14 FM-2 Wildcat, 12 TBM-1C Avenger | |||||||
| CVE Gambier Bay | Sunk | ||||||
| VC-10: 18 FM-2 Wildcat, 12 TBM-1C Avenger | |||||||
| Screen | |||||||
| DD HoelDD HeermannDD JohnstonDE DennisDE John C. ButlerDE RaymondDE Samuel B. Roberts | SunkSunkSunk | ||||||
| Task Group 77.3 Close Covering Group (Berkey) | |||||||
| CL PhoenixCL BoiseCA AustraliaCA Shropshire | |||||||
| Destroyer Screen | |||||||
| Destroyer Squadron 24 | |||||||
| DD HutchinsDD BacheDD BealeDD DalyDD KillenDD AruntaDD Warramunga | |||||||
| Task Group 77.5 Minesweeping and Hydrographic Group | |||||||
| DMS HoveyDM PrebleDM BreeseAPD SandsAM TokenAM TumultAM VelocityAM ZealAM RequisiteAM PursuitAM RevengeAM SageAM SaluteAM SaunterAM ScoutAM ScrimmageAM SentryDMS SouthardDMS ChandlerDMS LongDMS HamiltonDMS HowardDMS Palmer26 YMSPF GascoyneHDML-1074 | |||||||
| Task Group 77.6 Beach Demolition Group | |||||||
| APD TalbotAPD ManleyAPD GoldsboroughAPD KaneAPD BrooksAPD BelknapAPD OvertonAPD HumphreysAPD RathburneAPD George E. BadgerAPD Clemson | Embarking UDT 3, 4, 5, 6, 8, 9, and 10 | ||||||
| Task Group 73.7 Seaplane Tenders, San Pedro Bay | |||||||
| AVP San CarlosAVP Half Moon | |||||||
| Patrol Squadron 34 | |||||||
| 12 PBY-5 Catalina | |||||||
| Task Group 70.1 Motor Torpedo Boat Squadrons Seventh Fleet | |||||||
| AGP Oyster BayAGP WachapreagueAGP Willoughby39 PT deployed in 13 sections | One sunk | ||||||
| Task Group 77.7 Service Force (Glover) | |||||||
| Fueling at Sea Unit | |||||||
| AO SaranacAO AshtabulaAO SalamonieAO SuamicoAOG KishwaukeeAO SchuylkillAO TallulahAE MazamaAE Durham VictoryAE Iran VictoryAE Bluefield VictoryAE Canada Victory | |||||||
| Escort Unit | |||||||
| DE WhitehurstDE WitterDE Bowers | |||||||
| Kossol Roads Unit | |||||||
| AO Chepachet2 merchant AODE Willmarth | |||||||
| Leyte Gulf Unit | |||||||
| IX ArethusaIX CaribouIX MinkIX PandaIX PorcupineAO _Bishopdale_AW SevernAKN IndusAN TeakAN SilverbellAN SatinleafARL AchillesARS CableARB Midas ARD-19AE MurzimAE Poyang AE _Yunnan_AF ArequipaAF Calamaries AF _Mizar_AF OctansAK CruxAK GanymedeAK TriangulumAKS PolluxAKS AcubensAK Merkur AH MercyAH Comfort | |||||||
| Task Force 71 | |||||||
| Task Group 71.1 Supporting Submarines Seventh Fleet | |||||||
| SS DarterSS DaceSS AnglerSS BluegillSS BreamSS RatonSS Guitarro | Scuttled after grounding | ||||||
| Pacific Fleet (Nimitz) | |||||||
| 3 Fleet (Halsey; on BB New Jersey) | |||||||
| Task Force 38 Fast Carrier Force (Mitscher; on CV Lexington) | |||||||
| Task Group 38.1 (McCain) | |||||||
| CV Wasp | |||||||
| VF-14: 30 F6F-3 Hellcat, 3 F6F-3N Hellcat, 2 F6F-3P Hellcat, 7 F6F-5 Hellcat, 1 F6F-5N HellcatVB-14: 3 F6F-3 Hellcat, 7 F6F-5 Hellcat, 25 SB2C-3 HelldiverVT-14: 5 TBF-1C Avenger, 1 TBF-1D Avenger, 11 TBM-1C Avenger, 1 TBM-1D Avenger | |||||||
| CV Hornet | |||||||
| VF-11: 11 F6F-3 Hellcat, 2 F6F-3N Hellcat, 1 F6F-3P Hellcat, 21 F6F-5 Hellcat, 2 F6F-5N Hellcat, 3 F6F-5P HellcatVB-11: 25 SB2C-3 HelldiverVT-11: 1 TBM-1C Avenger, 17 TBM-1C Avenger | |||||||
| CVL Monterey | |||||||
| VF-28: 21 F6F-5 Hellcat, 1 F6F-5P HellcatVT-28: 9 TBM-1C Avenger | |||||||
| CVL Cowpens | |||||||
| VF-22: 25 F6F-5 Hellcat, 1 F6F-5P HellcatVT-22: 9 TBM-1C Avenger | |||||||
| Cruiser Division 6 (Joy) | |||||||
| CA Wichita | |||||||
| Cruiser Division 10 (Wiltse) | |||||||
| CA Boston | |||||||
| Cruiser Division 5 (Smith) | |||||||
| CA ChesterCA PensacolaCA Salt Lake City | |||||||
| Screen | |||||||
| Destroyer Squadron 46 | |||||||
| DD IzardDD CharretteDD ConnerDD BellDD Burns | |||||||
| Destroyer Division 100 | |||||||
| DD CogswellDD CapertonDD IngersollDD Knapp | |||||||
| Destroyer Division 92 | |||||||
| DD BoydDD Cowell | |||||||
| Destroyer Squadron 12 | |||||||
| DD McCallaDD GraysonDD BrownDD Woodworth | |||||||
| Destroyer Squadron 4 | |||||||
| DD DunlapDD FanningDD CaseDD CummingsDD CassinDD Downes | |||||||
| Task Group 38.2 (Bogan) | |||||||
| CV Intrepid | |||||||
| VF-18: 5 F6F-3N Hellcat, 36 F6F-5 Hellcat, 3 F6F-5P HellcatVB-18: 28 SB2C-3 HelldiverVT-18: 18 TBM-1C Avenger | |||||||
| CV Hancock | |||||||
| VF-7: 37 F6F-5 Hellcat, 4 F6F-5N HellcatVB-7: 30 SB2C-3 Helldiver, 12 SB2C-3E HelldiverVT-7: 18 TBM-1C Avenger | |||||||
| CV Bunker Hill | |||||||
| VF-8: 27 F6F-3 Hellcat, 14 F6F-5 Hellcat, 4 F6F-3N Hellcat, 4 F6F-5N HellcatVB-8: 17 SB2C-1C Helldiver, 3 SBF-1 Helldiver, 4 SBW-1 HelldiverVT-8: 17 TBM-1C Avenger, 2 TBM-1D Avenger | |||||||
| CVL Cowpens | |||||||
| VF-29: 3 F6F-3 Hellcat, 18 F6F-5 HellcatVT-29: 1 TBF-1C Avenger, 8 TBM-1C Avenger | |||||||
| CVL Independence | Night air group carrier | ||||||
| VF-41: 3 F6F-3 Hellcat, 2 F6F-5 Hellcat, 14 F6F-5N HellcatVT-41: 8 TBM-1D Avenger | |||||||
| Battleship Division 7 (Badger) | |||||||
| BB IowaBB New Jersey | |||||||
| Cruiser Division 14 (Whiting) | |||||||
| CL VincennesCL MiamiCLAA San DiegoCLAA Oakland | |||||||
| Screen | |||||||
| Destroyer Squadron 52 | |||||||
| DD MillerDD The SullivansDD Stephen PotterDD Tingey | |||||||
| Destroyer Division 104 | |||||||
| DD HickoxDD HuntDD Lewis HancockDD Marshall | |||||||
| Destroyer Squadron 50 | |||||||
| DD Halsey PowellDD CushingDD ColahanDD UhlmannDD Benham | |||||||
| Destroyer Division 106 | |||||||
| DD StockhamDD WedderburnDD TwiningDD Yarnall | |||||||
| Task Group 38.3 (Sherman) | |||||||
| CV Essex | |||||||
| VF-15: 22 F6F-3 Hellcat, 3 F6F-3N Hellcat, 2 F6F-3P Hellcat, 23 F6F-5 Hellcat, 1 F6F-5N HellcatVB-15: 25 SB2C-3 HelldiverVT-15: 15 TBF-1C Avenger, 5 TBM-1C Avenger | |||||||
| CV Lexington | |||||||
| VF-19: 14 F6F-3 Hellcat, 2 F6F-3N Hellcat, 1 F6F-3P Hellcat, 22 F6F-5 Hellcat, 1 F6F-5N Hellcat, 1 F6F-5P Hellcat VB-19: 30 SB2C-3 HelldiverVT-19: 18 TBM-1C Avenger | |||||||
| CVL Princeton | Sunk | ||||||
| VF-27: 18 F6F-3 Hellcat, 7 F6F-5 HellcatVT-27: 9 TBM-1C Avenger | |||||||
| CVL Langley | |||||||
| VF-44: 19 F6F-3 Hellcat, 6 F6F-5 HellcatVT-44: 9 TBM-1C Avenger | |||||||
| Battleships, Pacific Fleet (Lee) | |||||||
| BB Washington | |||||||
| Battleship Division 8 (Davis) | |||||||
| BB Massachusetts | |||||||
| Battleship Division 9 (Hanson) | |||||||
| BB South DakotaBB Alabama | |||||||
| Cruiser Division 13 (DuBose) | |||||||
| CL Santa FeCL MobileCL BirminghamCLAA Reno | Damaged | ||||||
| Screen | |||||||
| Destroyer Squadron 50 | |||||||
| DD Clarence K. BronsonDD CottenDD DortchDD Healy | |||||||
| Destroyer Squadron 55 | |||||||
| DD PorterfieldDD CallaghanDD Cassin YoungDD IrwinDD Preston | |||||||
| Destroyer Division 110 | |||||||
| DD LawsDD LongshawDD MorrisonDD Pritchett | |||||||
| Task Group 38.4 (Davison) | |||||||
| CV Franklin | |||||||
| VF-13: 1 F6F-3 Hellcat, 3 F6F-3N Hellcat, 30 F6F-5 Hellcat, 1 F6F-5N Hellcat, 4 F6F-5P Hellcat VB-13: 31 SB2C-3 HelldiverVT-13: 18 TBM-1C Avenger | |||||||
| CV Enterprise | |||||||
| VF-20: 4 F6F-3N Hellcat, 36 F6F-5 HellcatVB-20: 34 SB2C-3 HelldiverVT-20: 19 TBM-1C Avenger | |||||||
| CVL San Jacinto | |||||||
| VF-51: 24 F6F-3 Hellcat, 5 F6F-5 HellcatVT-51: 5 TBM-1C Avenger | |||||||
| CVL Belleau Wood | |||||||
| VF-21: 24 F6F-5 Hellcat, 1 F6F-5P HellcatVT-21: 9 TBM-1C Avenger | |||||||
| CA New OrleansCL Biloxi | |||||||
| Screen | |||||||
| Destroyer Squadron 6 | |||||||
| DD GridleyDD HelmDD McCall | |||||||
| Destroyer Division 12 | |||||||
| DD MugfordDD BagleyDD PattersonDD Ralph Talbot | |||||||
| Destroyer Division 24 | |||||||
| DD WilkesDD NicholsonDD Swanson | |||||||
| TG 30.8 At Sea Logistics Group Third Fleet | |||||||
| AO AtascosaAO AucillaAO CacheAO CalienteAO ChicopeeAO ChikaskiaAO CimarronAO EscambiaAO GuadalupeAO KankakeeAO KaskaskiaAO KennebagoAO LackawannaAO ManateeAO MariasAO MascomaAO MerrimackAO MillicomaAO MississinewaAO TappahannockAO NantahalaAO NechesAO NeoshoAO NiobraraAO PamansetAO PatuxentAO PecosAO PlatteAO SabineAO SaugatuckAO SebecAO TalugaAO MonongahelaAO TomahawkCVE AltamahaCVE BarnesCVE Sitkoh BayCVE Cape EsperanceCVE NassauCVE KwajaleinCVE Shipley BayCVE Steamer BayCVE Nehenta BayCVE Sargent BayCVE Rudyerd Bay | Sunk | ||||||
| Screen | |||||||
| Destroyer Division 102 | |||||||
| DD AylwinDD CappsDD DaleDD David W. Taylor | |||||||
| Destroyer Squadron 1 | |||||||
| DD DeweyDD DysonDD EvansDD FarragutDD Hailey | |||||||
| Destroyer Squadron 51 | |||||||
| DD HallDD HobbyDD HullDD John D. HenleyDD MonaghanDD Paul HamiltonDD ThatcherDD ThornDD Welles | |||||||
| Destroyer Escorts | |||||||
| DE AcreeDE BangustDE CrowleyDE DonaldsonDE EldenDE HalloranDE HilbertDE KyneDE LakeDE LamonsDE LevyDE LymanDE McConnellDE MitchellDE O'NeillDE OsterhausDE ParksDE RallDE ReynoldsDE RiddleDE Samuel S. MilesDE SternDE SwearerDE WatermanDE WeaverDE Wesson | |||||||
| Fleet Tugs | |||||||
| AT HitchitiAT JicarillaAT MatacoAT MenomineeAT MolalaAT MunseeAT PawneeAT SiouxAT TekestaAT Zuni | |||||||
| Ammunition Ships | |||||||
| AE Mount HoodAE SangayAE Mauna LoaAK Australia VictoryAE ShastaAE Lassen | Exploded from unknown causes during the operation | ||||||
| December echelon | |||||||
| AK Provo VictoryAK Elmira VictoryAK Boulder VictoryAE RanierAE Mount BakerAE NitroAK Alamosa | |||||||
| Task Force 17 Supporting Submarines Pacific Fleet (Lockwood) | |||||||
| SS TangSS SterletSS BarbelSS Snook | Sunk | ||||||
| "Clarey's Crushers" | |||||||
| SS PintadoSS JallaoSS Atule | |||||||
| "Roach's Raiders" | |||||||
| SS HaddockSS HalibutSS Tuna | |||||||
| "Banister's Beagles" | |||||||
| SS SawfishSS DrumSS Icefish | |||||||
| "Blakely's Behemoths" | |||||||
| SS SharkSS BlackfishSS Seadragon | Sunk | ||||||
| "Coye's Coyotes" | |||||||
| SS SilversidesSS SalmonSS Trigger | |||||||
| "Wogan's Wolves" | |||||||
| SS BesugoSS RonquilSS Gabilan |
References
Hornfischer (2004)
Morison (1958)
Naval War College (accessed 2012-11-2)
The Pacific War Online Encyclopedia © 2007-2009, 2012 by Kent G. Budge. Index
