SIM cards for your Galaxy phone or tablet (original) (raw)
Use the eSIM
Note
Some carriers may not yet support the eSIM capabilities of your Galaxy device. Contact your carrier if you have any questions about their plans to support eSIM.
An eSIM is an embedded version of a physical SIM card within your device, providing connectivity to your carrier's network without the need for a physical card. Activated using your carrier account information, it allows you to use the eSIM alongside a physical SIM to add a second phone number or carrier. This setup offers flexibility to transfer or convert your SIM configuration, as well as switch between SIMs for calls and messages, enhancing convenience and efficiency in managing multiple numbers or carriers on a single device.
Primary SIM Set Up:
- Navigate to and open Settings, and then tap Connections.
- Tap SIM manager. From here, you can tap the switch next to your physical SIM or activated eSIM to enable or disable their connections. You can also tap Primary SIM to change the default connection for making calls, sending texts, and using data.
To start using the eSIM, follow your carrier's instructions.
eSIM Activation Options:
Carrier Discovery Server
- Existing eSIM profile is found; tap Add.
- eSIM profile is downloaded.
- Restart the device to apply the eSIM profile.
Network Carriers that may allow Carrier Discovery Server
Asia-Pacific and Australia
- Australia: Telstra
- India: JIO
- Japan: KDDI, NTT Docomo, Softbank
- Korea: KT, LGU+, SKT
- New Zealand: Spark, 2degrees
- Thailand: AIS, Dtac, TrueMove H
Europe
- Austria: A1, Drei
- Belgium: Telenet, Promixus
- Czechia: Vodafone
- Denmark: Telia
- Finland: Telia
- France: SFR, Free Mobile
- Germany: Telekom
- Italy: TIM
- Norway: Telia
- Sweden: Telia
- Switzerland: Swisscom
Central and South America
- Mexico: AT&T Mexico
Middle East
- Israel: Partner
North America
- Canada: Bell, Fido, Freedom, Koodo Mobile, Rogers, SaskTel, Lucky Mobile, TELUS, Virgin Plus
- US: AT&T, Boost Mobile, Cellcom, Consumer Cellular, Cricket, C-Spire, FirstNet, Metro by T-Mobile, Mint Mobile, Spectrum Mobile, T-Mobile, Tracfone, US Cellular, Verizon, Xfinity Mobile
Carrier Push Notification
- eSIM ready notification appears. Tap the notification, and then tap Add.
- eSIM profile is downloaded.
- eSIM profile added to the device. Restart the device to apply.
Transfer your SIM:
Transfer SIM
- On your new device, navigate to and open Settings, and then tap Connections.
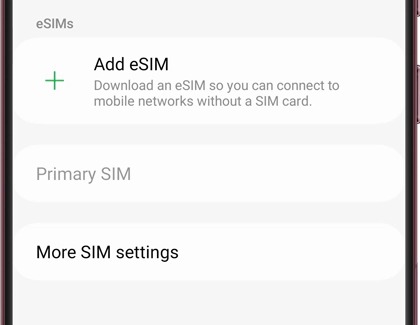
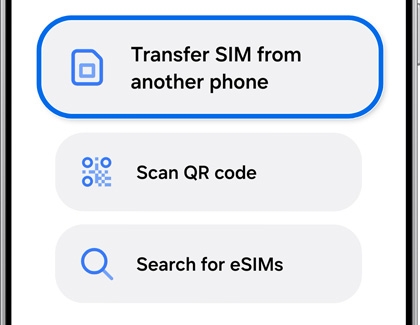
- Tap SIM manager, then tap Add eSIM, and then tap Transfer SIM from another phone.
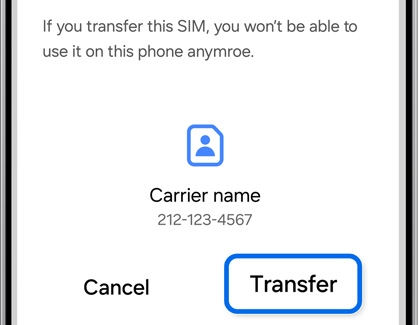
- On your old device, tap Transfer. Enter the code displayed on your new device into your old device.
- On your new device, select the SIM you want to transfer, then tap Transfer. Next, tap Transfer on your old device.
- Once the transfer is complete, tap Done on your old device. The SIM in your new device will be activated.
Network Carriers that may allow eSIM Instant Transfer
Asia-Pacific and Australia
- India: Jio
- Japan: NTT Docomo, KDDI, SoftBank, UQ Mobile
- Korea: KT, LGU+, SKT
- New Zealand: 2 Degrees
- Thailand: AIS
Europe
- Austria: Spusu, Drei, Magenta Telekom, A1
- Belgium: Proximus
- Czechia: T-Mobile, Vodafone
- Finland: Telia
- France: Free Mobile, SFR, Orange
- Germany: Telekom, Vodafone, 1&1
- Italy: TIM
- Lithuania: Telia
- Norway: Telia
- Portugal: MEO
- Slovakia: Telekom
- Slovenia: A1
- Spain: MasOrange, Movistar
- Sweden: Halebop, Telia
- Switzerland: Sunrise, Swisscom
- UK: O2, Spusu UK, EE
Central and South America
- Brazil: Vivo
- Mexico: AT&T Mexico
Middle East
- Bahrain: Zai
- Israel: Cellcom
- Kuwait: stc, Zain
North America
- Canada: Bell, Koodo Mobile, TELUS, Virgin Plus, Lucky Mobile, Rogers, SaskTel, Fido, Freedom Mobile
- USA: AT&T, Boost Mobile, Cricket, FirstNet, Mint Mobile, Spectrum Mobile, T-Mobile, U.S Cellular, Verizon, Xfinity Mobile
To transfer eSIM from an iOS device
You can transfer your eSIM from your iOS device to a Galaxy device seamlessly without contacting your network carrier. This is available only for supported carriers. You can find the list of carriers below.
In the case that your carrier is not on the list, you need to contact your network carrier to help move your eSIM to a new device.
Note: Both of your devices must be updated with the latest software. Both also must be connected to Wi-Fi and Bluetooth.
- On your new device, go to Settings > Connections > SIM manager > Add eSIM.
- On your new device, tap Transfer SIM from iPhone.
- On your new device, you will see instructions for SIM transfer from an iPhone. Tap Next.
- On your new device, the QR code for connecting devices will be generated.
- On your old device, scan the QR code. If you cannot scan the QR code, tap Enter a passcode instead on your new device and follow the instructions.
- On your old device, select a phone number from the list, then tap Continue.
- On your old device, confirm SIM transfer by tapping Continue.
- The selected number will be transferred to your new Galaxy device from your old device.
- On your new device, tap Settings and go back to the Settings menu.
Network Carriers that may allow eSIM Instant Transfer from an iOS device
Asia-Pacific and Australia
- Japan: KDDI, UQ Mobile
Europe
- Germany: Telekom
- France: Orange, SFR
- Switzerland: Swisscom
- UK: EE
Central and South America
- Mexico: AT&T Mexico
North America
- Canada: Lucky Mobile, Koodo Mobile, Virgin Plus, Bell, TELUS
- US: AT&T, FirstNet, T-Mobile, Verizon
Convert SIM
- Navigate to and open Settings, and then tap Connections.
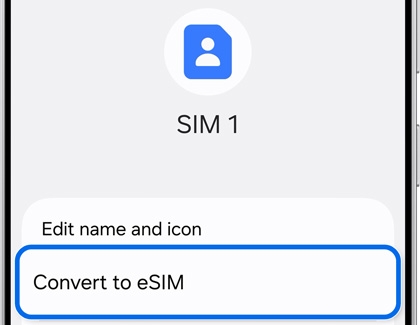
- Tap SIM manager, then select the SIM card, and then tap Convert to eSIM.
- Your information will be transferred from the physical SIM (pSIM) to the phone's eSIM.
Note
- Depending on the country of origin, eSIM may not be supported.
- Wi-Fi-only tablet models do not support eSIM functionality.
Network Carriers that may Support eSIM:
Africa
- Ghana: AirtelTigo, MTN, Vodafone
- Kenya: Safaricom
- Libya: Almadar Aljadid, Libyana
- Mauritius: Emtel, My.T
- Morocco: inwi, Maroc Telecom, Orange
- Nigeria: MTN, 9mobile
- Senegal: Expresso, Free, Orange
- South Africa: Cell C, MTN, Telkom, Vodacom
- Tunisia: Ooredoo, Orange
Asia-Pacific and Australia
- Australia: Optus, Telstra, Vodafone
- Bangladesh: Banglalink, Grameenphone, Robi
- Bhutan: Bhutan Telecom, Tashicell
- Cambodia: Cellcard, Metfone, Smart Axiata
- Guam: Docomo Pacific, GTA, IT&E
- Hong Kong: 3HK, CMHK, HKT, SmarTone
- India: Airtel, Jio, Vodafone-Idea
- Indonesia: Indosat Ooredoo Hutch(IOH), XL Smart
- Japan: NTT docomo, KDDI, Rakuten Mobile, SoftBank, UQ Mobile
- Kazakhstan: Beeline, Kcell, Tele2
- Korea: KT, LGU+, SKT
- Laos: Lao Telecom, TPLUS, Unitel
- Macau: China Telecom Macau, CTM
- Malaysia: Digi, Maxis, U Mobile, Yes 4G
- Maldives: Dhiraagu, Ooredoo
- Mongolia: Mobicom, Unitel
- Myanmar: ATOM, Mytel, Ooredoo
- Nepal: Ncell, Nepal Telecom
- New Zealand: 2degrees, One.NZ, Spark
- Pakistan: Jazz, Telenor, Ufone, Zong
- Philippines: Dito, Globe, Smart
- Singapore: M1, Singtel Mobile, StarHub
- Sri Lanka: Dialog, Hutch, Mobitel
- Taiwan: Chunghwa Telecom, Far EasTone Telecommunications, Taiwan Mobile
- Thailand: AIS, Dtac, TrueMove H
- Uzbekistan: Beeline, Humans, Og, Ucell, UMS, UzMobile
- Vietnam: MobiFone, Viettel Mobile, Vinaphone (VNPT)
Europe
- Albania: One Albania, Vodafone
- Armenia: Viva MTS, Ucom
- Austria: A1, Drei, HoT, Magenta Telekom, Spusu
- Azerbaijan: Azercell, Bakcell, Narmobile
- Belarus: MTS, A1
- Belgium: BASE, Orange, Proximus, Telenet
- Bosnia and Herzegovina: BH Telecom, HT Eronet, mtel
- Bulgaria: A1, Vivacom, Yettel
- Croatia: A1, Hrvatski Telekom, Telemach
- Czechia: O2, T-Mobile, Vodafone
- Denmark: TDC, Telenor, NORYS, Tre
- Estonia: Elisa, Tele2, Telia
- Finland: DNA, Elisa, Telia
- France: Free Mobile, Orange, SFR
- Germany: 1&1, O2, Telekom, Vodafone
- Greece: COSMOTE, Vodafone, Nova
- Georgia: Cellfie, MagtiCom, Silknet
- Hungary: Magyar Telekom, Telenor, Vodafone
- Iceland: Nova, Siminn, Vodafone
- Italy: CoopVoce, Fastweb, Ho.mobile, Iliad, Spusu, TIM, Vodafone, WINDTRE
- Kosovo: IPKO, VALA
- Latvia: Bite, LMT, Tele2
- Liechtenstein: Salt FL, Swisscom FL, Telecom Liechtenstein
- Lithuania: Bitė, TELE2, Telia
- Luxembourg: Orange, POST, Tango
- Malta: Epic, GO Malta, Melita
- Moldova: Moldcell, Orange
- Montenegro: mtel, Telekom, Telenor
- Netherlands: KPN, Odido, Vodafone
- North Macedonia: A1, Telekom
- Norway: Ice, Mycall, Onecall, Telenor, Telia
- Poland: Orange, Play, Plus, T-Mobile, Truphone
- Portugal: MEO, NOS, Vodafone
- Romania: Digi Mobile, Orange, Telekom, Vodafone
- Russia: Beeline, MegaFon, MTS, SberMobile, Tele2, Tinkoff
- Serbia: A1, Globaltel, mts, Yettel
- Slovakia: 4KA, O2, Orange, Telekom
- Slovenia: A1, T-2, Telekom Slovenije, Telemach
- Spain: Movistar, MasOrange, Vodafone
- Sweden: Halebop, Tele2, Telenor, Telia, Tre
- Switzerland: Salt, Sunrise, Swisscom
- Ukraine: Lifecell, Kyivstar, TriMob, Vodafone
- UK: EE, H3G, O2, SKY, Spusu UK, Three, Truphone, Vodafone
Central and South America
- Argentina: Claro, Movistar, Personal
- Bolivia: Entel, Tigo, Viva
- Brazil: Claro, TIM, Vivo
- Chile: Entel, Movistar, WOM
- Colombia: Claro, Movistar
- Costa Rica: Claro, Kölbi, Movistar
- Dominican Republic: Altice GSM, Claro
- Ecuador: Claro, Movistar
- El Salvador: Claro, Movistar, Tigo
- Guatemala: Claro, Tigo
- Honduras: Claro, Tigo
- Jamaica: Digicel, FLOW Jamaica
- Mexico: AT&T Mexico, Movistar, Telcel
- Nicaragua: Claro, Tigo
- Panama: Cable & Wireless
- Paraguay: Claro, Personal, Tigo
- Peru: Claro, Entel, Movistar
- Puerto Rico & United States Virgin Islands: Claro, Liberty
- Uruguay: Antel, Claro, Movistar
Middle East
- Bahrain: Batelco, stc, Zain
- Iraq: Fastlink, Asia Cell
- Israel: Cellcom, Hot Mobile, Partner, Pelephone, WeCom
- Jordan: Orange Jordan, Umniah, Zain Jordan
- Kuwait: Ooredoo, stc, Virgin Mobile, Zain
- Lebanon: Alfa
- Oman: Omantel, Ooredoo, Vodafone
- Qatar: Ooredoo, Vodafone
- Saudi Arabia: Mobily, stc, Zain
- Turkey: Türk Telekom, Turkcell, Vodafone
- UAE: du, Etisalat, Virgin Mobile
North America
- USA: Altice, Appalachian Wireless, AT&T, Boost Mobile, Carolina West Wireless, Cellcom, Consumer Cellular, Cox Mobile, Cricket, C-Spire, FirstNet, GCI, Google Fi, H2O Wireless, Metro by T-Mobile, Mint Mobile, Nemont, Nex-Tech Wireless, Optimum Mobile, PureTalk, Spectrum Mobile, Strata, Thumb Cellular, Ting, T-Mobile, Tracfone, Truphone, Union Wireless, United Wireless, US Cellular, US Mobile, Verizon, Viaero, Visible, Xfinity Mobile
- Canada: Bell, Eastlink, Fido, Fizz mobile, Freedom, Koodo Mobile, Lucky Mobile, Rogers, SaskTel, TELUS, Videotron, Virgin Plus
Read less
Insert the SIM card
Note
If you are changing carriers, you may need to have your device SIM unlocked. Please contact your original carrier for details on their unlocking policies and procedures.
If you are upgrading to a new device or changing carriers, you'll need to install your SIM card to activate service. Your carrier may require additional steps to get your service started, so get in touch with them to make sure your account is ready for the new phone.
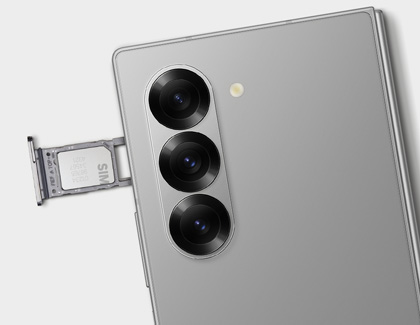
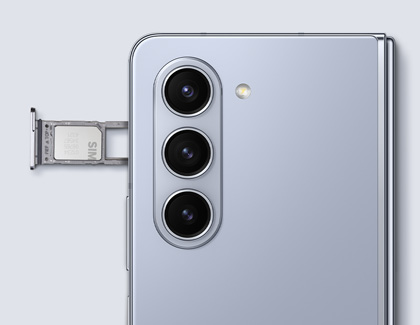
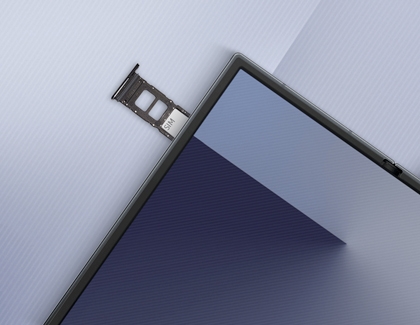
- Power off your device and then insert the ejector tool that came with your device into the hole on the SIM card tray.
Important: Be careful not to insert the ejector tool into any of the microphone or speaker holes along the edge of your device. Look for the outline of the tray to make sure you're in the right place.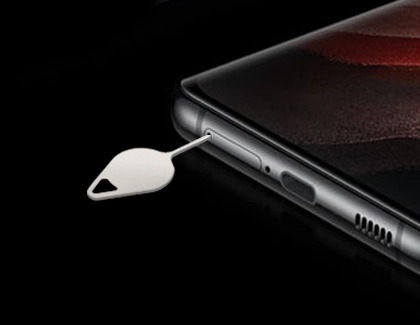
- Next, push the tool until the tray pops out.
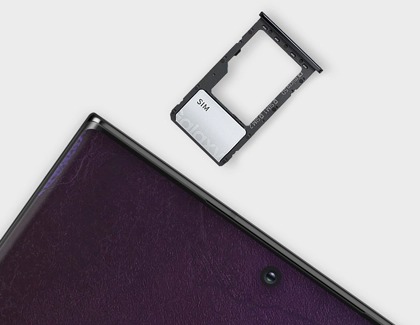
- Carefully line up your SIM card with the smaller cutout on the tray.

- Verify the card is flush with the tray, and then insert the SIM tray back into the slot on your device.
Note: The orientation of the metal contacts will vary by device. The SIM card will only fit correctly in one direction. It should be flush with the tray when correctly inserted.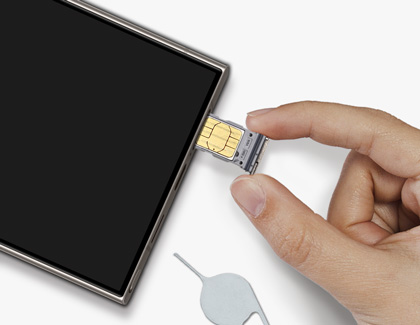
- Now, power on your device and you're good to go! If you are prompted for an unlock code, contact the phone's original carrier.
If you have any issues removing or inserting the SIM card tray, service may be necessary. If you need a replacement SIM ejector tool, you may be able to get one from your carrier or an electronics retailer.
Read less
Remove the SIM card
If you ever need to take out your SIM card, just reverse the steps we mentioned earlier.
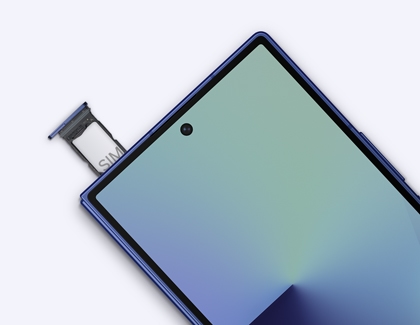
- First, insert the ejector tool into the hole on the SIM card tray, and then push it until the tray pops out.
- Remove the SIM card from the tray, and then insert the SIM tray back into the slot.
If you have any issues removing or inserting the SIM card tray, service may be necessary.
Read less
Insert and remove the SIM card on the Z Fold7, Z Fold6, and Z Fold5
Note
If the SIM card is inserted backwards, or if the SIM card tray is forced into the phone when it is not positioned properly, the tray may bend or break.
If you have a Galaxy Z Fold7, Z Fold6, or Z Fold5, you can use the instructions below when inserting and removing the SIM card.
Galaxy Z Fold7
- The Galaxy Z Fold device should be placed on a flat surface with the screen face up and the camera side down.
- Insert the ejector tool into the hole in the SIM card tray.
- Remove the SIM card tray when it pops out from your phone.
- Place the SIM card into the SIM card tray with the metal chip facing down. Ensure the card is aligned and level.
- Insert and press the SIM card tray into the SIM card slot on your phone.
- To remove the SIM card, insert the ejector tool into the hole in the SIM card tray, and then push it until the tray pops out.
- Remove the SIM card from the tray, and then insert the SIM tray back into the slot.
Galaxy Z Fold6
- The Galaxy Z Fold device should be placed on a flat surface with the screen face down and the camera side facing up.
- Insert the ejector tool into the hole in the SIM card tray.
- Remove the SIM card tray when it pops out from your phone.
- Place the SIM card into the SIM card tray with the metal chip facing down. Ensure the card is aligned and level.
- Insert and press the SIM card tray into the SIM card slot on your phone.
- To remove the SIM card, insert the ejector tool into the hole in the SIM card tray, and then push it until the tray pops out.
- Remove the SIM card from the tray, and then insert the SIM tray back into the slot.
Galaxy Z Fold5
- The Galaxy Z Fold device should be placed on a flat surface with the screen face down and the camera side facing up
- Insert the ejector tool into the hole in the SIM card tray.
- Remove the SIM card tray when it pops out from your phone.
- Place the SIM card into the SIM card tray with the metal chip facing down. Ensure the card is aligned and level.
- Insert and press the SIM card tray into the SIM card slot on your phone.
- To remove the SIM card, insert the ejector tool into the hole in the SIM card tray, and then push it until the tray pops out.
- Remove the SIM card from the tray, and then insert the SIM tray back into the slot.
Read less
Insert and remove the SIM card on the Z Flip7, Z Flip7 FE, Z Flip6, and Z Flip5
Note
If the SIM card is inserted backwards, or if the SIM card tray is forced into the phone when it is not positioned properly, the tray may bend or break.
The instructions below will help you insert and remove the SIM card on the Galaxy Z Flip7, Z Flip7 FE, Z Flip6, and Z Flip5.
Galaxy Z Flip7 and Z Flip7 FE
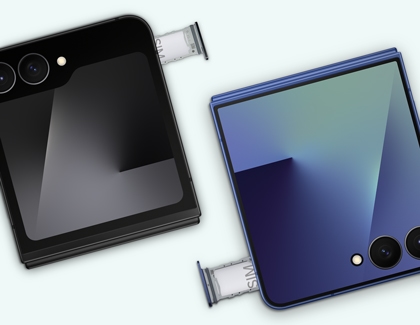
- Make sure your phone is closed. Insert the ejector tool into the hole in the SIM card tray.
- Remove the SIM card tray when it pops out from your phone.
- Place the SIM card into the SIM card tray with the metal chip facing down. Ensure the card is aligned and level.
- Insert and press the SIM card tray into the SIM card slot on your phone.
- To remove the SIM card, insert the ejector tool into the hole in the SIM card tray, and then push it until the tray pops out.
- Remove the SIM card from the tray, and then insert the SIM tray back into the slot.
Galaxy Z Flip6

- Make sure your phone is closed. Insert the ejector tool into the hole in the SIM card tray.
- Remove the SIM card tray when it pops out from your phone.
- Place the SIM card into the SIM card tray with the metal chip facing down. Ensure the card is aligned and level.
- Insert and press the SIM card tray into the SIM card slot on your phone.
- To remove the SIM card, insert the ejector tool into the hole in the SIM card tray, and then push it until the tray pops out.
- Remove the SIM card from the tray, and then insert the SIM tray back into the slot.
Galaxy Z Flip5
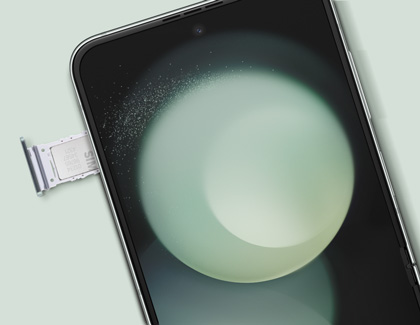
- Make sure your phone is open to the main screen. Insert the ejector tool into the hole in the SIM card tray.
- Remove the SIM card tray when it pops out from your phone.
- Place the SIM card into the SIM card tray with the metal chip facing down. Ensure the card is aligned and level.
- Insert and press the SIM card tray into the SIM card slot on your phone.
- To remove the SIM card, insert the ejector tool into the hole in the SIM card tray, and then push it until the tray pops out.
- Remove the SIM card from the tray, and then insert the SIM tray back into the slot.
Read less
Insert and remove the SIM card on the Z TriFold
Note
If the SIM card is inserted backwards, or if the SIM card tray is forced into the phone when it is not positioned properly, the tray may bend or break.
Follow the steps below to insert the SIM card. Before starting, make sure the Galaxy Z TriFold is fully unfolded.
- Fully unfold the Galaxy Z TriFold. The SIM tray is located on the left side of the device. While the device is unfolded, insert the ejection pin into the SIM tray hole to loosen and release the tray.
- While the device is unfolded, insert the ejection pin into the SIM tray hole to loosen and release the tray.
- Pull the tray out completely.
- Place the SIM card on the tray with the metal contacts facing downward, then gently press it into place.
- Insert the tray back into the tray slot.
- To remove the SIM card, insert the ejector tool into the hole in the SIM card tray, and then push it until the tray pops out.
- Remove the SIM card from the tray, and then insert the SIM tray back into the slot.
Read less
Insert and remove the SIM card on the XCover6 Pro
Note
The XCover6 Pro includes dual SIM card functionality.
Changing out the SIM card on your XCover6 Pro is different from inserting and removing it on other phone models.
- Remove the phone's back cover, and then remove the battery by lifting it up from the bottom.
- Next, insert the SIM card in its designated slot.
Note: You can also insert a memory card above the SIM card slot if desired.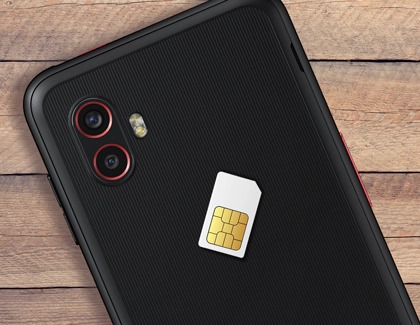
- Then, replace the battery by sliding it into its slot. Replace the back cover and make sure it snaps into place.
- To remove the SIM card, first remove the phone's back cover and then the battery.
- Remove the SIM card from its slot. Then, replace the battery and the back cover.
Read less
SIM card sizes
Important
Some carriers may provide all three SIM cards. Be sure to remove the one you need from the pre-scored plastic before inserting it into your phone.
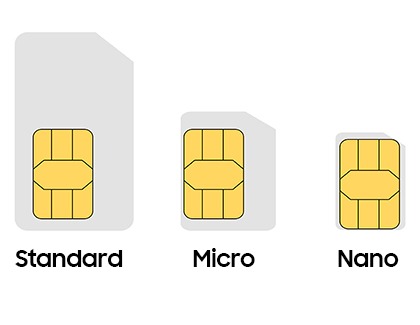
There are three types of SIM cards:
- Standard SIM: The largest SIM size, sometimes called mini-SIM and found in older phones.
- Micro-SIM: A medium sized SIM card, popular in previous models.
- Nano-SIM: The smallest SIM size and used by most new phones.
Read less
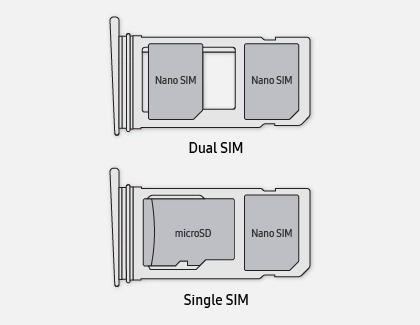
Dual SIM compatibility
Dual SIM features are made available on the device by either a physical SIM and eSIM (Hybrid eSIM) or two physical SIM cards (Dual Physical SIM). The following Hybrid eSIM devices support dual SIM features.
- Galaxy XCover6 Pro
- Galaxu S26 series
- Galaxy S25 Series
- Galaxy S24 Series
- Galaxy S23 Series
- Galaxy S22 Series
- Galaxy S21 Series
- Galaxy S20 Series
- Galaxy Note 20 Series
- Galaxy Z TriFold, Fold7, Z Fold6, Z Fold5, Z Fold4, Z Fold 3, and Z Fold2
- Galaxy Z Fip7, Z Flip7 FE, Flip6, Z Flip5, Z Flip4, Z Flip3 and Z Flip 5G
- Galaxy A57 5G, A56 5G, A54 5G, A35 5G, A36 5G, A35 5G, A26 5G, A25 5G, A16 5G and A17 5G
- Galaxy Tab S9 series
- Galaxy Tab S10 series
- Galaxy Tab S11 series
- Galaxy Tab A11+
Note
Carrier devices do not support these features. Only devices unlocked by Samsung can support Dual Physical SIM.
The following Unlocked Dual Physical SIM devices support dual SIM features.
- Galaxy S20 FE and S21 FE
- Galaxy A14 5G, A15 5G and A25 5G
- Galaxy A03, A13 LTE, A13 5G and A53 5G
- Galaxy A02, A12, A32 5G, A42 5G and A52 5G
Read less